Of all computer peripherals, the keyboard is subject to the greatest loads: every day it has to withstand up to ten thousand presses, which negatively affects not only the performance of the device, but also its appearance. Dust, food crumbs, hair and fur accumulate under the buttons and make the keys difficult to operate. The keys themselves also become sticky and untidy after prolonged use. To avoid this, the user must clean regularly. Read on to learn how to clean a mechanical keyboard at home.
What you need for cleaning
Before starting to disassemble and clean a mechanical keyboard, the user must prepare and place on the desktop all the necessary tools and aids:
- microfiber cloth;
- cotton swab;
- furniture cleaner or any other liquid that contains alcohol;
- special jelly for cleaning the keyboard;
- puller (key) for keycaps (can be replaced with a screwdriver or other sharp object);
- a can of compressed air (replaced with a vacuum cleaner or a medical bulb);
- brush.
The advantage of mechanical keyboards is that they are easier to clean due to raised keycaps and wider spaces between keys. However, the user should still approach the process of cleaning the keyboard with the utmost care, and, if possible, resort to methods that do not require complete disassembly of the device.
How to prevent contamination
As they say, it is easier to prevent than to correct later.
Therefore, you can minimize pollution using the following tips:
- Don't turn your workspace into an office desk.
- Wipe off dust from the keyboard surface frequently.
If your workplace is located where there is no way to prevent dirt from entering, then stores sell special silicone pads.
Such devices exactly replicate the keyboard of each specific model. It allows you to protect the keyboard from dirt and dust.
Is it possible to wash the keyboard with plain water under the tap?
There is no definite answer to this question: some wash it and say that this does not affect the performance of the device in any way, while others categorically state that it is impossible to clean the periphery in this way, since there is a risk of water getting under the board.
The best option is to rinse only the keys under running water. To be more effective, you can add detergent to the water and go over each button with a brush. This way you can remove greasy deposits and sticky layers from the keys.
Cleaning the keyboard surface
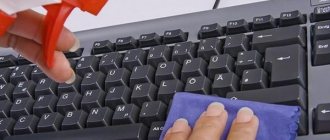
First of all, you need to disconnect it from the power source. Next, superficial cleaning is carried out using lint-free wipes and ear sticks. After moistening them with furniture cleaner or any alcohol-containing liquid, as far as possible, wipe the surface of the keys and hard-to-reach places between them.
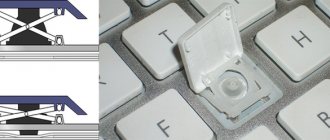
For more thorough cleaning, you can remove the buttons by carefully prying them up with a small screwdriver or, for example, a metal nail file. How to clean the buttons on the keyboard? They should be washed well with a sponge and soap, then dried thoroughly and put back in place.
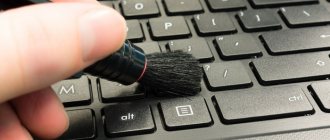
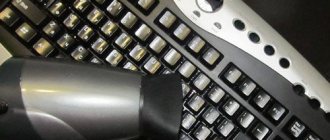
It's easy to get rid of crumbs and dust inside the keyboard using a hair dryer or vacuum cleaner. You can also try to sweep them out with a thin, stiff brush. You should be especially careful when removing dirt from the working side of the buttons, as alcohol-containing liquids can erase letters and numbers from them. It is worth first checking the reaction of the plastic to the cleaning agent on one of the buttons, and only if the result is satisfactory, continue working.
How to properly clean a mechanical keyboard
Let's look at how to clean depending on the classification of contamination.
From dust and dirt
If a mechanical keyboard has not been in use for very long, then most likely a certain amount of dust has actually collected on it, but larger debris has not had time to penetrate deep into the board and settle near the switches. In this case, the user can perform a superficial cleaning of the device in the following way:
- First of all, disconnect the keyboard from the power source.
- We take a can of compressed air and begin to blow through the keys, moving in one direction from one end of the keyboard to the other. Contaminants should fly away from the keyboard, and not just move across it. You can replace the can with a vacuum cleaner. However, you should be extremely careful not to suck in the keys.
- We get rid of dust and dirt on the case with a microfiber cloth slightly moistened with an alcohol-containing liquid. We wipe all keycaps and the outer surface of the device. You can use cotton swabs to treat hard-to-reach areas between the keys.
A deeper keyboard clean involves removing the keycaps and then soaking them. This is done as follows:
- Using a puller or screwdriver, pull out one key after another. First you need to take a photo of the initial state of the keyboard - its further assembly will be based on the photo.
- Place the caps in a bowl of warm water and soap for several hours. After soaking, lay out the buttons to dry completely.
- While the keycaps are soaking, take cotton swabs soaked in a little alcohol and remove dust and other dirt between the key switches. To prevent dust from entering while the keys are drying, turn the keyboard face down.
Once the keys are dry, all that remains is to put them in their places. You can also clean your backlit gaming keyboard from dirt in the same way.
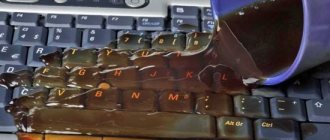
From sweet or regular water
How to clean a mechanical keyboard from spillage? If tea, cola, juice or plain water gets on the device, first of all you need to turn it off and turn it over so that the liquid can drain on its own. Further:
- Let the keyboard dry completely.
- If the keys on a mechanical keyboard stick, remove the keycaps from the keyboard and clean the affected areas with alcohol and cotton swabs.
- We wipe the inside dry and blow it with non-hot air to dry the contacts. Only after complete drying can you reassemble the device and connect it to the computer.
Useful: How to disassemble a mechanical keyboard
Unfortunately, a flooded device cannot always be saved: the contacts quickly oxidize and become unusable. In most cases, users have to contact a service center or even purchase a new keyboard.
What to do with a flooded keyboard
In addition to household dust and food debris, the keyboard is often subject to other contamination - spilled liquid (sweet drinks, coffee or tea). In this case, you should immediately clean your computer keyboard.
Regular
First, you will need to immediately unplug the keyboard and turn it over so that the liquid can drain out. Next, you need to disassemble the device: turn it upside down and unscrew the screws. Then each key is removed, wiped with a damp cloth and left to dry. The base of the device should be wiped with a dry cotton pad. After making sure that all the parts are dry, you can assemble the keyboard, connect it and check its functionality.
Laptop
If a laptop like an Asus has been flooded with liquid, first of all you will need to dry the contacts and cable. In order to open the case and find the motherboard, you should arm yourself with a screwdriver. Some laptops, like Acer, have latches on the sides that hold the keyboard in place. They will need to be removed for cleaning.
As soon as the case is opened, apply chlorhexidine to a cotton swab and wipe the contacts. Next, use cotton pads and napkins to remove all liquid. The part with the buttons can be dried separately with a hairdryer.
See also
How to quickly erase a marker at home, the best cleaning products and methods
Final keyboard assembly and testing
Once the markings are applied, workers “sieve” the keyboards in a basket with rubber pads until the pads, as a result of “churning” and random movement, fall into their nests on the back of the keys. The pads create a spring effect. Therefore, after pressing any key, it seems to spring back and return to its original place in the unpressed (pressed, in technical language) position.
Then the board is installed in the keyboard housing, and then an electrical membrane with a sensitive switch is installed for each key on the keyboard (Fig. 7). The switches are aligned under the keys. When a key is pressed, the switch emits a special signal that travels through an electrical circuit to a tiny processor (the microchip we started with in describing the keyboard assembly process) on the board, and then into the computer.
Rice. 7. Installation of a membrane with sensitive switches under each key of the future keyboard.
When the membrane is finally installed and aligned under the keys, the keyboard is covered with a plastic cover. Then the keys are tested, rejecting those that were assembled unsuccessfully for various reasons (Fig. 8). Problems can arise both due to improper assembly of the keyboard, and due to faulty radio elements that are installed on the keyboard's printed circuit board.
Rice. 8. Testing a fully assembled and ready-to-use computer keyboard.
It should be noted that modern radio components are of high quality; defective elements are rarely encountered. And keyboard assembly technologies have been developed in such a way that defects will be a rarity rather than a common occurrence. However, checking the keyboard after assembly is done. And now, after checking, the keyboard can be connected to the computer. And with its help you can print and enter the necessary characters and commands for a long time and reliably.
Electronics with mechanics “in one bottle”
A computer keyboard is a rather complex device. First of all, this is due to a large number of mechanical moving parts: buttons, rubber bands, movement-sensitive radio elements that receive key press signals. It is known in technology that the more mechanics there are in a product, the more complex and less reliable it is.
High reliability and durability of such devices with a large number of “mechanics” can only be achieved through strict adherence to all design and technological requirements. And also due to the high reliability of all the original components from which this product is assembled. So a computer keyboard is a prime example of how you can make a reliable mechanical device in our computer age. Simply, more reliable electronics come to the fore and replace less reliable mechanics.
And yet the keyboard works. It works to the delight of computer users for a long time, although there are so many mechanics in it that are not at all modern!
By the way, sometimes it is better to see once than to hear a hundred times. Especially when we are talking about little-known “subjects”, such as digital electronics, radio engineering, and the production of radio electronics products. Therefore, below you can watch a video about making computer keyboards:
Video: Computer keyboards. How are they made?
Assembling components on keyboard circuit boards
Now let's talk about assembling the keyboard in the factory. When a microchip is installed on a keyboard circuit board, that chip must be connected to other larger circuits on the boards. To do this, microwelding is used to attach a microchip to a board with tiny aluminum wires 1 mm thick.
After installing all the chips on the board, the connections of the microchips with the wiring are checked to ensure that the signals from the keys reach the chip through the aluminum wire and back. If the board passes this test, the chip is then covered with black glue (Fig. 2). This is necessary in order to isolate the joints and at the same time somewhat strengthen the entire structure. After all, such connections will then have to serve for a long time and flawlessly.
Rice. 2. Filling with glue the installed and tested microchip on the printed circuit board of the future keyboard.
Workers who assemble keyboards in a factory add electronic components to the back of the board (Figure 3). The components control the flow of electrical signals on the board. Resistors are then added to create resistance to the flow of electricity. Next, capacitors are installed, which serve to temporarily store electricity in order to equalize the signal levels from the keyboard keys to the chip.
Rice. 3. Installation of electronic components on the printed circuit board of the future keyboard.
After installing the components, 3 LEDs are mounted on each board (Fig. 4). They are needed to signal the keyboard user about the keyboard operating modes. For example, to show enable:
- NumLock keys (turn on the numeric keypad),
- CapsLock (permanently switching case to print in large capital letters only) and
- ScrollLock (prohibition of scrolling the monitor screen - screen “freezing” mode).
Rice. 4. Mounted LEDs on the printed circuit board of the future keyboard.
The connections of microchips, resistors, capacitors, LEDs and other radio-electronic components figuratively described above make it possible to implement such a keyboard operation scheme when pressing a particular keyboard key leads to the generation of one single unique signal (or a series of signals, if we are talking about, for example, about switching laptop operating modes using function keys).
Who designs and who produces keyboards
The keyboard operating circuits are developed by radio engineers who understand the features of digital radio electronics. They know exactly how to connect certain radio elements with each other so that in their work they generate only those signals that are needed to transmit accurate and unambiguous information from the keyboard to computers and laptops.
Manufacturers, production engineers, develop, looking at the radio engineers' diagrams, printed circuit boards in order to reproduce the radio engineers' plans one-on-one on them. In general, there is enough work for everyone! The production itself, the production workers, their bosses make sure that the keyboards they assemble are exactly as the radio engineers and production engineers (designers, technologists) intended them to be.
Soldering electronic components on the board and applying symbols to the keys
When all the electronic components are installed on the board, they pass through a furnace with heated molten tin, or rather solder (Fig. 5). Solder mostly consists of tin, but it also contains other additives, for example, flux, which allows you to degrease the surfaces being soldered together. The solder, after hardening as a result of cooling the board after passing through the oven, tightly secures and holds the tiny wires on the board, thus completing the assembly of electrical circuits, connections between individual elements (chips, resistors, capacitors, conductors) of the printed circuit board.
Rice. 5. Sending the assembled printed circuit boards of future keyboards to an oven for soldering electronic components.
Next, while the solder cools, letters, numbers and symbols are applied to the plastic keys of the future keyboard, indicating the functions of each future key. The symbol designations are laser cut onto the keys. Invisible to the eye, but really existing and having the temperature required to melt the plastic, the laser beam evaporates the coating on the key and exposes plastic of a different color underneath. The process of drawing characters is quite fast (Fig. 6).
Rice. 6. Applying symbols to the keys of the future keyboard using a laser beam invisible to the naked eye.
For example, the coating may be black and the plastic underneath may be white, or vice versa. Combinations of other colors are also possible: modern plastic can come in a wide variety of colors. Markings applied in this way will never be erased, unlike those applied with paint. Although, of course, even that which cannot be spoiled spoils - Murphy’s comic laws, the “sandwich laws,” tell us about this, which we always have to remember when we talk about any, even the most reliable technology.
It all depends on the life of the keyboard, on the conditions in which the keyboard was located. And a lot depends on the quality of the plastic coating itself and the keys themselves. However, laser technologies for applying symbols to keys provide the most durable results so far.