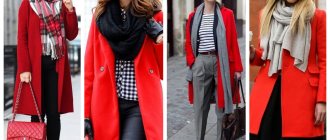
In the closet of almost any female representative, it is possible to find a coat that has long gone out of fashion, but looks as if it was bought quite recently. As a result, a dilemma arises: throw it away or update it? Of course, the first option is much simpler, but to implement the second you need to be creative and use your imagination.
To update your outerwear option, add fashionable prints to it or alter the silhouette, shorten the length of the sleeves, or add acrylic paints that are fashionable this season.
In addition, there are many options for other ideas that can actually be implemented from the fabric of an old coat, for example, making a bag or a bath mat, cushion covers for stools, or making a children's coat. If there are pets in the house, then you can sew clothes for four-legged animals from an old coat.
How to update a coat: patch pockets
Even a beginner can handle this modification. Sewing on patch pockets, for example made of faux fur, is as easy as shelling pears. The main thing here is to correctly cut out the parts from the capricious fabric. And then, without using a sewing machine, simply sew the pockets to your coat. Voila! The old product began to play in a new way.
How to update a coat: patch pockets. Option 1
How to update a coat: patch pockets. Option 2
How to update a coat: patch pockets. Option 3
New clothes
The amount of materials from an old unnecessary coat is quite enough to sew a new version of clothing.
Baby coat
You can easily sew an exclusive coat for your child. The model can be decorated with sewn pockets.
Important: to make the pockets more durable, it is recommended to stitch them twice.
To sew a children's coat, use the lining of an old coat. Its size should be slightly larger than the finished product. The result will be more comfortable wearing of the product after washing, since the fabric can shrink.
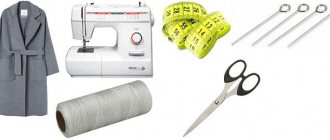
Vest/tank top
A homemade vest made from an old coat will help add some zest to your look. This type of clothing has been gaining popularity lately. Moreover, it is quite simple to make. To do this you will need:
- coat;
- scissors. Large and sharp, which will easily cut the material;
- sewing machine with a set of accessories (threads, needles).
The algorithm of work is as follows: first you need to shorten the length of the sleeve to 5-7 centimeters. After cutting out the material of the remaining sleeve, you need to remove the lining. The remaining material should be folded so that it follows the line of the shoulder. In order to end up with an even finish on the edge of the material without unnecessary lines, it is important to pin the edge of the garment with sewing pins. By carefully stitching the product, you get a new vest.
The length of the product can also be shortened. While wearing this type of clothing, it is allowed to decorate it with various brooches. This will make the image much more interesting.
Tip: if the product has a classic collar, then you can wear various thin scarves with such a vest. This will add sophistication to your look.
Skirt
This type of clothing can also be easily made from an old coat. At the same time, it is possible to tailor different versions of the skirt: you can sew it with slits, or you can leave it whole. It all depends on the length of the product and personal preferences.
The length of the skirt can be left the same as the coat.
To sew a skirt, you need to cut the old item into two parts, the lower of which will be turned into a new version of the garment. And from the upper part it is quite possible to sew a belt for a skirt.
In the process of work, you can change the silhouette of the skirt: if the coat was flared, then the new product can be sewn with a straight silhouette or made more tight-fitting.
Animal clothing
There are so many interesting things you can make from your old coat for your pets. Everything is limited only by imagination and laziness)
How to update a coat: knitted hood
The trend for several seasons in a row is a coat worn over a warm hoodie with a hood. Personally, I like this fashion, and sometimes a hood is vital. But pulling a coat over a warm garment is not the most convenient option. This is how a coat with a knitted hood appeared in my wardrobe. I cut it from an old sweatshirt and sewed it onto the collar of my coat. I suggest you do the same. Moreover, this is an excellent option for updating an outdated product.
Coat with knitted hood
You can also add a bright brooch to the coat, throw a beautiful stole on top, or replace the original belt with a new one. All of these options will extend the life of your coat and save you money from buying new outerwear.
If you found this article helpful, don’t forget to click “like”. And tell us in the comments, have you ever updated old jackets and coats? Share secrets and life hacks.
We use patchwork
You definitely shouldn’t rush to dispose of your old coat, even if it has lost its attractive appearance, is no longer liked or has become unfashionable. By approaching the matter creatively, it is easy to correct the situation. Patchwork - patchwork sewing. This technique is the best option for restoring items with obvious signs of wear.
The sequence of actions is as follows:
- We select bright but matching fabrics.
- We cut them into geometric shapes of different sizes. We will use them as patches.
- We distribute them over the entire coat, one from the other at a short distance.
- Carefully sew on top. There is a second option - we cut out pieces from the coat with scissors and insert them into the holes, filling them with scraps.
Interesting: How to sew a skirt from old jeans with your own hands: step-by-step photos and videos
It turns out original and creative. And most importantly, you definitely won’t find such a thing in a store, it’s exclusive, and what’s nice is that it’s made with your own hands.
Advice!
Before you begin the alteration, you need to put the coat in order. Clean it.
Let's start painting
The coat must first be washed. Immediately before painting, moisten with warm water.
To dye your coat a different color, prepare in advance:
- Water
- Vinegar
- Rubber brush
- Packaging of special dye for clothes
Strict adherence to all points of the paint instructions guarantees the best result. Determine the weight of the coat to calculate the required volume of dye. Fluff the lint on the surface of the coat by combing with a rubber brush. Dissolve the required amount of paint powder in warm water and follow the instructions.
IMPORTANT!
To dye a wool coat, you need to dissolve the dye in very hot water.
Upon completion of the dyeing process, the coat should be thoroughly rinsed several times. It is necessary to ensure that the water is completely transparent. During the last rinse, to fix the color, add a few tablespoons of 1-2% vinegar to the water. The finished “new” coat is dried on hangers in the open air.
Applique patch
Decoration is one of the easiest ways to breathe newness into an old thing. Handicraft stores have a huge selection of appliques, stylish and bright patches.
All you have to do is choose the appropriate color option and get to work:
- We prepare the product by removing dirt (if any) in the place where the decor will be.
- Lightly iron the fabric and wait for it to cool.
- We remove the backing from the decal and apply the picture to the item. Thanks to the sticky surface, it is easily fixed.
- Place a towel over the design and run a heated iron over it for 15 seconds.
- Reapply the heating device and peel off the protective film. It should come off easily, and the pattern should stick tightly to the fabric.
- For greater reliability, you can sew on the applique with threads.
Carefully study the information on the product tag. If the iron icon is crossed out on it, this option for restoring clothes is not suitable for you.
Laying finishing stitches
Edging stitching
The product is turned right side out, the piping is sewn into the split along the edges of the side, as well as along the neck.
Finishing stitches at seams
On the front side of the shelves, finishing lines are laid along the sides, the width of the lines is optional.
The finishing stitches on the sides should start/end from the finishing stitch on the collar.
Along the neck of the back, a machine stitch is laid the width of the foot from one to the other shoulder seam.
All temporary threads are removed, the lines are ironed with a steam iron through an ironing iron.
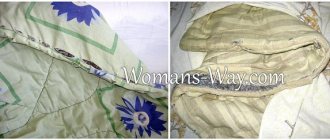
Processing the zipper
Basting and sewing the zipper
One part of the zipper is draped onto the left side of the shelf.
If you follow the rules, then the zipper is sewn between two layers of fabric, as it should have happened in my situation. See how to sew a zipper into a jacket in my master class: a winter parka jacket for a child is quick and easy. But, as I mentioned above, fabric consumption was limited. Considering the allowance for the zipper, I wouldn't have enough fabric for the collar.
If you choose the collar and allowances for the zipper, this would lead to a shift in the center on the shelf. Therefore, I chose an option where the zipper has not only a functional, but also a decorative purpose. In this case, changing the style is excluded, and the zipper on the outside will add originality to the product.
The zipper braid is adjusted with two lines, one next to the teeth, the second secures the edge of the braid.
Attention! If the zipper goes into the shoulder seam, then first support it and move the zipper into the shoulder allowance. After sewing the zipper, stitch the hole in the shoulder seam. If the zipper goes into the neck, then hide the end of the zipper in the seam of the collar and neck joint.
The second part of the zipper is basted to the side of the right shelf. The sections are combined, the selection is pinned to the zipper and the product. Then a stitching stitch is laid using a double/single-sided presser foot.
The left side on the shelf is processed in a similar way, at the same time securing the lining and the product along the neck.
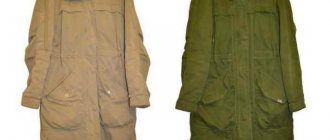
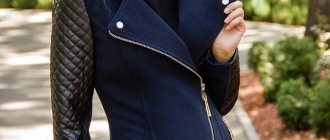
Using military style
This trend is very popular in the fashion world. It is impossible to imagine it without elements of military themes:
- large buttons;
- various khaki color inserts;
- metal fittings;
- large lacing.
All of this applies to the process of altering a coat. In this case, it is appropriate to sew braid onto the sleeves and gird yourself with a leather belt with a large buckle.
Also read: DIY apartment decoration for New Year 2019
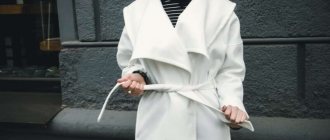
For the patient and diligent: neoprene coat
If you don’t want to remake an old thing, but want to get a new one, then neoprene comes to the rescue. This fabric is very easy to work with, does not fringe and at the same time holds its shape perfectly, so even someone who has never held a needle in their hands can sew a coat from it. It will take a little time to make such a coat, but the result will please you. Choose neoprene colors that are trendy this spring; the girl in the photo chose pink and was not mistaken.
Open the coat. Any item you own will be suitable for a sample pattern.
Sew the seams. Since you are working with neoprene, there is no need to finish the edges.
Enjoy the result)
Bottom of the product
Sundance, Gucci, J. Crew
In this case, you need to decide on an important stylistic decision - whether the embroidery will be symmetrical or not. If you prefer an asymmetrical option, be especially careful about the placement of future embroidery.
The scope of work in this option is quite extensive, so it will be better if you have experience in embroidery or appliqué.
How to trim the bottom of a coat with a facing with lining