Balloons delight the eyes of every person at various festive events, but after their completion one very important question immediately arises: “How to untie the balloon?” Many people leave the balloons inflated until they are completely deflated and then throw them away. But what if you really liked the ball and want to keep it? Naturally, you won't want to throw it away. How to untie the ball in this case? There is one good way to do this, but as you read the article, you will quickly realize that preventative measures are the most reliable.
Where to begin
A dispenser on a bottle of vodka or whiskey allows you to conveniently pour drinks into glasses. It is usually made of plastic. The item works like a valve: it’s easy to pour the drink out of the bottle without anything getting inside. This element protects customers from counterfeits and facilitates the process of filling glasses.
Original bottles from Jack Daniels and other designer containers can be easily adapted for homemade liqueurs, as well as used for decorative purposes. Simply remove the plastic element from the neck.
It is important to act carefully so as not to break the glass container.
Process
The preparations are over - now you need to figure out how to untie the knot on the ball. This will not be as easy as you would like - even with everything you have done so far. Arm yourself with a knitting needle, and as soon as the threads become more pliable, look for the place where they lag behind each other. As soon as you find such a place, insert the knitting needle there and begin to move it forward, lubricating it with oil if necessary. You will eventually be able to untie the knot if you are patient and can carefully manipulate the knitting needle without damaging the ball itself. However, it cannot be said that this is the answer to the question of how to easily untie a ball - the process is very unpleasant, complex and lengthy. Therefore, as mentioned earlier, preventive measures are the best solution in this situation.
How to remove the dispenser: methods
The dispenser is plastic, which means it can be steamed.
How to remove a cork from a bottle, procedure:
- Pour water into a small saucepan and bring almost to a boil.
- Remove the aluminum trim from the neck.
- Place the bottle in the water upside down.
- Soak for a few minutes in hot water until the cork softens.
- Wear oven mitts to avoid getting burned! Carefully remove the dispenser from the neck.
If you can’t pull it out with your hands, use the blunt blade of a knife as a lever: pick up the edge of the dispenser and, leaning on the neck of the bottle, push it forward.
Miss Clean magazine notes that the dispenser easily returns to its place after refilling the bottle. It will fit just as tightly as before removal. Only after several procedures with boiling water can the material deteriorate.
What to do if the dispenser is installed inside the neck and it is impossible to pick it up with your fingers? And in this case there is a way to get rid of it:
- Prepare a strong metal hook.
- Fill the heating pad with hot water and wrap it around the neck of the container.
- Support the structure with a towel.
- After a few minutes, hook the dispenser and pull it out forcefully.
Some ball dispensers from imported bottles of tequila, absinthe, etc. cannot be picked up either by hand or with a hook. In this case, just use a knife: cut the element inside the neck and remove it in parts. It will not be possible to reinstall the dispenser.
Particularly confused people have adapted to pouring drinks even through a dispenser. If it is possible to remove the valve from a beautiful bottle, then it is better to do this: it will be faster and more accurate.
Source
Cleaning the walls
First of all, let's look at how to clean the walls of an aquarium.
Be sure to turn off all electrical equipment!
In absolutely any aquarium, over time, a coating forms, both limescale - from poor quality water, and green - due to the presence of algae. It is precisely these, not very pleasant factors, that we will encounter sooner or later. Internal pollution makes glass and water cloudy and, as a result, unsuitable for your pets to live in.
First, you should thoroughly wash the aquarium glass.
What is needed for this
First of all, you need to learn how to properly clean an aquarium, because the appearance of the fish house entirely depends on this.
This can be done using the following devices:
- special scrapers with a metal blade
- nylon sponges
- regular kitchen sponges
Let’s tell you a little secret: “You don’t need to wait until the walls are covered with a cloudy coating.”
Periodicity
Make it a rule to wipe the glass of the aquarium at least once a week, even if at first glance they seem clean. This procedure is much simpler than washing cloudy glass that was two or three weeks old.
- If you decide to clean the walls of the aquarium without removing its inhabitants, then the use of any detergents is strictly prohibited.
- If you are planning a planned cleaning with the relocation of its inhabitants, then for this you can use a special washing sample of potassium permanganate solution.
It is with the help of these rules that you can easily wash off plaque of almost any complexity.
Where to begin
A dispenser on a bottle of vodka or whiskey allows you to conveniently pour drinks into glasses. It is usually made of plastic. The item works like a valve: it’s easy to pour the drink out of the bottle without anything getting inside. This element protects customers from counterfeits and facilitates the process of filling glasses.
Original bottles from Jack Daniels and other designer containers can be easily adapted for homemade liqueurs, as well as used for decorative purposes. Simply remove the plastic element from the neck.
The basics of starching things that every housewife should remember
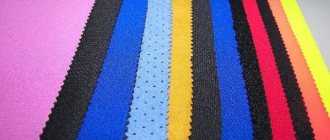
Contrary to popular belief, not all things can be starched. Specific processing is unacceptable when caring for items made of synthetic fabrics, black threads and underwear. In the latter case, this is prohibited due to the fact that such material does not allow air to pass through, and this negatively affects the condition of the skin.
There are three degrees of hardness of starched items, which traditionally differ in the degree of density achieved depending on the ratio of starch to the volume of liquid used. Despite this, the above indicators can be achieved using other available means, only the methods will be different.
- Soft starching. Take a tablespoon of starch per liter of water. Such processing allows you to give a clearer shape to blouses, shirts, dresses, and handkerchiefs.
- Medium starch. For a liter of water, take one and a half tablespoons of starch. This density is considered optimal for tablecloths and tulle, crocheted, and bed linen.
- Hard starching. Take two tablespoons of starch per liter of water. The collar and cuffs of a man's shirt are treated with this solution; it can also be used to shape napkins for table setting and decorative items.
Advice: It is better for novice housewives to start a new unusual manipulation gradually. Even the given dosages are very arbitrary and their fluctuations depend on the quality of the material. Everyone chooses for themselves how to starch a napkin or any other crocheted item, depending on the degree of hardness, adjusting the density of the active product.
How to remove the dispenser: methods
The dispenser is plastic, which means it can be steamed.
How to remove a cork from a bottle, procedure:
- Pour water into a small saucepan and bring almost to a boil.
- Remove the aluminum trim from the neck.
- Place the bottle in the water upside down.
- Soak for a few minutes in hot water until the cork softens.
- Wear oven mitts to avoid getting burned! Carefully remove the dispenser from the neck.
If you can’t pull it out with your hands, use the blunt blade of a knife as a lever: pick up the edge of the dispenser and, leaning on the neck of the bottle, push it forward.
Miss Clean magazine notes that the dispenser easily returns to its place after refilling the bottle. It will fit just as tightly as before removal. Only after several procedures with boiling water can the material deteriorate.
What to do if the dispenser is installed inside the neck and it is impossible to pick it up with your fingers? And in this case there is a way to get rid of it:
- Prepare a strong metal hook.
- Fill the heating pad with hot water and wrap it around the neck of the container.
- Support the structure with a towel.
- After a few minutes, hook the dispenser and pull it out forcefully.
Some ball dispensers from imported bottles of tequila, absinthe, etc. cannot be picked up either by hand or with a hook. In this case, just use a knife: cut the element inside the neck and remove it in parts. It will not be possible to reinstall the dispenser.
Particularly confused people have adapted to pouring drinks even through a dispenser. If it is possible to remove the valve from a beautiful bottle, then it is better to do this: it will be faster and more accurate.
When you pour, tilt the bottle, otherwise the vodka won’t flow, and this way it will be easier for the air to escape. The dispenser is a smart thing, but everything that is invented by man is screwed up by man.
The design is extremely simple and understandable. Just one note: don’t skimp on the electrical tape, otherwise everything will spill out onto the table. And another tip - do not spill vodka on a wooden table covered with varnish: the varnish will turn white, which is what happened to me when pouring:
For those who are especially curious, there is a video:
Empty liquor bottles can come in handy around the house. They can be refilled with liquid and can be used as a decorative item or as a material for crafts. But instead of a regular cap, a special dispenser is often installed on the neck of the bottle so that the drink can be conveniently poured into glasses or glasses. You cannot pour new liquid into a bottle with a dispenser. You cannot remove it by hand; it is installed tightly. How to remove the dispenser?
What you need to prepare for starching at home
Of course, you need to prepare the starch itself or another substance used for the starching process. But we'll talk about this a little lower.
Now let’s list the general things that you will need:
- pins made of stainless steel with heads;
- thin wire for inserting into the edges of the product for alignment;
- tape measure;
- spray bottle or bowl for solution;
- towel;
- flat surface (this can be a special board, carpet covered with film). It is desirable that the surface be covered with a checkered material; such a pattern can be used as an additional guide when laying out the product;
- if the product needs to be given some special shape, for example, if a cap is starched, then you need to prepare the appropriate blank. In its role, it is quite possible to use a jar or pan of the required size. Shuttlecocks can be dried on pencils, curlers or plastic bottles.
Filter maintenance
Very often you have to answer the same question:
“Tell me, how often should the filter be cleaned?”
There is no exact answer to this question; only general recommendations can be given.
A clear indication for cleaning the filter is a noticeably decreased water flow - this can be determined either visually if the “flute” is located above the water level, or by placing your hand under the water flow - and compare the sensations with those when the filter was just started. If the difference is noticeable, it’s time to clean the filter.
However, we would not recommend waiting for such a decrease in performance every time and cleaning the filter a little more often, especially if the aquarium has or occasionally has problems with the growth of unwanted algae (plaque on glass, soil and plants, “beards”, etc. ).
The fact is that the filter only retains dirt on its sponges, which physically remains in the aquarium water and continues to slowly dissolve and be processed by all kinds of bacteria. If the aquarium is densely populated with plants that manage to “recycle” all these substances, using them for their own growth, there is no big problem. But if there are few or no plants in the aquarium, all these substances will be used as food for algae (not to be confused with plants), which will happily and vigorously begin to grow everywhere.
Therefore, we recommend that beginner aquarists clean the external filter at least once every 6 weeks. If after 6 weeks the filter is opened - and it is not particularly dirty (after all, each aquarium is individual) - next time the interval can be increased. If it’s the other way around, reduce it, or perhaps choose a more suitable filter.
Here are a few basic rules when cleaning the external filter:
- Sponges for coarse filtration and non-porous ceramics (manufacturers often put them in the 1st basket) can be safely washed under the tap, directly with tap water.
- Biological filler (porous ceramics, all kinds of balls, rings, etc.) should be washed only to remove coarse mechanical dirt, simply by dipping it into a container of water that has just been taken from the aquarium. This will allow you to preserve your hard-won colonies of beneficial bacteria. If you simply rinse these fillers “under the tap”, most of these bacteria will die.
- Manufacturers recommend changing a fine sponge (white padding polyester) with each cleaning - but experience shows that they are quite capable of surviving at least 1 wash (can be done under the tap). If original fine cleaning sponges cannot be purchased, they can be replaced with universal fine filtration cotton wool - it is easy to cut (and even torn by hand) and can be placed in any filter.
- Don't forget to clean the engine compartment and filter rotor - a lot of dirt accumulates there too and even colonies of algae and bacteria grow. If this is not done, after some time the filter may simply stop. For these purposes, you can use special brushes.
- From time to time it is useful to clean the hoses - for these purposes it is very convenient to use flexible brushes, for example JBL Cleany - universal and inexpensive.
If your filter is equipped with taps for separately shutting off the inlet and outlet water flow, we recommend that after the filter has been connected back to the hoses, first open the inlet channel, and after a few - the outlet - this will ensure that the filter is correctly filled with water and avoid the formation of air bubbles in the head of the filter and problems with restarting.
Procedure for cleaning algae and decorative elements
In order to make the aquarium unique and create comfortable conditions for its inhabitants, various decorations are used - shells, large stones, ships, houses, artificial algae. These items are also covered with algae and traces of fish activity, so they require regular cleaning.
To maintain order in the tank, periodically weed out live algae and remove damaged parts of plants
Procedure for cleaning the decorations:
Remove items that require cleaning from the tank. Rinse items with warm running water. Use an old toothbrush and baking soda to remove plaque.
It is important to thoroughly wash all surfaces, remove plaque and dirt. Rinse the decorations with clean water and place them in the tank.
Note to the needlewoman
If you decide to starch your favorite knitted (and other) items, then these useful tips will be in your favor:
- If liquid gets on a product that has been starched, the procedure will have to be done again;
- You need to dry things carefully. If you iron them wet, all the snow-white parts may turn yellowish;
- You should not send freshly starched items to damp places for storage - they can “acquire” mold, which will simply destroy the item;
- If the mixture is not very clean, but has turned gray or yellowed, then before work it must be thoroughly mixed until the dirty layer disappears;
- When using sugar syrup for starching, remember that such a thing can become an “object” of attention of various insects;
- In order for the product to “stand” after starching, you need to prepare the thickest possible solution, then stretch the product onto a strong frame and dry it in the sun or in a warm place;
- If any elements stick together on the product after starching, you can simply hold them over a boiling kettle for a couple of minutes, and then “comb” them with a comb;
- To prevent starched items from sticking to the iron during ironing, starch should be made with milk rather than boiled water;
- To speed up the process as much as possible, the product soaked in the solution should be placed in the microwave for a couple of minutes, setting the maximum power, then squeezed out, and sent to dry. Starching with this method is carried out more efficiently.
A few words about drying
It is worth considering one important point - starched items should not be exposed to frost, since at low temperatures the starch can turn into sugar and become sticky.
All starched items must be placed on a dry, clean white cloth and sent to a well-ventilated area, waiting until completely dry. You can also use a regular towel - pin the product to it with pins.
Starchy, damp items can also be ironed by placing a clean, thin cloth on the item and setting the temperature to the minimum setting. But this must be done extremely carefully.
Follow these simple instructions and recommendations, and all your knitted items will be elegant and very beautiful.
How do you like the article?
Is it necessary to wash the aquarium?
Many people say that to clean an aquarium at home, it is enough to have “orderly” fish and snails. But in fact, this does not always help, and sometimes clogs the aquarium even more. Therefore, the vessel in which your pets live will have to be washed regularly. How often you do this depends on the size of the tank. Vessels with a volume of more than 200 liters are washed once every half month, and small ones will have to be cleaned twice a week.
Preparing a new aquarium
As soon as you purchase an aquarium and special devices for the life support of fish, you need to prepare it for occupancy.
Before washing a new aquarium, it is necessary to let the silicone odor disappear for a while at room temperature. After this, wash the glass container with warm water and baking soda. Then pour half the volume of water into the container, install the decorations and filter. After 24 hours, add the second half of the liquid so that approximately 5 centimeters remain from the top edge of the aquarium. The next step is to populate the container with fish.
Cleaning without siphon
In the natural environment, there are a large number of participants in the ecosystem: leftover food and fish excrement are eaten by snails, shrimp and bacteria. But to maintain cleanliness in the aquarium, their owners will have to work hard to properly maintain the fish.
Aquariums should be washed carefully and without sudden movements. Remember, interfering with the underwater world causes stress for its inhabitants. Cleaning the soil begins with plants and decorative elements
Large pebbles, shells, houses and castles should be taken out and washed under running water. Plants and algae are carefully inspected for defects. If they have yellowed or rotting leaves, they are carefully removed. When cleaning the bottom of the aquarium, it is better to immediately replant the plants, if necessary.
Cleaning of the soil begins with plants and decorative elements. Large pebbles, shells, houses and castles should be taken out and washed under running water. Plants and algae are carefully inspected for defects. If they have yellowed or rotting leaves, they are carefully removed. When cleaning the bottom of the aquarium, it is better to immediately replant the plants, if necessary.
If you clean the soil without a siphon, you can simply rinse it under running water. In this case, the fish should be transplanted into a separate container (basin, bucket).
This procedure looks like this:
- The soil is taken from the aquarium.
- Pours into a bucket.
- It is washed at maximum pressure until all the dirt is washed out.
- It is best to wear a rubber glove and periodically stir the soil in the bucket.