Do-it-yourself fabric appliqué will help you decorate your clothes, decorate your home, or disguise a hole in the fabric. The technique allows you to quickly and efficiently produce trinkets; the decor retains its appearance longer than paper decor.
Even children who can hold scissors in their hands can be involved in needlework. There are several varieties of ways to create appliqué from fabric.
Choosing fabric for the base
The base fabric plays an important role in making the appliqué. Not everyone is suitable for this purpose. For example, you should not give preference to delicate viscose knitwear, as it will stretch and lose its shape. Linen with good rigidity or matting does an excellent job of this task; even jacquard can be made on it.
Therefore, it is worth choosing fabrics that are stiffer than the applique itself. The material does not necessarily have to be thick and dense. Even organza can handle it, provided it has rigidity.
Fabric applique: step-by-step production
ok
First you need to prepare the necessary materials. To work you will need the following.
- Suitable drawing. You can draw it yourself or choose it from a magazine or book.
- Pieces of fabric from which the applique will be made. For beginners, it is better to opt for fabrics that do not stretch or fray, as they are easier to work with.
- Scissors, pins, needle and thread.
- Tracing paper.
- Non-woven fabric.
- Sewing machine.
Editor's choice: Fashion sets for 2022 - photos of new items for the season
The first step is to transfer the drawing onto tracing paper. If the design is multi-colored, then each detail must be transferred to a separate piece of tracing paper without cutting them out.
The next stage is sewing tracing paper with the details printed on it to pieces of fabric. This should be done on a sewing machine with a regular stitch. After this, the tracing paper is removed, and the outline of each part remains on the fabric. Now the excess fabric needs to be carefully trimmed with sharp small scissors, retreating from the stitching by 1-2 mm.
The resulting parts need to be placed on the clothes and secured with pins. If everything is in order with the drawing, you can proceed to the most important stage - sewing on the parts. To do this, use a zigzag seam, which is used to sew all the details along the contour. When finished, the applique should be ironed.
Suitable materials for the job
When creating an applique, any fabrics and elements can be used in the form of:
- thick wool, tweed, wool blend. Smooth appliqués on items such as sweaters, jackets, skirts, vests, and coats can be made well from these materials.
- soft knitted. They will help in creating unexpected draperies and add volume.
- smooth thin ones such as cotton, linen, silk. They will serve as excellent materials to create an accent color or a background for smaller details.
- transparent such as tulle, organza, gas silk, lace, guipure in order to create voluminous details represented by frills, flounces, bows.
What other applications are there?
Decorating clothes with appliqué is a very exciting process. Creative people can use a variety of techniques and materials for appliqué, for example:
- Back applique. In this case, the blank with the pattern is sewn along its contour to the wrong side of the item. After this, the front side is cut out along the contour with sharp scissors, and the applique is hemmed underneath.
- Rhinestone applications. To make them, you will need thermal film, on which the selected pattern is laid out from rhinestones.
Editor's choice: The most fashionable girls 2022: photo review of trendy new items of the season
- Glued application. This option involves attaching parts to clothing using special glue or web, which is melted with a hot iron.
- Sequin applications. This is a very simple type of application, accessible even to children. Sequins are sewn onto clothing using the same principle as buttons.
You can also sew flowers or other crocheted elements onto clothes using threads that match the color and texture.
You can attach an applique of bright multi-colored buttons to children's clothing. Application is a whole sea of ideas in which anyone will find something suitable for themselves. Photos widely available on the Internet will help you make the right choice.
Algorithm for working with an application
Before you start making crafts using this technique, you should know how to make an applique from fabric and the basic steps.
Working with the application includes the following steps:
- Template selection;
- Determining the preferred size, shape;
- Selection of materials;
- Cutting out elements;
- Selecting a background if it is not selected in advance;
- Overlaying details on the background;
- Fixation of elements;
- Dry if necessary.
Advantages of manual appliqué
Of course, an applique purchased in a store can be easily and quickly glued to the fabric using a regular iron. But it’s not always possible to find just such a drawing that matches the creative concept.
In addition, ready-made appliques in most cases are quite massive and look heavy and bulky on thin fabrics. The way out of this situation is simple - armed with patience and accuracy, start making your own applique.
Connecting elements: sew or glue?
You can connect the application:
- Hand stitches in the form of loop, chain, satin stitches;
- using a machine (select stitch type (zigzag), pitch, height);
- Stygis fabric with a hot-melt adhesive layer. The use of threads, needles, and glue is not necessary. Children can do appliqué with the help of Stigis;
- gluing on film. You need to stock up on cling film and two pieces of foil. On an ironing board, assemble a multilayer sandwich of foil (the size is larger than the motif that is glued), the base face up, cling film (cut along the contour of the motif so that there is a margin of 5 cm). Iron at minimum temperature, leaving to cool. The method is ideal for working with cotton fabrics. The finished item can be hand washed, excluding twisting.
How to make applique on fabric
Motifs for appliques can be bought in a store, created on your own, or cut out part of the pattern from fabric.
How to make a motive
Draw the motif directly on the wrong side of the fabric in a mirror image using a fabric marker (buy at the Burda store). Place a line along the outline of the motif.
Or draw the motif on paper and transfer its outline and internal details directly to the front using a disappearing marker.
Tip: to teach your child to sew, start with appliqué. Let him draw it with his own hands, and then practice making stitches; you can take a master class on making a “sheep” applique as a basis.
How to stitch an applique
To prevent the applique fabric from fraying, iron a spacer to it from the wrong side, for example, interlining H 180. Baste the applique fabric to the product from the front side to a pre-marked place. Place a fine zigzag stitch along the outline of the motif. From the front side, cut the fabric with sharp scissors (buy at the Burda store) applique close to the zigzag stitch.
Then stitch the edge of the motif again with a dense zigzag stitch. If you want the edge of the motif to look fuller, pass the thread through the finishing stitch.
If you do not want to stitch off the edge of the motif, you can outline it with a special outline paint for silk-screen printing. This will not only give relief to the edge of the motif, but will also protect it from falling off.
Important: if several motifs are sewn on top of each other, then you need to start from the bottom, as, for example, in a master class on sewing a cover for a sewing machine.
Online motives
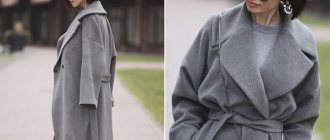
Drawings for appliqué motifs are easy to find on the Internet and can also be downloaded from our website. And these are not only hearts and stars, but also lovely butterflies in a master class on decorating various wardrobe items with butterflies - a skirt, a short jumpsuit, a scarf. Moreover, such appliqués do not have to be sewn along the outer contour; you can sew only the body, and grab the wings in several places with hidden stitches by hand. The combination of flat and voluminous large flowers looks avant-garde and non-standard - you can make them by following the description in the master class on decorating three different dresses with floral appliqués. You will find picturesque and bright applications of maple leaves and other plant motifs in the Art Nouveau style in the master class on organza applications. They will decorate not only clothes, but also many home accessories.
For children's clothing, on our website there is an applique of a cunning fox in a master class on sewing a pullover for a girl and a funny crab in a master class on sewing a blouse for a boy.
Tip: how to enlarge a motif downloaded on the Internet to the desired size is described in detail in the master class on 3 ways to enlarge a design.
Applique as part of a fabric pattern
If you want to use part of a pattern of some fabric as a motif for appliqué, cut out the motif with a large brim and iron a non-woven interfacing to it from the wrong side.
Baste the motif to the selected location on your product or sew it with a zigzag stitch. Cut the fabric that extends beyond the edge of the motif close to the zigzag stitch. Then stitch the edge of the motif again using a zigzag stitch, optionally passing a thread through the seam. Tip: if the fabric does not fray, then you can do without stitching along the edges, as in the master class on sewing slippers with appliqué.
Tulle appliques
Graceful translucent appliques are obtained using tulle. For a tulle appliqué, draw the motif on the front side of the piece and baste the tulle on the back side. Sew the contours of the motif on the front side using a dense zigzag stitch, while laying a thread along the edge of the motif so that it acquires volume. Cut the fabric inside the motif close to the zigzag stitch. Do not cut through the tulle.
Appliques from other transparent fabrics are made in the same way, for example, as in the master class with organza appliqué on tulle curtains.
Lace applique
It is done quite simply. Sew the motif cut from lace fabric onto the fabric from the front side using a dense zigzag stitch. Cut the fabric underneath the motif close to the stitching.
A lace applique can also be sewn on manually with hidden stitches, for example, as was done by the winner of the BurdaStyle 02/2014 competition, Zlata Stepanova, who used woolen lace braid to trim a coat: on the sleeves, back, and lower part of the skirt. Zlata cut out 2 different lace motifs and arranged them on the finished coat.
Applications with unusual effects
If you like interesting, unique designs, then use non-trivial materials for appliques: fur, fabrics with a mirror coating, metallic fabrics, with mesh embroidery, crocheted, as well as leather and suede.
In a master class on sewing a rectangular floor pillow, soft brown suede appliqués are sewn in the shape of a zebra skin pattern. Such a floor pillow will immediately give the interior a noble, exotic touch. And in a master class on sewing a floor ottoman pillow, ovals cut from leftover leather are sewn onto the fabric not along the contour, as described, but in the middle, imitating the vein of a leaf. From the outside, such an ottoman appears to be strewn with fallen autumn leaves.
Tip: the fleece-fleece haftfleece pad will help you complete the appliqué without much hassle. It allows you to firmly iron the motif onto the fabric. You will find detailed instructions on the packaging, as well as in the table for working with different types of non-woven fabrics.
Photo: BurdaStyle.ru
Adviсe
Before starting work, you should select the right tools and materials. Their quality directly affects the complexity of the work and the attractiveness of the product. An important factor is strict adherence to the algorithm of action when working with the application. Here are some tips to make the creation process easier:
- Pins are an important tool. With their help, individual elements are attached to the base. This allows you to change the location at any time without harming the material. This is important if there are a lot of small elements.
- To sew on the applique, use a thin needle. This gives the craft neatness and attractiveness.
- It is better to fix the details of the image using cotton threads.
- Sewing pieces near the border is not recommended, this will lead to tightening and lack of space on the base.
- Complex shapes such as a star or others with an acute angle require preliminary marking along the contour with a final seam.
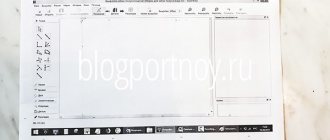
- Fabric applique is impossible without preliminary sketches. Templates should come in two versions. You can take any pictures and enlarge them on your computer. Print. Then transfer to cardboard so that it is convenient to trace on fabric.
Hedgehog made from seeds
Such an application will certainly interest the child, because he will need to work with very unusual materials.
For such a hedgehog you need to prepare:
- sunflower, pumpkin, watermelon seeds;
- walnut shell;
- dry leaves;
- plasticine;
- cardboard, colored paper for the base;
- PVA glue;
- scissors.
Description
First, we’ll draw it ourselves or print out a finished hedgehog pattern.
Now we will create a prickly coat of seeds. We attach a plasticine ball to the thick end of each of them. Carefully, starting from the outline, attach the “needles”.
Fill the entire surface of the fur coat.
We make an ear from a pumpkin seed.
We make paws from watermelon seeds.
We attach mushrooms to the back of the hedgehog. We will make them from walnut shells and yellow plasticine.
Let's make an apple out of red plasticine and attach it there.
In order for the applique with a hedgehog to have a completed look, we make a frame along the contour of the seeds. Glue dry leaves along the bottom edge.
Varieties
The fabric applique represents:
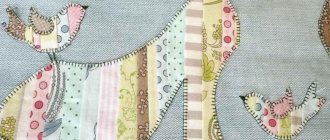
- Subject. The application is represented by separate elements assembled into one whole. Can be in the form of a leaf, branch, bird, etc.
- Plot. This application is compiled in such a way that the totality of actions and the sequence of events can be clearly traced.
- Decorative. Various patterns and ornaments are placed on the fabric. In this way you can decorate pillows, blankets, bedspreads, and other interior items.
By technique:
- Multilayer. The application is made of several layers superimposed on each other.
- Volumetric. A piece of padding polyester or cotton wool is placed under it, making the applique appear convex. This type of work requires careful washing, otherwise the applique will lose its appearance.
- Negotiable. The decorative blank is fixed from the inside out, not from the outside.
Middle group
This activity will not take up a lot of your time and money, but it will be a great way to spend your child’s time. In addition, similar applications can be used for kindergarten, as variations on the theme of “clothing” in the middle group.
Related article: Crochet rectangular tablecloth pattern with description for beginners
To complete this job we will need:
- The application itself;
- Scissors;
- Paints (pencils or felt-tip pens, depending on how you plan to paint the doll’s clothes);
- Paper doll.
Progress
You need to download a doll stencil from the Internet, print it and cut it out. If necessary, color the doll with paints, felt-tip pens or pencils. You can also download and print clothing options, or you can draw clothes yourself, the main thing is to know the proportions of the doll and its figure.
On ready-made clothing, you can glue all kinds of decorations using a glue gun or a regular glue stick: bows, ribbons, lace or braid, sew on beads or beads.
Don't forget to add special fastening strips to each piece of clothing, with the help of which the clothes will stay on the doll.
Senior group
For applications on the theme “clothes” in the older group, the option with clothes for dolls is no longer suitable: the children are older, they are unlikely to be interested in dressing up dolls. There is a more interesting activity for them: let them make leather applique on clothes with their own hands.
This application will take a little more time, but the result will be worth it. So, you will need:
- Skin flaps;
- Scissors;
- Threads;
- Any clothing on which you need to drape scuffs with appliqué or just fabric to show your child how to properly handle leather appliqué.
First you need to lay out the skin flaps in the places where you will sew them. Let your child thread the needle, don't scold him if it doesn't work the first time. Even adults do not immediately fall into the small eye of a needle.
Show your child how to properly sew an appliqué onto clothing and let him try to do it himself, repeating your stitches. Then ask to stitch it again, this time more tightly and securely. Be vigilant when trusting a child with a needle, watch his every action.
Related article: Salt dough panel for the kitchen: master class with photos and videos
When the leather patch is finally sewn on, be sure to praise your child for the job done. Praise is a good way to develop certain skills in a child.
And finally, to teach your child how to work with applique on clothes, you can try gluing the finished applique to a T-shirt or jeans.
For this you will need:
- Scissors;
- Purchased applique (they are sold in sewing stores);
- Paper;
- Iron.
This method is similar to decals, so the child should appreciate it. Here again you need to be very vigilant, because working with an iron is also very dangerous, do not neglect the safety rules, be sure to tell your child about them.
Progress
First, you will need a flat, hard surface.
An ironing board is unlikely to work, because you will have to press the iron with all your might to get the iron-on adhesive to fully adhere to the fabric. You can sit on a stable table, covered with a flat cloth, or directly on the floor.
The iron must be used without steam, so it is better to make sure this in advance so as not to spoil the applique. The iron should be set to the maximum temperature. Keep in mind that some fabrics do not handle high temperatures well, so test a small area to see how each fabric behaves before you begin.
Now you need to place the product flat on the surface, place the applique in the desired place with the picture facing up, make sure that the applique lies flat and there are no folds or irregularities under it. This place where you want to attach the sticker can be ironed first, this will ensure better adhesion of the applique to the fabric.
Next, to avoid damaging the fabric, place a sheet of paper on top of the sticker. Iron the iron-on adhesive over it, pressing the iron as hard as possible.
10 to 15 seconds are enough (depending on the temperature of the iron) for the picture to adhere tightly to the fabric. After this, let the application cool for a few seconds, but do not cool completely. Carefully remove the sheet of paper from the iron-on adhesive. If something is not glued, then return the paper and go through the iron again.
Related article: DIY wedding anniversary gifts by year with photo