A water cooler has long become an integral part of our lives. This device is installed in almost any office, gym, or beauty salon to provide a large number of people with clean drinking water, hot and cold. Many people use a cooler at home, because it is very convenient; by ordering delivery of a bottle, you can forget about the problem of clean water.
But over time, upon contact with moisture, this device becomes contaminated with a coating of bacteria, scale, and dust from the air. At the same time, the water acquires an unpleasant taste and smell and becomes dangerous to the body.
Therefore, it is necessary to clean the cooler in a timely manner. According to the recommendations of experts, it is necessary to clean the cooler once every 2-3 months or more often. In offices and companies, as a rule, they call an employee from the service company for this, but if the device is installed at home and is not used so intensively, you can clean the water cooler yourself.
Why is cleaning necessary?
Lack of regular maintenance of the cooler not only leads to its breakdown, but also causes illness in people using it.
With prolonged contact with water, a film of microorganisms and their waste products forms on the internal elements of the device.
As a result, the taste and smell of water is distorted, and it itself becomes a source of infectious diseases. Other reasons why you need to clean your water dispenser:
- scale accumulates on the heating element, leading to a yellow sediment in the liquid;
- water flows out of the device’s tap more slowly;
- the cooler heats the water longer before serving;
- The equipment completely breaks down.
If at least one of the listed symptoms appears, you should immediately clean the device.
How often to wash?
The instructions for the cooler indicate the need for maintenance at least once every six months. If water consumption exceeds 60 liters per month, then cleaning must be carried out once a quarter.
The more people use the dispenser, the more often it needs to be cleaned.
Other rules for the regularity of preventive measures:
- each time the cooler is charged, the water inlet needle, bottle neck and plastic cap must be disinfected;
- if the device is not used for one month, it is necessary to carry out unscheduled cleaning;
- the need for monthly treatment arises when the dispenser is located in areas with high traffic (medical facility, shopping center) or heavily polluted industrial premises;
- Information about the date of last cleaning and the scope of actions performed must be placed on the back wall of the cooler.
It is most advisable to carry out cleaning and disinfection measures at the moment when the water in the bottle is almost empty. This reduces liquid consumption and makes it easier to remove the container from the device.
What happens if you don't clean it?
Failure to comply with the rules of care threatens the development of infectious diseases among dispenser users. The first sign that should alert you is the appearance of foreign sediment, an unpleasant taste or odor in the water. This water should not be consumed; it may contain:
- E. coli - leads to serious poisoning and gastrointestinal upset;
- legionella – affects the gastrointestinal tract, nervous and respiratory systems of humans;
- Pseudomonas aeruginosa is the cause of bacterial pneumonia, osteomyelitis and meningitis.
Cleaning a water cooler at home: cleaning products
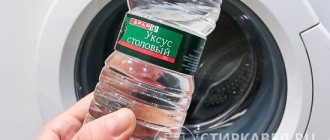
The simplest option involves using ammonia or iodine for disinfection. You can clean the internal surfaces of scale and deposits with citric acid (200 grams per standard bucket of water) or a solution of table vinegar. In this case, after filling, the dispenser must stand for a long time, from 5 to 12 hours, depending on the degree of contamination.
At home, it is better to rinse the device using vinegar and lemon.
As for special disinfectants, Aseptolin, Kriodez, Guanpolisept, and Bior-1 are considered the most effective. When removing scale, you can use the well-proven Biolight N or any other product suitable for cleaning kettles.
What is prohibited to use?
Some items and substances are prohibited for use in cleaning.
All of them lead to damage to the cooler:
- dishwasher (for washing small parts);
- metal sponges and brushes;
- any abrasive powders;
- cleaning products with caustic composition (concentrated acid, alkali);
- chemicals that should not come into contact with food: solvents, gasoline, acetone.
How often to clean your device
This question worries many users of these devices. The device must be cleaned even after changing the water supplier. If the device has not been used for a long time, it is necessary to contact specialists to carry out sanitary work. When the cooler operates around the clock, the internal components should be treated regularly. In turn, manufacturers advise washing the internal structure at least once every six months. Many users note that it is better to carry out sanitary work every three months, in which case it is possible to reduce the likelihood of bacterial growth and health hazards.
If you plan to do the cleaning yourself, you may encounter certain difficulties. Before disassembling the device, you should unplug it from the outlet and allow time for the system to cool down.
Step-by-step instruction
To service the cooler, it is necessary to allocate a sufficient amount of time, since the washing procedure will take from one to one and a half hours and about a day for disinfection.
Also, you will need a sufficient amount of free space. Cleaning the device consists of several successive stages.
External cleaning
You can begin external cleaning immediately after all water has been removed from the device. To treat the body, a soap solution is used - ¼ bar of grated toilet soap per 500 ml of water.
For disinfection, you can add a few drops of iodine or 20 ml of ammonia to the solution.
You can also purchase industrial products to care for the body of the device.
Processing sequence:
- Washing taps. They should be dismantled and washed inside using small brushes.
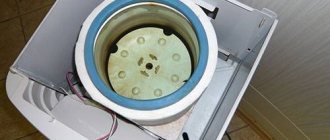
- Cleaning the fluid receptacle. This is where the largest number of bacteria accumulate due to constant contact with water. It must be washed with soapy water, then with clean water.
- Processing the divider . It is located at the bottom of the tank, under the bottle receiver. This element should be dismantled and washed with soapy water and clean water.
- Treatment of the outer walls of the housing. First, with a damp cloth, then dry to avoid the appearance of streaks.
Washing small parts
All removable small parts should be removed from the device body and placed in a prepared place.
Do not use a dishwasher to clean them, as exposure to hot water may cause the plastic to become deformed.
- To make it easier to remove plaque, small elements can be pre-soaked in a soap solution.
- Wash using a sponge and a miniature brush for hard-to-reach areas.
- Rinse well in clean water. The use of scrapers and metal floats is prohibited.
- Next, you need to soak in a disinfectant solution; you can buy it ready-made at a store that sells bottled water and water supply devices.
Disinfection time varies from 5 to 15 minutes (indicated by the manufacturer). Clean, treated parts should be stored separately from untreated parts.
- The last stage is complete drying and installation back.
Internal cleaning
After external cleaning and treatment of removable elements, you can begin caring for the internal surface of the device. For this, special solutions are used.
Citric acid based cleaning solution
This is the simplest, most affordable and effective option to remove plaque, eliminate unpleasant odors and disinfect the surface.
Citric acid does not pose a risk to human health even if it is not completely removed from the cooler.
- To prepare the cleaning composition you will need 200 g of powder and 10 liters of water.
- The entire volume of liquid with citric acid dissolved in it must be poured into the cooler and turn on the heating mode for 10-15 minutes.
- Then, disconnect the device from the network and leave the solution to act for 5-7 hours.
- After this period, drain all the liquid and rinse the inner surface of the dispenser with water.
If there are complex contaminants, the procedure can be repeated. You can clean the washing machine filter with citric acid, read more here.
Will you use citric acid?
Not really
Application of polymer antiseptic
For professional disinfection and cleaning, the drug guanpolisept is used.
It contains no chlorine or aldehydes; if the dosage is strictly observed, the antiseptic is completely safe for human health.
Principle of use:
- Mix the drug with water following the instructions.
- Pour the freshly prepared solution (it cannot be stored) into the cooler and turn on the device.
- Drain the water in small portions through the tap, evenly over one day.
- Completely remove the antiseptic solution and rinse the inside with clean water.
Disinfection of internal surfaces
Disinfection is carried out after removing plaque on the inner surface of the dispenser. To complete this activity you will need:
- Dilute a commercial disinfectant solution (available from your cooler supplier).
- Close the drainage hole and pour disinfectant liquid into the receiving tank.
- Place a container under the taps and drain a little liquid, so all internal elements will be filled with a disinfectant solution. The filling volume of the tank can be determined by the pressure from the taps; the stronger it is, the more liquid in the tank.
- Plug in the device, activate the heating toggle switch (without turning on the cooling toggle switch). Wait until the heating indicator turns off and deactivate the heating toggle switch. Unplug the device from the socket.
- Wait 5-6 hours. Drain the water completely by tilting the device in different directions.
- Clean the drainage holes from any remaining liquid. Close them again.
Mechanical water pump treatment
A pump pump is the most budget-friendly and compact option than an electric cooler. It’s convenient to take it to the countryside or out of town, providing yourself with high-quality drink.
Important: the pump is treated monthly, as well as every time the bottle is changed.
Cleaning steps:
- Remove the pump, disconnect the spout, disconnect the tubes.
- Wash the parts using brushes, adding dishwashing detergent or soaking them for 20 minutes in a 2% solution of baking soda.
- Rinse well under running water.
- Dry on a clean towel.
- Assemble the pump with pre-washed hands.
Adviсe
Recommendations for cleaning at home:
- if the procedure is being carried out for the first time, then for ease of reassembly of small parts you should photograph them before dismantling;
- Do not exceed the recommended concentration of detergents and disinfectants. As a result, they may not wash well or destroy the internal elements of the cooler;
- At the end of the procedure, you should check the drainage holes and water supply taps. They must be closed;
- The first switch-on is carried out according to the following algorithm: install a new bottle, pour about a glass of liquid from the tap, connect the device to the network, activate heating and cooling.
What is recommended to use
Allowed to use:
- Soft cloth napkins, brushes.
- Detergent gels intended for washing dishes.
- Plastic tubes are treated with a 2% solution of baking soda, soaking them by immersion for 20 minutes, followed by rinsing.
- The internal cavities of the electrical appliance system are cleaned with a solution of citric acid.
Cleaning the water cooler yourself is not at all difficult. This procedure should not be neglected. Regular cleaning of the device is the key to drinking safe drinking water.
Another method of washing an electrical appliance will be shown in the video below.
Preventive actions
To minimize the possibility of contamination and maintain the freshness of the water in the dispenser, the following recommendations should be followed:
- every time you change a bottle, treat the bottle receiver and neck with a disinfectant wipe;
- once a week, remove and process the taps, clean the pan;
- before installing the bottle, treat its surface and wash your hands;
- Carefully remove the protective label from the neck. Remains of this film may end up in a glass of drinking water;
- Do not use the cooler with a bottle of tap water. The device does not have a filter, and untreated water activates the development of pathogenic microorganisms;
- Wipe the outside of the housing with a damp cloth if there is visible dirt.
Cleaning the water cooler is a mandatory procedure that should not be neglected.
In the absence of proper care, pathogenic microorganisms begin to actively develop inside the device, the taste and smell of water change, and the device itself gradually loses its functionality.
Cleaning parts in contact with drinking water
During processing, not only the internal system is washed, but also faucets, bottle receivers, drip trays, if such are provided for in the design of the equipment. That is, everything that comes into contact with the water is cleaned.
- The removed parts are thoroughly washed by hand using a brush or sponge. Particular attention is paid to the bottle receiver, as a large number of bacteria accumulate on it.
- The elements are thoroughly washed under running water and dried.
- Anything that cannot be removed is treated with a clean cloth moistened with a cleaning solution. Then the surfaces are wiped with a clean, damp cloth, removing any remaining product.
- The body of the device is wiped with a clean rag.
Prevention
The main reason for device contamination is the users themselves, who introduce bacteria onto the device body. It is enough to place a container of water into the cooler once with dirty hands, and bacteria and microbes get inside and begin to actively multiply. Foreign microorganisms not only worsen the taste of the liquid, but also make it unsafe for health. These changes are often unnoticeable in hot water, so focus on liquid at a low temperature. As the best preventative measure, you can periodically clean the exterior of the housing (once a month). Pay special attention to those parts that come into direct contact with water. If the water has already bloomed, then it is better to call upon the help of specialists who will return the device to its original characteristics. The presented company operates in Moscow.
Professional cleaning of coolers: cost and stages
Serious contamination is grounds for calling a professional. It is not always possible to carry out high-quality cleaning of the device yourself.
On average, the service costs 1,500 rubles, and it needs to be performed about 4 times a year. The device is processed by a master as follows:
- specialists take the equipment to their office;
- in a special room, which is characterized by absolute cleanliness of both the surrounding space and the air, the entire cleaning process is carried out;
- For processing, only certified high-quality products and carefully disinfected instruments are used;
- the worker involved in cleaning this type of equipment has a special certificate and wears a sterile suit;
- The cleaning method is selected depending on the technical characteristics of the device and the degree of contamination.
The classic cleaning option requires the following steps:
- Internal cleaning of each cooler element.
- Washing of contaminants from the external parts of the device.
- Cleaning water supply taps.
- Disinfection of the neck, after appropriate cleaning.
- Treatment with special antibacterial compounds.
Why is disinfection so important?
Disinfection is included in the sanitization of the home cooler. The reasons for its mandatory implementation are:
- The appearance of scale due to the process of mineralization of water when heated. The internal parts of a home cooler may be damaged and pipes may leak. The unit will begin to leak. There is a possibility that water from the apartment will penetrate to the lower floor. Then just cleaning your home cooler won’t be enough.
- The appearance of organic deposits. These are bacteria that can enter the device from the outside and form as a result of ignoring cleaning. A mass of bacteria settles on the outer surface of the housing.
- Mechanical contamination. They arise due to a person’s carelessness when handling a home cooler. Contamination can, for example, cause pieces of paper (stickers) to get into the tube.
The importance of disinfecting a water cooler lies in eliminating the consequences of the above reasons, maintaining the internal and external cleanliness of the device and the quality of the water.