Water coolers have gained popularity for a reason. They are convenient to use to obtain drinking water by filtration. They are widely used both in offices and shops, and at home.
However, water has a number of disadvantages: it tends to settle during long-term storage, and also form scale when boiled. If you ignore this and do not periodically clean the device, it will soon become unusable. A cooler can fail for a number of reasons. You should not immediately get rid of the device; in most cases, it can be repaired either with the help of a specialist or independently if you have certain skills.
Either for preventative cleaning or for necessary repairs, the cooler will need to be disassembled. Don't know how to disassemble a water cooler? This is not difficult to do, however, it is necessary to adhere to a certain algorithm so that after reassembly the device continues its original functioning.
Preparation for the procedure
Before you start cleaning your water cooler at home, you need to carefully prepare for this process. You must first unplug the device from the outlet. The most successful moment may be the period of changing the container from empty to full. Further work is carried out in the following sequence:
To remove scale and deposits that have formed inside the device, you must use special means or prepare your own composition from 100 g of citric acid and 5 liters of water.
The amount of liquid and substance can be any, at the rate of 20 g of product per liter of water. The powder should completely dissolve in the liquid. After this, you can begin cleaning the structure.
Cleaning a water cooler: products, equipment, cleaning plan, tips, reviews
- The taps are carefully removed from the device. You should remember their location or make appropriate notes on the device. The removed parts are washed in a soapy solution or left in a container with a soapy solution for several hours. After this, you can clean all the grooves with a small brush. Clean taps are washed with running water, rinsed in a container with boiled water and dried.
- Start cleaning the drip tray. It looks like a tank with a grate and is located under the taps. It should be disassembled by separating the grille from the tray. They wash it in the same way as the taps and install it in place after drying.
- The bottle receptacle is pulled out by turning it counterclockwise. Clean it in the same way. Next they move on to the divider. It is a plastic circle with two holes, located at the bottom of the water tank.
The water cooler must be cleaned once every trimester. If we are talking about office premises, then this procedure is carried out by a special service. It can also be called to your home, but water cooler treatment can also be done at home.
Removing stains
Getting rid of external contaminants on a device is not always easy - often the contaminants eat into the plastic and removing them causes difficulties. To remove dirt, you can use the following products:
- Dishwashing liquid - apply it to a clean, damp sponge, whip it into foam and wash the surface of the appliance. After completing the manipulations, the foam is washed off from the unit, and the entire surface is wiped with a dry, clean cloth. Remember that it is unacceptable to use hard sponges - they will scratch the plastic.
- If grease gets on the cooler, you can prepare a solution from dishwashing detergent, water and table vinegar , taken in equal proportions. The mixture is applied to a plastic surface, left for a few minutes and rinsed off thoroughly.
- Baking soda copes well with external dirt of varying degrees. It is diluted with water to a mushy state and carefully applied to the surface, after which it is washed off.
To increase the efficiency of cleaning activities, before applying the cleaning agent, the entire surface of the cooler should be wiped with a damp cloth.
Why is cleaning necessary?
Lack of regular maintenance of the cooler not only leads to its breakdown, but also causes illness in people using it.
With prolonged contact with water, a film of microorganisms and their waste products forms on the internal elements of the device.
As a result, the taste and smell of water is distorted, and it itself becomes a source of infectious diseases. Other reasons why you need to clean your water dispenser:
The most incredible way to get my hair back!
This is just a DISASTER ! And after all, my hair did not start falling out in one day, but systematically - day after day I watched how the hair left my head: while combing, washing, even while sleeping. (read more…)
If at least one of the listed symptoms appears, you should immediately clean the device.
How often to wash?
The instructions for the cooler indicate the need for maintenance at least once every six months. If water consumption exceeds 60 liters per month, then cleaning must be carried out once a quarter.
The more people use the dispenser, the more often it needs to be cleaned.
- each time the cooler is charged, the water inlet needle, bottle neck and plastic cap must be disinfected;
- if the device is not used for one month, it is necessary to carry out unscheduled cleaning;
- the need for monthly treatment arises when the dispenser is located in areas with high traffic (medical facility, shopping center) or heavily polluted industrial premises;
- Information about the date of last cleaning and the scope of actions performed must be placed on the back wall of the cooler.
It is most advisable to carry out cleaning and disinfection measures at the moment when the water in the bottle is almost empty. This reduces liquid consumption and makes it easier to remove the container from the device.
What happens if you don't clean it?
Failure to comply with the rules of care threatens the development of infectious diseases among dispenser users. The first sign that should alert you is the appearance of foreign sediment, an unpleasant taste or odor in the water. This water should not be consumed; it may contain:
Do you like guys with long hair?
Not really
- E. coli - leads to serious poisoning and gastrointestinal upset;
- legionella – affects the gastrointestinal tract, nervous and respiratory systems of humans;
- Pseudomonas aeruginosa is the cause of bacterial pneumonia, osteomyelitis and meningitis.
How to Clean Your Own Water Cooler: A Complete Guide to Washing and Sanitizing
- To keep your water clean and your equipment working, carry out preventative cleaning of the cooler once every 3-6 months on your own or with the help of specialists. Also, do not forget to wash the faucets, drip tray, front panel, and of course, wipe the entire cooler body yourself at least once every 2 weeks. This procedure is simple, but very useful.
- When installing the bottle on the cooler, be sure to remove the protective thermal cap on the cap and the protective sticker on top of the cap. If the bottle does not have a thermal cap, disinfect the cap so as not to introduce bacteria into the cooler and not to drink spoiled water.
- To reduce scale on electrical appliances, use deeply purified drinking bottled water. This will help protect your equipment from damage by salt deposits. Remember that it is healthier to drink mineral water unboiled.
In general, when asked how often the device needs to be cleaned, the answer is “every 3-6 months.” This depends on the number of bottles of water that have been changed during this time. Office spaces require cleaning more often than homes. Typically, after using 19-20 bottles of water.
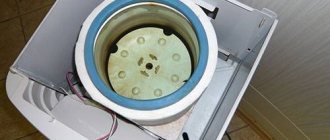
It's not a refrigerator, but it's cold
When the resistance of the temperature sensor (thermistor) drops below 33 kOhm, the semiconductor element and the cooling fan turn on.
From the cooling radiator (Fig. 4), on which the fan is installed, a coil goes into the water tank, which absorbs the cold emanating from the semiconductor element, and the water temperature drops.
In practice, this element and the fan can work for several hours in a row (especially in summer, when the ambient temperature is +25 ° C or more).
At other times of the year, as a rule, the cooler turns on automatically for a short time of 5-8 minutes.
As the water in the tank cools, the resistance of the thermistor increases. In table Figure 1 shows the resistance values of the thermistor MMT-1, MMT-4 (designation on the NTC board) at different temperatures. These parameters were established through the author's experiment.
Table 1. Dependence of the resistance of the standard thermistor on temperature
| Temperature, °C | NTC resistance, kOhm | Cooling time to +5° C, min |
| Room regular +22 | 11,8 | 8 |
| Hot summer +25 | 10 | 12 |
| Hot summer +30 | 8,2 | 25 |
| Chilled tank +5 | 33,3 | — |
Thus, the cooler automatically turns off when the thermistor reaches a resistance of 33.3 kOhm.
It is clear that in the hot summer, for hot office guys, the water temperature of +5° C may not be low enough. So, we will have to work on further cooling the water.
Rice. 5. View of the printed circuit board of the cooler temperature monitoring and control device
There are no “manual” adjustments on the board.
It would be possible to change the resistance values in the voltage divider (in the comparator arms), but, in my opinion, this path is irrational and expensive.
Option one
I recommend this as the easiest way to cooling.
Thermistor connection locations are indicated by red lines. Nearby, a circle indicates the location for connecting an additional resistor (marked on the board as RNTC, but not connected).
In order for the cooler to work longer, even after passing the +5° C threshold, it is necessary to replace the MMT-4 resistor (designated NTC) with another one: with a resistance (at room temperature) not 12 kOhm, but slightly lower - 8.2 kOhm or at least 10 kOhm.
Then, when the temperature reaches +5° C, the resistance of the thermistor will increase to 27.7 kOhm and water cooling will continue (this has been established experimentally) - until the moment when the resistance of the thermistor reaches the range of 32-34 kOhm. (there are different values as a result of the experiment). The water temperature at this moment will drop to +1° C. All that remains is to place a glass in the cooler and shudder...
The second way to clean the cooler
If the water cooler was washed a long time ago or it is very dirty, the question arises of what to do in this case. You will have to resort to the help of specialized products that can be found in the store in the household chemicals department.
- Unplug the device from the outlet and drain the water. For convenience, you can let the water cool. It is not recommended to open both taps. When a stream of water flows under low pressure, tilt the cooler in different directions and wait until it drains completely.
- Open the drain valve on the back of the appliance and drain the water in the same way by unscrewing the plug.
- Carry out external disinfection (see point 1 of the first method).
- Prepare a Kremklin, unscrew and soak the faucets with a drip tray in it for a couple of hours. It is better to disassemble the drip tray; assembly is carried out only after drying. Unscrew all other removable parts (bottle receptacle, receptacle for residual water, divider and body) and also soak in the solution. The drip tray and taps can be treated with Antiklin spray and cleaned with a hard brush. Screw them into place.
- Pour the product (Bior brand or other) into the receiving tank, after opening the taps (similar to steps 3-4). Once the container is completely filled, turn off the water supply and plug the cooler into a power outlet. Wait until the water is completely heated and turn off the device.
- After 6 hours, thoroughly scrub the sides of the bottle with a brush and your hands. All mucus and scale should disappear.
- Drain the solution, open the tap on the back panel to completely drain.
- Return the divider to the bottom of the container and pour clean distilled water (4-5 l) into the tank. Wash the container in this manner several times.
It can be seen that both methods have many similarities. The second instruction, which describes how to clean a very dirty water cooler yourself, unlike the previous one, requires the purchase of specialized products and extreme care.
Monitor the condition of your cooler. If your faucets are already leaking or become too clogged, you may need professional help.
To find out if it's time to flush your water cooler, try it; clean water shouldn't smell funny or taste bad.
After all the manipulations described above, assemble the cooler. When assembling, all parts should be wiped dry. Do not forget about all the tips and warnings given earlier, and before using the cooler for its intended purpose, turn on the water heating and cooling toggle switches. Now you can continue to enjoy clean and fresh water.
Is it worth calling a specialist and how much does it cost?
Preventive cleaning of equipment can also be done at home, but if the equipment is in fairly poor condition due to infrequent maintenance or the taste of the supplied water has deteriorated, then you should contact a specialist. This should be done especially if it is noticed that the products used at home do not cope with stains.
On average, this procedure will cost 1.5 thousand rubles. Cost may vary depending on region. This cleaning is required about four times a year. Professionals must carry out diagnostics, during which they will find out what kind of contamination has appeared on the “insides” of the cooler. Then the scale and dirt will be cleaned, as well as the device will be disinfected.
Specialists must take the device to their office premises, where in a sterile room, dressed in special suits, they will clean and disinfect the cooler. Products are selected depending on the type of contamination that needs to be eliminated. Cleaning is carried out by a specialist who has the appropriate certificate. The completion of the cleansing procedure is characterized by disinfection using special antibacterial compounds.
Disinfection of internal surfaces
Citric acid does not pose a risk to human health even if it is not completely removed from the cooler.
Expert opinion
Ksenia Diyanova, expert on beauty, purity, harmony
Ask me any questions, I will be happy to answer!
There are several ways to clean a water cooler at home or in the office. Do not forget about all the tips and warnings given earlier, and before using the cooler for its intended purpose, turn on the water heating and cooling toggle switches. The second way to clean the cooler Ask me all your questions, I will be happy to answer!
Cleaning a water cooler: products, equipment, cleaning plan, tips, reviews
- If you decide to clean the water cooler yourself, you should not resort to tap water. It is also not acceptable to use a steam cleaner or dishwasher.
- To know how often the device needs to be flushed, consult the manufacturer or specialist for advice. It is usually recommended to clean coolers at least once every 2-3 months (although the instructions may say “every six months”).
Direct sunlight promotes the “fermentation” of water in the cooler, as it creates a favorable environment for the growth of bacteria. You need to place the device in a place not illuminated by the sun.
Professional washing: what is included in the service, duration and cost
- The thermostat is set to minimum mode. In this case, it is necessary to adjust the indicators and the device will cool as it should.
- Perhaps, as in the previous case, the power of the unit is simply not enough for a large volume of liquid and you need to let the device stand for several minutes.
- Another reason could be a lack of rear surface ventilation. It is important that the gap between the device and the wall is at least 15-20 cm. Also, the device should be located away from heating elements and out of direct sunlight.
- Overheating of the system can cause insufficient cooling. In this case, the device must be disconnected from the network and left for 30 minutes.
Professional treatment is carried out in a special workshop - this gives a better result than home cleaning. The service includes:
Flushing the internal cooler system with clean water
To flush the system you will need approximately 5-10 liters of clean water. However, the volume of water in coolers may vary.
- Fill with clean water to the top of the tank. Leave clean water in the cooler for 30 minutes.
- Periodically, every 10 minutes, drain the water into a glass and pour it into the reservoir. So 3 times in 30 minutes. Five glasses of 200 ml or one liter mug.
- Rinse cycle 2: fill with clean water. Repeat the sequence of the first wash cycle.
- Drain the water from both taps completely. Insert the water receiver into place.
- You can stick a sticker on the back of the cooler for yourself indicating the date the cooler was cleaned.
- Place the full 19 liter bottle on the cooler with clean hands, having first removed the label.
- Plug in the cooler. Wait for the water to heat up and cool down. The cooler is ready for use. You can drink water.
Cleaning a water cooler at home: frequency of flushing and use of DIY cleaning products
After this time, it is necessary to drain the liquid from the tank, taps and valve. If the liquid is dark in color, the procedure should be repeated until a clear liquid is obtained when drained. Then the tank is filled with clean liquid and drained several times.
Expert opinion
Ekaterina Korneva, expert in the field of care, cleanliness and beauty
I will help you understand all the intricacies.
Lack of regular maintenance of the cooler not only leads to its breakdown, but also causes illness in people using it. Cleaning a water cooler, how to disassemble it, descale it yourself, professional washing. Cleaning a water cooler yourself at home If you have any questions, please contact me, I will be happy to answer!
Cooling using Peltier elements
The use of these parts to assemble a homemade air conditioner is a controversial issue. It's all about the energy consumption of Peltier elements (otherwise known as thermoelectric converters), which is incomparable with the amount of cold produced. Outwardly, they look like plates with 2 wires; when electricity is connected, one surface of the element generates heat, and the other - cold.
What do home craftsmen and car enthusiasts who strive for comfort do:
- Buy from 4 to 8 Peltier elements and mount them with the “hot” side on a ribbed aluminum radiator.
- This radiator is installed in such a way that it is cooled by street air.
- A cooler from the computer is attached to the “cold” side of the converters so that it supplies room air to the plate.
Peltier elements actually cool the air flow, but at the same time they simply consume electricity. After all, half of the energy is wasted because it is converted into heat and dissipated in the atmosphere. That is, for every Watt of electricity expended you will receive no more than 0.5 W of cold, while with a split system this ratio is completely different – 1:3. You can see how this works in practice in the next video:
Cleaning a water cooler - step-by-step instructions on how to clean a water cooler yourself
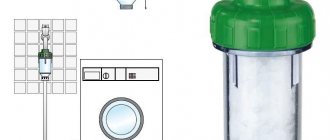
- After installing the taps and drain plugs, pour heated water into the tank to the brim (about 2 liters). Add 50 ml Biolight N descaling solution to the tank (at home you can use citric acid: 250 g of citric acid per 2 liters).
- Turn on the heating (set the red hot water button on the back of the cooler to position I). Leave the cooler turned on for 30 minutes.
- Periodically, every 10 minutes, pour water into a glass and pour it into the reservoir. So 3 times in 30 minutes. Five glasses of 200 ml or one liter mug.
- 15 minutes after turning on the hot water key, pour the heating tank through the tap again. Five glasses of 200 ml or one liter mug.
- Pour the Biolight N solution into a container. Turn off the key.
In order for the water from the cooler to bring only benefits, you need to monitor the device. If for some reason you do not want to seek help from specialists, you need to learn how to clean a water cooler yourself, what tools and products to use to remove dangerous microflora. This article describes in detail the features of sanitizing the device.
Why doesn’t my computer or laptop turn on after the procedure?
Sometimes after you have cleaned the cooling device yourself, the device itself refuses to start.
This happens for two reasons:
- Incorrect assembly.
- Damage to contactors and wires.
Try to disassemble it again for initial diagnostics. Check if everything was assembled correctly.
Why did the fan start to chirp?
It's worse when all the components are working, but the annoying noise has not disappeared. On the contrary, it is intensifying. This also means that you made a few mistakes during assembly. Most likely the impeller blades are touching the housing or radiator. Often they touch the power wires in some way.
Try to hang it evenly.
Why clean your water cooler?
A cooler or dispenser, like any other household appliance of constant use, requires timely maintenance. In addition to the usual replacement of an empty bottle, the device also needs to be sanitized.
It is at the last stage that ordinary users have difficulties. Many people don’t know if water coolers are cleaned at all. Because containers are changed frequently, and in the case of office use - almost every day. And cleaning the device is done much less frequently, not to mention sanitary disinfection. Although most often the cause of equipment breakdown is poor quality care and untimely cleaning.
How I found my ideal hair growth product
Hello dear! I want to share with you my solution to the sensitive problem of hair loss . The problems are very serious, at least for me. I would never have thought that this misfortune would touch me, especially at the age of 29 (read more...)
Preventive measures for cleaning the device also include removing scale and salt deposits. The entire space of the dispenser, which is in direct contact with water, is completely disinfected. How often should you clean your water cooler? At home, such cleaning is performed once every six months. And if the use is more active - every 2-3 months.
We can say that it is for the sake of disinfection, the destruction of possible fungal formations, mold that cleaning is carried out. The majority of bacteria that enter our water are not pathogenic, that is, they cannot cause serious illness or poisoning. But there is still a possibility that, for example, the pathogen E. coli will penetrate into the container.
The device becomes dirty only due to negligence. For example, they changed the bottle with dirty hands and took hold of its neck. Hence the possibility of bacteria penetrating into the water.
An indicator of harmful microorganisms entering water is the appearance of a specific smell and taste. This is a signal for cleaning.
Let's start with the bottle receiver. In case of hygiene violations, this is where all the dirt gets in first. This area needs to be washed a couple of times a week. The procedure is performed with ordinary dishwashing detergents, after which the receiver is rinsed with water. It is recommended to wipe the taps regularly and try not to touch them with cups.
Scale appears in coolers if you use not just purified, but mineral water rich in salts and beneficial microelements. Yes, using the latter is a matter of health. But there is also a flip side to the coin - minerals settle in the form of scale on the heating element. And such sediment reduces the heating element’s ability to heat the liquid and shortens its service life. Therefore, if the water has acquired the taste of boiled, and not just hot, it’s time to descale.
Flushing the internal cooler system with clean water
Monitor the condition of your cooler. If your faucets are already leaking or become too clogged, you may need professional help.
Expert opinion
Ekaterina Korneva, expert in the field of care, cleanliness and beauty
I will help you understand all the intricacies.
If you disinfect immediately, the chemicals will only burn the biofilm and will not destroy the bacteria. Disinfect the device and get high-quality water, the use of which will improve your health and benefit the body. What happens if you don't clean it? For any questions, please contact me, I will be happy to answer!
Tips for cleaning your device
It is not at all necessary to study a large amount of information on the topic of how to wash the inside of a water cooler on your own. All you need to do is follow simple recommendations:
- To prevent the penetration of bacteria into the water, you should completely remove the protective paper that covers the neck of the new bottle. The plastic bag from the bottle must also be removed before installation.
- Before installing the bottle on the device, you must wipe its neck with an antibacterial wipe.
- Disinfect small parts such as taps, drip tray and bottle receptacle at least once every two weeks.
- If the device is heavily soiled, special cleaning agents must be used to clean the internal surfaces.
- If the device performs poorly or it is impossible to clean hard-to-reach places, you must call a technician or contact a service center.
- To avoid the appearance of mold in the liquid or on the walls of the device, it is necessary to position it so that direct sunlight does not fall on it.
- It is recommended that cleaning be carried out under close supervision to ensure that children or other family members do not accidentally drink the cleaning solution.
If you wash small parts in a timely manner and monitor the condition of the device, then you won’t have to think about how often you need to clean the water cooler at home or when using the device in public organizations. Preventive measures will allow you to enjoy clean water at any moment.
Preparation for the procedure
- do not use surface treatment products that contain abrasive components;
- Fill the tanks with cold water only after they have cooled completely;
- Regularly disinfect the junction of the container and the pantograph. Purchase special antibacterial products for this;
- Position the cooler so that it is not exposed to direct sunlight. They destroy the material from which the device is made. In addition, heating the walls of the cooler negatively affects the quality of water and provokes its bloom;
- use latex gloves during processing;
- Keep the bottle receptacle clean - wash it once every three days. Do this with a damp cloth;
- Once every seven days, wash the pan and drain any remaining liquid from it. Clean the taps;
- Remove the protective paper, otherwise its fragments will fall into the water.
Now you should rinse the removable parts of the cooler (after disinfection, you can rinse the water inlet; after complete descaling, you can rinse the taps, pipelines, and drip trays). The pipelines are located between the tank and the taps. The taps are unscrewed counterclockwise.
Types of dispensers
Taking into account the principle of operation, equipment and size, coolers are divided into several types, each of which is suitable for use in different conditions. Models are available that supply only cold water, cold and hot, and models with liquid at room temperature. According to their design and operating principle, they are divided into:
- Floor-standing. Free-standing cabinets with a height of 80 cm or more have different designs. The model can be supplied with a bottom or top loading bottle. Floor-standing devices are characterized by high performance and functionality. They are used when chilled or hot water is needed and can operate at high speeds, which is why they are often installed in large companies.
- Tabletop. They are compact in size and have low liquid consumption, suitable for home or small offices. They are installed on the windowsill, kitchen table or countertop, as well as other surfaces. They often operate on the electronic cooling principle and do not waste a lot of electricity.
- With storage space. An additional cabinet can store dishes, cups and food. A number of models have an ozonizer in the cabinet. Ozone disinfects the surface and kills harmful microorganisms.
- With a refrigerator. The built-in chamber allows you to effectively use every part of the cooler. The compressor cooling system regularly maintains the desired temperature. Premium devices have LCD displays that display all the set parameters. A cooler with a refrigerator will be useful in the office.
- Built-in. The model saves space in the room. It can be installed in kitchen units, as well as in cabinets with a special niche. The dispenser is connected to the bottle installed behind the wall using a flexible hose. This system makes it possible to harmoniously fit the equipment into the interior.
- Flow-through. The dispenser does not need to be regularly maintained and the bottle changed. Thanks to the direct connection to the water supply, water enters the system automatically. To prevent contamination of the device and the entry of debris into the drink, the cooler has several filter elements. Therefore, it requires periodic maintenance and cleaning.
- With carbonation. The device has cylinders of carbon dioxide, which is mixed with liquid. This option is suitable for people who prefer sparkling water to regular water. The volume of the container is enough for 1000 servings.
Prevention
The use of preventive measures will reduce the possibility of bacteria penetrating into the water, as well as the formation of scale. To do this, it is recommended to clean all external components and parts: drip receiver, taps, needle and bottle connection ring, as well as the front panel. These parts are in frequent use, and therefore become more polluted. Regular cleaning will reduce scale deposits.
It is worth calculating your strengths: if you are not sure that you will be able to reassemble the device after dismantling, then it is better to call a specialist. Before installing a new water tank, you need to thoroughly wash your hands and also clean the needle of the device with disinfectant wipes.
It is recommended to pay attention to the labels covering the neck of the new bottle. They must be completely removed to avoid introducing bacteria into the water. You should not use solvents, acetone, gasoline or other similar products for cleaning, as they are too aggressive for this device. In addition, they cannot be completely removed even with a large amount of water.
If you follow the cleaning instructions, as well as regularly carry out preventive measures, the water cooler will be in use longer and will delight your household with fresh and tasty water.
How to lubricate a fan
To lubricate the fan, you need to disassemble the computer and remove the cooler from it.
Place the fan on the table and carefully remove the sticker. Part of the sticker is located just above the gap for the wiring.
From here it is easier to bend it.
Remove the rubber plug from the middle of the fan
To do this, you can use a small screwdriver, carefully placing it behind the edge of the plug.
You will see the end of the shaft inside the cylinder in the resulting depression. Place one drop of oil into the indentation.
Return the rubber stopper to its place and cover it with a sticker on top. Sometimes the sticker stops sticking. Then you can use regular electrical tape. After the fan has returned to its place, the computer must run for several minutes before the oil completely lubricates the cooler. After some time, the computer will become quieter and stop getting too hot.
As you know, a fan or cooler is a very important part of your computer. It regulates the temperature of the processor and prevents it from overheating. Everyone knows the sound of a computer fan running. But if at one point you notice that this sound has changed, for example, your computer began to hum like an airplane taking off, then this means that the fan clearly needs help, that is, cleaning and lubrication.
Instructions
Unscrew the bolts using a screwdriver, disconnect the connector, and remove the fan from the case.
Using a brush or cotton swab, carefully clean the fan blades and fan housing. Remove all accumulated dust and dirt.
Under this rubber band you will find the fan hub and axle, which you should lubricate. To perform this operation, take spindle or machine oil. You can also use a CV joint. For lubrication, apply a little oil to the fan shaft.
The oil should cover it, but do not drip too much, because otherwise, when you put the rubber in place, the oil may leak out of the recess and stain the body, then the sticker will not be able to stick back. To apply the oil more accurately and to prevent it from spilling, you can use a medical syringe. In this case, the lubricating oil must be very thin so that the syringe flows freely.
You can also lubricate the internal parts of the fan, but to do this you will have to disassemble it. We strongly advise you not to do this if you are not a specialist - a non-professional will not be able to cope with such a thin one, and you risk damaging the cooler.
Every laptop owner has encountered a problem in which the device begins to get very hot and at the same time make strange sounds. The reason for this is contamination of the cooler. After all, during operation, dirt and dust regularly enter the laptop. As a result, the fan, designed to cool the “brains” of the computer, becomes dirty and sometimes even stops rotating. What to do? Of course, lubricate and.
The first thing you need to understand is how to lubricate the laptop cooler. Is the oil ok? Maybe. But under no circumstances should it be plant or animal! Of course, for some time such oil will help you get rid of noise, but then the cooler will simply fail. The fact is that sunflower oil dries out very quickly, and all kinds of dust and dirt stick to it with redoubled force.
Also, you should not lubricate the laptop cooler with grease, petroleum jelly and other thick fatty lubricants, which the centrifugal force will squeeze out and scatter throughout the entire inside of the device. Maybe alcohol or tar? No, they will completely worsen the fan’s performance.
Then what kind of lubricant is suitable for a laptop cooling system? It must meet several requirements:
- Have an adhesive base;
- Be of a fairly thick, viscous and light consistency;
- Capable of operating at high speeds (the cooler produces about 4-5 thousand rpm on average);
- Withstand high temperatures (at least up to 100 °C).
Considering everything said above, it turns out that several options are suitable:
- Synthetic automobile oil.
- Lubricating oil for sewing machines, power tools, hair clippers, etc.
- Silicone grease designed for lubricating locks, hinges, mini-gearboxes and other household appliances.
- Special lubricant for coolers (for example, Molykote Omnigliss).
Is it possible to lubricate a laptop cooler with WD-40? We still wouldn't recommend it. Of course, the fan will stop making noise for a while, but WD-40 can damage other internal components. In addition, this product smells quite unpleasant. And don’t forget that WD-40 can be used to lubricate the same door hinge, which does not rotate at such a tremendous speed as a cooler.