Usually, kitchen stoves or cooking surfaces are equipped with hoods. Most modern models come with built-in lighting. But no matter how simple the design of the hoods, they also tend to periodically fail. Most often the light bulbs burn out in them. We will try to figure out what is the reason for this phenomenon, as well as how to cope with replacing the lighting in this device.
Why doesn't the light in the hood come on?
There are several reasons why the light bulb may not light:
- She has reached the end of her service life.
- A short circuit has occurred.
- The network is too congested.
- Dirt got on her.
- The cartridge is damaged.
- The wiring is burnt out.
- The switch is broken.
- Contacts are stuck.
Short circuit
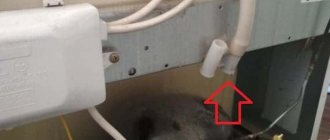
A short circuit could occur. Visually inspect the wires. If no external damage is found, test the power lines with a multimeter to find the location of the short in the hidden wiring.
If a short circuit occurs, find the damaged area and carry out repairs.
Power grid overload
Perhaps you have incorrectly divided the network load between other household items, or faulty equipment is connected to the network. There are several options to solve this problem:
- Increase the rating of the machine if the cable cross-section allows.
- Install a few extra outlets.
- If you have an outdated machine, replace it.
- If you use tees, replace them with extensions.
There may be a turbine (fan) installed in the hood. Because of this, the voltage becomes insufficient and the light does not work.
Entry of dirt or moisture
If dirt or moisture gets on the backlight source, it must be unscrewed, cleaned, and wait until it dries. After that, return it to its place. If the light does not work, there is another reason.
Cartridge
If the lamp socket burns out, you need to check the tongue that transmits voltage to the base. Often it is he who burns out. But there may also be other problems with the cartridge:
- It is strongly pressed, so it does not contact the lamp.
- Debris got inside.
- Contacts are damaged.
In the first case, we bend the cartridge to return it to the correct position. In the second we just clean it. In the third we repair connections.
If the cartridge is completely burnt out, replace the part. To do this you need:
- Disconnect the conductors (as shown in the photo) and remove the lamp.
- Remove all glass shades.
- Unscrew the cartridge and disconnect it from the wires.
- Remove the base.
- Replace cartridge. To do this, connect the phase to the central contact in the base, and zero to the second.
Wiring
The wiring may have burned out. You need to find the place where this happened. For this:
- Locate the burnt wire. First of all, check the one that is inside the lamp. This wire is the thinnest, so with a 90% probability it was the one that burned out. Replace the burnt wire.
- The wire may be intact, but came off when shorted. Connect in place.
Broken switch
- The switch burned out.
- Contacts are dirty.
If you are not very tech savvy, it may be easier to install a new switch. If you know how, try cleaning the switch contacts.
LED lamps
LEDs are used in the most modern models of hoods. Lamps of this type require minimal energy consumption. It is believed that savings reach 90%, plus, the lamps are characterized by increased resistance to vibration.
The principle is based on more complex processes than the glow of a hot metal thread. The phenomenon at work here is the emission of light, which occurs at the point of contact of dissimilar substances when an electric current passes through them.
Manufacturers promise a long service life - up to 10 years, although in practice it varies. LED lamps are found in hood models Krona MERY, Shindo Nori, Gorenje BHP, Hansa OKC, Bosch DWK, etc. The cost starts from 160 rubles.
In the event of a malfunction, the LED lamps are replaced with new ones; replacing only the LEDs is not possible. Most manufacturers recommend contacting customer service to update lamps.
However, the general principle of work comes down to the following:
- turn off the control switches, turn off the power to the device;
- remove the filters;
- disconnect the wire connection of the lamp;
- remove the lamp; in some models, this will require pressing a special spring;
- replace the lamp with a new one, connect the wire;
- put the filters back in place.
The new LED must match the old one in terms of nominal values.
Features of replacing light bulbs in hoods from different manufacturers
Candle-shaped incandescent lamp for Krohn hood
To change light bulbs in kitchen hoods from different manufacturers, you should carefully familiarize yourself with the features of their design. There are several popular companies whose products are most often purchased by Russian users.
Hoods “Krona”
The products of this company use candle-shaped “minion” incandescent lamps (E14 base) with a power of 25 Watts. The use of products with other parameters is prohibited. To access them you will need to remove the grease filter. Closer to the rear wall you can see sockets into which one or two lamps are screwed (depending on the model). To replace a burnt-out light bulb, you will need to unscrew it and then screw a new sample into its place. At the end of the operation, the aluminum filter is installed in place.
Maunfeld devices
When replacing lamps in Mountainfield hoods, you should distinguish between two types of models. In one of them, after disconnecting from the network, the light bulb is simply removed from the socket and replaced with a new one. For products from the Great range, you will first need to pry up the ring holding the lamp body with a flat-head screwdriver, and then carefully pull it out. After this, all that remains is to replace the lighting element and install the ring in place.
What is the E14 base type?
The most common model of the “E” base (EdisonScrewtype or Edison base), the number indicates the diameter of the contact part in millimeters. ... A lamp with an E14 base has a base connection with a diameter of 14 mm and a height of 26 mm.
Interesting materials:
How to transfer to free attendance at college? How to transport oil paintings? How to restart AirPods Pro? How do I reset my HP LaserJet M1132 MFP printer? How to reboot Sony Xperia XA1 Plus? How to reload a page on a computer? How to reload the page while clearing the cache? How to use a new oven for the first time? How do sea cucumbers eat? How to weave two French braids step by step?
Types of lamps for backlights
Illumination of the hob provides additional convenience when preparing food. In addition, the backlighting of the hood is also very beautiful. A kitchen in which a backlit hood is installed looks impressive and unusual, since the light from the backlight bulbs gives the room charm and coziness. Due to the fact that the backlight bulbs are located close to the illuminated surface, they do not require a lot of electricity, so they allow you to save on kitchen lighting.
Modern hoods are equipped with:
incandescent lamps. Such lamps are the cheapest, but have a fairly high level of energy consumption. Their main disadvantage is that they do not work for long, so they have to be changed often, especially when using the hood daily;
fluorescent lamps. This type of lighting has high indicators of durability, energy saving and brightness, but replacing failed lamps can become a problem if the design of the hood contains non-standard developments from the manufacturer
Therefore, when buying a hood with fluorescent lighting, pay attention in advance to the availability of consumables for it;
halogen lamps. Medium or premium class hoods have recently been equipped with such lamps.
With optimal energy consumption, they provide an even luminous flux of high brightness and at the same time have small dimensions;
LED bulbs. Such lamps are installed in the most modern models of hoods. LED lamps are in the same price category as halogen lamps. They consume 10 times less electricity compared to conventional incandescent lamps, and their service life is more than 30 thousand hours.
A little about the general
The vast majority of manufacturers equip hoods with lighting systems. This is extremely convenient, as the hob is fully illuminated and cooking comfort is increased. Each brand implements this option differently. Models differ in the type of lamps, their placement, and brightness.
Modern modifications of air purifiers are equipped with adjustable lighting intensity. In this way, the light flux can be diffused throughout the kitchen or directed onto the hob. The function is independent of the fan and can be activated independently of the main operation of the device.
Features of replacing light bulbs in hoods from different manufacturers
Candle-shaped incandescent lamp for Kron hood
To change light bulbs in kitchen hoods from different manufacturers, you should carefully familiarize yourself with the features of their design. There are several popular companies whose products are most often purchased by Russian users.
Hoods “Krona”
The products of this company use candle-shaped “minion” incandescent lamps (E14 base) with a power of 25 Watts. The use of products with other parameters is prohibited. To access them you will need to remove the grease filter. Closer to the rear wall you can see sockets into which one or two lamps are screwed (depending on the model). To replace a burnt-out light bulb, you will need to unscrew it and then screw a new sample into its place. At the end of the operation, the aluminum filter is installed in place.
Maunfeld devices
When replacing lamps in Mountainfield hoods, you should distinguish between two types of models. In one of them, after disconnecting from the network, the light bulb is simply removed from the socket and replaced with a new one. For products from the Great range, you will first need to pry up the ring holding the lamp body with a flat-head screwdriver, and then carefully pull it out. After this, all that remains is to replace the lighting element and install the ring in place.
Devices from Lex and Elicor
Lex devices use halogen bulbs, which are noticeably different from other lighting products. When replacing them, the most important thing is not to touch the working surfaces of the lighting elements with your hands, since they then quickly fail. The same procedure applies to hoods of the Elicor brand, in which halogen products are also installed.
https://youtube.com/watch?v=wXo6pywQZiA
Popular models
Why is embedded technology so in demand? First of all, thanks to its compactness and the possibility of camouflage in any interior .
Reviews of Krona built-in hoods confirm the quality of this equipment. The average cost for them is about 3-6 thousand rubles. The model range includes built-in hoods Krona 60 cm and 50 cm. Compact hoods Krona 50 cm can be mounted in any wall cabinet.
A built-in Krona 60 cm hood with electromechanical control with a capacity of 320 m3/h will cost about 3.6 thousand rubles. A compact model with a glass visor, gaining power up to 450 cubic meters, is estimated at 4-5 thousand.
Built-in hoods Krona Camilla 600 mm are especially popular. These are telescopic models that begin working when the retractable panel with a grease filter is opened. Controlled by push-button switches. The average noise level, like the maximum power, depends on the number of motors. The capacity of the Kron Camilla 600 hood with 2 motors reaches 550 cubic meters per hour. Noise level – up to 56 dB. The cost of this model is from 9 thousand rubles.
Variety in prices and operating parameters is also typical for Krona dome hoods. For 5.5 thousand rubles you can purchase a Krona 500 mm hood made of white steel with a maximum capacity of about 390 cubic meters per hour.
Dome-type hoods from this manufacturer can also reach a capacity of 650 cubic meters. The cost of a Krona 500 kitchen hood with such performance indicators can reach 14 thousand rubles.
Oversized Krona 90 cm hoods will cost about 10.3 thousand. We also recommend paying attention to Krona Diana hoods: unlike other dome models, they have exquisite rounded shapes. The width of this Krona hood is 60 cm, maximum power is 450 m3/h. The average cost is about 7.5 thousand rubles.
Kitchen hood lighting. Electrical problem.
I have already appreciated the advantages of using LED lamps by installing LED lamps and lamps throughout the apartment, and the last 2 25 W halogen lamps were left only in the hood in the kitchen, so I decided to replace them too. Replacement bulb in cooker hoods Cata. Replacing a light bulb usually does not present much difficulty even for non-specialists. But not everyone knows how to change a light bulb if it is installed in a hood, spotlight, microwave or refrigerator. And replacing a burnt-out light bulb in a regular lamp requires compliance with certain rules. Whatever light bulb you choose, sooner or later - in a month or ten years - it burns out and needs to be replaced. The question of how to replace a light bulb in the backlight is worrying, but in reality it’s easy to do it yourself, you don’t need to call anyone for help. If you know how to change a light bulb in a hallway or room, you can do it at the hood. The video shows how to replace diode lamps on an Aliot PS hood from the specialized Shindo brand.
Causes of failure
LED lamps are the most economical and durable.
The main reasons for lamp failure include:
- expiration of service life;
- breakage of the switch;
- electrical wiring problems;
- contamination and moisture ingress;
- short circuit in the power supply or break in the connecting contacts.
Each of the listed cases requires a special approach that will help eliminate the malfunction. Sometimes you can do this yourself, but in most situations you will need the intervention of a professional electrician.
How to replace a light bulb on a hood, refrigerator, oven, or sewing machine
A short circuit could occur. Visually inspect the wires. If no external damage is found, test the power lines with a multimeter to find the location of the short in the hidden wiring.
Perhaps you have incorrectly divided the network load between other household items, or faulty equipment is connected to the network.
There are several options to solve this problem:. There may be a fan turbine installed in the hood. Because of this, the voltage becomes insufficient and the light does not work. If dirt or moisture gets on the backlight source, it must be unscrewed, cleaned, and wait until it dries. After that, return it to its place. If the light does not work, there is another reason. If the lamp socket burns out, you need to check the tongue that transmits voltage to the base.
Often it is he who burns out. But there may also be other problems with the cartridge:. In the first case, we bend the cartridge to return it to the correct position. In the second we just clean it.
In the third we repair connections. If you are not very tech savvy, it may be easier to install a new switch. If you know how, try cleaning the switch contacts. The replacement process may differ depending on the type of structure, as well as the light source.
For example, in a Shindoo model hood:
Note. If you install halogen, do not handle it by hand.
Sweat left on the light bulb will cause it to burn out quickly. Use a dry cloth or napkin. Replacing a light bulb usually does not present much difficulty even for non-specialists.
But not everyone knows how to change a light bulb if it is installed in a hood, spotlight, microwave or refrigerator. And replacing a burnt-out light bulb in a regular lamp requires compliance with certain rules. If a light bulb in your home lighting fixtures has burned out and needs to be replaced, then first of all you should purchase a new one.
It is necessary to install a lamp of the same power and the same type. The light bulbs installed in the luminaires have maximum power limitations. Usually it is 40 W. This value cannot be exceeded, since the sockets and wiring in the lamp may fail.
Having found out what type and power the burnt light source in the chandelier or lampshade is, you need to clarify the type of base, after which you can purchase a new light bulb. If difficulties arise in determining the parameters of a burnt-out light bulb, you can simply dismantle it and take it with you to the store as a sample. If the bulb appears to have burst or crumbled when unscrewed, the remaining part of the incandescent lamp can be unscrewed from the socket by grasping the edge of the base with pliers or pliers.
When replacing an incandescent lamp in a chandelier hanging overhead, do not look at it. This will protect your eyes from splinters if the bulb bursts. To avoid accidentally cutting your hands, you need to wear gloves or wrap the lamp in a napkin. If an energy-saving light bulb is installed in the lampshade, then it must be unscrewed by holding it by the base, and not by the fragile glass tubes, which can easily break.
Inside these light sources there are vapors of mercury compounds that are very harmful to health. When replacing halogen lamps, they should not be handled with bare hands. Fatty fingerprints will cause local overheating of the flask and its destruction. Therefore, before working, be sure to wear gloves. Waterproof lamps are usually installed in the bathroom
When dismantling the lampshade, care should be taken not to damage the insulating elements. It is necessary to provide a place where you can put the removed lamp and tools during work.
After replacing the burnt-out light bulb, the lampshade is installed in place so that vapors and moisture cannot get inside the device. How to change a light bulb in a suspended ceiling if it is equipped with spotlights?
DIY repair
To replace the granules in the carbon filter, the air intake grille is carefully removed. Immediately behind it is a carbon purifier. The used granules are removed, and new ones are poured inside. If the carbon cleaner is not dismountable, it is simply replaced with a new one. Replacement process:
Be very careful when disassembling the device
- remove and place the air intake grille “face down” on the table;
- disconnect the old cleaner;
- carefully lay the new filter;
- install the grille in place.
If a light bulb burns out, it is replaced with a new one of the same type. If your new kitchen hood light still doesn't light up, then the problem is with the switch. One of the wires “comes off”, so the light in the kitchen hood does not work. If the halogen bulbs do not light up, the cause may be a burnt-out transformer in the device housing.
Reasons why the hood does not turn on:
- Lack of electrical connection. In this case, check whether the socket plug is firmly installed in the socket. If there is no voltage there, check the electrical panel to see if the circuit breakers have turned off. If necessary, replace blown fuses. If everything is in order with the fuses and circuit breakers, check whether there is power at the terminals of the exhaust device and whether the cord and plug are working properly.
- The switch button is faulty. A tester checks the switch and replaces it if it breaks.
- The power plug is faulty. Check and replace the plug.
- Fuses blown. Often the built-in fuses in the plug or connecting device blow out. Once the fault is confirmed, they are replaced with new ones.
- Internal damage to electrical wires. The tester checks the serviceability of the wiring located inside. If there are bad contacts, they are removed with pliers, crimping the tips, and tightened with screws.
If there are no problems with the lighting and the electric motor does not start, check the button block. Sometimes the common contact on the very first button burns out, which leads to the fact that none of the three speeds work. You will have to completely install the unit or resolder the burnt contact connection. To strengthen the soldered contact, a previously stripped wire is attached and soldered to it. If contact is lost in the connectors due to constant and strong vibration, then they are re-tightened.
If you doubt your abilities, contact a specialist
Exhaust device
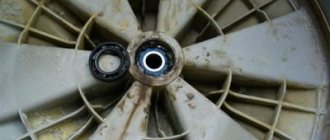
It will be much easier to troubleshoot a kitchen hood if you become familiar with its structure. Traditionally, this device works on the principle of an exhaust fan. The main element is the electric motor, which powers the entire system. The motor rotation speed is continuously controlled using different methods. A fan is installed on the engine, which can be axial or tangential.
Axial fans are familiar to everyone - ordinary blades, like any propeller. Air is drawn into the system using these blades. A tangential type fan has many blades located at equal distances from each other. Thanks to this shape, a very powerful centrifugal force is created, which pushes the air out.
In addition to the engine, hoods have a number of structural elements:
- grease and carbon filters;
- air intake grilles;
- exhaust ventilation grilles;
- switches and switches;
- lighting lamps.
After turning on the hood, the fan starts working. It sucks air from the space above the hob. This air flows through the air intake grille to the grease filter. Then everything depends on the type of hood. In an exhaust-type device, air is discharged outside through a special air vent. If the hood is of the filter type (hood without exhaust), then the air enters the carbon filter, where it is cleaned of odors and returned back to the room.
Main characteristics
Dome hoods are voluminous and quite massive. Their shape can be smooth, almost round - like a hemisphere, or consist of four inclined planes. The large volume allows you to place several filters and powerful fans inside.
There are two methods of air purification - flow and recirculation. In flow mode, the hood is connected to an air duct leading outside or to a ventilation shaft in the house. In recirculation mode, the air is cleaned by filters and returned to the room. Such a device can be installed in a kitchen with forced ventilation. Most dome hoods operate as flow-through hoods. Combined models are available.
The devices can be equipped with the following filters.
- Fat-absorbing. They are installed externally and can be removed if necessary. Experts advise regularly removing excess fat from them using detergents.
- Coal. These filters are built-in and located inside the device. Absorb fumes and neutralize food and burning odors. From time to time they need to be replaced with new ones.
The main indicator of the efficiency of a hood is its productivity. It is measured by the volume of air that the device can pass in an hour. This indicator has nothing to do with power, which is determined by the amount of electricity required to operate the device. It is believed that the highest performance is found in flow-through hoods that do not have carbon filters installed.
An approximate calculation of the required productivity can be made using the formula:
(x•y•z) •1.3•12
(x•y•z) – volume of the kitchen (product of length, width and height); 1.3 – coefficient that takes into account circumstances that reduce the performance of the device; The air in the kitchen must be renewed 12 times per hour according to sanitary standards.
Other parameters that will help you decide on the choice of device are also useful to know.
- Control method - mechanical or touch. Mechanical is provided in inexpensive models - these are buttons or sliders. It is not always convenient to remove dirt from them, which interferes with work and spoils the appearance of the hood. More expensive ones are equipped with displays and remote control.
- Number of engines. In standard devices with a width of 60 cm, 1 motor is installed. A hood with a width of 90 cm or more can be powered by two motors. But this will increase not only its productivity. Electricity consumption and noise levels will increase.
- It is better if the sound of the operating device is not louder than 45-50 decibels. This is sometimes achieved by installing two less powerful engines instead of one, which can negatively impact performance. The noise level of cheap models approaches 60 decibels.
- Indicators of filter contamination are printed on the filter or displayed on the housing in the form of light bulbs. You should not ignore their signals: this will greatly reduce the performance of the device and increase the load on the engine.
- The presence of an anti-return valve will prevent air from flowing from the ventilation shaft into the apartment when the hood is turned off.
- Backlighting and a timer will make using the device more comfortable: automatic switching on and off, operation in a pre-programmed mode, and the use of halogen lamps are possible. Incandescent or fluorescent lamps can also be installed.
- The width of the hood should be equal to the width of the stove or hob. Standard sizes are 50, 60 and 90 cm, but wider or narrower models are also available.
The surface of metal devices can be enameled or powder coated. The most durable coating is spraying, especially if the hood is colored. It turns out a beautiful polymer layer. The enameled surface is easy to keep clean, but its appearance is inferior to other materials. Plastic is a cheaper material and also allows you to experiment with shape and color. However, it breaks down faster.
Wood and tinted glass also create unusual surfaces. They are often used together with metal structures - this extends the life of the device. Hoods finished with these materials look stylish and can become one of the accents in the kitchen interior. But surfaces made of these materials require careful and careful care. The smallest stains are noticeable on glass, especially dark glass.
How to replace a light bulb
The replacement process may differ depending on the type of structure, as well as the light source. For example, in a Shindoo model hood:
- Open the hood cover. If you can’t do it with your hands, pry it off with a knife or screwdriver.
- Just take out the lamp.
For the Ariston brand, you need:
- Remove the lamp. To do this, press the clamps on the back of the lamp.
- Remove the lamp cover.
- Unscrew the old light bulb and install a new one.
- Return the lid.
- Return the lamp to its place.
If you are using fluorescent lamps, replacement will proceed as follows:
Turn off the lamp. Remove the grille or filter to expose the bulb. Remove the fluorescent panel by grasping it with your hands and turning it around its axis 90 degrees
The direction doesn't matter. Pull the fluorescent towards the light fixture. Install the new one by turning it 90 degrees around its axis
The direction doesn't matter.
Remove the grille by pulling the special latches
Pull the fluorescent towards the luminaire
How to change an LED light bulb in a hood?
The principle of replacing an LED is slightly different:
- First of all, remove the corkscrew ring, which is installed along the diameter of the case, as shown in the photo.
- Pull this ring to remove the LED. It is necessary to hold the base.
- We install a new one.
- Return the ring to its place.
— I purchased a pair of light bulbs with a G4 base of 12 Volts and a power of 1.8 W.
— I removed the lamp housings from the hood, disconnecting them from the power connector.
— I disassembled the lamp body and replaced the halogen lamp with an LED lamp.
— I collected and put everything back. Everything took 10-15 minutes.
Note. If you replace halogen lamps with LED lamps, you will also have to replace the transformer, because Their transformers are different. If this is not done, the lamps will hum when turned on.
At the moment, I have not solved this problem yet, but I will deal with it in the near future.
Types of malfunctions and ways to eliminate them
When the kitchen hood does not work due to poor and weak draft, first of all you need to check the filters; they can be clogged with dirt and grease deposits. Wash the mesh filter, change the carbon filter - and the device will work normally.
Plastic windows and doors installed in the kitchen cause the room to be completely sealed. When the hood is turned on, air does not flow into the room, which means a vacuum is created, which interferes with the normal operation of the device. The situation can be corrected simply by opening a window or door.
If a flow-type hood is installed in the kitchen, then the reason that it draws weakly may be the inoperability of the ventilation duct in the house. During long-term operation, the ventilation shaft becomes overgrown with cobwebs, dust, dirt, birds and small rodents get into it and die there. Thus, its cross-section becomes smaller, and the thrust decreases accordingly. You can check this by holding a lit match or lighter to the ventilation grille. If the flame of the fire deviates strongly into the ventilation duct, it means that it is clean, and you will have to look for other causes of hood malfunctions. If the flame is directed upward, it means that the ventilation of the house is clogged.
This problem is solved in two ways:
- The air duct from the hood is led out into the street, breaking through the wall of the apartment or house.
- Clean the ventilation.
Lights won't turn on
A good kitchen hood is a device with lighting, which is often used to illuminate the work area. Therefore, manufacturers supply the device with powerful lighting elements. It happens that the backlight stops working. The reasons for this situation include:
- The light bulb has burned out and needs to be replaced with a new one.
- The socket does not work or the machine is knocked out.
- Low voltage in the network. Checked with an indicator screwdriver. A decrease in voltage is also the reason for the slow rotation of the electric motor and a decrease in the efficient operation of the device. It will simply weakly suck in polluted air through the air intake panel.
- The power cable is faulty, which is checked for resistance with a multimeter.
- Break in the electrical circuit inside the device.
Using the method of elimination, you need to find the cause, and then move on to repairing the hood. But, in most cases, it is the light bulb that burns out.
The fan does not spin, the backlight does not light up
In this case, first of all you need to check the socket, circuit breaker and power cable. If these elements are working properly, you need to ring the electrical circuit.
- The fuse is checked for its integrity.
- The on and off button is tested with a multimeter. Sometimes the first contact burns out, which just needs to be cleaned and degreased with alcohol.
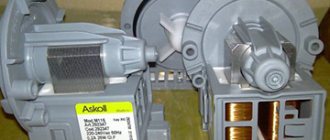
- The capacitor is visually examined. If it is not swollen, then it is tested for resistance with a multimeter.
- And the last one in the chain is the electric motor. It’s bad if its winding burns out. It is necessary to disconnect the motor from the circuit and ring each winding separately. If this reason is discovered, then you will have to take the hood to a workshop and repair or change the electric motor. It’s better to change it – it’s more reliable.
The fan makes noise when rotating
The fan must rotate quietly - this is the main requirement for the operation of the hood. And if extraneous noise is heard, then there is only one reason - poor quality assembly of the device at the factory. Chinese models are guilty of this; European ones are of higher quality.
You cannot solve this problem on your own. You can disassemble the hood and understand the reason, but there is always a chance that some component or part may break, causing the device to crack more. And there is no guarantee that after repair the fan motor will work normally, without noise.
The only thing you can do is check the quality of the fasteners to the wall. Sometimes this causes extraneous noise from the device during operation. It is necessary to tighten the fasteners, and if necessary, place a piece of foam rubber between the hood and the wall.
Natural ventilation at home
What is this ventilation system? Essentially, this is a complex of air ducts in a private house or a system of shafts in an apartment building, in which there is one main riser stretching from the basement to the roof. It is this that creates the draft due to the temperature difference between indoors and outdoors. And the greater this difference, the stronger the hood works. Let's add wind perpendicular pressure like cross sections. This is when the wind blows in a horizontal direction relative to the riser, and it pulls air from the ventilation with it. That is, air is sucked out of the premises naturally, and not with the help of additional equipment such as a fan.
Of course, in such a system there must be an air flow so that a vacuum does not form inside the house or the draft does not decrease. Therefore, vents are left in the foundation or holes are made in the floor of the first floor.
Replacing light bulbs
Whatever light bulb you choose, sooner or later - in a month or ten years - it burns out and needs to be replaced. The question of how to replace a light bulb in the backlight is worrying, but in reality it’s easy to do it yourself, you don’t need to call anyone for help. If you know how to change a light bulb in a hallway or room, you can do it at the hood.
- Disconnect the device from power.
- Remove the grille or open the shade to get to the lamps.
- Remove the burnt out lamp and replace it with a new lamp.
- Turn on the electricity and check how the backlight works.
A hood light will decorate the kitchen; its light will beautifully highlight the food being prepared and add variety to your cooking.
Security measures
Before carrying out work, turn off the electricity supply to the house. If the electrical wiring is incorrectly routed, a wall switch may open not the phase but the neutral wire, which will lead to an electric shock during removal and installation.
The work site must be convenient and safe. You cannot change the lamp on unstable benches and stools; for this you should use a high-quality factory stepladder. All procedures must be carried out very carefully so as not to damage the ceiling, the lamp itself and its wiring.
Thus, replacing light bulbs in suspended ceilings and spotlights is not as difficult a job as it seems.
The hood works, but does not eliminate odors
If there are still foreign odors in the kitchen when the hood is running, then most likely the problem is in the filter. The efficiency of the hood decreases if it is not replaced (not cleaned) in a timely manner. For example, the carbon filter located immediately behind the air intake grille must be replaced approximately once every 3 months. This type of filter can be dismountable, in which case only the carbon granules are changed (photo on the left).
Disposable grease filters (paper and fabric) must also be replaced. They are not restored and cannot be washed. But metal mesh structures need regular cleaning (they can even be washed in the dishwasher - approximately once a month).
If you are sure that the problem is not in the filter, then you can solve the problem as follows - increase the operating time of the device, turning it on a few minutes before turning on the burners and turning it off a quarter of an hour after the stove is free.
Features of forced ventilation systems
Today, it is possible to ensure the flow of purified air into rooms through several mechanisms. Ventilation in the house can be supply and exhaust (these are single installations that do not require additional equipment), dial supply, exhaust, or through the operation of a duct air conditioner.
If the room has metal-plastic windows that block the access of fresh air, ventilation must be ensured by installing special valves in the window profile.
According to the recommendations of experts, it is supply and exhaust systems that can provide the best ventilation of home premises. This design is a system consisting of a fan (a noise-insulated housing reduces the volume of its operation), an automation module, as well as special filters and sensors that affect the quality of operation.
When such a system is turned off, cold air does not enter the room, since a special damper in the housing prevents its further spread.
Thanks to the operation of supply and exhaust systems, it is possible to provide comprehensive air purification in the room. Some varieties of such structures allow you to warm the air if necessary.
Attention! The cost of fans of this type will directly depend on their performance. For small rooms, fans of 150 cubic meters per hour are suitable
The maximum power of forced hoods of this type is about 750 cubic meters per hour
A standard forced air hood includes one fan, so it is ineffective in rooms with large parameters. However, in small rooms it can easily cope with the processes of air purification and removal of harmful substances.
The stacked supply ventilation includes similar elements, but they are not mounted in a common housing. As a rule, the fan, filters and other components of such systems are placed separately.
The average capacity of such a ventilation system can vary significantly, from 80 to 7 thousand cubic meters per hour.
Another method of ventilation - duct-type air conditioners - do not have high performance indicators. On average, they will help purify about 20% of the air in the room. Additional filters, as well as heating blocks, will help solve some of the difficulties associated with their operation.
You can increase the efficiency of forced ventilation systems by constructing an attractive structure directly in the window area. Supply valves are mounted in the window profile, and fans and humidity sensors are installed in the shafts. As humidity levels increase, the built-in fans will automatically turn on and the air in the room will be purified. Through valves installed in the windows, fresh air will enter your home.
Important! The only negative property of such systems is the lack of ability to regulate the temperature of the air coming from the street during the hot and cold seasons.
There are no clear criteria determining which type of forced exhaust hood is best placed in a house or apartment.
But if you want to get an effective result, follow these recommendations:
- for 1- and 2-room premises, hoods with a capacity of 200-300 cubic meters per hour are sufficient;
- in apartments with a large number of rooms, the productivity of such a hood should be about 350-500 cubic meters per hour;
- static pressure indicators for apartments with 2-3 rooms should exceed 400 Pa.
It is worth noting that the installation and operation features of such hoods may differ depending on their purpose.
Let's talk about how to connect a forced ventilation system in rooms where this approach is considered the most common - in the bathroom and kitchen.
How to repair a broken hood in the kitchen, based on specific manifestations of the malfunction
So, now we intend to list possible faults one by one and tell you how you can repair a broken hood with your own hands.
Backlight does not turn on
For many, the hood plays the role of a fairly economical lighting device.
If the hood light does not turn on, perform the following steps one by one:
- Check to see if the light bulb is burnt out and replace it if necessary.
- Make sure the entire unit is working by turning on its fan.
- Use an indicator screwdriver to check if there is voltage in the power outlet. If there is voltage in it, make sure that the electrical cord is not damaged and that the RCD is in good working order. Using this method of exceptions, you will certainly be able to identify and eliminate the cause of the problem that has arisen.
Weak draft created by the hood
This malfunction is the second most common. With her, things are much simpler. If you notice poor draft, you just need to check whether the grease traps are dirty. Clogged filters are most often the cause of poor draft.
If necessary, the filters can be cleaned. Performing this operation is quite simple, and you can verify this by watching the video instructions below.
Another reason for insufficient hood draft may be poor operation of the ventilation ducts, where the draft can be checked using a lighter.
If the lighter flame does not deviate, then you will have to install forced ventilation.
The hood does not respond to pressing any buttons
This situation is more complex than those previously described. What should you do to repair the much-needed hood in your kitchen? First you need to check the integrity of the cord and the functionality of the RCD. If this check did not reveal any malfunctions, you should arm yourself with a tester and test the electrical circuits.
In addition, after looking at the hood diagram, you need to find the location of the fuse and, if necessary, replace it. If the fuse is working, you need to check the functionality of the capacitor, the condition of which sometimes causes the hood to malfunction.
Fan noise
The noise produced by the hood during operation may be due to poor build quality. If your unit belongs to a trustworthy brand, then we can talk about the quality of its mounting on the wall, since even a small gap can cause unpleasant noise. To correct this problem, tighten the fasteners with more force.