What is the button on the lid of the thermos for?
Relieve steam pressure in thermos
.
Sometimes, when there is a lot of food and it is very hot, during the day the steam from the inside presses the lid
and it is difficult to unscrew it... you press the
button
, the rod on the spring is pressed inward, excess steam comes out through the opened hole and the lid is unscrewed more easily.
Interesting materials:
How to advertise on Kufar? How to say my birthday correctly? How to speak Russian correctly or speak Russian? What is the correct way to speak in a post or in a post? How to search on Pinterest correctly? How to search on Pinterest? How to use hashtags on Facebook correctly? How to write a synopsis for a film? How to write an autobiography for admission to a military school? How to write a child's biography correctly?
Causes
The reason that a thermos (thermal mug) has a tightly screwed lid is a decrease in pressure inside it. Due to this difference, it becomes very difficult to open it. To solve the problem, you need to press the valve in the lid to equalize the pressure and calmly open it.
At the moment when hot liquid is poured into the thermos, the metal thread expands and fits tightly to the base, creating a vacuum. As a result, the lid fits tightly to the thermos, and it becomes very difficult to open it.
Simpler design
Let's say you only have a 0.5 liter bottle. Wrap it in foil. We put on two down socks or wrap them in a woolen scarf. We put on a black plastic bag and cover it with tape. The result will be a thermos from the “better than nothing” series.
What is needed to make a thermos
- For the first design:
- A pair of plastic bottles (0.5 and 1, or 1.5 and 3 liters);
- Aluminium foil;
- Insulation (see above);
- Scotch;
- Scissors;
- Preferably a knife.
- For the second design:
- Bottle 0.5 l;
- Two down socks or a wool scarf;
- Black package;
- Scotch;
- Scissors.
- "Thermos" from a flask
If you have a small flask for alcoholic drinks, then in winter it can serve as a good thermos. The volume of such flasks rarely exceeds 250 ml. However, when thirst overcomes, even a glass of water can significantly alleviate your situation.
Pour warm water into the flask, but not boiling water, so as not to get burned. We put it in a shirt or vest pocket with many pockets. We put on a sweater and a winter jacket on top. Thanks to its flat shape, concealed carrying does not pose any particular problems. The water temperature will always be equal to your body temperature, which is very good in the cold season. You won't be able to get warm, but you'll quench your thirst easily.
We found out that making a primitive thermos at home is not so difficult, but such designs are significantly inferior to industrial designs in terms of heat-insulating properties. It is advisable to make them only if it is not possible to purchase a factory product.
Every fisherman in cold weather while fishing dreams of hot tea or coffee to warm up a little, but it often happens that there is no hot water at hand due to the lack of a thermos. In a thermos you can keep not only hot liquid to keep you warm in the cold, but also cold liquid to enjoy cold water in the summer heat. In this article we will talk about how to make a thermos at home, using only available materials.
How to prevent such situations
So that you do not have to resort to extreme measures, you should not leave a thermos with boiling water for a long time. Use the prepared drink as directed within 8-10 hours. And then you will not have problems opening the thermos.
Naturally, before adding new liquid, rinse the thermal vessel thoroughly. Wash the flask and stopper separately. This will prevent its different parts from sticking together. It is worth remembering that the manufacturer prohibits placing some models in the dishwasher. Before using a thermos, carefully read the instructions for it.
Odor appears
No surprises: foreign odors arise in containers due to the products that are stored in them. Despite the fact that the inner surface of the thermos is made of materials that do not contribute to the accumulation of sediment (glass, stainless steel, etc.), it still forms over time.
A completely new thermos can also smell, which is due to the coating. When leaving the factory, the inner surface of the flask can be treated with a special composition that retains the properties of the coating during long-term storage of the product.
Finally, elementary mold may form in the container. The mechanism of this phenomenon is simple:
- You poured your favorite drink into the thermos;
- We went fishing;
- We came home tired, forgot to wash the thermos and put it in the closet;
- Six months later, when getting ready to go fishing again, we took out a thermos and discovered an unpleasant surprise in the form of a colony of fungal formations with a specific odor.
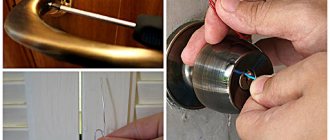
Opening methods
Safe and effective methods for opening the lid are to cool or heat it. Using a bottle opener or knife can also help solve this problem, but may damage the thermos.
Method one (under cold water)
This method is suitable for thermoses with external threads. The essence of the method is to place a thermos under cold water to cool. This way the metal thread will begin to narrow, fitting less tightly to the flask, and it will become much easier to unscrew the lid.
Method two (under hot water)
Thermoses with a cap with an internal thread must be placed under hot water. When heated, it will expand and fit less tightly into the main part of the thermos.
We use physical force
Using physical force, you can also open a tightly screwed cap. The best way to do this is to pull the lid up.
We use a bottle opener
If the cork is flat, you can try to pry it off with a bottle opener. This will break the vacuum that has formed inside the thermos and will make it easy to unscrew.
Important! This method should be used very carefully so as not to damage the integrity of the dishes.
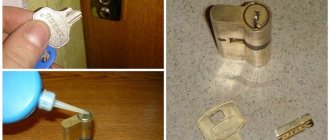
Special devices
You can also make your own special device for opening threaded lids. To do this you will need the following materials:
- rubber;
- fine-grain sandpaper;
- long bolt with nut;
- two wooden planks 20-25 centimeters long.
First, you need to make through holes in the planks of such a diameter that you can easily place a bolt in it.
Next, glue strips of sandpaper onto the planks and thread the bolt into the holes, securing it with a nut. In this case, the sanding strips should remain inside the device, and the free edges of the strips should be connected to each other with an elastic band.
Using this device is quite simple: you need to adjust the size of the opener to the diameter of the lid using a nut. Place the structure on it and carefully turn it. Sandpaper provides a tight adhesion to the metal cover, which greatly facilitates the unscrewing process.
other methods
There are several additional ways to open a thermos:
- Wrap the lid with electrical tape and pull it firmly in the direction of the thread;
- Use leather gloves when opening (the code fits tightly to the metal without causing slipping);
- Knock on the lid and walls;
- Try to pry it with a knife, this will break the vacuum inside, and it will be easier to open the thermos.
Recipes
As a rule, a thermos is usually used for long trips or for outdoor recreation. Most often, this container is purchased specifically for brewing tea. Which one to cook is a purely personal matter. The only thing is that in the cold season it is customary to use black varieties, and in the summer – green ones.
A tea ceremony using a thermos also takes place, because there are a huge number of recipes for this brewing method. At first glance, preparing ingredients may seem difficult, but in reality it is not.
Fragrant herbs: lemon balm, thyme, mint, medicinal herbs, lemon, ginger and many other components - all this will be an excellent basis for creating a chic bouquet of aromas that will unfold in a thermos.
Tea with lemon in a thermos
To prepare, you need to take lemon, sugar and dry brew of your favorite tea. The use of ginger in this recipe will be very tasty.
If you do take this root, then the step-by-step preparation will look like this:
- put finely chopped ginger in a thermos and pour boiling water over it;
- after a few minutes, add a portion of the selected type of tea;
- Add a few unpeeled but pitted lemon slices after five minutes;
- let the tea brew for about an hour and then pour into cups.
Tea with ginger in a thermos
Ginger is a wonderful tropical root vegetable that helps cope with colds, lose weight, has a beneficial effect on the digestive tract and many other beneficial properties. will help you gain strength and keep warm in cold weather.
To prepare tea with this root in a thermos, you just need to grate half a medium-sized fruit or cut it into thin slices, put it in a thermos and pour boiling water over it. Let it brew for 40 minutes to an hour and you can safely enjoy the aromatic and healthy drink.
Since, due to the ether content, ginger is endowed with a very specific taste, jam, lemon, apples, rose hips and cinnamon would be appropriate in combination with tea made from it.
Tea with rosehip in a thermos
It is best to prepare this drink at night.
In a thermos - very healthy and tasty:
- pour boiling water over the thermal container;
- Pour 40-60 g of dry fruits into a container and pour a liter of mild boiling water;
- add 8 tsp. sugar (this amount).
By morning you have a drink ready to drink.
Questions, answers and life hacks
To keep a mug or thermal glass warm longer, do not pour too much liquid into it, but do not fill it halfway either.
Remember that after you pour boiling water into the thermal mug and close the lid, a dense layer of steam forms inside, which helps to “maintain” the temperature. After opening the mug for the first time, it begins to cool faster. If you carry coffee in your hand and slowly sip from it, it will cool down sooner than if you carried the mug with the valve closed the entire time. The cooling rate depends on the surrounding temperature. If it’s minus outside, the thermal mug in the outer pocket of the backpack will cool down faster than in the car.
My thermal mug is leaking! What's wrong and can it be fixed?
To prevent the thermal mug from leaking, do not fill it with boiling water to the very top and let it sit for a couple of minutes without a lid. Excess liquid and high temperature create increased pressure in the flask, the plastic parts are deformed, and the mug begins to leak.
I drink tea from a thermal glass, and it smells like yesterday’s coffee. But the glass was clean!
To prevent the thermal glass from bothering you with the smell of metal, plastic or drinks previously poured into it, choose a model with an internal ceramic coating. The aroma of coffee and herbal teas can linger on porous metal and plastic surfaces, adding an undesirable flavor. Another option is to use different utensils for coffee and tea.
I love takeaway coffee, there are several favorite places around the city. Which mug is right for me?
Opt for a low mug if you plan to pour coffee straight from the machine. In addition, you may not need a vacuum mug that holds heat for a long time - the coffee in it will be too hot if you are used to drinking it on the go.
Does the thermal mug keep the cold well?
Typically, thermal mugs keep food and drinks cold longer than hot. Therefore, they can be used as containers for transporting chilled products, such as ice cream.
Is it possible to take a thermal mug on board an airplane?
At pre-flight inspection, the thermal mug must be empty, but you can fill it with your favorite drink before boarding the plane, in a cafe.
For you
All rights to materials posted in the women's online magazine “Kleo.ru” are protected by copyright and related rights legislation. Materials from the women's portal cannot be used without an active link to the source "Kleo.ru". The editors are not responsible for the content of advertising materials on the women's site. The user of the kleo.ru website guarantees that the placement of materials submitted by him does not violate the rights of third parties (including, but not limited to copyrights), and does not damage their honor and dignity. The user of the kleo.ru site, by sending materials, is thereby interested in their publication on the site and expresses his consent to their further use by the owners of the kleo.ru site.
Certificate EL No. FS 77 - 74583 dated 12/14/2018
Editorial address: Samara, Turgenev lane, building 7, office 74.
Thermoses are gaining great popularity today, becoming an indispensable attribute in almost every family.
But it happens that the lid of the thermos is tightly screwed on and it becomes almost impossible to open it. We will look at what needs to be done to solve this problem in the article.
Flask repair
If the thermos no longer holds heat, it means that something is wrong with the vacuum between the inner and outer containers. Glass flasks that are cracked in at least one place cannot be repaired. The fact is that a crack is a defect that begins to let air through. Its width is much larger than the atoms and molecules of air that make up the atmosphere. They pass freely even through microcracks, filling the vacuum to normal atmospheric pressure in a maximum of a few hours. The thermos is heated from the outside to a warm state, since air, unlike a vacuum, conducts heat.
If you are repairing a steel thermos with your own hands that has lost its vacuum due to a hole, then do the following:
Drill a hole in the bottom and solder a metal capillary tube into the hole. It is advisable to take copper, these are produced for repairing refrigerators and air conditioners. Steel is soldered using zinc chloride or another soldering flux - the solder spreads smoothly over it, not to mention the soldering of copper.
Pump up air using a car or refrigeration compressor. Do not exceed a pressure of 2 atmospheres.
Find and solder all defects in the case. If the inner flask is damaged, then it is difficult to repair a narrow-necked thermos - using a soldering iron in a narrow space is extremely inconvenient. It is impossible to pour sour and salty drinks into a thermos sealed from the inside, as well as to store, for example, canned food in an open jar: tin and lead react with acids, turning into salts that are poisonous to humans. This thermos is only suitable for water. If the defect is external, but the flask is intact, then use the thermos as before the breakdown.
Evacuate the air. Use a pressure gauge to see if the pressure in the interwall space increases after the compressor stops. If so, then the breach is not sealed properly. If not, then leave the compressor and thermos under vacuum for several hours.
If there is no vacuum leak, air is not sucked in, then the gap is sealed properly. Bend the tube, squeeze it, for example, using wire cutters, walking them over an area a centimeter or more long. Bite off the excess end, leaving a fold. Air will begin to be sucked in through the micropores of the bend. Before the vacuum is seriously disrupted, solder the bend and cut of the tube. You need to act quickly - use flux so that the solder instantly spreads over the cut end and reliably seals the place where the tube is bent and cut, until the air completely displaces all the vacuum.
Bend the tube closer to the bottom. Solder an opened tin can without a lid of a similar diameter to the body on top. This will protect the suction tube from damage, allowing the vacuum to be maintained.
The thermos has been restored and you can continue to use it.
Making a plug
Sometimes, when the original mechanism fails, people have a question: how to make a stopper for a thermos with your own hands? For this you will need:
- vice;
- aluminum foil;
- Styrofoam;
- cling film.
The easiest way is to bring an old cork back to life. It is enough to simply steam it, holding it in a vice, and keep it this way until it cools completely. Then you should wrap the plug in foil - this will save it from destruction under the influence of high temperatures.
And to make a new stopper (preferably before making a thermos with your own hands), you will need a piece of foam plastic. An element of the required size and shape is cut out of it, which is covered with cling film to prevent it from falling into the liquid.
If such a plug is pushed out by a thermos, then it will be enough to pierce it through with a syringe needle. It is advisable to make the hole in the center, otherwise the plug may become deformed.