When you come home, you want to put on slippers and home clothes so that your body can rest after a working day.
Today you can afford to buy slippers of different styles. But you can sew comfortable slippers yourself. There will be no need to purchase expensive material. All you have to do is find the pieces in your chest of drawers and prepare the patterns.
The step-by-step instructions described in the article will help you make original house slippers. They can simply be given as a gift.
Always needed, needed everywhere
Humanity invented shoes 30 thousand years ago. With the approach of cold weather, ancient people wrapped their legs with pieces of leather or animal skins.
In hot countries, hunters protected the soles of their feet from hot sand with the help of dense tree bark.
Since then, the materials for the production of shoes have changed, the style and cut have been improved, but this item of clothing has been and will be necessary at all times.
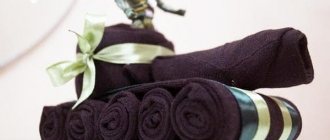
Bunny boots
This model is sewn according to the same principle as homemade ugg boots, but with the addition of decor in the form of bunny ears. You can sew them from fur, fleece and any other available materials.
Thin fabric for bunny boots needs to be strengthened - glued with special materials, quilted with denser fabric. The “bunnies” must keep their shape well, so that the soft ears stand out against the background of the boot and are “alive” and mobile.
Ear patterns are added to the main patterns. We cut out 4 parts from the fabric in the form of an elongated oval with an extension towards one edge, from which the auricle will be formed. In addition to the ears, you can decorate the boots with a tail made of the main fabric or a wool pompom.
If the boots are sewn with a lining, then the number of parts of the boot and toe is doubled. First, the upper parts are sewn together, then they are connected to the sole. The seam can be either external or hidden. It depends on the skill level of the needlewoman. The ears are sewn into the seam connecting the lining of the boot with the top.
In ancient Rus'
The nobility wore such shoes, and the peasants were content with bast shoes both in summer and winter. These products became the prototypes of modern boots and slippers.Russian boots had sharp, raised toes. These boots were called ostrogs. They were made from morocco, chrome, and yuft. They were embroidered with pearls and other precious stones.
Product assembly
The main fabric of this model is fleece with a brown pattern, the lining is the same, only gray. Insulation – thin padding polyester. The sole is anti-slip “foot” fabric.
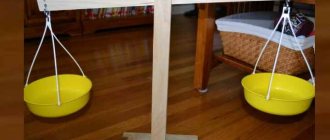
Sole assembly
Fold the layers of the sole in the following order: fleece, insulation, leather or anti-slip fabric. Stitch them together.
There are two ways to connect the sole to the main product: with seams outward or seams inward.
Processing with seams inside
The advantage of this treatment is a very neat appearance. Nothing is visible from the outside.
Negative aspects: due to the fact that thick seams are located on the inside, there is a decrease in space in the shoes and their size decreases. They can interfere with the foot when walking if the boot is not large enough.
The parts are connected as follows:
Important: the thickness of the sole layer is quite significant, so it is advisable to stitch this area manually or using an industrial sewing machine. A household machine may not be able to handle it.
Processing with seams facing out
The advantage of this treatment is that the foot in the boot is very comfortable, the thickness of the seams does not interfere with it.
Many models
They say that putting on shoes in a dream means happiness and wealth, but being barefoot means you will experience poverty. Not in a dream, but in reality, on the shelves of specialized stores nowadays you can find shoes of any model from flip-flops to over the knee boots: for work and leisure, sports and performances on stage.
Models advertise them on catwalks and on the pages of glossy magazines. But a photo of boots made with your own hands will be much dearer to your heart.
Working with the sole
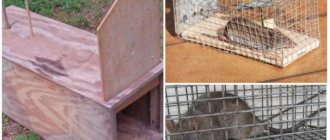
Before sewing slippers from old sheepskin coats, you need to take into account that the comfort and ease of use of indoor shoes largely depend on the functionality of the sole. This part of the slippers should be non-slip, warm and moderately hard. Of course, you can make it only from natural fur, but to create an additional thermal insulation layer it is best to use felt. The tops from old felt boots work well . If you don’t have them at home, you can buy thick shoe insoles at the market. Their size is adjusted to the sole, from which the excess allowance will be cut off.
The part must be attached to the workpiece before sewing the slippers; to do this, both elements should be glued together with waterproof glue. The composition should be applied along the edges and in stripes in the middle to leave space for ventilation.
It is recommended to take into account the property of felt to release small fragments of wool. To prevent home-made fur slippers from leaving debris on the floors, the insole should be covered with dark-colored cotton fabric.
Sole made from felt boots
From old to new
If you don’t find a piece of new thick fabric among the craft materials in your home workshop, then it’s not a problem.
Note!
Wood burning for beginners: tips and secrets for burning pictures
Plasticineography - interesting options for creating pictures from plasticine on cardboard for children
- DIY scrapbooking for beginners: what it is and how to do it. What you need to create a beautiful album or notebook (photo + video)
Disassemble old drape coats and suede or leather jackets that have become too small. This will be the material for your future creations.
This amount will yield not one, but several pairs of hand-made shoes. A pattern for making boots with your own hands can be made using patterns from old shoes or you can create it yourself.
To do this, you need to use a piece of cellophane or thin paper that will fit tightly on your leg. First, cut out the foot by tracing it with a pencil.
The side part and toe should be made by tracing the outline of the details of future products on paper or cellophane, applying it to your foot. Cut out the finished patterns, taking into account the allowance for seams, and transfer them to fabric.
Master class: house boots with felt soles
Today I want to bring to your attention a master class on sewing house boots. In addition, we will learn how to design the pattern ourselves and sew on the outer felt sole. So, let's begin!
We will need:
- fleece in two shades;
- a pair of felt insoles in your size;
- padding polyester;
- elastic band 2 cm wide;
- shoe threads;
- needle with a wide eye;
- a sheet of paper (in my case - A3);
- ruler;
- tailor's scissors;
- tape measure;
- patience