The problem of changing pants to a size smaller can arise for various reasons.
Firstly, the new thing may not fit your figure so perfectly. The non-standard figure of girls pushes them to undergo this operation in the pursuit of beauty. For example, height, fatness or thinness. Most often the length is shortened. Secondly, the product may stretch if washed incorrectly. Most often this is non-compliance with the temperature or spin conditions. The length or width of the trouser legs is altered.
Thirdly, my favorite thing became too big after losing weight. You will have to change the width of the trouser legs, at the waist, at the hips. Fourthly, the purchase was made under the influence of a moment of weakness. I liked the model, but didn't have the right size. But upon closer examination, it was decided to sew in or alter the product.
Fifthly, following fashion trends is not always affordable for fashionistas. And you have to resort to tricks. One such change is altering existing trousers. Or just change the model of your pants. Sixth, the trousers can fit well, except in some places. For example, flares, in the hip area.
Seventhly, abrasions or defects of the product could be discovered. Such services can be expensive in a studio. Therefore, it is better to stitch at home, provided you have minimal sewing knowledge.
How to sew pants by hand
Initially, you should decide in which directions you need to sew your trousers. So, you can sew in the length of the product (shorten), the width of the trouser legs themselves, along the hips (at the waist or along the entire length), remove flares, and adjust the waist.
It is necessary to stitch evenly from the side and from the step (internal) seam.
Sometimes you can do without a pattern. This applies to small adjustments to things. For example, changing the length, inserting small darts, narrowing the bottom of the trousers. And sometimes a pattern is required. This applies to adjusting clothing around the waist. The less you change, the easier it is to change.
Preparation
First, the product is washed. For example, cotton and wool shrink the product and can fit to size.
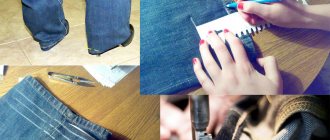
Then the trousers are ironed. This is necessary to prevent errors and irregularities. Trying on pants. Excess fabric is marked with pins.
It is always advisable to have chalk or soap on hand for marking, a sewing ruler, scissors, pins, thread, and a sewing machine. It is better not to draw with a pen or pencil, otherwise marks will remain.
Materials and tools
To reduce the size of your favorite pants, you need:
- needles;
- pins;
- strong threads;
- tailor's meter;
- scissors;
- a small piece of soap.
This procedure does not always require a sewing machine; you can do it manually. The craftswoman will need minimal skills. To sew in pants, an experienced person will need 30-40 minutes, a beginner - 2-3 hours.
There are suturing methods that use a sewing machine. With the help of such a tool you can easily “upgrade” any thing. In this case you will need:
- sewing machine with different threads;
- safety pins;
- needles;
- overlock;
- scissors;
- chalk or a piece of soap;
- tape measure;
- iron.
Trousers are a product with a complex cut that is not easy to alter, especially on the buttocks and hips. You should pay attention to the fact that it is better to make markings on the front side, and then transfer them to the back. This advice can be seen in all recommendations that describe how to sew pants properly.
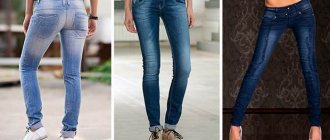
How to sew bell-bottom pants into straight ones
A flare is a slight extension of fabric onto items. The expansion can be smooth and large. It can start from the hip, knee, or mid-thigh.
Instructions:
- Initially, you try on your pants and need to twirl in front of the mirrors.
- The fit of clothes is examined from different angles.
- Excess fabric on the wrong side is marked with sewing pins or needles with knobs. It is recommended that someone do this to avoid curvature.
- We attach the needles with the point down so as not to prick.
- You can measure on both legs at once, but in the end they should be the same. Or then measure the processed one and transfer it to the second one.
- The product is carefully removed without touching the needles.
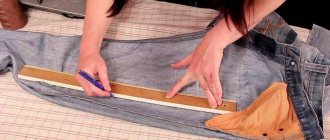
- The product is laid out on the table. The edges are aligned.
- First, all the work will be done on one trouser leg, then on the second.
- Using tailor's chalk, we mark with dashes the places marked with pins. If you choose a pen or pencil, you will have to scrub for a very long time.
- We take out the pins.
- Straighten the pant leg again.
- We draw a straight line.
- Mark a second line on the side seam 1-2 cm.
- We baste the seam along the first line.
- Try it on. Checked for measurement error, curvature, comfort.
- The thing is removed. Adjustments are made if necessary.
- Trying it on again.
- Excess fabric is trimmed.
- Ironed.
- The product is turned inside out if it was previously done on the front side.
- Levels out.
- The ends are processed separately or together. Preferably using a machine using a zigzag or machine foot.
- The product is stitched on a sewing machine. Ready.
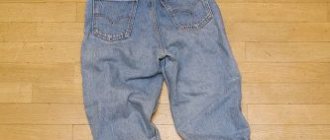
Model preparation
Before you start sewing jeans, you need to prepare the model for work. Pants can be hemmed not only from the bottom, but also in other places where it is necessary. If the goal is to narrow the item at the bottom, then the product is turned inside out and the bottom seams are ripped out, which are then ironed well.
It is worth noting that both women's and men's pants are sewn according to the same principle. The final result will depend only on the preferences of the person himself.
Note! The following life hack may help - before sewing in jeans at the waist, they should be washed at least once. This will prevent things from “settling” in the future.
Ironing things
Preparation for sewing at the hips consists of cutting the side seams (which are located higher), and to reduce the waist, the item is unzipped from the back. When ironing, special attention should be paid to the seams, so that later it will be easier to work with them. When cutting, it is important to be careful not to cut off too much or make a crooked line.
The following tips may be helpful when sewing:
- During work, you should try on the item several times to make sure there are no inaccuracies.
- If you have trousers in your wardrobe that match the required style, you can use them as a template.
- Don't rip your pants completely. Seams in the crotch area are quite problematic to sew on your own, especially for beginners.
- It’s worth specially purchasing strong threads if you don’t have them. Thin ones can tear at any moment, and all the work will be ruined.
- It is recommended to process the cut edges with an overlock or zigzag stitch, as denim tends to fray, and this will cause the item to suffer when worn.
You might be interested in this Basic rules for forming a chest dart
How to tape your trousers at home
There is nothing difficult in creating such beauty. Open the bottom edge (hem). Iron the product. Try on the pants from the wrong side. Spin around the mirror. Mentally estimate how much it needs to be narrowed.
Adjustment on one side is made subject to slight narrowing. Then it looks more practical (internal or external). Is there any decor?
Mark excess material on the material with pins. You have to be careful here. This may affect stretch fabric. The fabric will stretch a little and the stitching will be crooked. If the fabric is non-stretchy, your legs should fit comfortably into the pant leg. The main thing is not to overdo it.
- Remove carefully and spread on the table.
- Align. Draw a line with chalk along the marked areas. Draw a 2nd line for the seam.
- Baste with threads along 1 line.
- Try it on again and check the comfort.
- Adjust as necessary.
- Trim off excess fabric.
- Seal the edges.
- Machine sew trousers.
Adjustments on both sides are made under the condition of large narrowing. The same actions are performed, only on both sides at an equal distance. Otherwise it will be crooked. Finish hem and iron.
How to properly sew in the sides of trousers with your own hands
If the trousers are too large due to lack of volume in the hip area, then suturing can be done along the outer seam.
Instructions:
- Turn the product inside out.
- Try it on. Squat, walk around.
- The places to reduce how much are indicated with pins. Everything is distributed equally to avoid curvature.
- Draw a straight line with chalk.
- Manually sweep the marked areas.
- Turn it onto your face and try it on.
- Rip out the factory seam.
- Sew along the seam you have marked. For the entire length of the trouser leg, so that there are no distortions.
- Cut off the excess pop of the material and process the edges.
- Sew on the waistband and bottom edge of the trouser leg.
- Don't forget about the 2nd leg. Both should be the same length.
Sometimes the external seams are not touched due to decoration or other reasons. And they stitch along the inside line. This stitch is used for problems with the waist.
Instructions:
- The product is turned inside out.
- The excess is tried on and noted.
- The product is removed and placed on the table.
- The belt is separated. Cut in half from the back.
- Using a thread and a needle, a new seam is applied to the 2 halves of the item.
- The excess is trimmed and the edges are processed.
- It is being stitched.
- The belt is sewn on.
There are times when it is necessary to use internal and external seams. This applies to sewing up a couple of sizes, trousers with flares from the hip. Manipulations are performed as when sewing a side seam, only it is distributed over all seams.
How to sew trousers in a belt
There are several ways to make your pants smaller around the waist.
Stitching along undercuts
The item is tried on and how well the product will be sutured is assessed. Most often, excess matter will be reduced due to undercuts. Either the old ones are torn apart, or new ones are added.
The pants are ironed and then tried on. Excess fabric is marked on the trousers. The edges of the darts may butt up against the side seams, but avoid this. Otherwise, unsightly folds and distortion of the product are possible.
The harness and belt are unraveled. The necessary seams are basted. Excess is cut off. The darts are sewn using a sewing machine.
The belt itself is cut on the sides. Excess fabric is cut off. The edges of the product and the belt are sewn down. The belt is carefully sewn to the product along the lines. The harness is attached.
Reduction due to back seam
The waist of the item is reduced by several sizes due to the back seam. After trying on, the belt loops (belt fasteners) and belt are removed. The belt is cut in half.
The stitching on the middle seam is unraveling. The suture is sutured to the marked distance. The belt is reduced and processed. Stitched on a sewing machine. It is sewn to the main product. The belt loop is being restored.
Complete alteration
The most labor-intensive variation will affect the entire product. The belt loop comes off in the required places. Most often at the back of the product. The belt is separated a few cm (10) in both directions.
The crotch seam is ripped out to 9 cm. The middle seam is also ripped out. All are secured with pins to prevent displacement.
In the waist area it is necessary to deviate from the middle line by 2 cm. A line is drawn for the future seam. You should get a triangle.
It is stitched on a sewing machine and the edges are finished. The crotch seam is sewn up. The excess is cut off at the belt. Finish the edges and sew them back. The belt loop is attached.
Method using old trousers
How to sew wide leg jeans using old pants? The technique is not much different from stitching along the seams and waistband. In this case, the “ruler” will be old homemade jeans that match the shape of the legs and length. However, when using this method, you need to take into account some operating conditions.
- You need to work with two products on a flat surface, preferably wide enough to place jeans on it.
- The old product must be fixed. If the jeans constantly “slide” from each other, drawing future seams and making basting will be quite problematic. Jeans that have been altered may turn out uneven.
- When working, it is important to take into account the existing defects in the sample; they can complicate the work a little. For example, if the pants are stretched at the knees or there are slits, you need to straighten the product well.
- After taking measurements and basting the fabric, it’s still worth trying on new jeans, even if the sample fits your figure perfectly.
You might be interested in How to make a cat yourself from fabrics: patterns
Using old jeans as a pattern is a fairly simple method, suitable for those who do not want to create a pattern. This method is quite universal - it can be applied not only to jeans, but also to other types of trousers.
Sewing pants using an old pattern
How to shorten pants
Read the details - how to hem trousers
You need to try on the item. Fold the excess fabric and secure the length with needles. It is advisable to carry out this to a third party. This way there will be no curvature or length errors on the product. If this is a female model, then you need to take into account the heel. Also, the length depends on the model of the pants. If they taper towards the bottom, the edges should be just above the heel.
Place the product on the table and spread it out. Draw straight lines using chalk along the marks. The first is the desired length, the second with a hem. It will be 1-2 cm for women, 4-5 for men.
It is necessary to go through with a needle and thread to secure the desired result. Try it on again. Spin around the mirror. Then remove. If necessary, make adjustments.
Place the product on the table. Trim off excess material. Finish the edges. Sew on a machine.
It is not always necessary to cut off excess fabric if the excess fabric is small. You can simply hide them in the hem. Or use double-sided sewing tape at the hem. But after each wash you will have to re-attach it.
It is often recommended to sew on the braid. It will prevent the edges from fraying. The shade of the braid is selected to match the tone of the product.
It is better to sew it on a product that has never been worn. But the edges have already been treated to prevent fraying. The middle of the braid should run along the final length of the product. It is necessary to baste there.
On the inner side seam we bend the free end so that the beginning is closed. Fold the braid in half. It should remain inside and stick out from below by a couple of mm. We stitch on a machine. We process the hem of the product.
How to sew sweatpants
With this action, the material (knitwear), edge processing (straight, with elastic, with ties), and the tailoring itself are taken into account. These can be with an oriental motif, tight, straight pants. In a tight model, almost the entire model is most often altered. In the eastern ones, the side and crotch seams are altered.
So, the pants can be too wide in the elastic at the waist, too big in the leg, and in length. If the sweatpants are too big at the hips, you will have to sew them in at the side seams. Reduces material in equal proportions along all seams. Sometimes the middle seam is also connected when adjusting the seat height.
- Try it on.
- Mark excess material with pins. Remove the product.
- Turn inside out. Gently straighten it on the table.
- Draw a line. Leave to process the edges.
- Baste along this line.
- Try it on and compare the difference. Take off.
- Open the waistband and the bottom edge of the trouser leg.
- Open the edges of the side seams, the step seam, and the isch seam. Especially if the model should fit the figure. Most often, you can only sutured on the sides.
- It is stitched by machine.
- The edges are processed.
Excess material on the belt is trimmed. The edges on it are processed and sewn back. If there is an elastic band, then it looks according to the situation (how it fits on the figure and what kind of elastic). If there is a lot of material, it is better to trim it. Everything should look aesthetically pleasing.
If the problem is the length, then it is shortened. The elastic bands are altered onto the shortened product, taking into account their height.
How to sew wide-leg trousers along the entire length
Most often this concerns suturing on the sides, affecting the waist. This method is possible when suturing 2 sizes. The side, step, and ischial seams are altered. The material is removed evenly. The belt is also affected. This is described above.
If you need to alter an item to a larger size, you will have to redraw everything, build a sketch, transfer it to fabric and cut it, grind it and then sew it together.
Any thing can be sutured, but you need to clearly understand whether anyone can handle it. Most often, complex adjustments are required. And there is a risk of messing up. If you are not sure, you should take it to the studio. It would be a shame to ruin a good thing. It is worth considering one more nuance. Not all trouser models can be sewn in due to the peculiarities of tailoring.
Useful tips
Tapering jeans yourself at home is not as difficult as it seems at first glance. By strictly following the recommendations, you can avoid going to the studio. Here's what experts advise:
- When sewing the bottom of the trouser leg at the intersection with the transverse seam, you need to lift the foot and place an additional piece of material (cardboard, plastic card) under the back of it. This will help to avoid sudden changes in fabric thickness and gaps in the stitching.
- The threads that will be used to process the edges must match the color of the material.
- If you don’t have an overlocker, you can overcast the cutting part by hand. Even minimal processing of the edges will make the seam independent and protect the product from “spraying” and breaking through.
- The thread that is visible on the outside of the jeans should be the same color as the other seams.
- The finishing stitch can be done with double thread. To do this, two coils of the same color are inserted into the machine. One thread is used in the shuttle, and it is better if it matches the finishing stitch.
You can learn more about how to narrow jeans by watching a video master class from a specialist