A stylish coat emphasizes the femininity of its owner. However, sometimes outerwear becomes too big. How to sew a coat to size at home? After all, only things that fit her figure perfectly can give a woman confidence.
If you have your eye on an interesting model in the store, but there is no suitable size in stock, then you can try to sew the coat to fit your figure yourself or ask for help from a tailor. Having even a little cutting and sewing skills, following simple recommendations, you will be able to reduce the product not only in the shoulders, but also in the waist to the parameters you need.
How to sew a coat at home?
Share on social media networks:
Every woman knows that only those things that fit well on her figure can give her confidence and a chic appearance. This also applies to outerwear. A fashionable and stylish coat, for example, can emphasize the taste and femininity of its owner, and will also warm you up during the cold season. But it often happens that a favorite thing becomes big, and it is not yet possible to purchase a new one. Is it possible to do something in this case? You can try to fit it to your figure. Today you will learn how to sew a coat at home.
Actionable recommendations
In order for the process to be successful, you need to adhere to some rules:
- Carefully and with extreme care, set the desired area and size of the coat reduction.
- The model should be sutured evenly along all seams. If you decide to reduce your outerwear by one size, then the change in the volume of the model by 4 cm must be divided into all seams and darts.
- When reducing a product that does not have middle seams on the front and back, the model should be sutured along the side seams by one size. To reduce such an outerwear item by two sizes, it is necessary to lay the darts to a suitable depth.
- If the product has become too big for you or you don’t like the style of the model, don’t rush to get rid of it, you can try to sew a flared coat from the bottom or sew a trapeze coat straight, and you will get a new unique look.
If your favorite coat has become too big for you, don’t rush to get rid of it. With the help of simple manipulations, you can adjust it to your figure with your own hands. But if you are still afraid of ruining the item, it is better to take it to specialists.
Share on social media networks:
Every woman knows that only those things that fit well on her figure can give her confidence and a chic appearance. This also applies to outerwear. A fashionable and stylish coat, for example, can emphasize the taste and femininity of its owner, and will also warm you up during the cold season. But it often happens that a favorite thing becomes big, and it is not yet possible to purchase a new one. Is it possible to do something in this case? You can try to fit it to your figure. Today you will learn how to sew a coat at home.
How to reduce the size of your coat yourself?
Not only can old clothes suddenly become unsuitable for their owner, because in stores it can also be difficult to find a coat model of the required size. Especially often, petite girls find themselves in such situations, for whom it is difficult to find outerwear that fits their figure perfectly. You can buy a thing and take it to the studio for adjustment or correct the situation yourself. The main thing is to know how to reduce and alter the size of a coat with your own hands.
If you are determined to remake your coat to a smaller size, then for sewing you will need:
- New or old coat.
- Sewing machine.
- Scissors.
- Tailor's centimeter.
Reduce the product using these instructions:
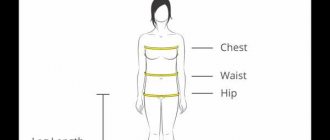
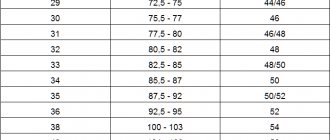
- First, try on your coat and determine how much you need to reduce it in volume. If you need to sew it in for just one size, then you will have to remove 4 cm, but if for two sizes, then, accordingly, 8 cm.
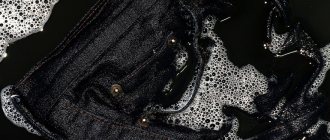
- Open the lining along the bottom of the product, then turn it inside out. Open the middle seams of the back and front, but do not reach a few centimeters to the sleeves.
Important! If there is a need to sew in an item larger than one size, you will have to rip out the side seams, leaving a small piece of the seam untouched under the sleeves.
- Leave 0.5 cm from each old seam of the quarter back and front. Use chalk to mark the places where the new lines will go. Sweep the parts together or pin them together with tailor's pins.
- If it is necessary to sew in the sides of the coat, then measure the same distance from each old seam in a decreasing direction. Prepare all parts for stitching.
Important! If it is necessary to reduce an item by one size, but there are no middle seams on the back and shelves, then the reduction occurs due to the side seams. To sew such a model in two sizes, you will have to insert the darts to the required depth.
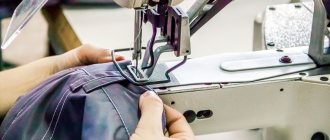
- Prepare your sewing machine. To do this, place the presser foot with the roller in the position for the appropriate fabric. Change the needle to a stronger one if we are talking about thick and dense material. Then thread the nylon thread there.
- Carefully place stitches in the marked places. Cut off excess material. Finish the edges of all parts using an overlocker or zigzag stitch.
- Using gauze lightly moistened with water, iron the middle seams towards the center of the back and shelves. Open and then press the side seams. Iron the darts towards them.
- Repeat all the manipulations done on the lining fabric.
How to shorten a coat at home?
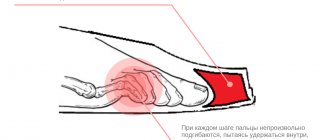
Fashionistas often face the fact that a new or old coat has become not quite comfortable in length, for example, it interferes with freely getting into the car and driving. This problem can also be solved on your own. Now you will learn how to sew a coat in length at home, in other words, shorten it.
Make the product shorter by following this pattern:
- Try it on to find out the new appropriate length.
- Align and pin the sides, lapel and hem.
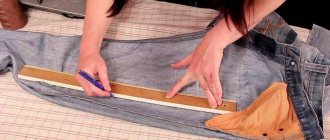
- Having received a specific mark after trying on, measure the distance from it to the lowest line of the product, set aside this value along the entire length.
- Considering that the pockets will now become redundant, it is better to cut them off, otherwise a coat with pockets at the very bottom will look ugly.
- Using chalk, mark a new bottom line, mark an allowance line at a distance of 5 cm from it, cut off all excess. Insert pins into the marked hem line.
- On the other side, draw a bottom line along the pins.
- Support the stitching on the sides, fold the bottom of the product and steam it.
- Cut the seam allowance at an angle to avoid thickening the fabric.
- Hang the coat on the shoulder pads, cut the lining 1.5-2 cm from the bottom line. Cut off the fabric completely along the edges.
- Turn it inside out, pin the product and the lining together, trying to match the middle of the back and the side seams. Give me a line on the typewriter.
- Sew the seam allowance without tightening the thread too much so that the bottom “walks” a little.
- Turn the coat inside out through the hole in the sleeve.
- Restore the stitching along the edges of the sides, sew up the hole in the sleeve, and steam the bottom.
How to reduce coat in shoulders?
If your favorite outerwear has become too big for you only on your shoulders, then coping with this problem will be even easier. In this section we will tell you how to make a coat smaller at the shoulders and sew it in at the shoulders with your own hands.
Reduce the size of the product at the shoulders using the following technique:
- First, open the shoulder pads. To get under the lining, open the side seam on the sleeve by about 20 cm. Then it will be sewn up and nothing will be visible.
- Place the shoulder pad on the shoulder so that its thickest part protrudes 1 cm beyond the shoulder bone.
- Raise the sleeve cap to a distance that matches your shoulders. Pin the sleeve cap to the shoulder seam, making sure it is in place.
- Once you have determined the new top point of the sleeve cap, you can move on. Pin it to the back and front of the coat to create a new armhole line.
- Make sure your new shoulder fits.
- Remove the product and use chalk to mark a line on the front side where the sleeve will be sewn on.
- Open the sleeve, mark the highest point of the collar sewn to the shoulder seam and the lowest point sewn to the side seam.
- On the front and back, cut off the excess fabric along the marked lines, leaving allowances. Line up the armhole directly to the armpits. Measure the length of the shoulder seams to ensure they fit together.
- Sew in the sleeve. Place the shoulder pad in its new place, fasten it manually, basting it to the most protruding part of the seam of the hem.
- Sew up the torn sleeve.
I want to sew my coat. Is there a great risk that they will spoil it?
Different prices. It somehow depends on the type of seam along which the stitching will take place. I know no more about cutting and sewing than a vegetarian knows about roasting meat.