Often a well-preserved coat has been hanging in your wardrobe for years, but you don’t want to put it on because it’s an outdated style and too long. Of course, you won’t be able to remake raglan sleeves yourself, but you can shorten a coat or make a jacket out of it.
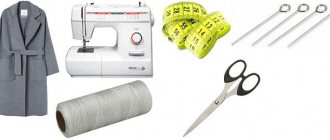
Shortening a coat in a studio is quite expensive, so try to learn how to shorten and hem the bottom of a coat yourself. No special tools or sewing machines are required for this; the main thing is to accurately determine the line along which you need to cut off the excess length of the coat.
The first video in the series on the topic “How to sew a women’s coat.” This video shows how to process a coat trim.
The second video in the series on the topic “How to sew a women’s coat.” This video shows how to process a pocket with a flap.
How much does it cost to shorten the sleeves on a coat?
Prices for repairs and tailoring in the studio
| Coat, raincoat, insulated jacket | ||
| 1.1 | Shorten a short coat with a straight silhouette without a vent | from 800 rub. |
| 1.11 | Shorten sleeves without transferring loops or loops | from 700 rub. |
| 1.12 | Shorten sleeves with transfer of stalemate, belt loops | from 1000 rub. |
| 1.13 | Shorten sleeves in coats with vents and buttons | from 1000 rub. |
How to shorten and sew a coat lining
After the bottom of the coat is folded and hemmed, you need to align the lining of the coat. Put the coat back on with a new hem and carefully straighten the lining on the shoulders, back and front. It is important that it hangs down without clinging to the fabric of clothing inside the coat.
Again, with an assistant, mark the hemline, but now on the lining. From this line on the lining, 2 cm is first reduced, and then 5 cm is added. As a result, it turns out that the lining needs to be made longer than the hem of the coat by exactly 3 cm. But on the condition that the finished lining will be 2 cm shorter than the bottom of the coat. See also the article How to hem the bottom of a product with a hidden seam.
If the lining is sewn to the hem, then it is cut taking into account the placement of the fold, such as shown in this photo. It is impossible to sew a lining without a fold on the shoulders, as shown in the top photo, since it will definitely “pull” the hem or back. Firstly, it can simply cling to clothing, pulling up the edge of the coat. Secondly, some lining fabrics can “shrink” after waterlogging (rain, snow). That is why experienced tailors, before sewing a coat, perform a wet-heat treatment of the lining fabric, and in some cases, wet the lining and then dry it.
How much does it cost to shorten a shirt sleeve?
| Shorten shirt sleeves with trim | from 1000 R |
| Shorten the shirt sleeve at the top (through the collar) | from 1500 R |
| Sew the shirt sleeve along the inside seam | from 800 R |
| Sew a shirt according to darts | from 800 R |
| Sew the shirt along two reliefs, without touching the hem and armhole | from 1200 R |
Interesting materials:
How to sterilize jars of tomatoes in a saucepan? How to sterilize tweezers at home? How to sterilize full jars in the oven? How to wash and dry leather gloves? How to wash a cotton sweater in a machine? How to wash mesh sneakers by hand? How to wash a jacket with Omni hit coating? How to wash kitchen rags? How to shoot with a Cargobob? How to cut an even bob?
2021
Scroll up
How to hem the bottom of a coat
When hemming an item of heavy fabric, such as a coat, it is necessary to distribute the weight of the item evenly and to do this, make several rows of securing stitches so that the fabric does not wrinkle. A particularly high hem (4-5cm) or a hem made from heavy drape fabrics can be made using two or three rows of hand-tacking stitches, for example, herringbone, as shown in this photo. This method of hemming a coat, using several rows of stitches, will not pull back the edge of the finished product, and will evenly strengthen it along the edge.
In our example, we are considering a coat with a loose lining, that is, the hem will be attached separately, and the lining is not connected to the bottom of the coat, so the cut edge of the fabric needs to be serged or otherwise sealed.
The cut edge of a hem made from heavy drape fabrics can be finished with an edge band or an overlock stitch on an overlocker. If you don’t have an overlocker, you can use a zigzag stitch on a sewing machine. Such processing when shortening a coat is necessarily necessary for loose fabrics, since the edge of thick, heavy fabrics cannot be processed with a double hem, since jeans are hemmed. A double hem will make the seam rough and can ruin the appearance of the coat and even “print” on the front side over time.
It is very important, before hemming the coat, to glue the hem area with adhesive material. It is not necessary to glue the part that is folded, but the front side must be glued to the width of the hem. This will strengthen the fabric and prevent the bottom of the coat from appearing as a “wave”.
Press the hem line lightly. Pin the hem by pinning it halfway between the hem line and the cut edge of the fabric. Fold the edge over the pins and sew the hem from the inside using a herringbone stitch. Then re-pin the pins higher and repeat this operation.
The folded and hemmed edges of the coat must be ironed along the wrong side, being careful not to press down the iron too much. To steam the hem more strongly, you can iron it with a damp iron. It is not advisable to iron the coat from the front side, since the edge of the hem may be imprinted. See How to iron clothes properly.
Shorten the coat
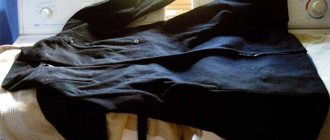
Wear your coat with the clothes you normally wear underneath and have someone help you draw a line that you can use to trim off any excess length. Your assistant can make the first chalk mark on the front of the coat.
Gradually turn to one side, and your assistant, with a long ruler in his hands, will make chalk marks directly along the front of the coat, remaining in place. The ruler should touch the floor, marks are made at the same distance from the floor. Connect the marks with a solid line, leaving a hem allowance of 4-5 cm.
Trim off excess fabric.
The hem of any coat that is not new is uneven, as the back of the product stretches over time due to wet weather. Since the fabric of the coat itself is quite heavy, depending on the characteristics of the figure, the back or shelves are more extended.
Therefore, it is impossible to shorten a coat well, focusing on the factory hem.
How to shorten coat sleeves at home?
The technique for shortening the sleeves of outerwear is similar to shortening the bottom, described a little earlier. But still, it also has its own distinctive features.
Progress:
- We completely rip the bottom of the sleeves, removing all unnecessary threads.
- We put on our coat and ask our friend for help - mark the line of the desired shortening with chalk. We turn gradually, and during this time your assistant leaves marks on the front part of the bottom of the sleeve. To do this, it is better to use a ruler or a stationery triangle.
Important! Make all marks in a calm position so that there are no distortions in measurements.
- We draw a solid line along the previously marked marks.
Important! Do not mark the line along the old hem, as the factory stitching may have defects.
- Now we cut off the excess lining along with the main fabric.
- We hem the sleeves to the length we need, and then align the lining fabric.
- We fold the lining once, holding it in the place where the sleeve is sewn and turned out. The most important thing here is to fold only the edge of the lining, without affecting its main part.
- We machine sew the formed lining to the bottom of the sleeve.
- We put small fasteners on the lining so that the hem does not fall apart. This must be done with each seam.
- We turn the sleeve inside out, leaving a basting for now.
- Carefully iron the bottom of the sleeve.
- We perform all the above steps with the second sleeve.
Well, your long-familiar coat has been transformed!
Style
Next you need to think about where you will wear the chosen coat. You also travel by car or public transport. If you need a universal coat that you will wear “both in feast and in peace,” choose a medium length. A short coat (short coat), which in its front resembles an elongated jacket, will not protect you from the cold. And a floor-length coat is not practical for those who walk a lot. The optimal length is approximately to the knee and slightly above/below.
Long coat
Long coat, street fashion.
Short coat.
Short coat, street fashion.
Basic coat models are a wrap coat in the Max Mara style, an oval cocoon coat and a straight/semi-straight coat. It's safe to say that one of these coats will suit you 100%. And if the main criterion for you is versatility, feel free to try on one of these coat models. Such coats are out of fashion and timeless. Fashion houses make them every year. In addition, they can be combined with anything, harmoniously complementing any look.
Basic coat models: wraparound, straight, cocoon.
Basic coat models, street fashion.
Hem the lining
After you have finished with the main fabric of the product, it is the turn of the lining. Put on your coat and straighten out the lining. Ask your assistant to measure the bottom line of the lining; it will be 3cm longer than the bottom edge of the coat, but when finished it will be 2cm shorter than the hem of the garment.
If the lining is sewn to the hem, it is cut taking into account the fold. You cannot sew a lining without a fold on the shoulders, because it will pull on the hem or back.
The coat remains an incredibly popular fall wardrobe item. If you are ready to update your favorite item, and feel that you cannot do without the experienced hand of a craftsman, come to the Mobile Tailor.
We are happy to advise you on remodeling options after listening to all your wishes. You will be pleasantly surprised at the transformation of your coat.
<< Back to Lifehacks Studio
Fabrics/materials
A lot depends on how often you plan to wear your coat. If you intend to wrap yourself in it with the onset of the first cold weather and not get out until spring, then, first of all, you need to take into account wear resistance. The strongest and most durable are wool, tweed, and cashmere. Accordingly, the greater the percentage of these materials in the coat, the more practical it is. Trendy velor and velvet are beautiful, but absolutely impractical, they quickly wear out and lose their original appearance. Leather and suede coats should be chosen from trusted places, since low-quality leather and suede wear out within a short period of time, become thinner, and then tear. It’s hardly worth looking at synthetics, since they don’t heat up.
Warm materials: cashmere, tweed, wool.
Cashmere and wool coat, street fashion.
Second stage - hem the bottom
Once you've figured out how to shorten a coat
, fold the bottom to the desired width and steam well with an iron. Pin the main fabric and lining together. Make sure the side seams are aligned. Sew by machine. The lining should not be pulled tight, it should be slightly loose. Look how it looks in the original version of the coat. After you have sewn all the seams, steam the bottom of the coat again and hang it on hangers or on a mannequin.