This regal plant does not often decorate flower beds - the inflorescences quickly lose their appearance and become sloppy, but for cutting it is unrivaled. This is precisely why gladioli are most often grown. This is a corm-like perennial plant native to the African subtropics. Over several centuries of breeding work, many varieties have been developed that are striking in color and size. But gladiolus did not learn to winter in our conditions.
Bulbs that renew themselves annually need to be dug up. Proper storage of gladioli will allow you to admire their flowers next year. To make it lush, you need to provide suitable conditions for storing gladioli bulbs in the winter in an apartment or cellar, carry out treatments against diseases and pests, and dry the planting material well. Its humidity should not exceed 14%.
Harvesting gladioli bulbs
How to prepare gladioli for winter storage? The main thing is to comply with the cleaning deadlines. Only timely dug up planting material will be well stored. The main reason for its death in winter is fungal diseases. Timely processing and high-quality drying will help avoid losses.
Excavation time
Only fully mature bulbs are stored well and produce abundant flowering the following season. For them to accumulate enough nutrients, a little more than a month should pass from flowering to digging. This is the case if the gladiolus was cut for a bouquet. If the plant is allowed to bloom in a flowerbed, another half a month must be added to this period. Experienced flower growers plant gladioli by variety, this makes it possible to clearly determine the timing of harvesting the bulbs - the flowering time of each variety is known.
Advice ! In order not to forget anything, it is better to write down the date when a particular variety bloomed.
If the bulbs are planted chaotically, it is more difficult to determine the timing of harvesting. There are patterns that you should focus on.
- The approximate harvesting time is mid-September, in warm autumn and later.
- The early varieties are dug up first, followed by those that bloom in the middle period, and the last ones are the late blooming ones.
- Gladioli grown from baby plants are harvested later than those grown from bulbs.
Advice ! Among the varieties of the same flowering period, those that have a dark color are the first to be harvested - their immunity to fungal diseases is weaker.
The timing of harvesting also depends on the weather: in dry autumn, you can keep the bulbs in the beds longer, rains can force them to be removed even if they are not fully mature. This will not greatly affect the quality of the planting material if the bulbs are well dried and covered with a layer of paraffin. In this case, choosing a baby is even easier - it is not yet separated from the mother plant and there will be less losses. In wet autumn, experienced flower growers carry out a test dig earlier than usual. If the bulb is infected with a fungus, you cannot wait to clean it. To protect gladioli planting material from thrips, it is better to carry it out before the air temperature drops below 10 degrees Celsius. Otherwise, pests will concentrate at the base of the stem and can hide among the dry scales.
Advice ! Cleaning is carried out in sunny, dry weather.
Harvesting bulbs
What is the best way to dig up bulbs? A pitchfork, a scoop and a shovel will do, the main thing is not to injure them and collect all the kids. It is problematic to preserve damaged planting material until planting. What do you do immediately after digging?
- The stem is trimmed, the length of the stump should not exceed 1 cm, or better yet, even shorter - most often the thrips that attack gladioli settle precisely at its base. When using pruning shears, it should be disinfected after each cut in a strong solution of potassium permanganate.
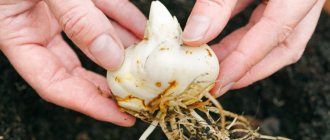
- The mother bulb is removed. If this does not work out right away, separate it after drying - the resulting suberized layer will help to do this with ease. You should not leave the old onion - it can be a source of infection.
- The roots are removed, but not from the bulbs obtained from the children. Their root system is only slightly trimmed. This way they will dry out less in winter. The roots of such bulbs are removed immediately before planting.
Advice ! You cannot get rid of covering scales on the bulbs; they are cleaned shortly before planting.
Now is the time to send the collected planting material to dry. But first it needs to be processed.
Processing gladioli bulbs before storage
The dug up bulbs need to be washed well from the soil. It is best to do this on a sieve under running water - each variety separately. Then – prevention against fungal diseases and pests:
- a solution of a fungicide, for example, “Maxima”, diluted according to the instructions or in 3% potassium permanganate, the bulbs are kept in it for about half an hour;
- karbofos solution according to the instructions.
Advice ! It is convenient to carry out processing by placing the planting material of each variety in a separate fabric bag.
Next, drying is carried out.
Drying bulbs
If all operations were carried out on a sunny day, allow the bulbs to dry in the sun. Further drying consists of two stages:
- about 3 weeks at temperatures from 25 to 30 degrees;
- up to 6 weeks at temperatures from 20 to 25 degrees.
For drying, planting material is laid out in 1-2 layers, with paper or fabric underneath. You can place the bulbs in wooden boxes with a mesh bottom and sides. Before storage, they are inspected again and all patients throw them away without regret. If this is a valuable variety and the damage is minor, you can try to save the bulb by cutting off the sore spot until healthy tissue appears and smearing it with brilliant green. But it will have to be stored separately from the rest of the planting material.
Advice ! Do not dry the bulbs close to heating devices, otherwise they may simply cook.
Treatment of tubers from diseases and pests
Newbie gardeners are often interested in the question of whether it is necessary to peel the gladiolus bulb before storing? After a month, you should clean the gladiolus bulbs from the upper scales and remove the old corms along with the roots. If necessary, you can use a sharp knife. It is easy to distinguish, the old corm is brown in color. When this is not done, it will die and infect the bulb.
Small baby tubers should be divided before planting. Trim the dried stems to a height of 1 cm.
Storing gladioli bulbs
This is an important stage in the life of a flower. Despite the apparent state of dormancy, the processes of laying the foundation of the future replacement bulb, flower buds and leaf primordia take place in the bulbs. To avoid failures and ensure full flowering next season, the planting material should not dry out due to dryness and high temperature or become sick from excessive dampness. It is important to prevent the bulbs from freezing.
How to store gladioli tubers in winter? Wooden containers, perforated paper bags, and cardboard boxes are suitable for this. They are stored well in mesh nylon bags; you can sew them from gauze.
Each variety is laid out separately and provided with a label. It is not easy to find a place that meets all the conditions in an ordinary apartment. Where to store gladioli bulbs in winter? There are several options: cellar, refrigerator, glazed loggia. Each case has its own nuances.
Timely pruning of flower stalks
Gladioli flower stalks should be trimmed immediately after flowering. This will not only help keep the flowerbed tidy, but will also allow the plants to accumulate strength for the winter. If the flower shoots are not removed in time, seeds will begin to set on them, which will cause an outflow of nutrients from the bulb.
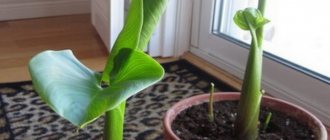
In this case, you cannot remove the leaves of gladioli. The leaf apparatus is involved in photosynthesis. It is through the leaves that the bulb receives nutrition and matures for wintering. The next 50 days after the flowers wither, the necessary substances accumulate in the underground part of the plant. Dig out the bulb when the leaves just begin to turn yellow, without waiting for them to completely wither.
Storage conditions
How to store gladioli at home in winter?
- the temperature is not lower than 3 and not higher than 7 degrees Celsius, at a higher temperature after 40 days - the end of the natural dormant period of the bulb, they can germinate;
- air humidity is about 70%.
Children need a temperature a couple of degrees lower and air humidity up to 90%.
Storing gladioli in the apartment
How to properly store gladioli in an apartment in winter? You need to find a place where the temperature is optimal. Usually this:
- window sill, if the frames are wooden and double-glazed windows are not installed, it can be quite cold near the window;
Advice ! Bulbs should not be allowed to freeze in severe frosts.
- near the front door or in the vestibule if it has 2 apartments;
- on a glazed warm loggia or at the door to the balcony, if one does not exist.
In the latter case, in a frosty winter there is a high probability that the bulbs will freeze. Therefore, they need to be moved in time to a frost-free place. For the cold period, you can build a special thermostat with a thermometer inside from scrap materials and monitor temperature fluctuations. To maintain the required humidity, a triple layer of newsprint is suitable, in which the container with the bulbs or each bag is wrapped separately.
Some gardeners sprinkle the bulbs with calcined and cooled river sand, placing them in a wooden box covered with paper. A layer of ash is poured on top of the sand. A good way to prevent fungal diseases is 1-2 cloves of garlic placed in each bag of bulbs. As the slices dry out, replace them with new ones. A well-proven method of storing bulbs is to layer them with dried mint leaves. It releases essential oils that prevent sprouts from appearing ahead of time.
Storing gladioli in the cellar
How to store gladioli bulbs in the cellar in winter? If it does not freeze, is well ventilated and not damp, then this is an ideal place to store gladioli planting material. It is best to place it in plastic fruit boxes with holes in the walls. They are placed on shelves. You can stack them on top of each other to save space. But you can’t store vegetables or fruits nearby. The moisture they evaporate will not benefit the bulbs - they may rot.
Storing gladioli in the refrigerator
This method can be used when the amount of planting material is small - the volume of the refrigerator is limited. But the temperature and humidity in it are constant and correspond to optimal conditions for storage. The most suitable place for the bulbs is a container for vegetables and fruits, but not directly with them. To prevent dampness from being so annoying, it is better to wrap them by grade in a triple layer of newspaper, which is changed at least once a month.
Advice ! If you have to turn off the refrigerator for a long time, the bulbs need to be moved for storage to another suitable place.
Dig it out carefully
Harvesting gladioli should begin in dry weather. Armed with a shovel, stick it at a distance of 15 cm from the flower. The blade should go in vertically. Carefully lift the clod of earth along with the bulb and shake it off any adhering soil. This method will keep the planting material intact.
Rinse the “harvest” in clean water. If in the spring you want to plant gladioli by variety, put them in different containers and label them.
Possible storage problems
Most often they are associated with latent diseases and non-compliance with temperature and humidity parameters during storage. The reason may also be improper preparation of planting material - insufficient drying time, not treated against thrips and diseases.
- Under-dried onions. They can get botrythiosis - spots that are light brown in color. Diseased bulbs will have to be thrown away, and the rest will have to be treated with a fungicide and dried.
- Gray-green mold is how the penicillum fungus manifests itself. The reason and actions are the same as in the previous case.
- The bulbs dry out a lot. Too high a temperature is to blame. Perhaps the planting material simply did not have time to mature. Unripe bulbs are waxed.
- Thrips were observed on the planting material. They are fought by keeping the bulbs for 30 minutes in a solution of “Inta-vir” or “Tseneba”. Three days of drying will be required.
- Germination too early. High humidity and temperature are to blame for this. The bulbs are emerging from dormancy and preparing for the growing season. Reduce the temperature to 1 degree Celsius to slow down the process and reduce air humidity.
- The bulbs are softening - the temperature is too low, they are simply frozen.
In order to detect problems in time, a regular inspection of planting material is carried out - at least once a month, and if signs of diseases have already been identified, then more often.
Share
Selection of quality corms
Bulbs of each variety need to be further sorted to get rid of material with signs of rot or drying out. At the same time, the dug up children are also sorted; bulbs that are too small will not survive the winter. Their minimum size should be at least 6–8 mm.
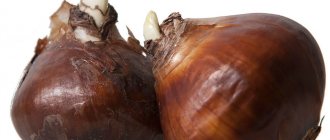
In this case, only babies that have covering scales will be stored well. It is better to throw away old bulbs; they will no longer produce full blooms. Young large corms have a regular round shape, their diameter is usually equal to their height.
What time should you do this?
Plant bulbs must begin to be dug up after they have flowered and about 35 to 45 days have passed. Approximately this will be the second half of September or the beginning of October.
You shouldn’t delay this matter too much; you shouldn’t keep the bulbs in cold soil for a long time. You can visually inspect the bulb and if it is covered with scales, then the bulbs are ripe and can be dug up.
This should be done as follows:
- To begin with, large bulbs are dug up, after which small ones are carefully removed and finally all the children are removed from the soil. The best way to do this is either with a pitchfork or a shovel with a wide base.
- It is better to remove them when the weather is warm outside. It is better if there is no rain on this day, since in this case it will be possible to easily shake off the soil from the bulbs.
- Also, the soil should not be very dry, otherwise it will make it difficult to remove the babies, who can continue to sprout for a long time. And this can lead to mixing varieties, which is undesirable.