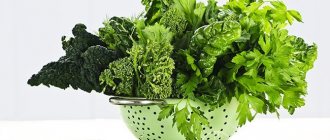
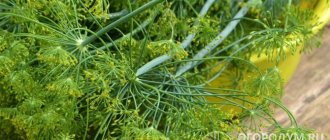
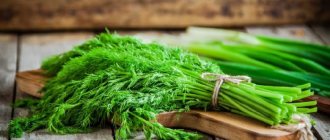
Dill, especially fresh, can improve the taste of almost any dish, be it a salad, soup or hot dish, which is why no garden can do without this aromatic herb. It is difficult to name dishes that dill does not go well with. It is not added except to desserts. This type of greenery enhances meat, fish, and vegetables. It’s impossible to imagine okroshka or seasonal salad without it. But, in order to preserve all its beneficial properties not only for cooking, but also for health, it is important to know how to store it correctly so that it remains fresh and aromatic for a long time. The article will tell you about the conditions for storing greens and how to keep dill fresh for a long time.
Keep it fresh
An ordinary household refrigerator is quite suitable for keeping bunches of any greenery in it for a short time.
If you are not going to store fresh dill for a long time, then:
- Take a bunch and put it in a jar. There is no need to wash the plants or trim the roots.
- Pour some clean water into the jar and cover the leaves with a plastic bag.
- Place the jar on the bottom shelf of the refrigerator.
In this case, the greens will not wither or turn yellow, but will remain juicy for 1-2 weeks.
You can store fresh dill in the kitchen for longer. If the garden is far away, then a piece of it can be transferred to the windowsill. Dig up young dill with roots, without destroying the earthen ball, and plant it in a flower pot. This will decorate the kitchen window sill and extend the time of use of the greenery. [flat_ab id=”28"]
Do you know that…
Some people try to grow dill from seeds on a windowsill. This is possible, but only in summer, and in winter you need powerful illumination with a phytolamp.
Although dill is sold all year round, summer dill contains 2 times more vitamin C than winter greenhouse
If you need dill throughout the winter, then use other options for storing it. Use:
- freezing;
- drying;
- pickling.
How to pickle dill correctly
For those who are going to pickle dill for the first time, we can recommend a simple classic recipe. It’s simple and the dill turns out great. For salting you will need:
- salt 250 grams;
- dill 1 kilogram.
Step-by-step instruction:
- Wash each leaf and dry.
- The prepared bushes are finely cut with a knife and mixed with salt.
- The gruel needs to sit for several hours. The color will change and the mixture will become darker.
- All that remains is to prepare the jars, sterilize and place the resulting pulp in them.
This salting method is simple, since you don’t need to make a special brine; you can do it in half an hour.
The jars should be stored in the refrigerator or cellar. If there is a lot of dill, then the proportions must be observed: the optimal ratio of dill and salt is 1 to 4.
There is an option for pickling in a marinade using citric acid:
- 0.5 kg of dill, cut into small pieces;
- 22–25 grams of lemon;
- 3 bay leaves;
- 1 teaspoon salt;
- 0.5 spoons of sugar;
- a glass of vegetable oil.
Mix all ingredients except dill and boil for 8 minutes. Place the plant in jars and fill with marinade. The jars should be sterilized within 10 minutes. To do this, place a cotton towel on the bottom of a large pan and place the workpieces on it. Then fill with water so that it reaches the hangers of the cans. The pan is put on fire. After sterilization, they are rolled up, turned over and allowed to cool. Store in a cool place: in the basement or underground.
We recommend:
How to store gladioli bulbs at home
Preparing for winter storage
Before choosing any of these storage methods, the plants must first be properly prepared:
- Rinse the greens purchased or collected from your plot under running water. Another option: place the stems in a deep bowl filled with water. Keep there for 10-15 minutes, and then rinse in the same way under a gentle stream of water.
- Then place dry towels on the kitchen table, spread the green stems on them in a thin layer, cover with paper napkins and let the moisture dry naturally.
Now the greens are completely ready for further processing.
Sorrel soup with chicken
The essence of the recipe is already clear to us from the previous section; you can only change and supplement the components. And this time, instead of pork, we will cook soup with chicken, but we will not fry the vegetables. We'll make an excellent refreshing soup.
So, take two legs and cook them for 20 minutes from the moment of boiling. This time is enough to start with; later the meat will be cooked along with the vegetables.
Let's prepare the rest of the products, wash and clean them.
Cut the potatoes into slices, the carrots can also be cut into slices, it is not necessary to use a grater. Either chop the onion well, or just cut it in half, and when the soup is cooked, remove it from the broth.
Sorrel is also cut differently, some simply cut the bunch at random to get fairly large pieces. Everything here is at your discretion, if you want, do it beautifully, if you want, do it quickly.
One by one, add the following to the broth: potatoes, onions, carrots, garlic, salt and cook until tender (15-20 minutes).
Lastly, add the sorrel, let it boil and remove from the heat.
Don’t forget to hard-boil the eggs at the same time (one for 1-2 servings).
After the soup has steeped, you can pour it into plates and season with sour cream. Add more, green sour soup goes well with it!
And add half or quarters of an egg. Everything is simple and delicious!
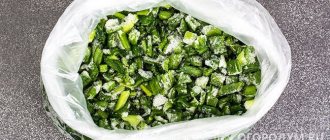
Freezing – saving vitamins
It is best to freeze dill greens in the freezer. Here it can easily lie for 1 year without loss of quality and taste.
The beneficial properties of dill are preserved 100% when frozen.
Entirely
Here's how to properly freeze dill for the winter:
- Place the dried stems, whole branches, in the freezer for 2 hours.
- Then remove and place in small portions in perforated polyethylene bags; alternatively, use cling film.
- Place the bags back into the freezer.
In winter, take out frozen dill and immediately use it for cooking.
Sliced
Here's another way to freeze dill in the refrigerator for the winter. The basis here is chopped greens. For preparation:
- Cut the washed and dried plants into small, 0.5-1 cm pieces.
- Place the mixture in bags or airtight containers in a thick layer.
- Place the preparations in the freezer.
In winter it is very convenient to get such semi-finished products and use them for their intended purpose.
Ice cubes
You can also store aromatic and healthy greens in the refrigerator for the winter in ice cubes, as in the picture below.
For this:
- Cut the dried stems into small pieces no more than 0.5 cm wide.
- Place in small portions into ice cube trays, filling them only 2/3 full.
- Fill the cutting containers with water to the brim.
- Place the molds in the freezer.
Remove the finished product from the refrigerator as needed and add to first courses as a seasoning.
Tip of the day
During storage, do not subject the semi-finished product to repeated freezing and thawing. This will ruin the taste of the product.
Dill: description
Dill belongs to the Celery family. Essential oils give the plant a specific smell and taste. Dill contains ascorbic acid, calcium, iron, mineral salts, and also many vitamins: K, A, E, D, H, B1-B12. Low calorie content (43 kcal), less than 2 grams of fat, proteins (3.5 g), carbohydrates (4.9 g).
The spice is beneficial for the human body. It satisfies hunger well and activates all processes of the digestive tract. Dill should be consumed by people with problems with the cardiovascular system. Due to the fact that the calorie content is low, many women use the plant as an aid to burning extra pounds.
Important! Harvesting of greenery should be carried out in June, before the release of umbrellas, so that all the beneficial properties are preserved in the plant.
Salting - we prepare for future use
If you want to preserve dill for the winter at home longer, try pickling it:
- Dry the washed greens with napkins to remove excess moisture.
- Trim the roots and remove thick petioles, leaving only young green twigs.
- Finely chop the prepared greens.
- Sprinkle it with salt in a ratio of 2 parts dill to 1 part salt and place tightly in clean, sterile jars.
- Sprinkle a layer of salt on top.
- Close the containers tightly with a nylon lid.
- Keep jars in the refrigerator.
This method of harvesting dill for the winter allows you to preserve it without loss of quality until the spring of next year.
Salted dill is an excellent soup dressing and fragrant seasoning for potatoes or various cereals
Tip of the day
Remember that this seasoning is very salty, so you need to salt the prepared dishes very carefully.
Preparatory stage
In order to preserve the aroma and natural taste of greens longer, it is important to properly prepare the harvest. Follow simple rules:
- carefully sort through the stems , removing spoiled and yellowed leaves;
- do not wash the branches if you are going to store the dill in the refrigerator;
- to remove dirt, simply shake off the greens or wipe them with a dry cloth ;
- -dry the wet dill by blotting it with a paper or waffle towel.
If you take these recommendations into account, fresh herbs will be prepared correctly and, under suitable conditions, stored for a month or longer. Depending on your needs, the grass can be placed in a plastic, cellophane or glass container. We will describe below what storage methods there are.
Drying - easy and long lasting
Another proven recipe for preserving dill for the winter is to dry it. This method of harvesting greens for future use allows for the longest storage of the product, and at home you have several options to choose from. In addition, dried dill is convenient to use when preparing various dishes.
Naturally
So, plants can be dried with whole stems. For this:
- Carefully sort the greens, remove spoiled parts, cut off the roots.
- Rinse the branches under running water and dry them.
- Tie 10 to 15 stems together and hang them in a dark, cool, ventilated area.
- When they are dry, put the workpiece in boxes or fabric bags.
In the same way, you can dry the branches of a flowering plant along with umbrellas, and then add them to dishes as a seasoning in the winter months.
Dry chopped dill is a classic of the genre. It's very easy to prepare:
- Take fresh plants and cut off all the thick stems.
- Finely chop the remaining branches on a cutting board.
- Scatter the chopped herbs on the table, cover it with a towel.
- After 1-2 hours, spread the dill in a dry room on paper in a thin layer.
- Turn it over occasionally to ensure complete drying.
Drying is the best way to preserve the aroma of dill
Collect dry dill and place in a container for further storage.
In the oven
Drying in the oven is another way to provide yourself with vitamins throughout the winter:
- Finely chop and place the dill in a thin layer on a baking sheet.
- Place the sheet in a warm (not higher than 50 °C) oven with the door ajar.
- During drying, stir the dill regularly so that it does not burn, but dries out on all sides.
- Let the workpiece cool.
Place it in prepared containers.
How to store dried dill
To ensure that the seasoning you prepare yourself remains aromatic and does not spoil, it is useful to know how to store dried dill.
- Glass jars with tight-fitting lids work best for this. This way, foreign odors, which are abundant in the kitchen, will not penetrate the product.
- Sunlight can cause the greens to fade, so keep the containers in a table or cabinet, behind a closed door.
You can preserve dill for the winter at home without any problems. Use each of the suggested methods to find out in practice what you like best.
Store correctly and be healthy!
Arabic dough A'jineh Mwarraqah
Category: Preparations Freezing
For sweet and savory baked goods. When the theme of the competition was announced, I immediately knew what to prepare and present. Once upon a time, on one of the Syrian sites, I found a recipe for the Arabic dough A'jineh Mwarraqah, I was very attracted by the fact that it can be made for use and frozen, and then surprise your guests and family with a variety of pastries, both sweet and non-sweet . It’s a pleasure to cook from such a preparation; it always turns out tasty, satisfying and unusual. And in order for your table to become generous and rich in an oriental way, you only need a minimum of time. This dough is somewhat similar to puff pastry (in principle, it turns out to be puff pastry), but there is a different method of preparation, and it is made in portions, which is very, very convenient, if, say, you need 10 pies, then you take 10 pieces and That's it, and you don't need to defrost all the prepared dough.
I will show and tell you in detail how to prepare 4 types of baked goods from this preparation (two sweet and two not sweet), so the recipe contains a lot of information and photographs, come in, watch, read, adopt it!))
I also want to say that if you have such a preparation, all the baked goods are prepared very easily and quickly, and I tried to choose the most delicious and easy-to-use fillings.