By preserving green vegetation from the garden, you get not only aromatic seasoning for your dishes, but also a complex of vitamins. Dill, parsley, cilantro and other herbs can be frozen or dried. I’ll tell you in more detail about how to properly dry dill so that you can add herbs to your favorite dishes throughout the year. And also where and how to store dried dill so that it does not lose its taste, aroma and benefits for as long as possible.
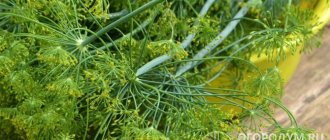
Dill
Selection of variety and time to collect dill for drying
There are three types of dill - early, mid-season, late-ripening. The variety should be chosen depending on the growing region. Choose leafy varieties that have dense, dark green foliage. Dill for greens is cut for storage until the moment when umbrellas appear. It should be taken into account that mid-season and late varieties can be cut multiple times during the season.
Early varieties are harvested 4-5 weeks after the start of the first shoots. Mid-season varieties are ready for cutting after 5-6 weeks; technical ripeness of late species occurs on average after 50 days.
The best varieties for home preparation:
- Gribovsky (early);
- Far (early);
- Amazon (mid-late);
- Anchor (early);
- Alligator (late);
- Hercules (late).
Collection time: the day when the dew has already evaporated. At the same time, pay attention to the weather - the workpiece is not collected in the rain.
Dill variety Gribovsky
How to freeze fresh dill: 4 ways
This is what frozen dill looks like - the color is like fresh.
At low temperatures, greens can retain their taste and beneficial qualities for up to 6-8 months. Before freezing dill for the winter, rinse it with cold water, shake it, and dry it with paper towels.
Method 1. Cellophane bags.
It is more convenient to make preparations for the winter in portions. In the photo - one serving of frozen greens
- Place the greens into bags - in each bag as much as you usually use at a time.
- Release all the air from the bags and tie them tightly.
- The long cellophane tip can be cut off.
- Place the preparations in the freezer so that it is convenient for you to take them out.
Take strong bags so that they don’t accidentally break in the freezer if they get caught on something.
Method 2. In cling film or foil .
Dill in foil, rolled in portions for freezing
It is better to freeze dill in portions, since the greens cannot be re-frozen and should be used as soon as possible.
- Washed and dried bunches of greens are tightly wrapped in cling film or foil.
- Sent to the freezer.
Method 3. Ice cubes.
Ice cubes are an excellent preparation of dill for first courses
- Place chopped dill on the bottom of the ice trays;
- top with boiled water or olive/vegetable oil;
- put in the freezer for several hours;
- As soon as the dill cubes are completely frozen, they can be taken out, put in a plastic bag and put back in the freezer for long-term storage.
Method 4. Dill oil: olive, vegetable or butter.
Dill in olive oil is suitable for dressing salads, pasta and boiled potatoes
First option:
- chop clean greens, place them in glass jars and add oil;
- it is important that there are no air bubbles left in the dill layer, and that the oil completely covers it;
- Close the jars tightly and put them in a dark, cool place;
- You can add black pepper, other herbs, and lemon zest to taste.
Second option:
- prepare snack butter with dill, garlic and other spices;
- all components are finely chopped;
- add to pre-softened butter and mix thoroughly;
- This mixture is placed on cling film, formed into a sausage and frozen.
Dill stays really fresh in a delicate mass of butter
Place the aromatic oil on foil or cling film
Wrap the still soft butter in a sausage
Snack butter after freezing
Cut into slices of snack butter are great on toast and on sides
Videos to watch how to make snack butter And more tips on how to keep your greens fresh longer in the refrigerator. Plus a recipe for delicious dill sauce
Preparing greens for drying
When the raw materials are collected, they need to be washed. This is necessary to clear the greens of soil and small insects. Use cool, clean water. Leave the greens in the water for 5-10 minutes, then place the vegetation on a cotton towel so that the moisture is easily absorbed. You should not use newspapers or magazines - printing ink will remain on the raw material.
Cutting is done using a knife or scissors. The plant does not need to be uprooted. The stems are also not added to food due to their toughness. A suitable part of the crop is soft bunches of rich green greenery. Darkened, yellow, limp twigs are not used for drying. Spoiled dill can spoil good raw materials with an unpleasant odor.
Washing greens
Drying chopped dill
Chopping greens is preferable for those who do not tolerate tough twigs in dishes. The chopped stems are mixed with soft bunches and are practically not noticeable in food. Dill, peeled and chopped in advance, is subjected to horizontal drying. In this case, the layer of greenery should not exceed 4 cm, otherwise putrefactive processes will begin to develop.
Chopped dill must be stirred regularly so that it dries evenly. Please note: you cannot cut the raw materials too finely; as the moisture evaporates, the greens will turn into dust.
Chopped dill
Drying with twigs
Chopped twigs are easier and faster to prepare. It is enough to pick the fluffy part of the dill, peel, rinse, and then choose a drying method. When the dill dries, just rub it with your fingers, after which the greens will crumble into small pieces.
Drying with twigs is the preferred option, as the rich aroma that the essential oil gives to dill is preserved. In addition, harvesting with twigs takes less preparation time and also increases the number of drying methods.
Bunch of dill
Where can you use dried herbs?
Most often, dried dill is used in cooking. It can be added to salads, as well as first and second courses. It can be mixed with other spices and goes well with dried garlic, onions, and peppers.
In addition to cooking, it is also used in folk medicine. They make infusions, decoctions, and dill water. Such methods are beneficially used to treat gastrointestinal diseases, diabetes mellitus and other diseases.
In cosmetology, dill decoction is used for rinsing hair and washing. It acts as an anti-inflammatory, antiseptic and strengthening agent.
Properly drying dill at home for the winter
Drying dill for the winter at home is not difficult. I'll tell you about the 5 best ways to harvest greens at home.
Outdoors in the shade
The method is good for those who live in a private house or country house. At an air temperature of +24°C, dill will dry within 3-5 days in the shade. Drying chopped dill in air requires a protected place from wind and direct sunlight.
With the natural drying method, it is easier to harvest greens with twigs. To do this, tie 5-7 branches with a rope to the stems, and then tie the thread to the support. This way the green part will be facing down. Tighten the rope with such force that the bunches do not fall off, but do not overtighten so that the stems do not lose their integrity. The distance between the bunches is 6-8 cm. To protect from the sun and insects, the greens can be covered with a white cloth. But make sure that there is ventilation of the raw materials.
Air drying greens
It is more difficult to air dry chopped vegetation. To do this, you will need white sheets or a sheet on which a layer of dill is laid out. In this case, the workpieces must be protected from the wind using side rails or covered with clean gauze. You will have to stir the greens at least once a day.
When choosing an air drying method, monitor weather conditions. In case of rain or strong winds, the raw materials must be brought into the house.
In the oven
The remaining methods are easy to implement in apartment conditions. The oven is an option for drying fruits and herbs.
How to properly dry dill in the oven:
- if the oven does not have a convection function, then the cabinet door must be opened slightly;
- to preserve vitamins, the temperature is set to no higher than +40°C; The oven must maintain the set parameters throughout the drying process.
To dry in the oven, you need to place sprigs or pre-chopped dill on a baking sheet, covered with parchment or silicone backing. If the baking sheet is ceramic or non-stick, you don’t have to line it, but stir it regularly to prevent the leaves from sticking. Select convection mode for an electric oven. Leave the vegetation at the set temperature for 2 hours, then stir the greens, if necessary, dry the dill in the oven until completely dry.
Drying greens in the oven
On average, the method takes 2-4 hours. Do not increase the temperature to speed up drying. This not only reduces the benefits of the product, but also reduces the taste, aroma and gives a yellow tint to the leaves.
In the microwave
The microwave has high power and temperature, so you will have to monitor the process without distraction. On average, you can cook dill for the winter in the microwave in 5 minutes.
Drying dill in the microwave:
- prepare, clean, dry the greens;
- Place a paper napkin on a flat plate and place a layer of greens on it, the thickness of which does not exceed 2 cm;
- put the plate in the microwave for 3 minutes, then remove, stir, and, if necessary, remove for a couple of minutes to dry.
Greens in the microwave
To avoid burning the top layer, a napkin is also laid out on top of the greens. It is also permissible to use paper plates instead of ceramic ones. Attention: do not leave the oven unattended, as the product dries quickly in it.
In an electric dryer
The device is suitable not only for vegetables and fruits, but also berries and herbs. If the vegetable dryer has a “herbs” or “greens” mode, then just put the dill in a container in a thin layer on trays, then turn on the specified program. If there is no such function, then a mode with a temperature not exceeding 40°C is selected. It is optimal to dry in an electric dryer with branches 4-6 cm long.
Dill in an electric dryer
Greens will cook in a dehydrator in 2-3 hours. During this time, it is necessary to change the floors of the electric dryer at least once.
In a refrigerator
The method takes longer due to the high humidity in the refrigerator. To dry, the vegetation is laid out on a board or plate. Cover the top with a paper napkin to prevent the dill from getting too dry. Next, the greens are placed on the lower shelf, where the temperature is higher.
It will take at least 2 weeks to dry dill using this method. At the same time, it is important to monitor the condition of the raw materials - stir, change napkins if necessary, otherwise there is a risk that the greens will become moldy or begin to rot.
Drying dill in the refrigerator
Oven drying
Today there is an oven in almost every apartment and house.
Instructions:
- Preheat the oven to 40 degrees.
- Place the dill on baking sheets lined with wax paper and place in a warm oven.
- Leave the door slightly open - you can insert a matchbox or plastic bottle so that it does not close at all. Then, thanks to natural ventilation, the moist air will escape and drying will proceed more evenly.
- It takes 2 to 4 hours to completely dry the dill in the oven.
We recommend: Simple savings: how to sew shoe covers without a sewing machine in 30 minutes
Important: Only at +40 will the dill dry without losing its aroma and will not turn yellow. therefore, increasing the temperature to speed up the process is not recommended.
If several baking sheets are installed, then change their places every hour, or better yet, twice as often. Mix the greens carefully, check: the branches should crumble when rubbed in your fingers, leaving your hands dry.
How to check the readiness of dried greens
You can make sure that the moisture has evaporated from the grass by touching it. Signs by which the readiness of the product is determined:
- the leaf part crumbles easily in the hands;
- thick stems are easily separated from thread-like segments;
- the color becomes 1-2 tones lighter;
- the weight of raw materials is reduced by 2-2.5 times.
The finished product crumbles in your hands and smells fragrant. To preserve the smell, it is poured into containers for storage.
Recipes for dishes with dried dill
Dried dill can be added to soups, meat and fish dishes, stewed and fried vegetables, and when preparing pickled and pickled cucumbers. Dried dill seeds are added to sauerkraut.
Dried dill is not used to decorate dishes.
Chicken goulash
We will need:
- chicken fillet - half a kilogram
- one onion;
- one not very large carrot;
- tomato paste - 2 tablespoons (can be replaced with fresh tomato);
- wheat flour - 2 tablespoons;
- water - 350 milliliters;
- salt;
- dried dill.
- Wash the chicken fillet, dry and finely chop. Fry the meat in vegetable oil.
- When excess moisture has gone, add finely chopped onion to the pan with the chicken. Fry it for a couple of minutes and add carrots, grated on a coarse grater.
- Once the onions and carrots are browned, move all the ingredients to the edges of the pan and add flour to the middle. Fry for a minute, then mix well with all the ingredients.
- Add tomato paste (or chopped tomato), water, salt and spices. Mix everything well and simmer under a closed lid for 20 minutes.
- You can serve mashed potatoes or pasta as a side dish.
Almond dressing
Almond sauce has a delicate taste and delicate aroma.
We will need:
- water - 150 milliliters;
- lemon juice - 30 milliliters;
- almonds - 120 grams;
- garlic - 1 clove;
- dried parsley - 2 teaspoons;
- dried dill - 1/2 teaspoon;
- salt - to taste.
- Pour boiling water over the almonds, peel the skin after 10 minutes (press on the tip on one side, and the nut will easily pop out of the skin). Roast the nuts and grind in a blender.
- Mix nuts with water and lemon juice.
- Add chopped garlic, parsley, dill and salt.
- Whisk everything well, cover and refrigerate.
Dried dill is not only healthy, but also a very tasty seasoning, which is widely used in cooking. It is loved for its excellent taste and delicate aroma, which gives dishes a unique taste.
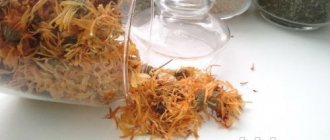
How and in what to store correctly
To preserve the aroma, the raw materials are poured into airtight containers for storage. The greens must be completely dried and cooled, otherwise no matter what container you choose, condensation will form on it, which will lead to mold.
Storage options without loss of aroma:
- fabric bag made of natural materials (cotton, linen);
- zip packages;
- paper bags;
- glass, porcelain, ceramic jars.
To prevent the essential oil from evaporating from the product, dried dill must be isolated from air. To do this, use tight lids, clasps or knots. From time to time, the greens need to be checked for insects and ventilated.
Storing dill
How to store:
- to dry dill at home, choose a dark, cool place, suitable room temperature is +17°C;
- monitor the humidity so that it does not exceed 80%;
- Direct sunlight should not fall on dried vegetation.
It is optimal to store dried dill in a kitchen cabinet and in a glass jar.
Are the beneficial properties lost?
The main season for dill is summer. But if you take care in advance, you can use it throughout the year. The main ways to preserve dill are drying and freezing.
Let's take a closer look at drying. It has been scientifically proven that, compared to freezing, properly dried greens contain more vitamins and microelements, such as:
- calcium;
- iron;
- phosphorus;
- magnesium;
- beta-carotene;
- vitamin E, C.
What to do to prevent dill from turning yellow when dried
Reasons why a plant changes color:
- Excess moisture . If the greens are cut early in the morning or in the evening, when dew has appeared, then this provokes the appearance of a dark color on the branches. The right time for collection is a dry, sunny day.
- Washing the culture in warm water . Before drying, greens collected at the dacha or purchased at the market must be washed. But this must be done at a water temperature no higher than +20°C. Otherwise, the dill will turn yellow after drying.
- Drying in the sun . Exposure to ultraviolet radiation leads to overdrying. Because of this, some of the vitamins will be destroyed, which will affect the color of the grass.
Overdrying is the main cause of yellowed leaves. Microwave, oven, electric dryer also lead to color change. Don't leave greens unattended and stir them frequently as they dehydrate. In this case, yellowing will be avoided.
Dried dill
In what form should you dry dill?
It is recommended to determine in advance in what form to dry the greens, since the features of its storage depend on this.
Drying chopped dill
First you should start preparing the place for drying. To do this, a flat surface is covered with cloth or special wrapping paper. Do not cover the surface with newspapers, as the branches will become saturated with printing ink.
See also
Description of diseases and pests of dill, treatment and control of themRead
After preparing the place, all the collected dill is finely chopped and laid out on the surface. It is not recommended to place chopped greens in the sun, as this will cause them to quickly deteriorate.
Drying dill sprigs
Most housewives prefer not to chop the dill, but to dry it entirely. Many of them consider this method to be the best since it does not require much time or effort. To do this, just collect ripe greens from the garden and thoroughly wash them from dirt. Then the branches of all the collected bushes are broken off and laid out in the sun so that they dry faster. When the plants are well dry, the leaves are plucked from the branches and placed in a container for further storage.
The main advantage of this method is that the essential oils from dill, which is dried in this way, will evaporate more slowly.
Advantages and disadvantages of dried product
The benefits of dry dill:
- a significant part of the vitamins is retained;
- The shelf life of properly dried herb is 1-1.5 years;
- Due to its aroma, dill increases appetite;
- Regular use of the product reduces blood pressure;
- green vegetation improves mood;
- the essential oil in the composition has a positive effect on the respiratory system;
- The plant stabilizes insulin levels;
Decoctions and infusions are made from dried dill. The decoction reduces flatulence and has a gentle effect on the intestinal walls. Due to the diuretic effect, body weight is reduced and swelling is reduced.
The benefits and disadvantages of dill
But there are also disadvantages, for example:
- due to its ability to reduce blood pressure, it should be used with caution by hypotensive patients;
- the crop easily absorbs hazardous substances from the soil, so it is better to dry greens from your garden;
- allergic reactions in the form of coughing, choking, skin rashes are possible;
- in large quantities causes abdominal pain, vomiting;
- in case of kidney disease, it can provoke an exacerbation.
Decoctions of dried dill have more contraindications than advantages. Therefore, it is better to add the plant in small quantities to food as a spice.
Grandmother's method of drying dill
What are the health benefits of dried dill?
Dried greens contain vitamins C, A, E, P. There is calcium, potassium, phosphorus, copper, manganese, iron, zinc, magnesium. The preparation is rich in oleic, linoleic, and folic acid. At the same time, the calorie content is only 40 kcal per 100 g. Such a supplement will definitely not harm your figure. The composition and concentration of chemical elements depends on how the dill is dried. High temperatures destroy a unique product.
Useful properties of dried dill:
- eliminates flatulence, bloating in the abdomen;
- normalizes stool, soothes the intestines;
- accelerates kidney function, relieves swelling;
- improves digestion;
- restores metabolic processes in the body;
- helps cope with nausea;
- relieves nervous tension, fights insomnia, irritability;
- facilitates the outflow of bile;
- Boosts immunity and helps fight viral and bacterial diseases.
Dill has antispasmodic, diuretic, and antibacterial effects. The plant rarely causes an allergic reaction or individual intolerance. Dill water is given to babies from birth to tame an obstinate tummy. Greens will also not harm pregnant or nursing mothers. On the contrary, it will help you stop taking chemical medications and contribute to the development of a strong, healthy fetus.
Pickling dill
If you want dill to be on your table all winter, then you can pickle it:
- Wash the greens thoroughly and dry to remove excess moisture.
- Leave only small green sprigs.
- Finely chop.
- Sprinkle with salt in a ratio of 2 to 1. Where 2 parts are dill, and 1 part is salt. Place in clean, sterile jars.
- Sprinkle salt on top as well.
- Close the jars tightly with nylon lids.
- Store in the refrigerator.
Using this storage method, your greens will remain fresh until the next season.
Preparing dill for winter storage
For long-term storage of dill for the winter, you need to carefully prepare it. To do this, you need to rinse the plant thoroughly under running water or place the stems in a basin or other deep container with cold water, hold it there for 10–15 minutes, and then rinse under running water. Wet branches need to be dried. This can be done by laying them out on clean towels in one layer, covering them with paper towels on top and waiting until all the water is absorbed.
In glass jars
Dill can be kept fresh in bags or glass jars for up to 60 days. For this:
- Greens, previously collected in bunches, are placed in a glass container (up to 1 liter) or plastic bags. There is no need to wash it beforehand.
- If the dill is in a bag, it is tied together with air to give it the opportunity to “breathe”. It is enough to close the jar with a plastic lid.
- Keep such supplies on the refrigerator shelf, where it is not too cold. At the same time, all the beneficial substances and even the aroma will be preserved.