sdelay.sam.ua
The neckline is often one of the main problems with new clothes. A neckline that is too deep looks provocative and is not suitable for every woman. An excessively narrow throat causes discomfort. In this case, modeling of the neckline is performed. This can be done in a studio or yourself. The operating principle depends on many features of the product. The material, model, cut, size matter. Before starting work, it is advisable to make a drawing of the future product and decide on the key points that you would like to correct. With incorrect calculations and drastic changes, the back, front, armhole or shoulder may be distorted. Therefore, it is important to act carefully, connecting all the dots so that they do not change the basic cut.
How to work with different fabrics
Before looking for specific recommendations on how to sew a T-shirt or other item, you should take a close look at the fabric from which it is made. Working with each material has its own specifics. Depending on the type of fabric, a suitable needle, thread and even the size of scissors are selected.
If the T-shirt does not fit, it can be adjusted to the desired size
Thus, for sewing thin fabrics, thin threads and small needles are used. The color of the thread must match the basic tone of the material.
When choosing scissors, the property of the material, such as the degree of cutting resistance, is taken into account. For materials such as linen, cotton, synthetics it is large, for woolen fabrics it is small.
If the selected fabric is prone to shrinkage, before you start cutting it, the cut (or the finished product to be altered) should first be subjected to wet heat treatment (WHT).
Knitted fabric requires a special approach when sewing
For loose fabrics (for example, silk), it is necessary to provide for more significant seam allowances and prepare an overlocker in advance - experts recommend in this case processing the edges before starting to baste the product.
Fabrics that are slippery or prone to deformation must be cut and recut with the utmost care and with very sharp scissors. It is most convenient to attach them to a cardboard template before starting work.
How to keep a shirt collar in a suitcase without creases
Do you often travel on business and need to adhere to a dress code? The collar of a shirt often gets wrinkled in a suitcase under the weight of other things. Preventing such deformation is actually very simple. Place a rolled-up trouser belt inside the collar. This will give additional rigidity to the collar and keep it in its original form without creases.
A Brazilian travels 36 km by bike every day to take his loved one home.
Why French children behave well: eight ways to raise them
Lost weight: what Sofia Tarasova sacrificed for the sake of “VIA Gra” (new photos)
Self-stitching
Any item of clothing can be worn with pleasure only if it fits well. T-shirts are no exception to the rule. Therefore, if the purchased summer wardrobe item has too wide shoulders, inappropriate length or a narrow collar, you should try to alter the item yourself. If you have minimal sewing experience, there should not be any particular difficulties in deciding how to hem a T-shirt on a sewing machine.
A T-shirt that doesn't fit is not a problem
Important! The item to be altered must be clean and ironed.
You might be interested in: Simple patterns for summer dresses for size 50
Neck
The sewn-on neckline on knitted T-shirts tends to stretch during wear. The neckline becomes too large and fits poorly. There are many ways to stitch the neckline of a T-shirt. The simplest of them involves doing the following:
- Prepare pins, a hand knitting needle (with a blunt tip) or a sewing machine.
- Turn the product inside out.
- Turn the edge of the collar over to the wrong side and carefully pin it with pins.
- Sew the trim by hand or sew on with a sewing machine. It is important that the stitching is elastic.
It is not difficult to bring a stretched neck of a T-shirt back to normal.
There is another scheme, it involves tearing off the neck and re-sewing it. But it’s worth giving a step-by-step master class of this process:
- Peel off the collar trim from the T-shirt.
- Open any shoulder seam by about 2 cm.
- Iron all parts of the product.
- Cut the seam from the finishing strip.
- Unfold and iron the strip again, stretching it at the same time.
- Finish one of the long edges of the plank with an overlocker.
- Place the placket and T-shirt with right sides facing each other.
- Baste so that the neck line and the raw edge of the placket coincide.
- Cut off the excess part of the plank.
- Sew the bar.
- Turn the stitched strip to the wrong side and baste.
- Attach the placket and stitch side by side at a distance of 0.5 cm.
- Sew up and finish the ripped section of the shoulder seam.
You should use the method of tearing off the neck only if you have enough sewing experience.
Home conditions do not always allow you to use this method, since not everyone has an overlocker.
On the sides
It often happens that you buy or receive as a gift a T-shirt that is larger than you need. Don't rush to turn it into a spacious home outfit. After all, sewing a T-shirt one size smaller on your own won’t be difficult at all.
It’s easy to sew the sides of a T-shirt
It’s ideal if you have a cover stitcher and an overlocker, but if you don’t have them, any modern machine that has an overlock stitch will do. Next, the algorithm of actions to reduce the product on the sides will be as follows:
- During the fitting process, mark the locations of future seams - each side, from below and to the armhole line.
- Without ripping the seams, cut off the overlock stitch both on the sides and in the armhole.
- Mark the line of the future seam with chalk (it is better to use a pattern).
- Fold the T-shirt in half lengthwise, align the cuts and pin everything together (the left and right sides should be identical).
- Mark the new armhole line with chalk.
- Do not remove the pins, but use them to pin together the back, front and armhole.
- Fold the product along the shoulder seams and pin together.
- Cut off all excess, leaving a seam allowance of 0.7 cm.
- Fold the sleeves together, making sure to pinch the bottom.
- Mark the highest point on the rim line with chalk.
- Mark the front part of the part, transfer similar marks to the second sleeve.
- Remove all pins.
- Align the sleeve caps with the armholes, and the highest point of the cap with the shoulder seams.
- Sew all seams. It is recommended to sew the sides and sleeves in one go.
You might be interested in this: Creating a pattern and cutting a blouse with one-piece sleeves
Overlock is a great helper when altering knitwear
This way, downsizing your T-shirt won't be too difficult. Sewing a top or T-shirt is even easier - you don’t have to bother with the sleeves.
In the shoulders
You can sew a T-shirt at the shoulders without ripping. The amount of work will be quite small:
- Mark the desired length from the collar to the far shoulder line.
- Draw a line with chalk, taking into account that the seam should end at the edge of the armpit line.
- Fold the T-shirt in half.
- Cut the fabric along the line. If done correctly, the body of the T-shirt and the sleeve will become separate pieces.
- Pin together the cut sleeve, back and front.
- Sew the connected parts and steam with an iron.
When sewing shoulder seams, it is important to calculate everything accurately.
Important! The main condition that should be observed when altering T-shirts is to use a knitted and relatively wide seam to prevent the fabric from bunching.
Armpits
The armpit of a T-shirt may be too wide, even if the product itself is just right. The problem may be a non-standard figure, not the most accurate pattern, etc.
Most often, to correct the armpit, clothing is sutured along the shoulder seam line - this is easier and more convenient. But there is another option: take a piece of clothing with an optimal armhole as a sample, apply it on a flat surface to the T-shirt that is to be altered and, matching the shoulder seams, carefully transfer the armhole line, then cut off the excess and sew the product. The most important thing is to make sure that both T-shirts are well aligned.
When sewing a T-shirt under the arms, the main thing is not to overdo it
If the collar on your T-shirt is stretched. Solving the problem in a few steps
A stretched T-shirt is a problem that each of us knows about. Careless removal of the T-shirt or poor placement of the item when drying can affect its appearance. Fortunately, this is quite possible to fix!
How to fix a stretched and wavy collar on a T-shirt?
To “repair” such a T-shirt, we will need an iron and ice water or ice cubes.
First, wash the T-shirt in the usual way. Then we fold the wet collar into an accordion and, holding it in this way, place the collar under ice water or put ice cubes on it.
This instant cooling of the fabric will make its fibers more rigid, which means they can better retain their shape.
Then we lay the T-shirt on a horizontal surface. We smooth the ruffled collar with an iron so that it straightens and takes its normal shape.
It is important that the collar does not dry completely when ironing!
After you have ironed the T-shirt, leave it in the same position until completely dry.
Once the T-shirt is dry, iron it again and the collar will look the same as when you bought it.
Here is another option to make the neck of a T-shirt elastic again. Let's watch this video.
Source
Hemming along the length
In some cases, the product fits perfectly, but you are not satisfied with its length. There is nothing easier than taking a dress or a T-shirt to a tailor, but it is not much more difficult to do the work yourself. You can reduce the length using a sewing machine or using the old time-tested method - manually.
Shortening a T-shirt is a fairly simple process.
On a sewing machine
Hemming a T-shirt, tank top or any other product made of knitwear or synthetic material is carried out according to a similar principle. How to hem a T-shirt using a sewing machine:
- The product is cut to a certain length.
- The bottom of the T-shirt is folded along a pre-marked line and it is determined at what distance from the edge the seam will be made and basted.
- Place the garment to be shortened under the foot of the sewing machine, wrong side up.
- Align it so that the left needle is located at the very edge of the hem.
- Place a stopper and sew in a circle with a hidden seam, trying to avoid pulling.
- They tie knots and hide the threads.
You might be interested in: Patterns and sewing of men's workwear, uniforms and work overalls
Manually
In the absence of a sewing machine and the desire to seek help from a specialist in the studio, the least that can be done to reduce the length of the product is to figure out how to hem a T-shirt by hand.
If the knitwear is dense enough and not prone to unraveling, you can leave it alone; if there is a risk that the knitted weave may “work,” it is better to process the edge with an overlocker.
After shortening, the bottom of the T-shirt is hemmed by hand using a hidden cross stitch, which is popularly called a “goat”.
This is approximately how the Kozlik seam is made
This is done as follows: with a needle, grab one or two threads of the fabric from above and below from the cut of the allowance. It is important to carefully ensure that the stitches are not visible from the outside. The distance between the fabric thread grips should be about 1 cm.
Life hack: how to make stretched clothes look decent again (6 photos + 2 gifs)
To resuscitate the T-shirt we will need:
1) A cup of water with ice; 2) Iron; 3) Flat surface.
Step 1: fold the stretched edge of the garment like this
Step 2: dip it in ice water for a couple of seconds, holding the folds
Step 3: squeeze out the water (not forgetting the folds)
Step 4: Place the T-shirt on a flat surface, straighten out the folds and iron from bottom to top
No need to iron for a long time. The fabric should dry on its own.
Step 5: Leave to dry for a few hours and you're done!
Candace did this experiment on her son's T-shirt and it worked. She also explained why T-shirt collars stretch. This is particularly due to hang drying. Water flowing down deforms the product, so it is better to dry T-shirts on a flat surface.
Therefore, to prevent T-shirts from stretching, it is better to dry them on a flat surface.
Source
How to sew straps on a T-shirt
It is very easy to shorten the straps on a T-shirt:
- the strap comes off on one side (preferably from the back);
- excess tissue is removed;
- the part is returned to its place and carefully sewn
Important! Before cutting off the length of the straps, you need to carefully measure the length that you should end up with.
Thin straps are easier to sew in
Correcting the situation
A stretched neckline creates a sloppy look and ruins the whole look, but we know how to fix the situation. First, wash the T-shirt in your usual way, and then proceed to drying. First, distribute ice cubes over the surface of the neck and leave for a while. This will make the fibers of the cotton fabric harder and will retain their shape longer.
After this cooling, straighten the collar on a horizontal, flat surface. You will see that it lies in a wave. Iron this wave so that the neckline is straightened. There is no need to dry the fabric with an iron for a long time; you just need to give the desired shape to the neckline.
Next, the T-shirt needs to be dried in a horizontal position, and not on its weight, as we are used to doing. Otherwise, the collar, smoothed with an iron, will again take on a wave-like shape and all our efforts will be in vain.
In fact, this life hack applies not only to T-shirts, but also to other items of clothing that have a neckline. It stretches on most of our clothes for the same reason as on T-shirts, but now you know what to do about it and how to fix the annoying little thing.
We are sure that if you follow this simple advice from a Japanese expert, your clothes will always look neat.
Source
How to reduce a T-shirt size by washing
The easiest way to reduce the size of a T-shirt is to machine wash it in hot water. If the shrinkage required is small, it is enough to set the temperature to just above 40 degrees. If the item needs to be made significantly smaller, it is strongly recommended to wash the T-shirt at +90 degrees.
Knitted T-shirts shrink well when washed
Thus, if an item purchased or given as a gift does not fit, do not rush to make home clothes out of it. Just a little effort, and it will be quite decent to leave the house. And if you don’t feel like sewing at all, you can always turn to a professional seamstress for help, who can do everything you need quickly and efficiently.
What to do if the collar on your T-shirt is stretched? An easy way to get it back into shape
I am sure that many of us have favorite items of clothing that we simply cannot or do not want to part with. Often such clothes already lose their original attractive appearance, but we still wear them. This happens all the time. If you consider yourself to be in this group of people, then you probably have your own favorite T-shirt from this category of things. Often the collar of T-shirts stretches, or rather the elastic in it. Because of this, the T-shirt immediately loses its appearance. But, there is a way to restore a wrinkled and stretched collar to its former “slenderness”. This can be done quite simply at home.
Quality of clothes
www.liveabout.com
The higher the quality of the clothing, the less likely it is to shrink. Special finishes and manufacturing technologies that prevent shrinkage are more often used by higher-end manufacturers who care about product quality. Because most people don't want their clothes to shrink, Gagliardi notes. Customers want to be able to wash their clothes over and over again and keep wearing them, and for them to continue to look the same as when they bought them.
Knitted trim
To sew a T-shirt, like in a store, you will need to buy a ready-made knitted strip (trimming, trim). It is made of ribbed knitwear, ribana, very elastic and holds its shape perfectly. The same method is useful for a tunic or T-shirt dress.
How to process a knitted neckline:
- Place the finished strip on the front side of the neckline.
- Baste (this is important so that the edge does not stretch).
- Sew using an overlocker or fine zigzag, making sure that the parts do not stretch.
- Take out the basting.
- Lay out the pieces so that the seam is on the wrong side and the placket is facing up.
- Place a securing stitch along the face using a zigzag with a slight bend or a stretch stitch.
- Press to make the seam flatter.
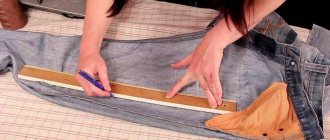
Changing the size of denim items
You can make even denim clothes fit. You've probably noticed that after washing, denim trousers become smaller, but then they wear out. To consolidate the shrinking effect, wash your denim items in warm water. It should not be at the highest possible temperatures, otherwise things will simply fade. By drying denim items in a dryer, you can achieve the same effect.