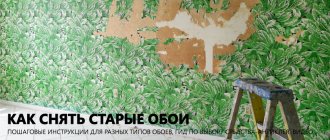
The question of how to remove paint from walls arises during the renovation process, when, after removing the wallpaper, an old layer of oil composition, applied back in Soviet times, is discovered underneath. It is very difficult to remove, especially from large areas. In such cases, thermal, chemical or mechanical cleaning methods are used.
Removing paint from walls is a labor-intensive process that can be done in several ways Source repaireasily.ru
When to shoot
In years past, painting walls has been popular in kitchens and bathrooms. In modern times, beautiful tile patterns have been included in the design, which cannot be laid without clearing the surface of the old paint.
But there are situations when this is not necessary, for example, if the wall will be covered with plasterboard in the future. In other cases, the coating is removed, since it does not promote adhesion (cohesion) of the material with adhesives, plasters and other building compounds.
Treating walls after removing wallpaper
When all the work is completed and the walls have been cleared of the last piece of old wallpaper, it is time to assess the condition of the surface. In most cases, part of the plaster is removed with the canvases, so the wall is unlikely to be able to boast of perfect evenness. Before starting finishing, its surface must be carefully prepared.
Previously, there was a misconception that there was no particular need to bother preparing walls for wallpapering. Alas, there are still fans of this opinion. It is not difficult to guess that as a result of this approach they do not get a very high quality finish, even if they have chosen high-quality wallpaper. An unprepared wall contains irregularities that even the thickest wallpaper cannot hide. This surface is more porous, which means that much more wallpaper glue will be used, and adhesion will be worse. Cracks on walls in contact with the street can even cause mold to develop.
Whatever the subsequent finishing of the walls (wallpaper, painting, decorative plaster, etc.), the list of surface preparation activities will be approximately the same:
Primary priming of the walls is necessary to improve the adhesion of the finishing material to the wall, reduce the degree of moisture absorption (saving paint, glue), and speed up the drying process of the putty. The primer is applied with a roller; in hard-to-reach places you can use a brush. If you see that somewhere the composition is absorbed into the wall literally before your eyes, it is better to apply a second layer;
Glims DeepPrime Primer
To prepare walls in any room, the Glims DeepPrimeGrunt and primer is perfect, which allows you not only to strengthen the base, improve adhesion and save paint or glue, but also protect the surface from the appearance of mold and mildew due to the antiseptic included in the composition. The primer can be applied to almost any surface, it dries quickly (4 hours) and has low consumption (0.08-0.2 kg/m2).
- plaster is not always necessary. If the surface of the wall does not contain deep holes, drops and other defects, and you plan to hang fairly thick vinyl or non-woven wallpaper, then it will be enough to putty some of the unevenness. If the defects are significant, thin wallpaper or painting will be used, then you will have to use plaster first. For brick walls, a cement-sand composition is used; for concrete walls, gypsum plaster is more suitable. It is most convenient to use ready-made mixtures that only require adding water. A separate article on the website is devoted to the technology of plastering walls;
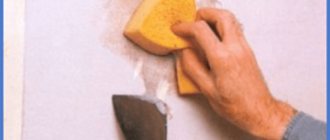
- It’s better not to neglect putty. It allows you to reduce the roughness of the walls, perfectly level the surface, which will have a positive effect on the quality of subsequent finishing. Putties differ in composition. If you do all the work yourself, it is better to take a gypsum composition - it is easier to apply than cement. The putty is applied with spatulas, but the finishing layer does not need to be applied if thick wallpaper is hung, decorative plaster is applied or ceramic tiles are installed;
- Repeated priming will allow you to finally prepare the surface for subsequent finishing. This time the composition should be much smaller.
Remember to let each coat you apply dry thoroughly. Data on complete drying time will be indicated on the packaging.
The article was written for the site remstroiblog.ru.
Choosing a method for removing paint
When choosing a wall paint remover, consider the following criteria.
- Type of dye - oil, acrylic or water-based. If the type is unknown to you, then you will need to select a removal method by experimenting on a small area. You need to start with the least labor-intensive methods. It is also important to know the number of layers and the strength of their adhesion to the wall.
- The material of the painted surface is concrete, wood, metal or drywall. For example, oil paint is the most difficult to remove from unplastered concrete.
- Further work includes painting, tiling, etc.
- The budget for the event is for the purchase of special tools and equipment.
- Possibility of ventilation.
Useful tips
To make it easy to remove old paint from walls, you need to choose the right option.
If applied correctly to a wall or ceiling, the paint will come off quickly, and the wall surface will not be damaged and you will not need to putty and level it. In this case, it is important to pay attention to the greasy stains that may be on the wall. If there are any, then it is important to reduce them, otherwise they will appear on fresh paint. To prevent this from happening, you will have to wipe the spot with the stain, putty it and only paint the area again
To prevent this from happening, you will have to rub out the area with the stain, putty it and only paint the area again.
Alternatively, you can also use chalk. If you rub the area with the stain with a clean piece of chalk, the greasy stain will gradually be absorbed into it. The procedure must be repeated until the stain completely disappears. You can try to wash the greasy stain with a detergent that fights various types of stains on surfaces.
Work with paint should be carried out taking into account the type of coating. For some, a harsh impact is needed, for others, a delicate one. The same principle works when removing old paint from walls. Based on what exactly you want to get, you use certain methods and methods that will ultimately give you the desired result.
For information on how to properly remove oil paint from walls, see below.
What you will need
The choice is also influenced by the availability of the necessary tools. The following devices can be used:
- brush;
- personal protective equipment (respirator, goggles, rubber gloves, etc.);
- ax for notching;
- construction hair dryer;
- chisel;
- putty knife;
- roller;
- iron scraper;
- electric drill;
- Bulgarian;
- chemical agent for removing paint from walls;
- water.
Important! Before the procedure, cover the furniture and floor with film to prevent them from becoming covered with construction debris.
The most common mistakes
When performing work, inexperienced repairmen make the following mistakes:
To remove paint from large areas, only manual labor is used, for example, using a spatula. This takes a lot of time and effort. It is better to give preference to power tools.- Remove paint using a solvent in rooms with poor ventilation. Inhalation of toxic fumes can cause poisoning.
- Overheat the walls using a hair dryer or blowtorch. Such carelessness may cause a fire.
- Working too hard on the wall with an ax or similar tool. It will be difficult to cope with the emerging irregularities.
You cannot work without gloves, regardless of the chosen paint removal method.
Three main options for removing oil paint
It is most problematic to remove oil dye from unplastered surfaces. But it can be done. Today there are three main methods, which are characterized by labor intensity and duration of the process.
Use of chemicals
Removing paint from walls using chemical mixtures is carried out according to the instructions supplied with the product. Prepare the solution and spread it over the surface using a brush or roller.
Advice! Movements must be performed in one direction only.
Wait until the dye softens. Remove it along with the wash using one of the devices to choose from:
- putty knife;
- scraper;
- brush with metal bristles.
The advantage of the option with paint remover: speed of cleaning.
Flaws:
- a specific smell that does not disappear for a long time;
- in addition to durability, it is characterized by a high content of toxins;
- upon contact with skin causes chemical burns;
- considerable cost;
- requires special disposal.
Important! If the surface has been painted several times, the product will not remove the coating the first time. It will not be possible to quickly remove paint from the walls, since the application of the chemical composition will also need to be done repeatedly.
Follow safety rules during work - ventilate the room, use personal protective equipment. Allergy sufferers, children, pets and pregnant women are prohibited from attending. Make sure that the composition does not come into contact with the skin. Wear protective clothing.
It is possible to clean walls from old paint using other methods. If you need to work on a plank floor, wet the surface with water and then cover it with soda ash. Make the layer thick so that it covers the entire area. Wet the burlap and cover the floor. Wait a day, constantly keeping the material moist. After the expiration date, remove the layer using a spatula. This is done easily, as it will swell from moisture.
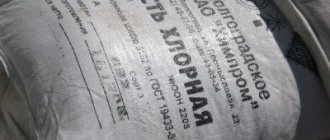
The next method is a mixture of potassium carbonate and lime. The first component can be replaced with soda ash. You will need 400 g of it. Mix this amount in 1.2 kg of quicklime and apply to the surface. Wait 12 hours before removing paint from the wall.
Another way is to use liquid glass. Lubricate the coating, let it dry and remove the silicate film along with the peeling paint. The procedure may need to be repeated several times.
Chemical cleaning is also suitable for the following types of dyes:
- glyphthalic;
- pentaphthalic;
- polymer;
- nitro.
For small areas, you can use solvents.
Heat treatment
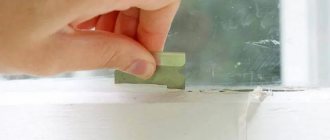
A hair dryer will help in this situation. Heat the surface until the dye softens. Next, you need to remove the paint from the wall using a spatula or any other scraper. If a special hair dryer is not available, do not use a regular one. It is better to heat the coating with an iron, after covering it with a large sheet of foil. At the end of the work, wash the wall, clean up minor defects and wipe with a swab dipped in solvent.
This method is suitable for those places where there should be no vibration and shock (where there are window frames, glazed doors, etc.). This method is not used where wiring is located, or where there are decorative elements that are damaged by high temperatures (for example, plastic).
The main disadvantage of the thermal method of cleaning walls from paint is the evaporation of toxic substances when it is heated, as well as the specific odor that accompanies this. Safety measures include working exclusively in ventilated areas. In addition, you need to use personal respiratory protection.
Types of mechanical methods for removing paint
This option is suitable for anyone who is worried about toxic emissions from other types of wall treatments when removing old paint. To do this, use a notch with an ax. The process has the following characteristics:
- no harmfulness;
- cheapness;
- not dangerous;
- duration of work;
- labor intensity.
The sequence of actions is as follows:
- make notches using a tool;
- spray the painted surface with water;
- wait for it to be absorbed;
- Rip off the old paint from the wall with an axe.
Important! If you choose the right blade angle, it will increase the efficiency of the work, as well as the speed of its completion.
This option is suitable for difficult to ventilate rooms. It is used in small areas, since a lot of physical force is used for work. It is often used where tiles will be laid in the future, since the resulting unevenness contributes to better adhesion of the materials.
Interesting! The surface is sprayed with water to reduce the amount of dust generated in the process.
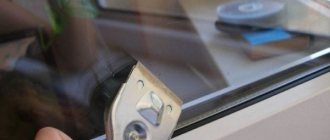
You can peel off the paint from the walls if it has already begun to peel off due to age with a spatula or chisel. This is also a labor-intensive method, but it is clean. It is suitable for wooden surfaces, as well as places where sockets, baseboards, pipes, etc. are placed. In the process, you need to have sandpaper, which will be needed to sharpen the tool.
Electromechanical method
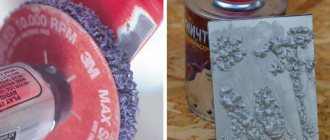
This method is suitable for removing old paint from concrete walls as it is highly efficient, making the job easier. To do this, use a grinder with a wide grinding wheel with an abrasiveness of at least 40, but be prepared for the fact that a lot of dust will be generated in the process. After a minute of processing, you need to wait 20 minutes for the dust to settle. Now on sale you can find models equipped with a vacuum cleaner, which makes the procedure easier and cleaner.
Also used for work is an attachment created like a brush made from cutting steel wire.
You can also take a hammer drill with special attachments. There are two options for removing paint from walls in the bathroom and other rooms. In the first case, chains are used as attachments. This method is suitable for any surface - wood, metal or concrete . It is characterized by efficiency and low cost. Use the same method to remove rust.
To carry out the procedure, two types of chains are taken:
- paint remover;
- 13-link configuration.
Features of this paint stripping tool:
- the thickness of the link must be at least 5 mm;
- the central link rotates 6 links on each side;
- the base is a 6 mm bolt;
- the drill should rotate to the left;
- After putting on the chain, tighten the nut firmly to maintain fit during operation.
If the end link flies off on one side, then the one on the opposite side will also need to be removed so that there is balance. Work continues until at least three links remain with each of them.
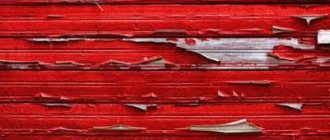
Important! When cleaning, the paint from the walls will fly off in pieces, so you will need to protect your body from mechanical impact.
In the second method of working with a hammer drill, brick crowns are used as an attachment.
The electromechanical method is rarely used on painted wood, since the tool can easily damage the surface. To work you need to have special skills.
Washing technology
When the choice of a suitable product has been made, it’s time to figure out the correct technology for its application:
- For the most effective and deep penetration of the reagent into the layer of old paint, the surface must be free of dust and other contaminants. You can wash the walls using household chemicals, and then scrub them with a stiff brush or coarse sandpaper;
- Now we apply the chemical composition itself. This should be done using a wide brush or roller. Do not wet them too much so that the product flows or drips onto the floor. It is better to direct movements in one direction;
- So that the reagent does not evaporate from the surface so quickly and has time to have the proper effect on it, you can cover the surface with a film. This, of course, must be done with gloves;
- After the recommended time, remove the film and remove the paint;
- At the end, you need to wash off the remaining reagent from the wall and neutralize its effect. The manufacturer will definitely provide recommendations on this matter.
That's all, your walls are ready for further transformation. If one of the above methods does not give full effect, try combining it with other methods. By and large, they are all suitable for removing any type of paint.
The article was written for the site.
Tags:Preparation for room renovation, Enamels and paints
Removing water-based dye
In this situation, you can quickly remove the paint from the wall, since most of them are not waterproof. To do this, wet the roller in warm water and treat the surface. You can also use a soap solution. Leave it damp for 10 - 15 minutes, then clean the area with a spatula. The procedure may need to be repeated, and even use a wire brush. If this does not help, then use the methods listed for eliminating oil dye.
Advice! Treat small areas to monitor moisture levels.
Briefly about the main thing
To prepare walls during repairs, you can use various methods - chemical, thermal or mechanical.
Chemical involves applying a solvent or remover, while thermal paint is heated with a hairdryer and then scraped off with a spatula.
With mechanical finishing, the finishing coating is knocked down with an ax or cleaned off with a drill with an attachment.
Acrylic paint is removed with a metal scraper for washing dishes, and water-based paint is thoroughly soaked with water and scraped off with a spatula.
Removing acrylic paint
A wire brush and coarse sandpaper are suitable for removing acrylic paint. Wear rubber gloves to protect your hands during the process. If the paint you buy is of high quality, it will be more difficult to remove. If the simple method doesn't work, use the oil dye removal instructions.
Advice! If the surface coated with acrylic paint is planned to be painted with the same material in the future, then the previous layer does not need to be removed if it has retained its smoothness.
Axe, hammer, chisel - rough but effective
This method can be called the most straightforward and simple. Simple - in terms of the primitiveness of the manipulations performed, of course, because you still have to put in enough effort. But if you have strong hands, patience and a tool at hand, then why not?
- requires serious leveling of the wall afterwards;
- ideal if ceramic tiles are used as a finishing material;
- all work must be carried out with a gauze bandage - in the process a lot of dust appears, which can cause irritation of the mucous membrane and suffocation;
- not suitable for walls made of gypsum board sheets, lining, plastic.
- axe;
- hammer;
- chisel;
- water;
- rag.
Work order
- We take the ax in our hands and make notches all over the wall;
- generously moisten an area of about 2*2 meters with water - it’s faster and easier to do this with a regular sprayer, but if you don’t have one at hand, then an ordinary rag will do;
- give the wall time to absorb the liquid;
- then pick up a hammer and chisel and confidently clean off the oil layer in the places where the notches are made;
- fix the chisel at an acute angle to the wall - and things will go faster;
- then repeat the operation for the next section - do not try to master the entire wall at once: it is better to divide the existing area into 5-6 fragments and work with them sequentially.
What not to do
It is not recommended to use the following products to remove paint:
- the thermal method using open fire is too fire hazardous;
- chemical remover - not used in unventilated areas.
Regardless of the method you choose to remove paint from walls, do not forget to use personal protective equipment. In any process you will be exposed to the following negative factors:
- dust;
- toxic substances;
- small particles of flying coating.
The most important thing to protect is the respiratory and visual organs.
Choosing a cleaning method depending on the type of paint
All of the above methods are perfect for removing oily compounds. However, some modern compositions, for example, water-based or acrylic, require a special approach.
To figure out how to clean walls from old paint, you need to know what components it is made from.
Water-based
Water-based emulsion is often used in rooms with high humidity. Although the composition contains water, it will not be possible to wash it off the walls by simply rubbing the surface with a wet brush or sponge.
To clean the wall, you will first need to moisten it well with a roller. In order for the paint layer to completely soften, you will have to treat the surface with a wet roller several times. If the room is warm, it will dry out very quickly, so you may need to dampen the wall at least 8-10 times. Then the water-based emulsion is removed using a scraper or wide spatula.
Before removing the water-based finishing coating, it must first be softened with water. Source duluxe.ru
It must be taken into account that the softened paint will flow onto the floor. To protect laminate or parquet, you must first cover the corners between the floor and walls with moisture-absorbing fabric.
If desired, instead of water, you can use paste, wallpaper glue or PVA glue. These compositions also promote the dissolution of the water emulsion. However, at the end of the work they will have to be washed off with water.
Acrylic
To remove acrylic paint, use the dry method. It is not recommended to wet the wall with this type of finishing coating. You can knock it down with an ax or scrape it off with coarse sandpaper, or take a drill with a brush attachment made of metal.
There is another answer to the question of how to remove old paint if you don’t have the necessary tools at hand. The acrylic coating is easily removed with a regular metal mesh for cleaning dishes.
The choice of cleaning method depends on the strength of the coating: the higher quality the paint, the more difficult it is to remove. If you plan to paint the wall again with acrylic paint, then you don’t have to remove the old one.
There are many attachments for drills and grinders that make it easier to remove a layer of paint and clean the surface. Source ytimg.com
Required tools and materials
Depending on the chosen surface cleaning method, a set of necessary tools is selected. For mechanical removal you will need:
- Axe. Its application begins with applying serifs along the plane of the surface to be painted. Then it is moistened with water and left for a few minutes. When the painted layer is saturated with moisture, the ax is placed as parallel to the surface as possible and the paint is removed with sharp movements.
- Chisel. Before removing all the paint from the wood, you need to remove it from the recesses and narrow areas. A narrow chisel or spatula is suitable for this.
- Sandpaper. With its help, you can quickly sharpen a dull tool.
- Using an electric drill or grinder attachment to remove paint is appropriate in the bathroom, as this fills the room with dust. Grinding wheels or chains can be used as attachments. However, such tools are not recommended for use on concrete tiles.
- A cup-shaped cord brush can act as an attachment for a drill. This method of cleansing is quite dusty, but effective and does not take much time.
- Various washes. Chemical paint removers for wood can even remove stubborn layers of paint. They are applied and kept for the time specified in the instructions.
- Spray bottle with water. Moisture is used as a preparatory step.
It is advisable to prepare everything you need in advance so that during the work you will not be distracted by searching for sandpaper or a spray bottle.