Almost all men do not like tying ties, especially if you need to make a complex knot. Some don’t even want to learn this and ask their wives for help. In order not to encounter such a problem again, fashion designers came up with the idea of sewing elastic bands and fixing the decoration on them. To ensure that the accessory does not lose its appearance after washing, you need to know how to tie a tie with an elastic band.
Today we will see step-by-step instructions for attaching this decoration. Let's see how to choose the right fabric and why you need to pay attention to it. We will also look at some rules to consider when choosing a tie.
What is an elastic tie?
This type of tie differs from others in that it is worn with an elastic band that is secured with threads. Instead of elastic, some people use elastic tape because it looks nicer. This method of fixation is used for butterflies.
Is a tie with an elastic band comfortable?
Not really
You can also secure the accessory using ribbons, but this is a more complicated option. The headband is used by those men who do not like to constantly tie heavy knots or simply do not know how to do it. Some parents tie their children's ties this way, as they might come undone at school. Step-by-step instructions will help you make any knot and secure it.
An unusual alternative to elastic: what do manufacturers offer?
It is important that a school tie is not only beautiful, but also practical and comfortable. That is why adult models with complex knots are not considered at school age. For little fashionistas, simplified versions of the “adult” accessory were invented - with elastic and more. In combination with a school uniform, it is allowed to use interesting models of ties with a zipper or, even simpler, with a clothespin.
The first option is that a young gentleman can easily put on/take off a tie with a zipper at any time, quickly and easily. Models of such accessories are sewn with a zipper along the axis, dividing them into two equal longitudinal parts, each of which can be detachably attached to a shirt. On the reverse side they are equipped with a button that allows you to fold the tie below the knot when fastening it. Externally, a tie with a zipper is no different from a standard one, but retains its original appearance throughout its entire service life.
An equally interesting invention is a tie with a clothespin, which is often used for the little fashionistas and fashionistas. It is easy to attach to any clothing, both a men's shirt and a women's blouse. The model is ideal for creating a festive look without wasting time and effort on components and fastenings, and most importantly, it does not require a detailed video to understand the features of use.
(
6 ratings, average: 3.83 out of 5)
How to tie a tie with an elastic band step by step (photo)
If you give yourself enough time, then any man can tie a tie with an elastic band. The main thing is to carefully follow the instructions step by step. For adult men and for children, the principle of tying a knot is the same, it all depends on what kind of knot you want. Step-by-step instructions will be shown below. This knot is called Windsor.
A headband tie looks exactly the same as a regular one, so there are a few things to consider when choosing one:
- Seasonality . Don't wear the same accessory for a whole year. Choose different materials for each season.
- The accessory must be the correct size . For boys, the tip of the jewelry should not reach the belt buckle. The man himself adjusts the length, taking into account the characteristics of his build and height.
- The costume must be the same fabric as the decoration.
- Pay attention to the color scheme . Buy a universal tie that will go with any outfit.
These are just some tips, but they greatly influence the image of a man or boy.
Features of the regatta model
A tie with a clasp is called a regatta. This model was invented by a young yachtsman who had no time to tie a tie, so he cut it at the back and sewed on a loop with a button. This type of tie is worn by military and office workers, receptionists, and waiters, but is not worn with a business suit. A regatta tie is a costume accessory that boys can wear.
This is a sample with an elastic fixation and a knot already tied; the kit includes special fasteners. Models are produced specifically for various professions; style attributes are available for sale for employees of the Ministry of Internal Affairs, railway workers, and waiters.
Types of regatta model products:
a narrow black strip of fabric, can be issued with a badge;- wide classic version;
- children's;
- female.
Women's models are produced for office workers, police officers, there are also options with designer patterns and knitted ones, with a rectangular tip, forked or diagonal.
Choosing a material for a children's tie
Before you learn how to tie a school tie, you need to decide on the choice of fabric. If you buy good fabric, then your decoration will not come undone. It is best to give preference to:
- Silk,
- wool,
- jacquard material,
- Atlas.
Only on natural fabrics will the knot look beautiful, especially if there is an elastic band. Also pay attention to the season; in cold weather it is better to wear thick accessories, and vice versa in summer. A correctly selected accessory makes a child an intellectual.
Master class on sewing a butterfly
When making such a model, the work is conventionally divided into three stages. On the first one, a pattern is made. The second involves preparing all the details. At the third stage, all elements are stitched together. Each of these points should be considered in as much detail as possible.
The first step is to create a pattern. In this case, the work does not cause absolutely any difficulties. You just need to prepare three rectangles with the following parameters:
- 8x13 cm;
- 13x23.5 cm;
- 11.5x22 cm.
It is most convenient to carry out these manipulations on an ironing board. In this case, the patterns are fixed on the surface with pins.
Now you need to attach the resulting pattern to the board and carefully cut out each element on the fabric. As a result, there should be three triangles of different sizes.
The largest element is taken to work first. It must be folded lengthwise and ironed to smooth out the fold. After this, the workpiece is straightened and folded again, but this time across. In this case, the contours of the fold and the edges must match.
Exactly the same manipulations should be performed with the second edge. It is folded strictly along the fold line in a vertical direction in a folded form and ironed. At the next stage, the fabric is overlapped on the second side.
Similar actions now need to be performed with a medium-sized part. The smallest element is folded lengthwise, then unfolded and folded again along the edges to the fold contour. In this form, the workpiece is ironed. In this way, the fabric is folded until a narrow ribbon can be created. Each of the folds must be ironed.
At this stage, the butterfly consists of individual elements. They need to be combined into a single whole. In this case, it is necessary to sew the middle element with a regular seam and tighten it a little. The same actions are performed with the largest part.
You can sew the edges of the smallest piece using absolutely any seam. Even a basting one will do. The large and medium element are now connected and stitched. A kind of ring is formed in the center, created by their third part.
Now you need to sew an elastic band to the bow. To do this, measure the required length, cut the tape with scissors and pull it into the ring. In order to be able to adjust the width in the future, it is recommended to additionally equip the accessory with a beautiful clasp.
How to properly tie a school tie with an elastic band: instructions with photos
Before tying the knot, try the length of the elastic around your baby's neck. It should not be too loose, as the tie will not fit tightly to the neck. At the same time, do not tighten the headband too much so as not to cause discomfort to the boy. Some make special adjustments so that the accessory can be loosened or tightened.
Interestingly, a schoolboy's tie does not need to be tied regularly; it is enough to fold it once and sew it up. This will help fix the shape.
Advice! To prevent the headband from tearing, wrap and sew any material around the elastic.
Let's see how to tie a tie with an elastic band, step by step instructions.
- Place the product face down on the table and place the headband on top, in the middle of the fabric.
- Throw the thin end of the accessory over the headband towards you.
- Bring the small end to the left, going under the rim down.
- Tie a knot by pulling the two ends out.
- Shape the knot so that there is a nice triangle on the front side.
- Iron the decoration so that there are no wrinkled parts.
Having made a small tie on the headband, you need to sew the knot with thread. Thanks to this, even after washing, the decoration does not require re-correction of shape. To learn how to tie a tie with an elastic band, you can look at the photo for step-by-step instructions.
Expert opinion
Helen Goldman
Male stylist-image maker
You need to tie a knot on the ironed accessory.
Additional recommendations
A classic silk accessory must be securely fastened with a knot. It is additionally recommended to stitch it so that wearing the original product does not cause any difficulties. In this case, the elastic band deserves special attention. It comes in several varieties.
The simplest option is most often used. True, it is also possible to use an elastic band, which is initially already looped. As it wears out, it needs to be replaced. This method of fastening is considered the most affordable and simplest.
Also, men often choose accessories with ribbons equipped with fasteners under their jacket and shirt. The peculiarity of this product is the ability to adjust the length depending on the volume of the neck.
It is useful for everyone to know the rules for wearing and tying a male accessory. Having learned how to put it on, you can go further and start making such a product yourself. The process is quite simple. It does not require large material and time costs. As a result of the efforts made, it will be possible to create a unique thing. You can choose absolutely any color for it. For example, a black or blue accessory would be an excellent solution. It can be either wide or narrow, made in various styles.
Techniques for tying a tie
The types of tie knots are comparable to knowing Albanian - it is not used in everyday life, but if the opportunity to shine has presented itself, there will be no competitors. Every man appreciates a woman who can create an impeccable tie knot on his neck with a slight movement of her hand... appreciates and is secretly a little afraid.
There are many techniques for tying a tie, but the article shows the most basic and easiest for beginners to learn: a simple knot, a classic knot, a Windsor knot, and a Pratt knot.
Simple knot: step-by-step instructions
This knot is the basis of the basics, the simplest method that is passed on by fathers from generation to generation. The easiest method is also called “quadruple” or “four-in-hand” because it is performed in four movements.
The simplest quadruple knot: step by step instructions.
Procedure:
- Place the tie around your neck so that the wide end is on the left and the narrow end is on the right.
- Place the wide end over the narrow end and wrap underneath.
- Immediately make a turn on top.
- Bring the end of the tie inward and upward, straighten it and push it down.
- Adjust height and tighten.
Easy classic knot: step-by-step instructions
The lightest of the classic knots is called the “half-Windsor”. This is the first step towards truly complex tie knots. A tie tied in this way is perfectly worn in everyday life, but commands respect in society: a light classic with a twist.
It goes like this:
Light classic knot (half Windsor) step by step instructions
- Place the tie around your neck so that the wide end hangs below the narrow end.
- Place the wide end over the narrow end.
- Pass the wide end under the narrow one.
- Insert the wide part overlapping into the neck loop.
- Swipe down and to the right.
- Wrap the resulting loop overlapping.
- From the bottom left, pull the wide end inward into the neck loop.
- Insert the wide end into the resulting pocket.
- Pull the tie at the bottom end.
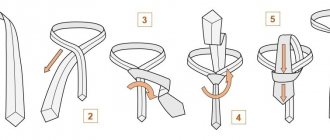
Windsor knot
Classic "Windsor"
- the simplest of the most complex ones, looking dignified and solid due to the voluminous tie loop, which is made by a few additional turns. This knot works great on ties made of thin fabric; on thick fabric it will look too pretentious. In addition, it is better to tie medium-width ties with a Windsor knot: it will look tacky on too narrow and too wide.
Instructions for tying a tie with a Windsor knot:
Windsor knot step by step instructions
- Wrap the tie around your neck.
- Place the wide end over the narrow one.
- Thread the wide end through the loop.
- Pull it down and to the right.
- Pass the wide end under the narrow one.
- Repeat the loop.
- Pull the wide end down and to the left.
- Wrap it around the narrow end.
- Thread the wide end of the tie through the neck loop again.
- Tuck the tie into the pocket.
- Tighten.
Pratt knot
This knot was invented by US Chamber of Commerce employee Jerry Pratt, which is why the knot is also called “American.” Sometimes it is found under the name "Shelby". This knot is very popular in America due to its versatility and elegance, which has made it popular both in office life and at social events.
The Pratt knot is tied in the following way
:
Pratt knot - step-by-step instructions
- The tie is placed around the neck with the seams facing out, the wide end on the right, the narrow end on the left. The left end is extended to the level of the navel, the main movements are made wide.
- Pass the wide end under the narrow end to form a cross.
- From this position, pass the wide end under the tie loop on your collar.
- Wrap it under the collar and pull it to the left.
- Move the wide end from left to right, forming the front side of the knot.
- Thread the wide end through the collar loop again.
- Thread the wide end into the pocket.
- Tighten your tie.
Thus, there is nothing difficult about tying ties. The basic movements are simple and vary in number of revolutions. With these simple instructions, you can easily learn how to tie a tie with the most classic knots.
A tie is one of the most important details of the image of a successful man, but it is important not only to purchase a quality accessory, but also to be able to tie it correctly. In fact, there is nothing complicated about this and all sorts of schemes have been invented a long time ago - all you have to do is follow the instructions step by step, and everything will work out!
Adviсe
The tie can be made of the same fabric as the skirt or trousers
If the school charter allows you to choose a tie to your taste, then you should take into account a number of nuances in order to turn the accessory into a bright detail of the image:
- a successful combination with elements of a suit (the tie can be the same color as the jacket or skirt/trousers, but if the suit is plain, the tie should be a tone darker or lighter);
- a pattern on a tie (geometric patterns - circles, squares, diamonds - look best as an element of a school uniform).