At least once in his life, every man comes across such an accessory as a tie. The rules of etiquette oblige you to accompany business style clothing with this element of your wardrobe. You can easily find information on how to tie a tie on the Internet. Step-by-step instructions provide all the necessary knowledge about tying patterns. The difficulty will be only one thing - choosing the appropriate knot for the selected tie. At the moment, there are more than 80 possible ways to tie a knot.
1. Windsor
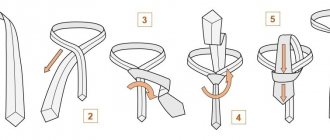
This is a noble classic method, distinguished by a triangle knot. It fits best over a wide neck collar. Are you wearing a business suit today? Great! This node will come in handy for you.
Step-by-step instruction
- Place the wide part of the tie on top of the narrow part.
- We push the wide one through the loop at the back, pull it forward, pull it down, then a little to the right.
- Then we pull the same tip into the resulting loop on the neck, and then move it to the left.
- And here it is, the result: we have a knot. Draw the wide “tail” of the tie over it back to the right.
- Now we move it up through the loop on the neck...
- This end in front has formed a ring, we push it into this “eye” and lightly secure the knot.
Video instruction
Ways to tie a tie in pictures for men
All methods of tying a tie, of course, will be very difficult to learn and train, but you need to know the most sophisticated ones that suit a man’s style. The more a man knows the techniques, the more diverse his image will be. The most common knot options around the world today are the Windsor and Half Windsor, Double and Cross knots, Prince Albert and Grantchester knots, as well as the Triangular knot. There is also a standard and simplest version of the knot for beginners.
Simple knot
If tying a tie is a completely unfamiliar activity for a man, experts advise starting training and learning with a simple knot called Four-in-hand or “four”. The result of weaving should be an asymmetrical cone with the slight negligence characteristic of England. To weave you need to do all the manipulations:
- the tie is put on the neck, the wide edge is lowered lower, after which it is thrown in a cross motion on top of the narrow strip to the left side;
- now it is pulled under the narrow edge, wrapped around the thin edge to form an ear;
- then the wide strip is lifted up and threaded through the loop on the neck into the resulting eyelet.
That's it, the knot is ready, all that remains is to level it and straighten the thick edge of the tie along the narrow strip. The universal version of the knot is compatible with all types of accessories of any width and materials of manufacture. At the same time, it looks beautiful and youthful, elegant and at the same time strictly in the classic style.
Half Windsor
Using a technique such as Half Windsor or Half Windsor, you can easily and quickly get a beautiful, light and neat knot with the iconic dimple under the base. You can execute this node as follows:
- from right to left, cross the narrow strip of the tie with the wide edge of the tie, make a turn and pull the wide ribbon through the loop on the neck;
- now they pull it out under the narrow edge on the right;
- wrap it again, but around a narrow strip, forming a pocket;
- leading to the left, the wide strip is raised up to the loop;
- Now the strip is lowered down, threading the pocket around the narrow strip.
The knot is ready, all that remains is to tighten it slightly and adjust it in the center of the shirt. For this method, it is better to choose a tie made of dense and padded fabrics. If a man is wondering how to tie a wool tie, the Half Windsor is the perfect answer.
Grantchester knot
Grantchester is a technique for tying a tie of sufficient length, which results in a knot close to the Cavendish version. We are talking about a large and colorful knot, and to get sufficient volume, the tie needs to be longer than the standard model. So, we tie a tie beautifully in Grantchester as follows:
- a wide strip is crossed with a narrow one on the inside, after which two turns are made in the direction to the left, forming a double pocket;
- a wide strip is lifted up through the loop from the inside;
- lowered over the pocket in the direction to the right, after which from the inside under a narrow strip it is carried out to the left;
- now they wrap the narrow strip around the wide strip again, forming a third pocket;
- on the right side, a wide strip is raised up to the loop on the inside;
- at the end, a wide strip is threaded down through three pockets.
The result should be a voluminous and wide knot, which is located in the center of the shirt collar. Stylists advise combining this knot with a Shark collar.
Cross knot
If a man wants to tie his tie beautifully in an elegant and informal version of the knot, it is worth considering the Cross Knot technique, which was developed by a woman and designer from Sweden, Amanda Christensen. You can create a node in the following way:
- a wide strip is placed on top of a narrow one towards the left;
- make a turn around the narrow part to form a pocket, after which the wide edge is brought up over the loop;
- draw out the girth of the loop, drawing a wide stripe on the right;
- repeat the rotation around the narrow part again, making another pocket;
- repeat the turn, but now bringing the strip from the inside into the loop;
- The wide edge is threaded up and then pulled into the pockets.
The result will be a voluminous and uniform knot that can hide some flaws in a man’s appearance. Most often, this technique is practiced on ties made of thin, flowing fabrics.
Windsor Knot
The classic Windsor technique, which has been practiced for many years by men around the world. Stylists generally believe that any man should learn this knot, as it is ideal for formal meetings and everyday work environments. You can braid Windsor as follows:
- cover the narrow strip with a wide strip from right to left, make a turn around the narrow strip;
- the wide edge is drawn from the inside into the loop, a turn is made on the right side around the loop;
- a wide strip, drawing out from the left under the loop, repeating the turn from this side;
- now a wide strip is made around the narrow one, forming a pocket;
- the edge is inserted from the inside into a loop on the neck, lifted up and then pulled into the pockets.
The result is a strict knot of sufficient volume, a rich and symmetrical design with double reliable fastening. This knot will brighten up a tie of any shape, variety and size.
Double knot
If we consider all the options for tying a tie, the Double Knot is a simple and very attractive design that is performed in several steps:
- the wide edge intersects the narrow one from the outside;
- a turn is made twice around and the wide edge is brought from the inside under the loop on the neck;
- After this, the wide edge is drawn from the inside of the double pocket.
The result is an elegant and classic design that looks best when paired with long, thin accessory options. The difference between the simple method and the Double Knot is the number of pockets, that is, turns of a wide strip around a narrow one.
Prince Albert Knot
Prince Albert is an English classic tie tying technique that allows for narrow and thin versions of the accessory. You can assemble the structure as follows:
- the long wide edge is placed crosswise on top of the narrow edge in the direction to the right;
- make two turns from inside the narrow strip, bringing out a wide strip on the right side;
- now the wide edge is brought out from below to the loop on the neck and lowered into the pockets with which the narrow strip was wrapped.
All that remains is to straighten the structure on yourself, adjusting the knot. Ideally, this English version will look on short men, as well as on thin and elongated accessory models. But it is better to choose a shirt with an extended collar.
Triangle
Standard instructions for tying a tie in a triangular shape, the Kent knot technique is suitable for beginners in this matter, since it is quite simple in itself. To weave you need to do the following:
- the wide strip should be 30 cm lower than the narrow strip;
- a wide stripe intersects with a narrow stripe on the inside;
- now they make a turn around the narrow part, forming a pocket;
- after this, a wide strip is placed under the loop from the inside;
- at the end, a wide strip is passed through the pocket, straightening down to the very belt of the trousers.
The result is a standard triangular knot, which is ideal for the winter season and wool ties. Although it will look elegant and stylish on silk models.
2. Cross
Great for a long tie, which is often purchased by tall men (ideally wool or cashmere), as well as a high collar.
Photo diagram of tying
- So, we place our “noose” so that the wide edge is on the right.
- We put it on the narrow end from above in the direction to the left, bend it around, and bring out the wide tip from below to the right.
- If everything works out, we throw it on top through this loop, and bring the wide tip to the left.
- We “wind” it around the narrow part, turn this thin end to the right and pass it through the resulting loop.
- We knitted a double ring for ourselves.
- We take the wide “tail” of the tie, carefully thread it through this eye - or, if you have a powerful neck, then through the back loop (this method will help visually reduce your size).
Step by step video
Pratt or American knot
The Pratt knot, or Pratt knot, was invented by US Chamber of Commerce employee Jerry Pratt. The knot is universal and suitable for a classic collar and with rounded ends.
Click to enlarge the Pratt node diagram!
More details here ->>>
3. Hannover
Another triangle knot, and it turns out even larger than the Windsor. The collar should be as wide as possible. Perfect for miniature representatives of the stronger sex. How to tie a tie if it is quite wide? This instruction will do just fine.
Scheme in pictures
- Cross the ends of the tie thrown over the collar so that the thick edge lies below and the seam facing out, and the thin edge lies on top, “looking” with the end to the right.
- Throw the thick end to the right, covering the thin one. Now we direct it from the bottom up under the tie on the neck.
- to the left and down, wrap it around the resulting knot once and bring the same tip through the neck loop from above.
- We make another turn, this time from left to right.
- Now all we have to do is pull the wide tip through the neck loop behind the knot and pull it through it, pull and pull... That's it, you've done it.
Video
Butterfly
“Butterfly” is a shorter, more original and strict version of such a common men's product as a tie. It is usually combined with tailcoats and tuxedos. However, in everyday life there is a place for such an accessory, however, if it is tied beautifully and correctly. How to do it?
- The bow tie is worn around the neck so that its right side is longer than the left (from the side of the tie owner).
- The longer edge is placed on top of the shorter one and passed through the center.
- The short side is made even shorter by folding one side of the “butterfly” like an accordion.
- The long edge of the tie “grabs” the short side, moving from top to bottom, and winds back.
- The more elongated half of the “butterfly”, in the same way as the other half, is folded like an accordion and passed through the resulting loop.
- The ends of the “butterfly” are carefully pulled in different directions to secure the knot.
For information : if you tie a bow tie correctly, the finished product will have two “wings” on both sides. In this case, the length of the outer sides should be equal to the length of the inner sides. Otherwise, the accessory will not make the desired impression.
Agree, tying a bow tie beautifully and symmetrically is very difficult . It is for this reason that it is recommended to start your first acquaintance with such a neck accessory with a simpler “butterfly” with an elastic band.
The photo shows a diagram for tying a bow tie:
But if you really want to learn how to tie an original classic product, then carefully study not only the description and photograph of the process, but also the video on the topic.
We invite you to watch a video on how to tie a bow tie:
Cross tie
A non-festive option - this knot is suitable for the weekend, and this way you can tie not only your own, a man’s tie, but also your friend’s accessory.
How to tie a tie correctly - step-by-step instructions
- When throwing a tie over the collar, make sure that the seam goes inward.
- Point the narrow end from left to right, laying it on top of the wide one.
- Fold it from the bottom up and pull it through the tie loop around your neck.
- Move the thin end to the right, “dive” under the thick tip - you get a loop.
- We pull the wide “tail” up through this loop.
- Now we place the narrow tip into the same loop, pulling it behind the loop on the neck.
One last push and you are to be congratulated.
Which methods are suitable for narrow models
All these tying methods are not universal and can confuse inexperienced fashionistas. There are techniques that are only suitable for wide, massive models, and there are options that are used only for narrow accessories. Among the latest:
- quarter;
- "Half Windsor";
- cross or "Christensen".
The standard width of modern ties ranges from 8.25–9.50 cm. Narrow ones include models with a width of no more than 6.5 cm. In order not to make a mistake with your choice, you must follow the following rules:
- the width of the suit lapel should be comparable to the width of the tie;
- large men should not choose too narrow models;
- Slim styles are good for casual style, but are not always appropriate for formal events.
To get complete information, you can find videos with step-by-step instructions - watch and tie a knot at the same time. If you are not lazy and train more often, the process will become easier each time. And after a short period of time, tying a tie will already occur automatically.
Quarter
Christensen
Half Windsor
Oriental, aka Eastern
The simplest of knots, it fits perfectly with a thick (say, thick wool) tie. Not suitable for those with a round face.
There are types of knots designed to be tied in three seconds - however, they also fall apart quickly. This method is just that. The instructions for “knitting” it are short, but, however, you will have to get used to it - not everyone can do it without training.
- We throw a thin “tail” over a wide one, directing its “arrow” to the right.
- We “hug” the narrow half with the wide half, directing it to the left.
- Now we pull this wide end at the back of the knot through the neck loop, pull it through the knot from top to bottom. The node is ready!
Video instruction
How to tie a tie on yourself: life hacks
The fashionable word today “lifehack” has become popular with society because it simplifies various complex tasks and actions many times over. The same can be said about the methods of weaving ties; experts offer life hacks on how to quickly and beautifully design a design without any skills.
Illustration of how to braid a tie in 10 seconds.
Video on how to braid a knot in less than half a minute:
Thanks to such little tricks, men who do not have free time for complex and sophisticated knot options will quickly cope with the task of weaving a tie.
6. Kelvin
With a “purl” knot. One of the difficult knots, Kelvin is the brother of the Oriental knot, so if you have already figured out the step-by-step method of tying an Oriental tie, there will be no problems with this either.
- We cross the narrow tip with the thick one, laying it on top, with a seam on the outside, and to the right with an “arrow”.
- Wrap the thick end around this tail, then pull the wide end out from underneath, forming a complete twist.
- At the end, the thick half of the tie should “peek out” to the left.
- Now we place this end towards the right, on top of our future knot.
- Push the tail into the neck loop through the knot and tighten.
Step by step video
How to wear a tie with an untucked shirt
In order to wear an untucked shirt, you need to have a very slim figure and not have problems with being overweight. In principle, young men will be able to afford this. An impressive adult will be embarrassed by his appearance. If you really want to wear an untucked shirt and also tie a tie to it, then you should opt for a tandem in the same color scheme. It is desirable that the color and pattern of the tie be similar to the color and pattern of the cuffs and collar of the shirt.
A plain shirt in grey, white or black with sleeves rolled up to the elbows in combination with a thin black tie will look beautiful. It looks especially stylish with jeans (on a slender figure!!!).
Young ladies can afford to wear a tie with a plaid shirt with short sleeves or 3/4 sleeves, but older men do not need such experiments.
Trinity Knot
There are many ways to tie a men's tie. One of them is the Trinity Knot, which in English is called The Trinity Knot. This tying method may seem complicated, but in fact it is not entirely true.
You can easily tie a Trinity knot as follows:
- First, you need to put the tie around your neck so that the ends hang down on your chest with the wrong side facing the shirt (with the seams facing in). The wide end should be placed on the left, the thin end on the right.
- The wide tip should be immediately positioned at the level of the belt buckle on the trousers, because its length will remain that way. All other actions will be performed only with the thin end.
- So, we take the thin tip and throw it in front over the wide cross.
- Then it needs to be passed under the left side of the Trinity collar directly under the chin and wrapped around it once.
- After this, this end is threaded from below under the wide one, threaded under the right side of the collar and wrapped around it once (similar to what we did before on the left side).
- The thin end is then threaded under the bottom and brought over in front of the wide end to form the front face of the Trinity (as in step 8).
- We pull the thin tip into the resulting loop and wrap it around the wide end, after which we thread it through the loop again, as shown in the diagram (step 11).
- We insert the tip into the loop from the wrong side and straighten it so that we get a beautiful “triple” Trinity knot.
Trinity looks very unusual and elegant. Suitable for a special occasion when a man wants to look presentable, but not banal.
How to tie a men's tie from a satin ribbon?
Despite the numerous types of ties and knots made from them, homemade versions are very popular, not so much because of issues of economy, but because of the possibility of creating a designer bow. A man can design a non-standard and elegant version of a tie, having only one satin ribbon. The Wismar knot, which is practiced by both men and women, is ideal for such an accessory.
The weaving method itself was described above, although for learning it will be enough to look at the step-by-step actions in the illustration. This knot is recommended to be worn only on special occasions. But for a work and official setting, a tie made of satin ribbon and a Wismar knot are not recommended by stylists.
You can also use ribbon to create an elegant and bright butterfly for another special occasion.
Eldridge knot
The Eldredge Knot (in English called The Eldredge Knot) is another simple way to look original and elegant in English.
To get such a beautiful knot, you should use the following method:
- The tie should be positioned in the same way as in the first case: the wide end on the left, the thin end on the right.
- We cross the thin tip in front of the wide one.
- We wrap the wide end to the right side, and pass the thin end over the collar of the Eldridge knot and wrap it around it once, as in the diagram.
- We form the front part of the Eldridge knot by wrapping the thin tip in front of the wide one and threading it through the resulting loop (step 6, 7, 8).
- We wrap the free end around the collar again, throw it over the top and thread it through the resulting loop (step 10-13).
- It will be like 2 turns around each side of the collar of the knot. The thin end must be threaded through the loop from the wrong side and hidden behind the wide end of the tie. Straighten and place evenly the folds of the fabric. The Eldridge knot is ready.
Fashionable asymmetry or Prince Albert knot
The Prince Albert knot or Prince Albert knot is a rather sophisticated and asymmetrical knot for a tie. Looks great on thin men. We recommend using a thin tie up to 5-6 cm wide. Suitable for medium, wide and button collars.
Click to enlarge the diagram of the Prince Albert node!
More details here ->>>
9. Cape Knot
Cape (called The Cape Knot in English) is not the simplest, but definitely the most effective way to style a tie. It is also called a “tie within a tie.” Indeed, the Cape gives the impression that one small tie is located inside a second, larger one.
To create this miracle, use this method:
- We place the tie, as in the first two cases, with the wrong side facing us. Place the wide end at the level of the trouser belt buckle.
- We throw the thin tip in front over the wide one and pass it under the chin into the formed corner.
- Then we wrap its end once around the front of the Cape knot, forming its “pediment”.
- We wrap the thin end around the collar on the left again, thread it under the bottom and do the same operation on the right.
- Then we lift the wide end, find the intersection and thread the thin tip into it.
In terms of technique, Cape is very similar to Eldridge, but is a simpler version of it. Moreover, this method allows you to get a very beautiful, elegant “nested” knot in English.
Rules for tying a Prince Albert knot
As with all other knots used to tie ties, for Prince Albert there are instructions to help you do it quickly and efficiently.
Step by step instructions in pictures
Take the tie with the inside facing you, with the seams inward, so that the wide end is on the right and the narrow end on the left. Take the end of the narrow side and place it at a level slightly above the navel. The size will vary due to different heights, as well as the thickness and width of the product.
Place the wide side of the accessory on top of the narrow side, as if making a crosshair.
Wrap the narrow side with the same end of the product, moving from left to right.
Move the wide end horizontally from right to left, thus forming the front side of the tie.
The action must be repeated and wrap the wide side again, but placing it slightly lower than the first wrap.
Carefully pull the wide end towards the neck, thread it under the resulting collar.
On the front side of the completed bundle, pass through the loop formed in step 5.
Wide end, carefully pull down, gradually tightening.
Adjust the knot so that it is evenly positioned in the collar.
Freestyle knot
The easiest way to look elegant and at the same time slightly imposing is to tie a Freestyle knot (in English it sounds like The Free Style Knot).
This is a simple knot, vaguely reminiscent of a Windsor.
Use the following tying method:
- The starting position is the same as in previous cases. We direct the wide end to the left, the narrow end crosswise over it.
- Place the wide tip behind the narrow one and pull it to the right.
- Then we thread it through the loop, as in the diagram, from top to bottom.
- After this, we wrap the wide end in front of the narrow one, thread it under the chin and easily insert it into the loop in front.
- Straighten the knot and adjust the tightness.
This is a very simple way to form a beautiful, voluminous knot. It will look equally good with any width and color of fabric.
This is also a favorite way for women to tie ladies' ties and thin neckerchiefs. It allows lovers of sophisticated style to be strict and elegant in English.
When should you choose a wide tie?
According to all the rules, the width of the accessory corresponds to the width of the lapels of the jacket. But not in the case of a wide tie, the best option in this case is if there is no visual difference between the sizes of the tie and lapels.
Do you wear a wide tie?
Not really
- If a man is slender and relatively short in stature, he needs to choose the right wide tie. Catchy ornaments will visually distract attention from their owner and attract too much attention from the audience. A single-color accessory, similar in color to the suit itself, will visually give a man the appearance of a broad-shouldered, tall gentleman.
- An athletic build and tall stature are the ideal figure for wide ties. And such men know exactly how to tie it correctly and beautifully.
- For men with a larger body, a wide neck accessory will give them a slim and complete look.
Important! A large tie knot is capricious in its own way; dense lining material is not suitable for it. In this case, the appearance will be unkempt and bulky. Therefore, the selection of material is very important. Also pay attention to the collar of the shirt, whether there is enough space under the collar. Finishing touch! Once the tie is tied, check the length of the ends. The wide end should be neither long nor short, the ideal option is two centimeters below the waist!
How to accurately choose this elegant accessory?
- Drawing. Put on a striped suit - get a plain tie. The pattern of the tie should not repeat the patterns of other things from the image (and first of all, the shirt).
- Color. Choose a color not at random, but by trying it on with both the shirt and the suit. And remember: the tie should be an elegant “strokes”, not a dominant spot of color. If you choose a bright red model, you will, of course, be remembered... But perhaps only by the look of the tie. But men's style is to stand out with intelligence and discreet clothes.
- Lenght and width. There are different models - all of them are created for our different figures, that is, tall and short, fat and thin men. A thin, miniature guy will be fine with thin lapels and the same tie - well, a large man is better off buying a wider model.
We knit a knitted tie beautifully
A knitted tie is a new trend in men's fashion, which belongs to the casual style, that is, the urban style. Today, men prefer to wear such tie models with strict classic and retro looks in suits and shirts. They are preferred during the cold seasons of winter and autumn, and fashion designers combine them with tweed suits and mismatched jackets.
Knitted tie
In principle, most tie designs are suitable for this model. But the following methods are considered the most ideal options for weaving a knot:
Quarter knot:
Kent node:
Prince Albert:
For reference! Knitted tie models are an unofficial version of accessories for men, which is called knitted ties.