What is this text about? In this text we will answer the following questions: how to insert a wide elastic band into a belt, how to stretch an elastic band on clothes, how to loosen an elastic band on pants, How to stretch an elastic band on panties?
Underwear fits tightly to the body, so a mistake with the size in this case is especially unpleasant. But many are faced with the purchased item being too small. This happens when a manufacturer sews underwear according to a reduced size chart.
How can you stretch your socks?
If the heel or sock is pinching, the problem area can be heated with a hairdryer until the skin is noticeably softened, and then put on with a sock and worn until completely cooled. You can “freeze” narrow shoes by taking water into a strong plastic bag, putting it in the shoe and placing it in the freezer.
Interesting materials:
How to switch to HDMI on LG TV? How to navigate in After Effects? How to move a layer mask? How to multiply 2 cells in Excel? How to transfer a Yandex account to another email? How to transfer data from one account to another iPhone? How to transfer photos from Instagram to Contact? How to transfer a gallery from Samsung to Samsung? How to transfer cookies from Google Chrome to another computer? How to move an object from one layer to another in Illustrator?
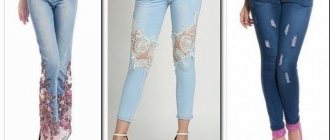
Models of trousers with elastic for women
Women's trousers with elastic can be of different models and styles:
- Bloomers are wide trousers in oriental style. They often have a low waistline. Elastic is sewn into the waistband and the bottom of the legs. Sewn from light types of fabrics.
- Pants - flared from the knee or hip. The elastic is sewn into the belt.
- Breeches are wide at the top and very narrowed at the bottom. Their length is slightly above the ankles. A popular model with a high waist and a wrap. The elastic is sewn into the top and bottom of the pants.
- Wide-leg palazzo pants. They are intended for a festive event. The flare starts from the waist or hip. This model visually resembles a skirt. They are able to correct the figure and distract from its shortcomings.
- Models that are very tight-fitting (skinny).
- Sports models are designed for training. The elastic waistband provides a comfortable fit that will not interfere with your workouts. Elastic bands on the legs provide additional wearing comfort.
- Bananas are trousers that have oval-shaped legs. They look impressive due to the folds at the hips and narrowing towards the ankles.
- Capris are a cropped trouser model that reaches mid-calf length. The elastic is sewn into the waistband and the bottom of the trousers.
- Cargo is a loose-fitting model with wide legs that reach mid-calf. Sewn with a low rise, large patch pockets and flaps. The elastic is sewn into the top and bottom of the trousers. These pants are often sewn in military style.
- Pumps - have wide legs and length to the middle of the shin. Gathered at the bottom with elastic.
- Classic pants. Sewn with a wide elastic waistband. The office version is characterized by a straight cut, without decoration.
Today, the trend is high-waisted trousers that are gathered with an elastic waistband.
The elastic band for pants can be:
- open or hidden under fabric;
- narrow or wide;
- different densities;
- with rope, braid or tape;
- with a wide tie belt.
Important rules when choosing trousers with elastic:
- you cannot choose trouser models whose elastic bands dig into the sides;
- the model should fit well: the pockets do not bulge, creases do not form at the seams;
- The trousers are made of high quality fabric.
Video on how to sew trousers with elastic
Scotch
And again returning to the topic of depilation... If the pellets have appeared recently and there are not so many of them yet, then a good sticky tape will help to overcome them.
In this case, the free part of the pants must be held with the other hand to prevent additional stretching of the material. This procedure must be repeated until the fabric is completely free of matted lint.
Pros: budget and fast method. Cons: Not suitable for all types of fabric. The method will not cope with a large number of pellets.
How to sew elastic into pants
To work you will need:
- Pants that require elastic to be sewn into them.
- Rubber. Its thickness depends on personal preference (1.5-3 cm).
- Pins.
- Sewing machine.
Work process:
- Install a knit stitch on the machine. It will not stretch or deform the fabric. Set the interval to 3, put the foot in zigzag mode.
- Fold the elastic in half and stitch the ends of the elastic with the established seam to align it into a circle.
- The elastic is attached to the inside of the top of the pants. To do this, the elastic seam is located on the front seam of the trousers and is attached with a pin. The other part of the elastic is attached to the opposite seam of the pants. Next, the elastic is evenly distributed and attached with pins.
- The elastic is sewn to the trousers using a knitted seam. The seam should be 2-3 mm from the edge.
- Place the machine foot on the overcasting foot. Set the type of seam to overlock with small intervals. Sew the edge of the product. This seam will make it more neat.
- Fold the elastic inward along with the top of the trousers. Secure the fold with a pin. Go over the entire top of the pants and secure the folded elastic band with pins.
- Set the presser foot to normal mode, set the knit stitch at intervals of 3. Sew the elastic around the entire circumference. The seam should be 1.5-3 cm from the edge.
Video on how to sew elastic into trousers:
We use plastic
Plastic hair ties are quite popular because they are beautiful and sophisticated. Luckily, you can also make them yourself.
Note. You can buy soft plastic in specialized stores for creativity. It can be very different.
For example, thermosetting, requiring heating up to several hundred degrees to harden. And there is one that only needs to spend about twenty minutes in a regular oven.
Example of a plastic rubber band
This material has many advantages:
- sculpting with it is a lot of fun;
- it has a great variety of shades;
- You can make any shapes from it.
For example, it is easy to sculpt ordinary ladybugs. Or some other similar beautiful composition. You can paint the product using ordinary acrylic paints - they are very durable, do not wash off and will ensure the brightness of the product.
Once the plastic is finished in the oven, glue a rubber band to it.
Literally anything can be made from plastic:
- bows;
- flowers;
- insects and other figures.
Is it possible to return items to their original size?
It’s possible, but not for any sweater. Cotton, acrylic and synthetic materials are unlikely to be restored, but wool, cashmere or mixed types of threads with a high wool content can be returned to their previous state. A lot depends on how much the sweater is stretched.
The original size 46, stretched to 52, can be safely thrown into the trash, and if the item has stretched one size or only the sleeves or neck have stretched, there is no reason to panic. It will take a little effort and time for the sweater to regain its previous shape.
Move cuffs
This is the easiest way to shorten pants, allowing you to maintain the original appearance of the product. The following algorithm of actions must be followed:
- Carefully rip the cuffs away from the bottom edge of the pants. This should be done with small nail scissors so as not to damage the fabric.
- Measure the length of the trousers. It is advisable to leave a margin of approximately 1.5–2 cm, since knitted items shrink a little after washing.
- Draw a cutting line.
- Check that the length on both legs is correct. To do this, just connect the two parts and make sure that the lines drawn on them completely match.
- Cut off excess material.
- Secure the cuffs with pins around the circumference of the legs.
- Sew the cuffs to the product.
Stretching an elastic band
There are two ways to loosen the elastic:
- Take any item of your choice: a chair, an ironing board, a small drawer or a table. Pull the item over the object and leave it in this state for a day. It's better to wait a few days. The rubber band can be moistened with water.
- The most effective way is to iron the elastic with a hot iron. Using a damp towel, it is worth moistening the necessary part of the clothing for stretching. You can dip the item in water. The fabric must not be damp, it must be damp. The iron is then heated to maximum temperature. Next, the clothes are fixed on the ironing board so that the elastic stretches to the desired state. Gauze or any fabric is placed over the elastic band. Then the elastic is ironed with an iron. After such manipulations it should stretch. If necessary, the procedure is repeated. It is important to carry out all actions carefully, since some types of fabrics cannot be ironed even through the fabric.
Pants with an elastic band are comfortable and convenient. They are used for any occasion. Using simple steps, you can sew an elastic band into the waistband or bottom of trousers at home. It will also not be difficult to replace the elastic band in your pants if it is damaged or stretch it if it is too tight.
Replacing the gum
To work you need:
- The elastic is the same width as the old one.
- Large size pin.
- Thread and needle.
- Scissors.
Work process:
- Bend the belt and make a small cut in the middle. The hole size is 1.5 cm. If the elastic is sewn into the seam, it must be ripped open with scissors.
- Cut the elastic and take it out.
- Attach a pin to the new elastic band.
- Start inserting the elastic into the slit on the waistband.
- Move the pin and rubber band with your fingers to the end.
- Secure the elastic band into a double knot.
- Sew up the cut with a needle and thread.
Video of replacing elastic in trousers
How to knit purl stitches.
Insert the right knitting needle into the loop from right to left behind the working thread and wrap it around the thread counterclockwise. Pull the resulting turn into the loop and transfer the new loop from the left knitting needle to the right one. This is a classic purl stitch.
_______________
Rubber bands are different. Most often, this is a double-sided pattern that can be used to knit a hat, scarf, snood, or shirtfront.
In the photo for this article, the hat is knitted with an elastic band *knit 2, purl 2*. There is a description in the article How to knit a men's hat with knitting needles. Five options. Option number 4.
Some types of elastic bands are used for cuffs and trims on sweaters. Choose the one you like!
The best, in my opinion, are video master classes on knitting elastic bands.
What to do if the fabric is stretched?
If only a specific part of the product is damaged, for example, the sleeves are stretched, then apply warm water only to it. Soak the area in warm water and then dry as described above. Warm water will also help shrink your sweater or jacket if the item is about a size too big for you.
Interesting materials:
How to preserve greens longer? How should sick leave be paid by law? How should a gas stove be positioned in the kitchen? How should the tablecloth hang? How should a chandelier hang in the kitchen? How to deliver a wedding cake? How to effectively cool the air with a fan? How to travel to Turkey on your own? How to save your family budget on groceries? How to emigrate to America from Russia?
Various fabric elastic bands
First, let's look at how these accessories are made from scrap materials, such as:
- ordinary pieces of fabric;
- beads;
- pieces of underwear rubber bands and other household items.
In the photo: how to make and apply elastic from a sock
For example, a hair tie made from a sock is quite common.
To make it you need:
- take a new and clean sock of a suitable color;
- carefully cut off the part intended for fingers;
- roll the sock into a tight donut;
- That’s it – you have a ponytail retainer ready.
But there are other, more sophisticated methods. We will talk about them in the following subsections.
Making kanzashi
Now let's talk about how to make a kanzashi hair tie.
For this you will need:
- fabric you like for its color;
- one bead of any color; It’s better if it matches harmoniously with the selected fabric;
- rubber;
- threads;
- a piece of thick cardboard;
- needle;
- scissors.
This is what you should get
Note. All the described methods use simple components. Even if you don’t have something at home, you can buy it in the nearest store. The price of such components is minimal.
| Stage | Description |
| First | Cut out three circles of different diameters from cardboard:
|
| Second | Place each circle on the fabric, trace and cut out. You need to make five fabric circles of each diameter. As a result, you should have 15 circles. |
| Third | Next, start working with circles:
|
| Fourth | Now sew the flowers - the largest one should be at the bottom. |
| Fifth | Sew an elastic band to the bottom flower. |
| Sixth | Attach a bead to the middle of a small flower - you can use glue for this. Instead of a bead, a beautiful bright stone will do. |
Sew the folded circle.
We collect the petals into a flower.
In this photo, three flowers of different sizes are sewn into one
Making an ordinary flower
Here is another method on how to sew a fabric hair tie.
To make it you will need the following components:
- fabric of the color you like;
- circle of suede of small diameter;
- rivet;
- threads;
- needle, scissors;
- regular elastic band for fixing strands;
- glue.
Note. This decoration can be called a bracelet - a hair tie, since it is worn in a similar way and allows you not only to fix the curls, but also to decorate them.
The sequence of actions is as follows:
- Take the fabric and cut a strip about five centimeters wide from it.
- On one side of this strip, cut out small, neat petals of the future flower.
The fabric must first be gathered onto a thread
- Glue the strip onto the suede circle with the petals facing out.
- Glue a rivet in the middle of the almost finished flower.
Hairpin with rivet
- Glue an elastic band to the back of the flower.
- Wait for the glue to dry.
- DIY hair decorations are ready.
Final result
Note. Knitted hair ties are even easier to make. Of course, if you know how to knit. Take a regular rubber band and tie it in a circle.
The knitting pattern can be anything your imagination dictates.
Simple hairpin decoration
If you are interested in simple, most common hair clips, then to make them you will need small hair bands, as well as:
- a piece of fabric measuring ten by fifty centimeters;
- scissors;
- sewing machine.
The product is created as follows:
- the fabric is folded from the wrong side;
- stitched along the edge - the indentation should not be more than one centimeter;
- the fabric is folded inward and then folded in half;
In the photo: exactly how to fold the fabric
- machine stitched along the stitched edge;
- about 3 cm before the place where the stitching begins, it is necessary to provide a small hole - it is needed for the elastic;
- the fabric is turned right side out;
Once sewn, turn right side out.
- the underwear elastic is threaded and tied;
- the remaining part is stitched;
- The finished elastic band straightens out - and the decoration is completely ready for use.
All that remains is to sew up the place where the elastic was inserted
Now you know how to make a hair tie from regular fabric, but there are other materials that are suitable for these accessories.
Models of trousers with elastic for men
Men's models of trousers with elastic can be:
- Straight cut. This is a classic option. Suitable for all men.
- Joggers are a popular and fashionable trend. The model is a little tight-fitting and features straight pants with an elastic band that fit tightly around the ankle. Suitable for those who value comfort and convenience in clothing.
- Cargo - a model with elastic at the bottom of the legs and patch pockets. Sewn from thick fabric. The pockets are deep and wide. The elastic band can be either wide or narrow.
Which material to choose?
When making hair ties, you can use any material. It could be:
- leather;
- atlas;
- cotton;
- velvet;
- felt and more.
Don't throw away small scraps of fabric - they will come in handy when creating an elastic band. For decoration you can use:
- beads;
- fringe;
- beads;
- buttons;
- rhinestones and much more.
The following materials and tools will help in production:
- scissors;
- needles;
- pins;
- threads;
- pins;
- Some products may require glue and wire.
Returning the sweater to shape
There are several ways to return things to their former sizes and volumes. You can choose the one that seems more suitable for your case.
“Wedge with wedge” for a sweater
So, you washed the item in the washing machine, after which you observe this opus. If the sweater is machine knitted, then you need to do a seemingly crazy manipulation - wash it in the washing machine again! But this time according to the rules:
- Place the item in a laundry bag (you will see this device in the photo) and load it into the drum of the washing machine.
- Add detergent specifically for washing wool to the compartment.
- Set to quick wash mode.
- Set the temperature to the minimum - 30 degrees will be enough.
- Be sure to turn off the spin! Replace with simply draining the water from the drum.
- Automatic drying must also be deactivated.
- When finished, remove the item from the bag and gently wring out the sweater by hand.
If the sweater has stretched after washing, when “resuscitating” it you need to wring it out very carefully
- Now we will start “reconstructing” it - lay the product on a towel or piece of fabric.
- Give the sweater the look that suits you - pull up the fabric on the sleeves, pull it in at the waist, adjust the neckline, etc. This is done like this: place your palms on the product and smoothly, grabbing the material, carefully move them towards each other, avoiding folds. You need to start this kind of work with the seams of the product, then move on to the neckline and sleeves, then tighten the rest.
- When the item is completely dry, it will literally harden in the shape you intended, so try not to miss anything when recreating the volume of the item.
Dry horizontally on a towel
And now a little secret for those who want to reduce a machine-knitted item by several sizes: the sweater needs to be washed at high temperature - this is the only change in the above algorithm.
Advice! During drying, be sure to monitor the condition of the towel. As soon as it becomes completely wet, it must be replaced with dry one. When transferring things, do not forget to put them into marketable form again. If you do not change the towels, the sweater will become saturated with an unpleasant moldy smell due to dampness.
Machine wash only at low temperatures, no spin or dry
Hand wash sweater
What to do if the sweater is hand-knitted? And there is a solution to this problem - we will act manually. The instructions are as follows:
- Fill the bathroom with some water - warm, but not hot.
- Lay the stretched sweater on a water surface, give it time to become thoroughly saturated with moisture.
- Once it is completely wet, drain the water.
- Wring out the thing.
- Wrap the item in a large terry towel and wring it out again. Proceed carefully, do not twist.
- Lay the item on a towel in the same way as in the previous point: giving it the desired shape instead of the stretched one.
- After complete drying, the product should return to its previous volumes and sizes.
Some claim that a stretched sweater will return to its original size if you dry it on yourself after washing it like this - it will fit like a glove! We believe that wearing a wet thing for a long time is an extremely dubious pleasure, but if you have a mannequin of your parameters at hand, you can put a sweater on it, turn the figure into a horizontal position and leave it to dry on a towel.
How to properly store a sweater
Advice! Please note that in this way the sweater can dry for a day, or even more, depending on the density of the material. Speeding up this process by moving the item onto a radiator, heated towel rail or heating device is a sure way to ruin the sweater. The cost of such “acceleration” is too high.
Partial restoration of the sweater
This is also a common case: after unsuccessful washing/drying/wearing, only a specific part of the sweater has lost its shape. How can we be here? The recovery is similar to the previous ones:
Moisten the deformed area with water
- Wet the deformed area by spraying water from a spray bottle.
- Lay the item also on a towel or terry cloth.
- Give the part the shape it lost.
- After a couple of hours, the sweater will be uniform and the right size.
Advice! You can speed up drying of the product by using a hair dryer. But be careful: turn on only cold air! Hot air jets will further aggravate the situation.
More ways to get your sweater back into shape
When the previous methods did not help, you can do the following:
- If the product has simply stretched out a little when worn, it will easily return to its previous shape if you wash it in cold water and dry it horizontally.
First, soak in hot water
- Soak in hot water for 10-15 minutes. You can add liquid detergent for wool items. Wash by hand after soaking. Then immerse it in cold water for 20 minutes, squeezing it out first, but without twisting it. Place a sweater on a horizontal rack above the bathtub and let the water drain. Then lay it out in the correct shape on a towel, sheet or large piece of fabric until completely dry.
Add vinegar for added effect
- You can try this method: place the product in very hot (almost boiling water) water for 5 minutes. Then quickly transfer it to a cold one - you can even throw ice cubes into it and add vinegar to such an extent that the water acidifies. He must lie there for 10 minutes. Place on a horizontal rack above the bathtub; when the water has drained, dry the product on a towel in a horizontal position, remembering to give it the correct shape.
Always read the tag on your clothing
- If the sweater is 100% natural wool, it can be dry cleaned. They use heat treatment or washing at high temperatures. The disadvantage of this method is that the wool will be matted and poor-quality coloring may suffer.
- A very extreme way: dry it on something hot. Maybe the product will shrink, but other problems may appear.
More recommendations are in the video in this article.
Advice! Do not tumble dry! It can only ruin a woolen item.
To avoid this problem, do not dry things in the machine!