Is it possible to sterilize jars in the oven?
Before learning how to sterilize jars in the oven, empty or with blanks, you need to understand whether processing dishes at high temperatures in the oven is allowed? Sterilization using the traditional steam method gives good results. But this method is not always practical. If you need to process a lot of dishes, then sterilization turns into a long process, since only one container is placed above the boiling water in the kettle.
For successful preservation, you need to properly prepare the container.
To save time, housewives discovered all the benefits of heat treatment in the oven. This is one of the safest options, provided you choose the optimal mode. In this case, it is necessary to follow certain rules, then the jar will not burst, and all bacteria will be destroyed.
It is important to immediately prepare a suitable container that will not burst.
Basic Rules:
- The household appliance must be clean before use;
- the glass container is sterilized immediately before placing the workpieces;
- the jars should not touch (they must be arranged in a free order);
- avoid sudden changes in temperature (the container may burst);
- observe the timer;
- Do not allow cold water to come into contact with dry, sterilized jars.
It is necessary to carefully inspect the containers. If cracks or chips are found on the neck, such containers cannot be subjected to heat treatment.
Important! Before heat treatment, containers are placed only in an unheated oven. After sterilization is completed, they must cool down before they can be removed.
Dry disinfection of jars in the oven is effective, kills all bacteria, eliminates the possibility of burns and stuffiness in the room (which is typical for the steam sterilization process).
Using an oven you can carry out high-quality sterilization. In addition, the containers will not need to be additionally dried, which often takes a lot of time.
Preparing containers
If you know the important rules for processing glass containers and follow them, you can quickly and efficiently prepare jars for further preservation. Before you begin, you need to decide which utensils will be sterilized:
- empty;
- filled with preparations;
- together with the lids (they are placed next to each other; closed containers cannot be sterilized).
Preparing glassware for preservation is an important step. It is important that the jars are intact; you must carefully inspect them in advance for chips and cracks. If there is stubborn dirt on the dishes, such a preservation jar will not be suitable.
It would also be a good idea to check for leaks. To do this, screw the lid tightly onto the jar of water, after which the container is turned over. If the liquid does not leak out, the dishes are suitable for further preservation.
Metal lids must be clean, free of rust, and screw tightly. You need to check the integrity of the rubber band in advance. It is better to take new lids, but if it so happens that the housewife had to use them from previous conservation, it is necessary to get rid of the ingrained smell. For this purpose, the products are placed for 15 minutes in a 9% vinegar solution, which can be replaced with lemon juice.
Regardless of which container will be placed in the oven - empty or filled, it must first be thoroughly rinsed under running water with a small amount of detergent. You can replace dishwashing gel with baking soda.
Sometimes, after washing, the container is additionally treated with laundry soap or mustard powder, and then the mixture is washed off under the tap.
There is no need to wipe the container dry, since droplets of moisture contribute to more effective sterilization of the jars in the oven. The container prepared for processing is placed on a clean towel with its neck down.
There should be no chips or cracks on the cans
Be sure to wash jars before sterilizing
There is no need to wipe the jars dry
How to Sterilize Empty Jars and Lids in the Oven
Before heat treatment, jars and lids must first be prepared. In this case, only metal lids are subjected to dry sterilization. The containers should be free of chips, scratches, cracks, rust (applies to lids) and other abrasions. This is necessary to prevent the seal of the vessel from being compromised both during processing and during further storage of the workpieces.
The lids, like the jars, must be thoroughly rinsed, and then placed in a pan of water and boiled for 15 minutes.
Lids and containers are thoroughly washed and rinsed. If chemicals are used for cleaning, you need to rinse longer with running water. In the first option, the container is installed with the neck down, in the second – up, to evaporate excess water.
Both dry and wet vessels can be sterilized in the oven.
Preliminary preparation for the process
Containers for blanks need preparation, namely, you need to find out how sealed the packaging for winter products is and how to properly wash the containers.
About the tightness of cans
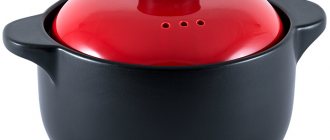
Without sealing there will be no storage; the jar with its contents will not last even a month. To make the closure airtight, use tin lids with a rubber band.
Unvarnished tinplate is suitable as lids for jams, preserves, pear and apple compotes. But it is better to cover vegetable marinade, sour berries and sour fruits with varnished yellow lids.
Cover to cover discord PHOTO: koffkindom.ru
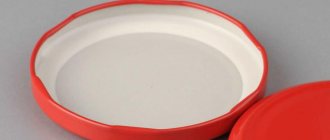
If the jar involves the use of a screw cap, then this is even more convenient.
When the screwed cap cools down, it creates a vacuum effect inside PHOTO: metalprint-ua.com
Wash the jars correctly
First, we inspect each container, discarding vessels with cracks and chips.
Advice! Threaded jars are also checked by screwing their lids on. It should fit tightly around the neck.
The test is carried out as follows: water is poured into the jar, the outside of the container is wiped dry. Now the container is screwed on with a lid, turned over and shaken. Droplets of water appearing on the table will let you know that the closure is not tight.
At the first stage of washing, it is better to fill each jar to the top with water and leave for a couple of hours. It happens that solid particles invisible to the eye stick to the inner walls, but in water they get wet and are washed out perfectly.
Washed jars are waiting in the wings PHOTO: kinkong.ru
For washing we use baking soda. It eliminates all odors and is completely washed off along with the dirt.
Important! Do not use an already used sponge to wash jars! It must be new!
Then the lids are washed, this requires warm water and laundry soap PHOTO: kinkong.ru
Sterilizing jars in an electric oven
Sterilizing jars in the oven of an electric stove is much easier, since the temperature in such a device is evenly distributed.
Heat treatment is carried out according to the following instructions:
- the oven must be cleaned and free of foreign odors;
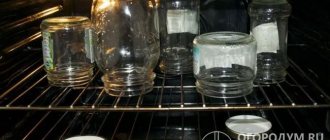
- clean containers and metal lids without rubber are placed on a wire rack or baking sheet in a loose order, not tightly to each other;
- place in a cold oven;
- heating should be gradual and take place at a certain temperature range: 40° - 2 min, 60° - 1 min, 80° - 1 min, 100° - at least 1 min (the maximum temperature for sterilizing glass jars in an electric oven is 120-150 °);
- After the set timer ends, wait 5-10 minutes until the containers cool down.
You need to carefully remove the jars using oven mitts and towels.
For reference! If hot pouring is used for preservation, you can use hot jars. Warm or chilled products are placed only in chilled containers.
When processing dishes in an electric oven, you need to take into account the location of the heating elements. It is necessary to install containers at the same level or increase the disinfection time interval for items placed on the lower tier of a household appliance.
There are many benefits to using ovens for sterilization. Such seams are perfectly stored and almost never explode.
Sterilizing jars in a gas stove oven
The sterilization process in a gas oven is practically no different from processing in an electric oven. There is only one difference - the maximum heating temperature is 180°. The fire is lit at low power so that the jars heat up gradually.
For the first 5-10 minutes, the thermometer should show 50°, then the temperature increases to the limit set for the gas stove.
The volume of processed containers affects the sterilization time:
- 0.5-0.75 l – 10 minutes;
- 1 l – 15 minutes;
- 1.5-2 l – 20 minutes;
- 3 l – half an hour.
10 minutes are enough to sterilize the lids.
Pasteurization of cans in the oven
Processing at high temperatures is not always suitable for preserving the beneficial properties and taste of products. In this case, longer heat treatment at lower temperatures is appropriate.
Thanks to heating, the container is not only sterilized, but also dried. This saves time on additional drying of containers, as after steam treatment.
The time interval for pasteurization of empty cans is increased by 1.5-2 times, and the temperature is reduced by 10-15°. How to properly pasteurize a glass container:
- the jars are placed neck down in a cold oven;
- heating the space of the household appliance should be gradual (to begin with, set the temperature to 60°);
- after a few minutes, increase the degrees to the maximum temperature for pasteurization - 90°;
- processing time is at least 20 minutes.
After heat treatment, it is recommended to immediately cover disinfected dishes with a clean lid.
How to sterilize jars with blanks
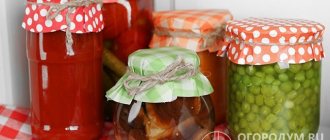
Many recipes for preparations require sterilization of glass containers along with the ingredients. This is necessary to ensure that canned foods last longer.
Most recipes for winter preparations require sterilizing jars in the oven along with the ingredients.
How to properly sterilize filled jars in the oven:
- glassware can be placed not only in a cold oven, but also in a slightly heated oven;
- there should be a distance of at least 5 cm between the cans (up to 6-8 cans with a volume of 1-1.5 l can fit);
- each jar can be covered with a metal lid (you cannot screw it on);
- set the required temperature (mostly 120°).
Place containers with ingredients without lids in a cold oven.
After heating to the desired degrees, you need to set a timer. The minutes are recorded from the moment when the surface of the workpiece begins to boil. If the recipe does not indicate how long heat treatment is required, then sterilization is carried out for the same amount of time as for empty jars.
Leave to sterilize for 20 minutes (time may vary depending on the volume of the container).
After completing the process, the containers with the ingredients are carefully removed from the oven and immediately rolled up.
Cover the canning with a lid.
Important! Sealings are placed only on a dry towel. If it is even slightly damp, the jar may burst due to temperature changes.
Sterilization process
Harvesting does not require much experience. Even an inexperienced housewife can easily handle this technology. However, there are several mandatory rules that must be followed when canning at home:
- careful overhaul;
- complete processing of raw materials;
- preparing the necessary equipment;
- selection of cans;
- washing;
- sterilization of containers.
- step by step execution of the recipe.
Note! Even minimal non-compliance with the technological process can cause the appearance of harmful microorganisms, resulting in spoiled canned food.
For homemade preparations, jars with a capacity of 0.5-3.0 liters are always used. To tightly close glass containers, factories produce metal lids with rubber, narrow rings. They are designed to create a complete seal. The diameter of the lids corresponds to the neck of the jar. Usually it is 83 mm. To seal the jar, special seaming machines are used. This kind of canning requires a lot of time, as well as physical strength.
Today, housewives are increasingly using glass containers equipped with screw caps. This innovation made it much easier to prepare and preserve food.
How to sterilize empty jars without an oven
Disinfection using an oven is just one of the options for processing cans. There are several other methods you can use.
For a couple
In this situation, you will need a saucepan, the size of which will depend on the number of jars to be sterilized.
The container is filled with water and brought to a boil.
As soon as the water boils, a metal sieve, colander or other structure that allows steam to pass through is placed on the surface. The containers are placed upside down on top. For containers with a volume of 0.5 liters, 10 minutes of treatment is enough, for 1.5 liters - 20 minutes, 3 liters - 30 minutes.
A sign that the jars have been sterilized will be large drops of water running down the glass.
For reference! A kettle, a double boiler, a pressure cooker, a dishwasher, and even a solution of potassium permanganate are also used for sterilization.
On the water
One of the easy and energy-intensive methods. In this case, you will need a large saucepan. The container is filled with water, jars are placed in it, put on fire and brought to a boil. After which the dishes are taken out and laid out on a dry towel with the neck facing up.
For heat treatment, 5 minutes in boiled water is enough.
Microwave
Killing germs in the microwave speeds up the disinfection process. Only cans can be processed; it is advisable to boil the lids in a separate container.
To remove the lids from the pan, it is better to first drain the water or use special tongs.
To carry out the procedure, jars filled with water (about 2 cm from the bottom) are placed in the microwave oven. Empty containers are prohibited. The maximum power and timer are set for 5-6 minutes. The water in the container should boil. After which the cans must be removed with dry oven mitts.
The larger the container, the more time it will take for heat treatment.
Processing containers in a steamer
You need to pour a small amount of water into the steamer and put the lids on. After this, place the attachment for the jars and place them on the surface. Connect the device to the network.
This method is similar to the previous methods. Its difference lies in the fact that the container must be placed on a grid. The operating principle is similar, but the mechanism will be different.
The steamer is prepared in the following sequence. Water is poured into the lower section. After waiting for the water to boil, place the jars on the surface. Exposure time is 15 minutes.
Remove the container using an oven mitt. Let the droplets drip and start filling with food.