Nowadays, when there is no longer practically clean water, we have to install a container for storing and using water in places where there is no water supply (dacha, country house). Water is a substance in which various forms of life develop and have adverse effects on the human body. Even in city water supply pipes there are enough harmful deposits that can cause harm to human health. Purifying water from germs and rust is a necessity for every person to maintain their health.
- Buy a used container or in a store
- Clean the used container from food residues
- Washing and cleaning the walls and bottom of deposits
- Disinfection of the container.
Now let's look at the entire cleaning stage one by one.
You can store drinking water in a used container in the same container that used to store food liquids: drinks, juices, wines, spirits, vinegar. It is strictly forbidden to use containers in which petroleum products or sewage were previously stored.
Before using the container, it is necessary to clean it of previous food residues . If possible, it is advisable to purchase a container with rounded corners and a closing lid; it is easier to clean it from food residues and deposits.
Alkali treatment
To clean plastic bottles, you will need baking soda and water. Pour soda into a container (for a 20-liter eggplant you will need 200 g of soda) and add a small amount of water to make a thick porridge. Then close the lid of the container and leave for several hours for the reaction to appear. To enhance the cleaning process, you can shake the container several times. At the end, the cleaned plastic containers should be rinsed with running water.
Soda is an excellent antiseptic, so it will clean the container not only of visible plaque and dirt, but also of harmful bacteria.
Draining water from the water heater
Draining the water is a mandatory step, since without this you simply will not have access to the internal elements of the structure. Before starting work, be sure to turn off the boiler, disconnect the wire from the power source and wait until the already heated water cools down to an acceptable temperature - that is, one that will not get you burned when interacting with it. Also close the cold water supply pipe using the shut-off valve.
For the draining procedure, you may need a hose extending from the safety valve to the bathtub, or an adjustable wrench. If the water heater does not hang above the bathtub or sink, then also stock up on rags so that you can quickly remove water from the floor in case of a spill.
There are several ways to empty the boiler tank. The first of them is the fastest, but it is only applicable if the equipment hangs above the bathtub or sink. That is, there should be a container under it from which the water will go directly into the sewer.
The implementation of the method is absolutely simple. It is necessary to disconnect both pipes that are connected to the bottom of the boiler - that is, both the “cold” and the “hot”. The result will be two holes through which drainage will occur almost instantly. Of course, after all the cleaning procedures you will have to restore these connections again, so it is often more convenient to use another method.
It consists of activating the safety valve. As you can learn from the materials on installing a boiler, this element is one of the main ones in the piping of the device. There is a pipe on the valve. You need to connect a rubber hose to it, the other end of which is lowered into the bath. Then move the handle on the valve to the open position.
It is worth noting that draining water in this way occurs quite slowly, so be patient. For example, if your water heater is designed for 80 liters, then the emptying process will take a couple of hours. In addition, if this procedure is not carried out frequently, the valve may become clogged, which will significantly impede drainage. In this case, it is necessary to clean the hole using some thin tool.
This way, you will not only speed up the liquid removal process, but also prevent serious problems with the water heater in the future, since the safety valve is designed to normalize the pressure in the tank if necessary. If it increases, the element works automatically, releasing excess water. Otherwise, the tank may become deformed or even burst. Therefore, the condition of the safety valve must be carefully monitored.
But let's return to our topic. After you have drained most of the water, a small amount still remains inside the container. This is not scary - it will pour out when you proceed to further actions. If the boiler does not hang above the bathtub, then do not forget to place a basin under it.
Cleaning with salt and dishwashing detergent
Coarse salt and dish soap will help remove green residue from plastic dishes. To do this, you need to pour 4-5 tablespoons of coarse salt into the container (it will serve as an abrasive material) and add 3-4 tablespoons of detergent and shake the container in a circular motion so that the salt and detergent foam and begin the cleaning process. The stronger the agitation of the liquid, the faster and more effective the cleaning will be. If the deposit is strong, after shaking the container can be left to soak for an hour, and then repeat the centrifuge again. After cleaning, rinse the container with water.
Millet
The method of cleaning eggplants with millet is one of the most popular. Hard grits act as an abrasive.
To remove greens:
- Pour 1-2 liters of cold water into the eggplant. The less liquid, the faster the cleaning will occur.
- Pour a glass of millet inside through a funnel (or paper).
- Stir the contents in a circular motion until the sides are clean.
We recommend: How to chop greens easier and better: chop or trim with scissors
If you don't have millet, you can use rice, peas, and beans.
A clear example of how to clean the inside of a 19-liter water bottle:
Rinse with pharmaceutical products
An inexpensive but effective antiseptic, which is found in any home medicine cabinet, can easily clean and disinfect plastic utensils. To treat a 20-liter container, you need to prepare the following solution: dilute 100 ml of hydrogen peroxide in 2 liters of water. Pour the resulting liquid into a container, close the lid and leave for 2-3 hours, during which time the hydrogen peroxide will react and dissolve algae, sediment and dirt. After the time has passed, you need to shake the bottle or canister several times and rinse with running water. If the plaque is very strong, then the procedure should be repeated again.
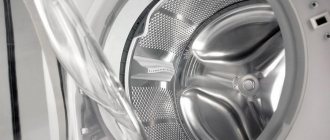
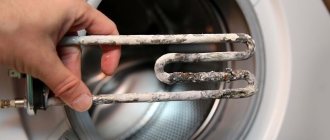
Signs of scale appearance on heating elements
When scale forms on an electric heating element, the operating time of the equipment increases. When the water is heated, extraneous noise is heard from the cavity of the tank, and in the water flow there are gray-yellow lime flakes that have separated from the body of the heating element.
Scale forms simultaneously on the heater and the boiler body, so cleaning of all internal surfaces is required.
Scale forms simultaneously on the heater and the boiler body.
Cleaning with cola and citric acid
Cola has long been known as an excellent cleaner and detergent, and in combination with citric acid it can clean even very old dirt, and most importantly - without any chemicals. In a plastic container with a volume of 20 liters, you need to pour 1.5–2 liters of carbonated drink and add 15–20 g of citric acid. In no case should you close the vessel, as during the reaction the cola will foam and gas will be released, which can rip off the lid. In addition, it is better not to hold the bottle in your hands and move away to a safe distance. After 10 minutes, the resulting liquid must be drained and the container rinsed.
It is not necessary to buy expensive detergents to wash plastic containers. It is enough to use folk remedies to quickly, cheaply, and most importantly, efficiently wash the container from green deposits and dirt.
Source
How to dry the canister after cleaning
When time is not pressing, the container is simply turned over and placed on the neck so that the remaining water drains out. A large canister is unlikely to dry completely overnight, but it can easily dry out in 2 days.
And in conditions when you want to dry the container faster, they do this:
- Roll paper into a tube (newspapers, paper towels, office sheets are suitable). Place it inside the canister so that the end sticks out - then the package will be easier to get out.
- Place the container on the table upside down (on the neck).
- On one side, a coin or other flat object is placed under the neck. We need to make sure that air passes inside.
This method dries containers of any size in a few hours. The paper absorbs moisture, and the excess flows out of the throat.
How to wash greens from the walls in 19 liter plastic bottles
How to remove greens from a bottle under the cooler, how to store water and how often should it be washed? To solve the issue of cleaning greens in a plastic bottle, I resorted to a simple technique. The green coating was removed quickly, the work was done in 10 minutes independently and at home.
In today's post I am conducting an experiment related to cleaning a bottle of greens that have accumulated during use due to lack of care. Disinfecting and removing greens from the walls of the dishes has always been in the first place if we use tap water, but here the method “will do” didn’t work. The greenery on the edges of the dishes began to scare me!
How to clean the foam agent?
Safety requirements when working with foam concentrates
- on the skin - wash with soapy water or plenty of warm water;
- into the organs of vision - rinse with 1% sodium chloride solution;
Interesting materials:
How to remove a section break on the current page? How to remove stains on a jacket? How to remove powder stains from a sofa? How to remove stains from trousers? How to remove ads on Samsung Galaxy S 5? How to remove ads in VK music on Android? How to remove rubber print from a T-shirt? How to remove a pattern from a sweatshirt? How to remove rust from an electric stove? How to remove rust from metal products?
Wash greens in bottles and how to store water
When using tap water, although we very rarely use it for drinking, mainly only for washing dishes and laundry, but with the advent of various types of filters, this task has become easier, although everyone knows that when water is supplied from the city water supply, it This is how filtration takes place, where in addition to harmful substances, useful ones are also lost, but urbanization cannot exist any other way.
Otherwise, it is impossible to provide people with water in cities, through high filtration, through treatment plants, losing everything along the way. Despite any filtration, the water will still contain living substances, such as beneficial micro and macroelements, as well as bacteria and mycelium, which in normal composition preserve health and support the rhythm of life, but at a high rate of death.
I am more interested in collecting water from spring sources so that I always have clean and spring water at home. Although manufacturers of various containers recommend storing water in plastic bottles, it is not for nothing that earlier, for longer storage and disinfection of spring water, it was stored in earthenware containers. There, water can even be stored for up to 3 years without losing its beneficial properties!
When to use plastic bottles. It is recommended to pay attention to the marking of the production designation, PET (E) - polyethylene rephthalate
, is the designation that indicates the suitability of the container.
Those marked PVC
are considered toxic containers and are only suitable for storing chemicals.
Thus, having paid attention to the dishes, what brand they were and whether they were suitable for use, it was decided to look into their storage condition. Looking at my home plastic cylinders in which I store clean drinking water, I saw a green coating with a mold-colored tint along the edges in the folds and bends inside the container, and quickly decided to look for information on the Internet.
Here it became clear that this is true, due to the constant presence of containers in a humid environment and the lack of disinfection, a dark green coating - mold - forms around the ring-shaped bends, which is not bad. And now the task has become, how to wash a bottle with a narrow neck?
Before this, it didn’t really occur to me that dishes need to be cleaned not only for storing any liquids and not just rinsed with running water, but specifically to keep them clean all year round, also for drinking water, especially spring water. Here we will choose options for how to wash our eggplants.
Modern methods of protecting tank coatings from rust
More advanced and reliable methods of protecting the internal surface from rust formation are technologies for applying a protective coating using multi-component paints and coatings.
Ethyl silicate coatings with the addition of zinc powder
One of the most effective means is coating the inner surface of ethyl silicate coatings with the addition of zinc powder. The technology is based on the polymerization process of ethyl silicate compounds. The zinc powder contained in these compounds forms a coating that does not react with iron and water. In addition, this coating can withstand heating up to a temperature of 200 degrees, which fully corresponds to the heating mode of the tank in the bathhouse.
Painting with heat-resistant paints that provide protection from moisture allows you to protect the tank from corrosion for up to 7 years. One of the products is Cetra, a heat-resistant paint that can withstand heat up to 350 degrees. After hardening, it withstands contact with most aggressive substances, so there will be no problems with heated water when covering the surface of the tank.
Epoxy enamels
Epoxy enamels, when applied to a surface, form a uniform coating that can withstand metal heating up to 120 degrees. This is one of the most affordable means for processing a metal tank. The product has high adhesion and at the same time an expansion coefficient close to that of metal. The plasticity of epoxy compounds allows for reliable surface coating regardless of temperature changes. In addition to recipes that you can prepare yourself based on liquid glass and aluminum powder, the market offers compositions for treating heating devices and sealing seams of high-temperature equipment.
Polymer compounds saturated with metal powder
In addition to the above means, a good effect is obtained by using anti-corrosion metal-filled compounds. These polymer compounds, saturated with metal powder, form a stable surface coating, which over time, through the process of diffusion, forms a reliable protection for the metal. The positive side of this product is its reliability and resistance to mechanical stress. Enamel is not afraid of not only temperature changes, but also mechanical damage, it is not afraid of impacts, which is important for a water tank in a bathhouse.
As for heat resistance, the enamel can easily withstand temperatures up to 300 degrees. An example of the use of such products is enamels for the restoration and repair of bathtub coatings.
Now that almost the entire arsenal of means for installing a protective coating has been revealed, all that remains is to choose a product, prepare the tank and apply the protective layer. Moreover, all methods and means do not require the use of special equipment and special skills to successfully complete the work.
How to wash a bottle with a narrow neck, whether to use chemicals
There were absolutely no plans to use chemistry, after all, it is food that we use on our table, we drink it every day. Regarding chemicals, we already use enough of it, both from the urban environment and when washing dishes, even in small doses, but it still enters the human body.
I think chemicals should only be used when you need to wash the green stuff inside a plastic canister or when you need to wash a Eurocube. When washing food containers, perhaps in small quantities, purchase them in trusted stores that have proven themselves for a long time and comply with all safety standards.
I understand that this is my omission, as the owner of the house whose family may suffer from this, it acts gradually, getting into our body, but thank the Almighty, everyone is alive and well, but I immediately began to remove this form of cohabitants in our container.
Where does rust come from in a water tank?
The appearance of rust in the tank of a sauna stove is common for containers with an open volume. This is especially true for homemade containers, which are created using steel or metal sheets or large diameter pipe sections.
Upon contact with water, and even more so when the temperature rises due to a chemical reaction, the walls are first covered with a small layer of oxide, and over time the corrosion process becomes widespread. The containers most susceptible to these processes are in bathhouses, which are used occasionally, and especially in cold times, when the room remains unheated and after the procedure is completed, the water is drained from the tank.
Corrosion does not bypass tanks in heated rooms; this process takes a little more slowly, but there is no escape from it. The process lasts slowest in tanks that are constantly filled with water, but here, too, over time, rust is deposited on the walls.
There are several reasons for the occurrence of rust - contact of water with unprotected metal, the presence of iron oxide in the water itself, saturation with chemically active substances that promote corrosion.
How to clean the inside of a bottle
As stated in the recipe, for removing mold inside glass and plastic bottles, a simple cleaning method was described and, as it turned out in the end, effective. A cleaning composition made from simple items that any housewife has in her kitchen.
The instructions are simple, you need to pour the millet grains into a container that needs to be separated from the greens and fry thoroughly. You can repeat this procedure several times to be sure that the bottle is clean.
Washing 19 liter bottles - instructions
- Millet, 5 tablespoons per 19 liter bottle.
- Baking soda 2 teaspoons per 1 bottle.
- Warm water, 2 cups (400 grams).
Then all that remains is to thoroughly beat the mixture inside the container and shake it vigorously to get into all the areas where there were those same moldy shades inside the folds of the eggplant. I did these steps in the bathroom, since water still drips from the hole in the lid, otherwise it could be scattered all over the room.
I poured millet into the container; for those who don’t have millet, I think you can get by with other types of grains. The same wheat or rice grains for cleaning cylinders will probably help the same, if not better than millet, it’s worth a try!
So, adding two teaspoons of baking soda, I poured warm water from the tap.
He went into the bathroom and began to carefully mix the composition inside the container, every now and then, trying to get into all the areas affected by mold. And to my surprise, from the very first movements, I saw how easily and without coercion the entire layer of a dark green hue, which was packed in all corners of the folds, was removed from the bottom of the container, from the place of bends and closer to the lid.
Thus, after working with one cylinder and rubbing it for 6 or 7 minutes, I poured the dirty composition into a plate to see what the composition had become. You can see how the green turbidity has completely come out from inside the cylinder. The millet is slightly stained in a dark color, having worked like sandpaper on the surface of the plastic wall.
Here in the video you can see how easily mold is removed from the walls of the container.
So, at home there are always three 19-liter cylinders in circulation, which are always ready in case of a trip somewhere in the countryside, for example, to collect spring water. We have a habit in our family, we drink a lot of water, starting with a glass every morning before breakfast, I’m glad that this has become a habit, most importantly a healthy one!
Cleaning procedure
Now we get to the insides of the equipment that need to be cleaned. To do this, you will need a simple and indicator screwdriver, wrenches and pliers. We will approach the target from below. As a rule, the bottom of the boiler is covered with a decorative panel. It is secured with screws, which are also covered with plastic elements. The latter can be removed using a flat-head screwdriver by squeezing the latches. However, do not overdo it so as not to break these parts. In principle, they do not carry any special functional load, but without them the overall aesthetics of the equipment will be slightly compromised.
Next, unscrew the screws that hold the decorative protection panel in place, and then remove the latter. You will see various fastenings and contacts. But before you get into them, first check with an indicator screwdriver for the presence of voltage - or rather, make sure that there is no voltage. Only after this proceed to further work.
You can carry out further procedures by removing the boiler from the wall or leaving it in place - this depends solely on your convenience. Of course, in the first case you will have to disconnect the water pipes as well. During further disassembly, we highly recommend keeping a camera handy and photographing each step, and from several positions. In the future, this will make it much easier for you to assemble the structure, because you will know exactly which contact is connected to what.
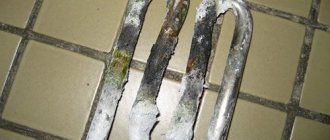
So, disconnect all the wires that prevent you from getting inside the tank. Now unscrew the screws that hold the tubular electric heater in place and then pull it out. This should be done carefully, especially if the boiler has served you for a couple of years, but has not yet been cleaned.
In such equipment, the heating element is usually covered with a very thick layer of scale, which physically prevents it from being pulled out. If this is your case, then you can scrape it a little with a screwdriver or other similar tool. The scale layer will become thinner, and removing the element will become more feasible.
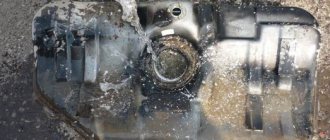
After you have removed the heating element, inspect the inside of the tank. Usually there is not much dirt on it. If so, great, just rinse the container with water. If there is still a lot of scale on the walls, then you should clean it off manually, and very carefully. The use of abrasive compounds in this case is unacceptable. The inner surface of the tank is usually covered with enamel. If you scratch it, then in the future the contaminants will be deposited much more intensely, and corrosion processes will begin to make themselves felt.
We also mechanically clean the tubular electric heater from all dirt stuck to it. You can use a regular knife for this, but be careful not to damage the surface of the element. There is no need to mechanically clean the heating element to a mirror shine - to remove residual contaminants, it is better to use a very simple but effective product.
Take two bags of citric acid and dilute it in two liters of water. Then place the heating element there so that it is completely covered with the solution. Leave this whole thing for a day. After 24 hours you will receive a practically new element, absolutely clean and suitable for further use.
There is another method for cleaning a water heater. From some point of view, it is even more convenient, since it does not require disassembling the boiler and mechanical cleaning. But the latter is still more reliable. Therefore, this second method should be used only when the first one is not suitable for some reason. For example, if the water heater has a very large volume, then cleaning the tank from the inside is very problematic, because it will be difficult for you to reach the upper areas. This procedure is also suitable for indirect heating boilers, since the procedure for disassembling them and removing the heating element is very difficult.
For this cleaning method, you will need chemicals. You can take the same solution of citric acid, but in a more powerful concentration. You can also purchase ready-made formulations at a household chemical store. They are designed specifically for descaling. Of course, you should not take the cheapest option, since they usually have low efficiency. It’s better to take a more expensive product, then you can count on the tank and heating element actually becoming clean.
All this chemistry works independently, without your participation. The only problem is getting it inside the tank. To do this you will need a hose and a funnel. Open the “hot” tap on the mixer and release about a third of the total volume of water from the boiler. Then close the tap and connect the hose to the drain fitting. Insert a funnel into the second end, lift it above the tank and pour in the descaling agent. Next, you should wait for the time indicated on the packaging. Then drain the solution from the tank and rinse the container thoroughly.
Where do you fill 20 liter bottles with water?
I mostly buy water from vending machines for 4 rubles a liter of water, next to the house in the neighboring yard. To those who still don’t know, everywhere in the city of Kazan, combining several courtyards, there are automated devices for independently collecting clean drinking water.
How to top up your balance in the terminal, based on the number of liters of the container you want to fill, press the fill button, insert the bottle and then water automatically pours out, filling the required amount of water into the container. Today I buy a 19 liter bottle for 76 rubles.
In principle, physical exercise for the body is close to home, but due to the long absence of washing, it turns out that such everyday tasks appear. So, I decided for myself the issue of cleaning mold inside plastic containers and recommend it to everyone, so that they, in turn, can clean their glass containers too.
This method also works well for glass containers. Removes green deposits, wine residues, dirt, much worse than in plastic bottles, where you can’t get through with a brush. Only a good shake with the grains inside the container provided a way out of this situation.
I would like to conclude my note on cleaning the bottle from green deposits. Enjoy using this method of cleaning containers and not just plastic ones. Relatively safe to clean, especially for food bottles, it's also cheap. You can leave millet or rice as a reserve if you don’t eat it, although we love rice in our family and make pilaf from it.
Share this note on social networks with your friends, let them benefit from it, and don’t forget to subscribe to other Lifehack articles. Have a nice day everyone, clean bottles, good health, see you soon!
Repost and win a laptop!
Every month on the 1st of the month iBook.pro gives away gifts.
- Click on one of the social buttons. networks
- Get a personal coupon
- Win a LENOVO or HP laptop
—>
LENOVO or HP from 40-50 TR, 8-16GB DDR4, SSD, 15.6″ screen, Windows 10
Removing green residue from a bottle
Plaque does not appear in glass bottles. And plastic ones are cleaned the same way as canisters. But due to the fact that the bottle is smaller in size, the following methods are most convenient:
- soda;
- salt (used similarly to soda);
- mustard (both grains and powder - the latter is often used by young mothers when cleaning baby bottles);
- peroxide and potassium permanganate.
A small bottle can also be cleaned well by a steam generator. The hose of the device is inserted into the neck, and after 2-3 minutes the coating is already behind the plastic - all that remains is to rinse.
Ways to eliminate external problems
If the liquid contains a large amount of sulfates , and a magnesium anode is installed in the boiler, a chemical reaction occurs inside the tank when heated. As a result, hydrogen sulfide is synthesized, and the water acquires the characteristic smell of rotten eggs. It is almost impossible to purify water from sulfates. They solve the problem in two ways. You can treat the tank with heat-resistant enamel and use the water heater without an anode. The enamel will protect the walls from corrosion, and in the absence of an anode the reaction will not proceed. Another way is to install an aluminum or titanium anode that does not react with sulfates.
If the problem is in the pipes , it is necessary to flush the entire water supply in the apartment. Specialists are involved in this work, as certain equipment will be required.
If water containing hydrogen sulfide is supplied from a well or well, you can install a filter that absorbs the gas . It's expensive, but drilling a deeper well will cost even more.
The most common method of water purification is chlorination.
After washing the tank, it is necessary to clean the inner surface of germs and harmful organisms to humans. The industry took care and created a number of disinfected substances. concentrated calcium hypochlorite granules (CGP) from the market , fill the tank one quarter with water, add 8 grams of CGP per 100 liters.
Pour clean water until full. Leave the solution for a day. After a day, drain the solution into the prepared container. After these procedures, the tank is completely cleaned and ready for use. After cleaning, pour the solution into the sewer or take it to a wastewater treatment station to clean the solution from chlorine. You cannot pour chlorine solution into reservoirs; fish and vegetation in the reservoir will die.
Prevention of scale formation on heating elements
It is difficult to avoid scale formation in instantaneous and storage heaters, since lime and salts are dissolved in tap water. To reduce hardness, ionic filters are installed at the entrance to the house, reducing the concentration of impurities in the liquid. The formation of limescale accelerates when heated to a temperature of more than +45°; operating equipment at reduced power allows you to slow down the process, but at the same time the problem of an unpleasant odor arises due to the proliferation of bacteria (applies to storage water heaters).
It is recommended to use a cleaning agent for preventive purposes every 30-40 days of operation; the chemicals dissolve and remove a thin layer of loose deposits. If the owner of a house or apartment notices that the water is heating up slowly or that extraneous noise is coming from the equipment tank, then unscheduled mechanical or chemical cleaning should be carried out to extend the life of the heating element. When purchasing new equipment, you should choose models with an electric heater in a ceramic shell that is not covered by scale.
Caring for water heaters from different manufacturers
All water heaters are designed the same, however, manufacturers sometimes make adjustments to the design. Let's look at the features of disassembling boilers of three popular brands:
- Ariston water heaters have a different flange mounting. To remove it, push it inside the housing. In the tank, the flange is turned clockwise and pulled out. To clean the Ariston water heater, it is not necessary to remove it from the wall. All main components are located below and can be easily removed.
- To clean the Baxi boiler from scale, first remove the thermostat. Do not completely unscrew the nuts on the flange to drain the remaining water. There will be a maximum of 2–3 liters of liquid at the bottom of the tank. When the water has drained, unscrew all the nuts, and then carefully remove the flange with the heating element.
- Thermex water heater is disassembled in the same way as an Ariston boiler. The device differs in the maintenance of the magnesium anode. The protection is changed once a year.
Other brands of boilers do not differ in complex design features.
What is meant by boiler cleaning procedure?
To figure out how to clean boilers without calling a technician, you need to learn how to disassemble them. All electric water heaters are designed almost the same. The methods of attaching the heating element and the electronic unit may differ slightly. The second important point is that you need to know how and with what to clean the water heating device. There are two methods:
- Dry cleaning. The boiler does not have to be disassembled. It is enough to use a special factory-made descaling liquid. Among the traditional methods, a concentrated solution of citric acid is suitable.
- Mechanical cleaning. A complex method that requires disassembling the water heater. First of all, heating elements in storage boilers become coated with plaque. First you need to clean the heating element and then rinse the tank.
The mechanical method is justified when chemical cleaning of the water heater does not bring positive results.
Before you begin cleaning the electric boiler, the device is disconnected from the water supply and electrical network and the water is drained from the tank.
Causes of scale
In order to clean the water heater less frequently, owners install filters on the incoming water pipe. They trap coarse particles and dirt, but the water hardness remains the same. Modern cleaning systems are not affordable for everyone and they also do not guarantee 100% results. Due to increased water hardness, lime deposits – scale – accumulate in the water heater. A hard crust first covers the heating element, and then the inner surface of the storage tank.
With a scale thickness of 1 mm, energy consumption increases by 10%. If the heating element is overgrown with a hard coating 10 mm thick, then the consumption will increase to 70%.
Cleaning the container from residual liquid products
First you need to drain the remaining food liquid from the tank.
It must have a drain valve located in the rear. To do this, the tank must be tilted so that the remaining liquid is completely drained. It is advisable to pour the liquid into a container and then remove it to a safe place. In stationary tanks, a flush tap is provided at the bottom. If such a tap is available, it is better to use it rather than a regular drain tap. After draining the remaining food liquid, the container must be rinsed . For initial rinsing, you can use regular washing powder or dishwashing detergent diluted in hot water. If the neck of the tank allows a person to get inside, then you can use a stiff brush with a short handle and a bucket of cleaning solution.
If the neck is narrow, you can use a brush with a long handle. Thoroughly rinse the walls and especially the corners so that not even a small fraction of residual liquid remains. Even a small part of the initial liquid residues can spoil the taste of water. After thorough rinsing, you need to open the drain valve and pour the solution into a container to subsequently remove the liquid to a safe place.
Using a hose or hydraulic remote control, thoroughly rinse the walls and bottom . If such washing is not available, you need to pour a cleaning solution, “preferably hot,” into the container and leave it for several hours. After this, you need to rinse the container until there are no traces of the cleaning solution left. Discard the solution in a safe place.
Cleaning the tank
If there is dirt inside the tank, it can be removed mechanically. That is, wipe it with your hands. Suitable for this:
- Soda;
- Vinegar;
- Lemon acid;
- Detergent.
Cleaning a removed tank is a more reliable and economical way than pouring solutions into it and heating it. You will need very little active substance and a regular sponge or dish brush with a long handle. But remember a few rules:
- If the inside of your boiler is painted with enamel, do not use hard or metal brushes or sponges;
- Perform all work wearing gloves;
- If there is a thick deposit of scale, you will have to install the water heater in place, pour the active substance into the boiler and warm it up;
- If corrosion appears on the inner walls, the best option is to sand it off and paint the tank with enamel.