A washing machine breakdown does not happen “suddenly”; the user can notice its preconditions in advance. If you notice that the drum is knocking in the washing machine, then an urgent check is needed, and possibly repairs.
You should not delay diagnostics, since the causes of extraneous noise in the MCA can be different, and this can result in serious and expensive repairs.
Noise Level Standards
The noise level of a washing machine of a certain model is specified in its instructions. It depends on what the drive is:
- in the belt version, its variations are from 60 to 72 dB (decibels);
- with the direct drive option, the threshold is reduced - from 52 to 70 dB.
What do these numbers say? The fact is that the user will still hear the operation of such a device, and absolutely silent washing machines do not exist. The technique works, but such audibility should not create discomfort. If such a feeling occurs, the device is clearly not working. And it’s good if the reasons turn out to be not very serious.
Prevention measures
In order not to encounter the problem of noise during the spinning process of the Indesit washing machine, you need to remember the following preventive measures:
- When stowing items, be sure to check the pockets of items and not stow underwear with poorly sewn buttons, decor, etc.
- The search for the source of the problem should begin with simple nodes, gradually moving to complex ones.
- If extraneous sounds appear in the “spin” mode, it is necessary to organize diagnostics and establish the cause of the problem.
- It is advisable to start the machine with optimal load of laundry. It is better to avoid overloading and underloading.
- The service life of a household appliance without breakdowns largely depends on the correct installation and connection of communications.
You should not even partially open the washing machine if the device is under warranty.
A lot of important and useful information about repairing Indesit washing machines is presented in this section.
Noise due to improper installation
Why is this technique buzzing? If such a “concert” occurs already during the first launch, it is necessary to carry out such a check.
- Check to see if the shipping bolts are unscrewed. Often such confusion occurs among installation beginners who decide to carry it out without the presence of a specialist. Here it will be enough to inspect the device - the notorious bolts are located on the back of the case. Their task is to properly fix the drum when the device is moved to a new home. During installation, the bolts are removed and plastic plugs supplied with the device are installed instead.
- The equipment must be installed on a level and hard floor.
- Be sure to adjust the legs so that the machine does not wobble during operation. It will be enough to turn them in the direction necessary for balance. Anti-vibration stands can be used.
Unscrewing the transport bolts
DIY machine repair
To repair a machine yourself, you need to know its structure and operating principle. As a rule, repairs involve replacing old parts with new ones. When troubleshooting, you must first disconnect the machine from the power supply.
To replace parts yourself, you need to have a standard set of tools, and to repair the control board or electronics, you may also need a soldering iron.
Cleaning the drain filter
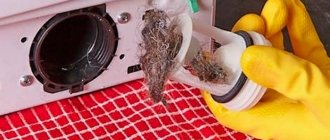
The first thing a washing machine owner can do is clean the filter. It often happens that small items of clothing or threads get there, which subsequently prevent the water from draining from the washing machine. To do this, you need to open the small cover located at the bottom of the machine and unscrew the small plastic plug using pliers.
After this, you need to clean the filter and rinse it under running water.
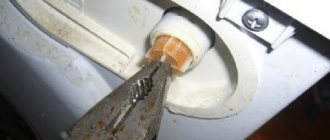
Cleaning the fill filter
This filter is located in the water intake hole. It can become clogged with small particles of dust or sand. To do this, you need to unscrew the inlet hose and use pliers to pull out the filter - a small plastic mesh that needs to be rinsed under water.
Replacing the heating element
If the repair involves replacing the heating element, you must first remove the back cover of the machine. Then disconnect the terminals and use a multimeter to check the element for functionality. The faulty heating element must be unscrewed using a wrench. After the old heating element is removed, you need to replace it with a new one. Be sure to install all parts in the correct order.
These are the most common types of repairs that you can easily carry out yourself. For more serious damage, it is better to contact a specialist.
Noise due to faults
Sometimes sound discomfort in a washing machine appears only at certain stages of its operation. Perhaps it's this:
- Cracks have appeared in the body where the shock absorbers or legs are located.
- The pulley on the drum has become loose. This can be solved quite simply - remove the back cover and tighten the corresponding part.
- The same effect is caused by loose bolts on the engine backlash. Here, too, simply strengthening the fasteners will be sufficient.
- Cracks in the tank require replacement (and it is better to have a specialist do this).
- The top springs can also become loose, as can the fastenings that hold the counterweight. All this can be solved by simple fixation.
Much of the above can be eliminated on your own, without resorting to the services of professionals.
Counterweight (load stone) displacement
The washing machine tank is made of plastic, so under the influence of a drum loaded with laundry, it vibrates quite strongly. The counterweight itself is a cement or plastic block that is attached to the tank and stabilizes it. That is, it makes it less mobile under high dynamic loads on the drum. Displacement or destruction of the counterweight is one of the simplest, but far from harmless, breakdowns that need to be quickly corrected. This malfunction is diagnosed as follows: the drum begins to knock when spinning at maximum speed or with a large load, and the sound comes from the bottom.
Destruction of the counterweight
If the bolts holding the counterweight are loosened or completely unscrewed, the counterweight may become dislodged or the drum may have a lot of play. This problem can be fixed quite simply, you just need to tighten the bolt. And to prevent this from happening again, you can take the bolt a little longer and put a lock nut between it and the washer.
If the counterweight is destroyed, the situation is much more serious. Cement stone is practically irreparable. You need to go to a repair shop and just buy another one.
Bottom counterweight
You can get to the counterweight to secure it (adjust it) as follows:
- The dispenser tray is fully extended. To do this, you need to press firmly on the central latch.
- Several screws will be visible in the opening that appears. Unscrew them and remove the control panel.
- On some models, you may need to additionally press out the plastic latches; we do this carefully using a flat-head screwdriver.
- At the upper end of the front panel you can see the heads of screws and bolts. Unscrew them and remove the front panel.
- That's it, we got access to the counterweight located at the bottom of the tank.
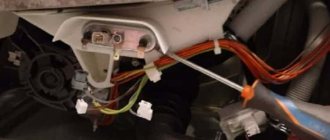
IMPORTANT! Before disconnecting the contacts on the dashboard, it is advisable to photograph them with a mobile phone, so that later you do not play the sapper of which wire to plug in where
Upper counterweight
Again, on some models the counterweight units may be located at the bottom, while on others they may be located at the top or rear. The exact position can be found according to the diagram in the data sheet, which is attached to each washing machine.
How to remove strong noise when operating equipment
Replacing bearings
If the machine begins to make a lot of noise, the fault may be hidden in the bearings. Testing this hypothesis is quite simple - you need to turn the drum manually with the machine turned off. If the process went quietly, then you need to blame other broken parts. If your guesses are confirmed, you need to do the following.
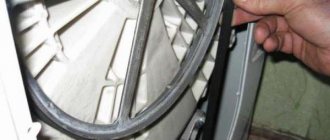
- The front wall is removed (locking screws follow the cuff, the bottom panel and control panel are removed).
- The back wall is removed - you need to carefully unscrew the screws.
- The heating element behind which the engine is located is removed. It will also need to be pulled out, after first moving the belt.
- It is necessary to disconnect the tank, which is attached to the body using springs and shock absorbers.
- How to disassemble the tank? It usually consists of two halves bolted together.
- Worn bearings are knocked out and replaced with new ones.
- Everything goes backwards.
Typically, wear of such parts appears after the aging of the tank seal - it is this part that is responsible for sealing the tank. When moisture seeps in, the bearings begin to rust and wear out quickly.
The process of replacing bearings for different brands is described in more detail in our articles about Samsung, Indesit, Ariston washing machines.
Foreign objects
The equipment can make a loud noise for another trivial reason - there is a foreign object in the drain pump. This is often indicated by the inconsistency of loud sounds heard during washing: they will resemble a crackling sound.
Foreign objects can be understood as bra underwires, coins, buttons and other small metal objects. Removing them will be easy:
- It is necessary to loosen the fastening of the heating element and pull it out.
- Using tweezers, objects caught in the pump are removed from the resulting hole.
- The heating element is put back into place, the rubber seal is lubricated with liquid detergent.
Typically, the drain pump can fail after only five years of using the washing machine, and foreign objects in it will only speed up the process.
By the way, it is not recommended to replace and disassemble the drain pump without the help of a professional. But if the user is determined to do it himself, he will find this video useful:
The cuff is erased
The washing machine hums during the wash itself also because sometimes the sealing collar begins to rub too zealously against the drum. Rubber crumbs on the surface of the door will indicate this moment. You can try to figure out such a misunderstanding yourself (a method that is not always justified by experts):
- A piece of medium or fine sandpaper is fixed on the side of the drum using tape.
- The technique starts in push-up mode. This trick will cause the paper to strip the cuffs at the points of contact with the tank.
- The machine starts rinsing - this will clean the inside of the equipment from rubber dust.
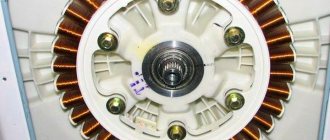
Loose pulley
If the sounds are intermittent clicking sounds, then you may suspect a loose drum pulley. This is not surprising: gradually it can become loose. To prevent the part from freely moving, the loosened bolt is unscrewed and placed on a sealant, which will prevent it from loosening again.
How to secure a drum pulley
The counterweight is broken
The washing machine often makes a lot of noise due to the counterweights. These parts are needed to give stability to the tank during the squeezing process. Sufficient weight of such elements will perfectly balance the tank on both sides. What you need to know about counterweights? The difficulty is that such parts are located in hard-to-reach places. To examine them, you need to help yourself with a flashlight. And manual examination is also expected - after palpation, loose areas are tightened. In any case, if the integrity of the counterweights is compromised, they should be replaced to prevent destruction of the tank.
Worn brushes
The machine hums, but the drum does not turn - here you can suspect worn brushes in the electric motor. The knocking in such cases is usually very loud. It is best to entrust the work associated with this replacement to a specialist. This is due to the fact that the machine will have to be completely disassembled by removing the motor.
The user must understand: noise coming from the machine is a signal of a malfunction. Especially if this hum is abnormal. It is imperative to promptly diagnose and eliminate any problems that arise.
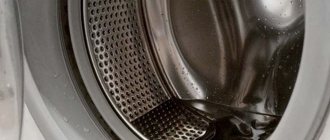
Washing machine during spin cycle: drum rattles and unit vibrates
A small free play of the drum is initially provided by the manufacturers, but the permissible play does not cause any knocking during operation of the device. Extraneous sounds during the washing process in most cases are a consequence of wear of parts. To identify the real reasons, a sequential check of the main parts of the drum mechanism is performed.
The condition of the main elements that ensure normal rotation of the centrifuge, the correctness of its position, as well as the presence of possible deformations and damage are checked. Certain types of malfunctions may be indicated by features of improper functioning of the equipment. For example, when a shock absorber fails, the drum sags to one side, losing the ability to center things during washing.
Based on the results of technical diagnostics, the relevant parts are repaired, during which the shock-absorbing device, bearings or supporting crosspiece can be replaced with similar branded parts.
Identifying a problem by sound
The greatest noise from the SMA comes from spinning, which is explained by the high speed of rotation of the drum. If the noise level is 75 dB, then there is nothing strange about excessive volume. To determine the cause of the malfunction, you need to listen to the sound, which can be:
- increasing, uncharacteristic of the washing process;
- vibrating strongly during spinning;
- resembling blows or grinding sounds.
Such sounds can occur when washing items with metal elements. If such violations are constant, then this is the main sign of minor or serious damage.
If the color of the water changes when draining, rusty spots begin to appear on clothes after washing, the drum begins to jam or there are leaks, and all this is accompanied by a roar, then this indicates wear on the shaft, oil seal and bearing. To repair the part, the intervention of a specialist is necessary. You can independently determine the common causes of the malfunction.
The drain filter is broken
Owners often encounter unpleasant noise and crackling noises when draining water during and after washing. In order to identify the causes of unpleasant sounds, you should examine the drain system for breakdowns. The most common cause is a malfunction of the drain filter, and this is where the inspection should begin. It is located in the lower right corner of the washing machine and can be reached by opening the door. The filter often becomes clogged with foreign objects, so it should be removed and washed thoroughly. It is necessary to examine the space behind the drain filter and, if contamination is observed, clean it too. If a part is deformed or faulty, it must be replaced.
Hatch cuff defect
Some may find it strange that the cuff of a washing machine can become a source of suspicious noises, but nevertheless, it is so. The purpose of the cuff is to prevent water from pouring into the gap between the body and the hatch during operation. If the cuff is installed correctly and the material from which it is made has not lost its elasticity, a small gap remains between it and the rotating parts. The cuff is not in contact with the drum. If it is distorted, the situation changes. The edges of the cuff go inward, preventing the normal rotation of the drum, thereby causing noise.
It is worth noting that such a malfunction, which creates an unpleasant noise, is more often found in inexpensive devices from little-known manufacturers; washing machines from LG, Samsung, Indezit and other world brands are free from this drawback.
If abrasions are visible on the cuff, this is the reason. You can correct the situation in the following way:
- open the hatch, turn the drum by hand,
- determine the part that clings to the cuff,
- stick a piece of fine sandpaper on the drum,
- run the washing machine in spin mode.
As the drum rotates, the sandpaper will remove excess rubber and friction should stop. Of course, this method will only work if the size of the protruding edge of the cuff does not exceed a few millimeters. Otherwise, the cuff will have to be replaced.
If the cuff is in order and the noise does not stop, you need to move on to checking other parts of the washing machine. Further actions involve disassembling the machine, completely or partially. Before getting down to business, you need to soberly assess your capabilities, and in case of the slightest doubt, contact specialists.