The computer keyboard is one of the most loaded parts of the computer. In the modern rhythm of life, users spend a lot of time at the computer: eating, working, sometimes even sleeping. And, naturally, a large amount of debris accumulates in the keyboard over time; this is dust and crumbs. The longer the keyboard is not cleaned, the more dirt accumulates both on the keys themselves and in the space, under and between them.
Liquid spilled on the keyboard is a whole story. If, with gradual contamination, you have time to search the Internet and find out how to properly clean a computer keyboard at home, then in the event that tea or coffee is spilled on the keyboard, you must act quickly, without delay, otherwise the keyboard will not be able to be saved.
The first step to cleaning a computer keyboard at home is to unplug it; if it is a wireless keyboard, then it is enough to remove the batteries from it.
Conventionally, cleaning can be divided into three types: easy - superficial cleaning, moderate cleaning, and complete cleaning.
Easy cleaning
When you are not eating at the computer, there are no animals in the room, from which small lint collects in the space under the keys. And cleaning the computer keyboard is carried out regularly; in this case, in fact, it is not necessary to disassemble the keyboard (provided, of course, that it works properly). Let's figure out what we need for cleaning.
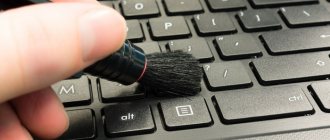
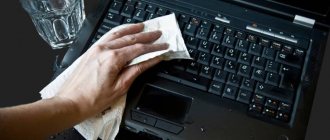
For such cleaning, it is enough to arm yourself with a specially cleaning cloth for your computer, or a damp cloth, ear sticks, a vacuum cleaner, a hair dryer, and a can of compressed air.
1. To clean the keyboard at home with a hairdryer, you need to blow out all the dust and crumbs from the keyboard as much as possible, using cold air mode. If you have a compressed air cylinder, it is more convenient to use it.
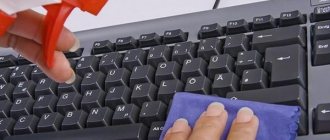
2. Use a vacuum cleaner to collect everything that could not be removed with a hairdryer, then wipe the surface of the keys with a damp cloth.
3. In hard-to-reach places in the corners of the keys, ear sticks soaked in alcohol can remove the deposits of fatty deposits from the hands, which inevitably appear over time during active work at the computer.
If it is slightly dirty, it is not necessary to use any additional products; surface cleaning without disassembling it is enough.
What can lead to dirty keys?
No matter how you keep your workspace clean, a lot of debris will accumulate in the space between the keys.
Accumulated dust pellets lead to blocking the keys.
However, this is not the worst thing. The worst thing will be if dirt gets inside the device.
Unprepared users grab their heads and rush to the service center, looking for help. The high price doesn't even stop them. But with the basic knowledge gained in today's article, you can save money and time.
Cleaning with partial disassembly of the keyboard
How to clean a keyboard if it is heavily soiled, if the computer keyboard has not been cleaned for a long time, and the computer keyboard itself is regularly bombarded with crumbs from sandwiches, cookies, cigarette ashes, and particles of animal lint? In this case, you need to partially disassemble the computer keyboard.
1. As in the first case, any cleaning should begin no earlier than the keyboard is completely de-energized. 2. Using a nail file, table knife or screwdriver, you need to pry the key from one edge, it should jump out of its socket with a characteristic clicking sound, you don’t need to put a lot of effort, the keys, in principle, should be easy to remove.
3. Before dismantling the keys, you should find a photo of your keyboard online, or take a photo with a camera or phone, so that during assembly you don’t get confused about where to insert which keys. 4. The keys themselves should be washed: how and with what detergents is used is not important. Just before use, make sure that the cleaning agent does not harm the stability of the paint on one key, so as not to accidentally wash off all the symbols. 5. After all the keys have been removed, washed and dried while waiting for assembly, we will begin cleaning the platform itself, here it is the same, everything depends on the amount of dirt.
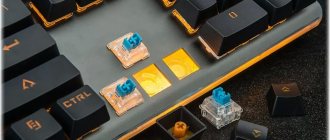
You can use a vacuum cleaner, ear swabs, cotton pads, and alcohol. It is necessary to thoroughly clean the entire surface of the plastic container with mounts for the keys from dirt. Then we proceed to assembly, checking the photo of the keyboard, return the keys to their place, installing them in place, you should hear a characteristic click, indicating that the key is installed correctly. 7. Some keys have stabilizing springs; you need to carefully install these keys so that the curved edges of these springs fall into special grooves; these springs prevent large keys like the spacebar or Enter from warping. And when you press them anywhere, they work evenly.
When is it necessary to disassemble?
Despite the effectiveness of external keyboard cleaning using air, improvised and special means, there are a number of situations in which the device will have to be disassembled.
These are the situations:
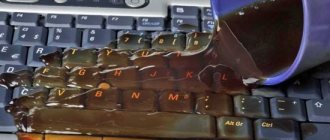
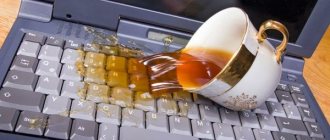
- If liquid is spilled on the keyboard. A device flooded with tea, coffee or compote will have to be disassembled in any case.
- If you plan to do a general cleaning of the keyboard. It is recommended to carry out it approximately once every 3 months, but at least once a year.
- If after external cleaning the keys become stuck, stuck or do not work.
- If external cleaning has not dealt with the amount of debris and dust stuck in the device, and debris particles are visible to the naked eye.
- If, when pressed, a key makes a characteristic sound, similar to a squeak, the key is pressed only with force.
ATTENTION! Before you begin deep cleaning, be sure to make sure that the device is without a battery and is not connected to the mains.
Complete keyboard cleaning
Many users spilled some drinks on the keyboard. How can you work without your favorite cup of tea, or play your favorite toy without beer? With awkward or sudden movements, the contents of the previously tasty or healthy drink end up on the keyboard.
There is little pleasant, but everything can be fixed, and quite easily, you just have to use either the on-screen keyboard for at least a day, or connect another, spare one, if anyone has one. How to clean a computer keyboard with heavy dirt or spilled liquids.
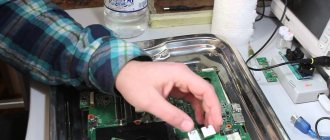
1. Disconnect the keyboard from the network. 2. Unscrew all the screws on the back cover; depending on the modification, there may be a different number of them. 3. The keys still need to be removed; how to do this is described in detail in the previous paragraph, so there is no point in writing the same steps again.
4. Using a plastic card or mediator, if available, around the perimeter of the case, release all the retaining clips and remove the back and front keyboard covers. 5. You need to disconnect the circuit board before cleaning the keyboard. If liquid is spilled, you need to remove moisture with a swab dipped in distilled water from the contact board, then wipe with alcohol, since to remove moisture, all layers need to be separated, but not torn, and they cannot be folded until completely dry; you can hang the board on a clothesline to dry . 6. Inspect for damage or darkening on the film; this may indicate a broken contact, as a result of which some keys will not work. 7. All parts of the keyboard should be assembled no earlier than they are completely dry.
General information
If you spill liquid on your keyboard, it will be a big problem. In case of gradual contamination of the keyboard with dust, there is time to look for a way to clean it, but in the case of spilled liquid, you need to act quickly, otherwise it will be impossible to save the keyboard.
REFERENCE! First, you need to unplug your keyboard to begin cleaning it. If the keyboard is wireless, then you first need to remove the batteries or power supply from it.
There are three types of keyboard cleaning:
- light (superficial);
- medium difficulty;
- complete cleaning.
How to clean your keyboard
Sometimes it happens that you have to wash the keyboard, in the literal sense of the word. Not separately and in parts, but almost entirely. This applies to non-separable computer keyboards, where when you remove the back cover and top panel with buttons, it turns out that the contact board is enclosed on both sides in a protective casing consisting of two metal plates, riveted along the entire perimeter with plastic terminals at high temperatures.
We removed everything that could be removed and then either break it to get to the board or wash it entirely. Ideally, this should be done in distilled water, but in my practice, after a solid portion of sweet coffee on such a keyboard, when distilled water was not at hand, I actually had to wash it in a basin with detergent, and then rinse it for a long time in running water . But such an impromptu does not happen often, fortunately, and on average I clean the keyboard once, disassembling it completely every six months and weekly with a damp cloth and a vacuum cleaner.
After such a shower, the non-removable keyboard needs to be dried for at least 3 days in a warm place. Then assembling and connecting the keyboard as described above is not difficult.
Deep cleaning
A deep cleaning will be required to remove any serious dirt or dried liquid. To be able to clean the inner surface of the device, you need to disassemble it, and studying the instructions will help you do this correctly.
Cleaning procedure:
- Use a Phillips screwdriver to unscrew the screws that secure the keyboard elements.
- To remove the top part with the buttons, pry it off with a knife in one corner. Remove carefully so as not to break the fasteners.
- Remove the removable keys and soak them in warm water, an antiseptic or soap solution. Soaking will remove traces of sebum, dust and other impurities.
- Use an old toothbrush to clean the main parts and then the buttons.
- If the keys cannot be removed, remove the board, lighting elements and wires, and then rinse the device with warm running water.
- After cleaning, dry the device thoroughly so that not a drop of water remains. Assemble the structure, tighten the screws and connect the device to the PC.
Before removing and washing the buttons, take a photo of the layout. This will make assembly easier and help avoid confusing the keys
Special cleaning products used for electrical equipment
Specialty cleaning products used for electrical equipment, including keyboards, include:
- napkins,
- sprays,
- gels,
- slime gels (such as Super clean),
- compressed air cylinders.
Such products are sold in household and computer equipment stores, or in specialized online stores. Many manufacturers, such as AF or Boco, produce cleaning kits for professional computers and laptops, where each product has its own unique composition and is suitable for a specific type of component.
These kits are a little more expensive, but their composition and properties are ideal for the task at hand: be it cleaning the screen, keyboard, or any other part of a professional computer.
Have you already cleaned your laptop keyboard?
Of course not yet
Why do you need to clean computer and laptop buttons?
Expert opinion
Irina Kovtun
Before you try to clean the keyboard on your laptop or PC, it doesn’t hurt to figure out why it’s needed. At first glance, the answer is obvious: to clean the keys from visible dirt and give your computer equipment a neat look.
In fact, with constant contact of fingers with buttons, a favorable environment for the proliferation of pathogenic microorganisms is formed on their surface. After working at such a keyboard, people often take food with dirty hands and put it into their mouth along with bacteria. Therefore, the main goal of the hygiene procedure is to take care of your own health and the well-being of your loved ones.