If the drum of the washing machine begins to wobble during the spin process or from rocking when it is turned off, then there is no reason for premature worry. The machine tank, together with the drum, is suspended on springs at the top, and at the bottom has supports in the form of shock absorbers.
This allows the entire structure to move in three possible directions. And if the drum dangles during the spinning process, you should not compare this with a catastrophic problem. You probably overloaded your SMA, and it had to respond with chatter.
Additional signs of concern
A breakdown should be suspected if the drum play during spinning begins to be accompanied by certain symptoms:
- the unit rattles, and most of all - when spinning clothes,
- during the spin process, the drum begins to knock on the body part or on the glass loading hatch,
- the washing machine starts jumping or vibrating,
- The drive belt keeps falling off,
- the drum begins to rub against the cuff of the loading door,
- At first glance, the machine works fine, but the rotating drum makes squeaks and other noises,
- oily traces are visible under the unit,
- the machine begins to leak, there are traces of rust on the tank behind the rear panel,
- laundry is stained with oil or rust,
- the drum dangles a lot, then flies off and falls to the bottom,
- the washing machine chews the laundry,
- the drum jams and turns with difficulty, producing a metallic grinding sound,
- During operation, plugs are knocked out, smoke appears from the machine,
- The drum of the device is skewed.
Such a loose element, along with any symptoms, begins to signal a significant breakdown. And even in the case when the machine executes all programs, its operation is not recommended. When the drum of a washing machine dangles, more serious problems can be expected in the near future, including complete disposal of the device.
Preventative cleaning measures
Due to frequent use of equipment, malfunctions occur. Therefore, it is necessary to carry out regular prevention:
- Before washing complex laundry, you must make sure that all items are removed from your pockets and that there are no sharp buttons or protruding decorative elements on the surface.
- Check the condition of the rubber seals regularly. If they are not tensioned tightly, then water seeps through them and the drum begins to rust. Signs of damage can be seen in these same elastic bands: as soon as they darken, they need to be pulled closer to the body.
- Check the condition of the water that is pumped into the tank. If there is excessive salt content in it, the tank becomes coated. Regular cleansing is the ideal solution to the problem.
- You should not load the tank with a large number of things, so as not to wear out the fasteners and other parts.
Advice
Before each load of laundry, it is necessary to check that the drum is securely fastened and that there are no visible changes in its appearance, first pour water into the tank and run it idle to make sure that the engine is working properly.
Causes of breakdowns and the procedure for determining them
A certain percentage of play is built into the washing machine by the manufacturer; this is considered normal. And there is no extraneous noise. But when the conversation turns to a breakdown, you need to act as follows:
- The loading hatch of the washing machine opens, then you should grab the drum with your hands, moving it to the sides without much effort. After this, it must be twisted clockwise and in the opposite direction. If you notice a grinding sound, these are the initial signs of a problem.
- Turn on the washing machine and set the “spin” program to the highest limits. When chatter occurs during rapid rotation, it feels as if the drum has been thrown off its own axis, and loud noises are heard again. Why does this happen? Look for a problem in the bearing or shock absorbers.
- To reliably clarify the failure, it is necessary to inspect the bottom of the machine. In most cases, failure of bearing devices is accompanied by water leakage through moving parts located on an invisible part of the tank. There is a high probability that at the end of the wash a large puddle will appear under the machine. This means that it is high time to replace the seals and bearings.
- When significant knocking noises are heard, but there is no water leakage, the bearings should not be changed - check the shock-absorbing devices. And getting to them is much easier.
The initial stage, which does not involve disassembling the unit, will not help determine anything else. It is possible to finally understand where the problem lies only after penetrating under the body part.
Failure of springs and shock absorbers is usually recognized quickly. They are simply examined thoroughly, shaking them a little. If at least one failed spring is detected, or a broken shock absorber is found, we can assume that the breakdown has been identified and disassembling the tank itself will not be required. And if everything is in order with such elements, then you will have to disassemble the machine further to remove the tank.
The device of washing machines
Few owners of a washing machine think about its design and operating principles. However, in order to independently repair a faulty automatic washing machine at home, you need to know its internal structure and the purpose of the main components and parts.
Control
The main part in a modern washing machine is the control module. It is with the help of the control board, which is a metal substrate with many resistors, diodes and other elements, that all washing processes take place: starting and stopping the machine, heating and draining water, spinning and drying clothes.
The module receives information from special sensors about how to act at a given time. The machine uses three sensors:
- pressure switch - shows the water level in the tank;
- thermostat - determines the water temperature;
- tachometer - controls the number of engine revolutions.
The control module is not only the most important, but also the most expensive part of the washing device. If it fails, the machine begins to act strange or completely refuse to do its job. Without special skills in repairing electronic equipment, you should not repair the board yourself. Most often, this part is completely changed or sent to professionals for repair.
Execution devices
Having received the appropriate washing instructions from the owner of the machine (mode, water temperature, the need for additional rinsing, etc.), and having checked the condition of the sensors, the control module gives the necessary orders to the executing mechanisms.
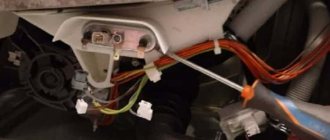
- Using a special UBL device, the loading hatch door is blocked. The machine will remain in this state until the end of the wash, and only 2-3 minutes after draining the water, the control module will signal to unlock the hatch.
- Water is supplied through the valve into the tank of the device. As soon as the pressure switch shows that the tank is full, the water supply will automatically stop.
- A tubular electric heater (TEH) is responsible for heating the water. From the module it receives a signal about the turn-on time and the temperature to which it is necessary to heat the water in the tank.
- The machine’s engine, which is connected through a belt or directly to the drum pulley, is responsible for rotating the drum. The moment of starting and stopping, as well as the rotation speed, is controlled by the control module.
- Waste water is drained using a pump. The drain pump pumps water out of the drum and sends it into the sewer pipe.
Such seemingly simple mechanisms, controlled by an electronic module, perform all the work of the washing unit.
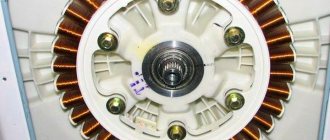
Washing machine tank
The tank is a sealed plastic container that occupies most of the body of the washing machine. Inside the tank there is a drum for loading laundry and a heating element.
The washing machine tub consists of two parts connected by metal brackets or bolts. Water is taken in and drained through special pipes connected to the walls of the tank. To reduce the vibration that occurs when the drum rotates, the upper part of the tank is attached to the machine body with springs, and the lower part with shock absorbers.
The drum is made of high quality stainless metal. By rotating in it, the laundry is washed and wrung out, completely free of dirt. A rubber cuff located between the tank and the drum ensures the tightness of the structure.
How to replace a bearing in a machine
To carry out such repair work, it is necessary to remove the rear housing cover, disconnect the drum from the motor shaft, and sometimes remove the electric motor. Due to the fact that during assembly the bearing is firmly pressed into the mount, it must be knocked out. In a number of models, it is possible to dismantle the crosspiece, and sometimes you have to remove the tank itself.
Particularly difficult are cases where the washing machine has a solid tank made of plastic or composite material. To access the drum, you have to cut it. Instead of the dismantled broken bearing, a new analogue is installed, then the machine is checked for rotation and the rigidity of the drum fastening, and assembly is performed in the reverse order. You can organize a trial run to test the device.
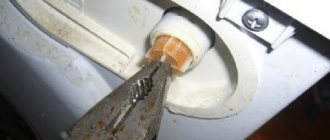
Drain hose
Attaching the drain hose of a washing machine is not complicated, but the work is especially important. Before manipulations, it is necessary to disconnect the machine not only from the power supply, but also from the water supply.
Drain hose
One end of the drain hose is attached to the pump, the other to the sewer, sometimes it is simply lowered into the sink or bathtub. Before disconnecting, you need to drain the remaining water from the machine system by lowering the end of the hose into a low basin or simply onto a rag on the floor. Next, loosen the clamp that holds the hose and remove the hose. We put a new one in its place and tighten the clamp.
We lay the hose inside the machine body so that no kinks are formed, take it outside, and screw it to the sewer. Before assembling the machine, it is important to check that the hose is sealed.
How to replace a shock absorber
This element, like spring hangers, cannot be restored. A specialist will install new ones for you. Temporary measures will not help in such situations. You will have to remove the housing cover, loosen and remove the springs one by one to inspect the fastening points for integrity.
When the tank is freed, you can remove and change the shock absorbers, and hang the tank in its original place. If the old springs have lost their elasticity, they are replaced with new analogues. By the way, when performing work, the master must check the condition of the tank and the supporting bearing cross.
The repair is completed with assembly and testing.
The water doesn't heat up
First of all, you need to disassemble the machine and inspect the heating element. It is likely that too much scale has formed on it or it has burnt out. In the first case, it is enough to clean the heater from limescale; in the second, the unit will have to be replaced. (See also: How to descale a washing machine)
If the automatic machine does not heat the water, then the reason may lie in the water level regulator. When the device is broken, the unit simply “does not understand” that there is enough water and it’s time to turn on the heating element.
Another likely cause could be a broken thermostat. It turns off the heating element even before the water heats up to the required temperature.
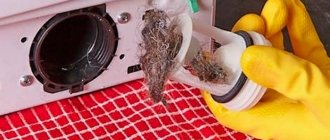
There is a foreign object in the drum
During the washing process you can hear knocking and rumbling noises. Sometimes the cause of this is an object that accidentally ends up in the drum. Often this phenomenon is caused by a break in the shock absorber or spring from the main frame.
During vibration and rocking, the broken element begins to knock on the body and tank quite rhythmically. It may appear that there is an object in the drum. If the element has completely fallen off, the roar will not be very rhythmic, and the drum will sway in a certain direction.
A distinctive sign of suspension problems is the drum swaying at low speeds during washing. Deviation from the axial will immediately catch the eye, and a strong knock will be heard on the body part. It is possible to identify problems with such negative manifestations only through a serious inspection of the device.
It just stops in the middle of the washing process
If the washing machine stops during washing and does not complete it, there may be several reasons:
- There is a blockage in the system. Forcefully drain the water and clean the inlet and outlet hoses and all possible filters.
- The electricity supply has stopped. Check the plugs and machines on the panel, smell the socket, check if there is light in another part of the house, call all contacts.
- Incorrect mode selection. Perhaps there is a pause in the program you have chosen and you just need to wait.
- The pump is broken, water is not pumped out at the right time and the washing process is disrupted.
- The water pressure in the system has dropped. Check the pressure of water flowing from any tap in your home. If the pressure is weak, pause the wash, wait until good flow returns and continue.
- The thermostat or heating element is broken, the water does not heat up to the required temperature, and the program crashes.
- The outlet hose is leaking and water is constantly going down the drain. At the same time, the system pumps water into the drum to the required level, the processor always “thinks” that the water has not yet filled. To eliminate the problem, you need to check the reliability of the connection between the outlet hose and the drain riser.
- The control timer has burned out. The machine “does not understand” when to end one process and start another and therefore stops completely. This is a rather complex device. You won't be able to repair it yourself; it's easier to buy and install a new one.
- The electric motor burned out. This breakdown is also very difficult to repair on your own; you will have to call a specialist.
Tools needed for repair work
It all depends on the type of damage. If you need to change shock-absorbing elements or springs, then all you need are flat-head and Phillips screwdrivers, an awl, some keys and a repair kit suitable for this model. And if bearings need to be changed, then a wider range of items will be needed:
- hammer with striker made of copper,
- rod or pin made of steel material,
- sealant (cold welding),
- set of screwdrivers and awl,
- open-end wrenches and a set of sockets,
- pliers,
- special lubricant for washing machine parts,
- bearings and seals included.
The shaft is removed from the drum pin with a copper hammer, because this type of striker will not damage the part. A steel rod or other suitable device is needed to knock the bearings out of their seats. The main thing is that such a device must be long and suitable in thickness.
Welding or sealant will be needed when in some model of washing machine the tank turns out to be one-piece. It will have to be sawed along the seam, then the connection will be made. Using an awl, the stuffing box elements are pryed up, pulled out, all fasteners are unscrewed with screwdrivers; keys are needed for the same purpose. Lubricant is applied to shock-absorbing elements and seals.
How causes are identified in machines from various companies
Minor drum chatter in Ariston, Kandy, Bosch, LG or Samsung washing machines is provided for by the manufacturer from the very beginning. Backlash is necessary for the normal functioning of the device. But such rocking of the drum does not cause the formation of extraneous knocks during the washing process. But when they are heard during the spin cycle, it is recommended to take a number of actions:
- open the loading door, grab the drum with your hands, and twist it. If you hear a grinding noise, look for the problem.
- Indesit starts with an empty drum at maximum. If during rotation there is a feeling of large vibrations accompanied by noise, then it is necessary to inspect the bearings or shock-absorbing devices,
- pay attention to water that may leak from the machine,
- If you hear a grinding noise but cannot find a leak, replace the shock absorbers.
The water doesn't drain at all
The most harmless reason may be choosing the wrong washing mode. Check to see if the switch is in the delayed rinse mode. It is also likely that the wash program has stopped due to a lack of electricity - check the plugs.
Another quickly removable reason that water does not drain from the washing machine may be a clogged filter or drain pipe, or a bent pipe. Check and clean these components and reconnect the machine.
A clogged or broken pump is another cause of malfunction. Forcefully drain the water, disconnect the pump, clean it or replace it with a new one.
The next reason why the washing machine does not drain water may lie in the electrical part: any contacts have oxidized, the timer or water level switch has failed. All these areas need to be “ringed” and, if necessary, the damaged part must be replaced.
Advice from the experts
If there is a problem with a bearing or shock-absorbing device, then all elements should be replaced, because a failed part will soon lead to a chain of problems from its analogues. And when you have disassembled the washing device, immediately change the seals, which also have operating limitations and wear out quite quickly.
Remember that machines from different manufacturers differ in their design and are disassembled in different ways. This feature should also be taken into account when undertaking repair work on your own.
Disassembling the unit tank and removing the bearings must be done correctly. There are washing machines in which it is possible to get to the shock absorber through the top of the machine or through its bottom. This convenient feature helps save time during repairs - you don’t have to remove the panels.
Let's halve the glued tank
Disassembling a glued tank will be different from working on a “new” tank. First of all, this will affect fixation, since after repair it will be attached not only with self-tapping screws, but also with sealant. The first ones are easy to unscrew, but the second one will have to be tinkered with - the dried glue holds well and is not removed quickly.
Some “craftsmen” suggest removing the sealant with a sharp knife, picking and cutting. However, experienced craftsmen do not recommend doing this for two reasons. Firstly, it is too long and ineffective. Secondly, the blade can jump off its intended path and puncture the tank, creating a new problem. It is much safer and more effective to go the other way: cut the tank with a hacksaw with small scars, going in a circle along the seam. Repeated cutting will be easier, since only the layer of dried glue will provide resistance.
The main thing is to act extremely carefully, focusing on the old “path”. Even the slightest bevel will ruin the tank - gluing it will be extremely difficult
It is not enough to simply halve the tank - it is important to remove any remaining sealant. A layer of dried glue will prevent the tank from sticking together, so you need to clean it off the seam
We proceed like this: take fine-grained sandpaper and sand the cut without going into the plastic. Then we shake off the crumbs with a rag and proceed to repair the bearing assembly.