Cleaning the calipers is important, because otherwise the car will brake poorly or not at all. The fact is that the part performs a braking function and if it malfunctions or rusts, it simply disables the brake: the pads or guides begin to jam, and the piston jams. You can do the cleaning yourself or trust the service station employees.
Brake caliper design
Car enthusiasts are not always good experts in the field of car maintenance and sometimes do not know all the intricacies of the technical standards that are required for the effective operation of cars. Calipers are cleaned annually or every 40,000 km of the vehicle. The frequency and types of work differ significantly from servicing a conventional brake.
The device consists of pads, brackets, pistons and sliding pins that press the pads against the rotors during braking. Over time, the pins consume all the lubricant, and the sliding process is disrupted, after which the following “problems” appear in the car:
- The brakes do not make contact with the rotor, causing the pads to wear unevenly.
- The pad constantly interacts with the rotor, which creates heat that destroys the brakes.
- The brakes become weak due to the fact that the linings do not lie on the entire working surface.
The device is an integral part of the braking system.
When the brake pedal is depressed, fluid flows from the master cylinder to the calipers, putting pressure on the piston inside, thereby pushing the pads against the metal discs and stopping the car. The key role is to create friction with the rotors, thereby braking the wheel. There are two types of devices: floating and fixed. Floating - Moves in and out, creating friction with the rotors. Brake grease washes off on wet roads. Metal parts are susceptible to rust, so it is recommended to clean them to improve the performance of your car.
It is advisable to carry out cleaning annually. In expensive cars, brake discs are made of cast iron. Conventional brake systems are very sensitive to corrosion and must be thoroughly cleaned during mandatory equipment lubrication procedures. Rust residue in critical areas can cause brake problems.
It is recommended to use a round wire brush and cleaner to remove old grease and corrosion, and use a fine sanding disc at low speeds to clean the area. The process should not be too aggressive, especially for aluminum components, to ensure that corrosion and not metal is removed.
Why does rust appear and why is it harmful to cars?
The discs in the brake system of a car are made of materials that are susceptible to corrosion. Therefore, the oxidation process begins on them immediately after moisture enters. Stainless alloys are not suitable for this part - they have a low coefficient of friction.
Working surfaces are cleaned by brake pads during constant driving. But on other parts the rust remains and grows. If a car sits idle for a long time, a corrosion layer appears on the working surfaces. After a long break, braking on dirty discs worsens. Excessive rust from non-working parts gets onto other metal parts of the chassis - caliper, hub, wheel rim.
During braking, small particles of moisture and rust fly in all directions, even reaching the bottom of the car. This leads to the fact that over time you have to remove rust from the metal of other car parts.
Materials and equipment for prevention
Once rust starts, corrosion will never stop on its own. Rebuilding a caliper usually costs less than replacing it with a new unit, but requires additional time and effort from drivers. Before you clean the caliper from rust, you need to collect all the necessary materials. To achieve sparkling shiny devices you will need:
- A large piece of durable cardboard.
- Cans of enamel paint.
- Several plastic bags.
- Wire brush or blast clean.
- Drum brake.
- Insulating tape.
- Car jack.
- Screwdriver. This will help remove the screws on the brake line and remove the caliper spring clip.
- Rubber vacuum cap to help block leakage from holes.
- Air nozzle: will force compressed air into the brake line opening and force the piston out of the calipers.
- Oil: Responsible for processing metal parts that are connected to each other. Typically molybdenum disulfide lubricant is used.
- Board: will help create the necessary space for inserting the air nozzle into the hole in the brake line.
- Brake fluid and a cleaning attachment will help remove dirt and grease.
Helpful information
To ensure that the cleaning procedure is as effective and safe as possible, you must adhere to the following recommendations:
All work must be carried out outdoors or in a room with good ventilation.- Only plastic or glass containers can be used to soak parts. Metal basins are not suitable for this purpose.
- Blackening of the metal or the liquid in which it is soaked is a normal reaction. It indicates that the cleaning process is active.
- To speed up cleaning, you can heat the solution by lowering a boiler into it. In this case, inhalation of vapors should not be allowed.
- If it was not possible to get rid of rust the first time, repeat the procedure 1-2 more times. If necessary, you can increase the exposure time.
You can learn about methods and methods for removing rust from a car here.
Rust removal sequence
To keep your brake calipers in tip-top shape, you need to clean the sliding pins regularly. Remove old oil, debris and rust, then add heat-resistant lubricant to the pin and put it back in. The entire process may take about an hour.
The following step-by-step instructions will make cleaning easy:
- Remove the caliper. This is not possible if the car is at ground level, so you will first need to jack up the car. Once it is raised, loosen all the nuts on the four wheels without removing them completely.
- Remove the nuts on the front two wheels.
- Keep the nuts in a safe place.
- Carefully place the film on the surface and cover the cap. This process ensures that most of the vacuum is properly retained in the brake system.
- Loosen the line at the point where it meets the caliper.
- Unscrew it partially and bring the tray to collect the drops.
- Using a screwdriver, remove the spring clip.
- Loosen the bolts and remove them, then remove the caliper from the rotor.
- When it is completely free, you can pull out the pads.
- After removal, use a rubber vacuum cap and pan to collect the liquid. Place a piece of wood between the piston and the outer flange.
- Do-it-yourself cleaning of calipers from rust is carried out using brake fluid to remove contaminants and grease.
- Use a cleaning brush and brake fluid.
- Spray some of the brake cleaner onto the brush and begin processing. Do not spray cleaner directly onto the calipers. The more carefully this step is performed, the better the cleaning effect will be.
- When finished, remove the front locking clip and close the drain valve using masking tape.
- Once it is closed, secure the brake hose fittings as well.
- Take some stiff cardboard and cut out a piece in the shape of an inverted L. You need to protect all parts of the car with plastic film. If paint gets in, the normal functioning of the braking system will be disrupted. You may need to use duct tape to hold the plastic in place.
- Spray the paint onto the caliper using a slow and steady motion. Take special care to prevent paint from getting between the brake pad and rotor.
- Leave the paint to dry before removing the plastic and cardboard.
- Move to the next wheel and repeat the process.
- Make sure the paint is completely dry before attaching the wheels.
- Repeat the process until the caliper is completely clean.
- Observe safety precautions when performing work. Any dust or dirt in the air can get on wet paint. In addition, the smoke from spray paint is dangerous if the driver inhales it, so it is recommended to wear a dust mask when working.
- Replace the piston and reattach the brake line, then install the brake caliper into the wheel. Once all four calipers are serviced and the wheels are installed, check the brakes. If any problems are found, contact customer service.
Electrochemical method
This is an anodic cleaning method that is capable of combating powerful rusty layers. It is used in industry, but with its help you can remove rust on machine parts with your own hands. It may not work the first time, since you will have to select the concentration of the solution and the current strength.
Necessary equipment and chemicals:
- DC source 12 - 36 V and up to 1 A. You can take a power supply from a computer or a car battery.
- Soda Ash. The approximate concentration for dilution is a teaspoon per liter of water.
- A plastic container that will hold the part to be cleaned.
- A piece of stainless steel. You can get cat dishes from a pet store.
- Connecting wires, clamps. It is advisable to include a current regulator in the circuit so as not to overload the power source.
- Dissolve soda ash in the required amount of water. For better dissolution, heat the water.
- Place the part to be cleaned in a container, connecting it using a clamp and wire to the “+” terminal of the power source.
- Place a stainless steel object connected to the “–” terminal of the source in the same container. The parts in the container should not touch each other.
- Pour the soda solution into the container so that it completely covers the damaged part.
- Turn on the power source and make sure that the process begins: foam will appear, and air bubbles will escape from the rusted part.
- Make sure that the corrosion layer is separated from the surface and goes into the solution, which becomes dirty brown.
- Wait a few hours to ensure the part is completely cleaned. The time depends on the degree of corrosion of the part.
In terms of cleaning power and quality, this method is not inferior to sandblasting. But with it, oxides are removed without damaging surfaces.
Corrosion protection KENT
With KENT Corrosion Protection sprayed onto the visible surface of the disc, the coating prevents corrosion from developing.
Features and Benefits:
- Prevents the formation of corrosion and rust.
- Creates an attractive appearance of the car based on a transparent coating system.
- There is no need to disassemble the wheels and clean the rims before starting the car.
- Without silicon.
- Safe for use in the truck.
- Does not affect vehicle safety.
Protective equipment depends on the characteristics of the vehicle. Wrong choices can lead to life-threatening accidents. Therefore, it is imperative to buy them from trusted manufacturers who produce products that meet safety standards.
Before cleaning a brake caliper from rust, you need to do the following:
- Clean the discs and let them dry.
- Shake the product well before use.
- Spray the product evenly until the disc has a sealed coating. Wait until it dries completely.
What types of lubricants are there?
If you meticulously find out who produces these lubricants, you will find out that for the famous brands indicated on the packaging, these lubricants are produced by specialized companies. But the conversation is not about them, but about how these substances are divided, and which one is better suited for lubricating the guides and other elements of the caliper.
In this case, they can be divided into several different types, each of which contains several lubricants that correspond in their characteristics to the operating conditions of various elements of the disc brake caliper.
Synthetic or mineral pastes with added metals
In the first group, it is worth considering high-temperature lubricating pastes with Anti-Seize properties. These lubricating substances contain entirely or partly a synthetic as well as a mineral base. With the addition of synthetic thickeners, submicron particles of metals such as molybdenum or copper. Also, instead of metals, solid substances of lubricants can be used, which work successfully at super-temperature values. This group includes:
- Complex lubricating paste products.
- Metal-free pastes.
- Lubricants containing copper or molybdenum disulfide.
They can be used to cover anti-squeak plates, pressure springs, and the back side of the pads.
Here you can highlight pastes from the following major brands: Huskey, Loctite, Wurth, LIQUI MOLY, Textar, Mannol Kupfer, Valvoline Cooper, Motip Koperspray, Bosch SUPERFIT.
Mineral oil based pastes
The second group includes synthetic lubricating pastes, which are based on mineral oil with the addition of a bentonite thickener, containing fatty acids and metal particles. Their distinctive feature is the absence of a dropping point with a working range from –45°C to +180°C. Excellent for lubricating brake caliper guides (fingers). Here are several such pastes from different manufacturers: ATE Plastilube, Loctite Plastilube, Molykote.
Synthetic oil based pastes
Well, the third group includes lubricating pastes intended for all moving elements of the disc brake caliper: piston in the cylinder, guides (pins), etc. They are compatible with most rubber-based materials, elastomers and plastics. They are based on highly purified synthetic oils with the addition of a stable thickener and additives with anti-wear, antioxidant and anti-corrosion properties.
Such lubricants are insoluble in water, brake fluid, acids and alkalis. They also have low volatility and high dielectric strength. These lubricating pastes are produced by the following brands: Molykote, Permatex, SLIPKOTE.
Domestic manufacturers in this segment have distinguished themselves with MS-1600 paste.
From the description it is clear that the optimal choice is lubricating pastes of the third group, because it is not for nothing that many machine manufacturers recommend them.
Paint for brake systems
The choice of paint for the caliper depends not only on the color, but also on the durability.
Wear and chemical resistance should always be taken into account when considering the best brake protector. One of the first factors to consider when purchasing paint will be the type of caliper: not all of them are suitable for painting. The first type is a floating caliper, with a piston on one side of the rotor. The second type is a sliding caliper, which is usually found in an adapter slot. It works on one piston. On the other hand, the number of cylinders used in a fixed caliper usually ranges from 2 to 8 discs. No bushing or sliding pin is required, it attaches to the bracket. Typically, the best performance calipers have more pistons and less heat retention.
Another factor to consider will be the quality of the paint. It is designed not only to change the appearance of the car, but also to protect against corrosion or scratch accumulation. Some paints are specially formulated to provide protection in extremely hot or cold weather conditions.
The third factor is a safe standard. Painting a brake caliper may affect its functionality. It may also become hotter than the engine. This is why the paint you choose should be safe and heat resistant. If it suddenly begins to peel off, it can peel off from the caliper, get into the brake system and damage it.
Helpful information
Brake discs are made of cast iron, so when purchasing specialized compounds, you need to clarify whether the chosen product is suitable for this type of metal.
When working with chemicals, you need to take care of personal protective equipment . It is unacceptable to remove the part from the solution with bare hands. They must wear rubber gloves.
The cleaning procedure should be carried out in a room with good ventilation.
There is a lot of useful and important information about methods of fighting rust on a car in this section.
Consumer Reviews
VHT SP731, red brake pad paint, is specially formulated for brakes, drums and calipers.
This is a brilliant product for custom rotor detailing. Ideal for any color primer as it has a clear finish. Has first-class adhesion, quick-drying. The disadvantage is that it is not the most brilliant among other analogues. Dupli-Color BCP400. Brilliant, fast-drying red paint. Dries in less than 30 minutes. Remains resistant to cracking. Comes with brush. The downside is that the brush is not the best to use and there is no spray option.
A wide selection of anti-corrosion cleaning products will always allow the car enthusiast to choose the right option for his car. If you master the technique of cleaning brake systems from rust yourself, you can not only save money, but also reliably protect your car.
When is cleaning needed?
Many car enthusiasts do not think about cleaning and inspecting brake calipers in principle, since they are a reliable mechanism and often do not show any signs of wear until one of them completely fails. Therefore, you need to know when to clean your calipers.
Due to prolonged operation of the calipers without cleaning, they jam and, as a result, overheating of the brake system, which leads to rapid failure of the brake pads and their frequent replacement.
If one of the calipers on the front suspension begins to jam, this can lead to the car pulling to the side when braking, which leads to disastrous consequences when driving such a faulty car.
It is very convenient to carry out preventive maintenance when changing car tires in the off-season, since you do not have to remove the wheels once again specifically for cleaning, unless there is an urgent need for it.
If you notice at least one of the above points, then you immediately need to contact a service center to prevent damage to the brake system of your car.
Read also: Replacing Fiat Alba steering rods
I described the technology of the procedure in a previous entry (www.drive2.ru/l/7122266/) After cleaning the brake discs and replacing the handbrake pads, the noise in the wheel remained. It turned out that after the first press on the brake, the block on the right side (where the noise was) does not move enough, that is, the piston jams. I scoured the Internet, gained knowledge and got started. I disassembled the calipers into small pieces:
I took the victim out of the solution for inspection, having survived 1 brake disc and a couple of small parts:
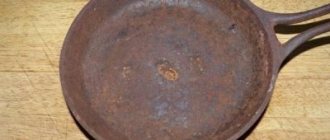
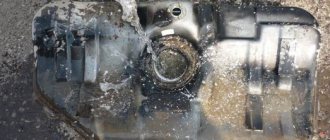
Test photos of calipers before cleaning:
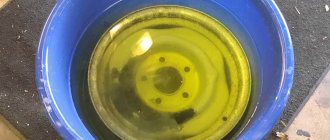
I wrapped the victim and parts of the calipers around the wires and prepared the solution. I'll leave it on overnight and see the results tomorrow.
Continuation: In short, after electrolysis I had to leave the pieces of iron without wiping them. Within a few hours they were covered with rust again, the cylinders were covered with rusty specks. I had to repeat the procedure, and then clean the cylinders, because after electrolysis, black dots remained in the places where the specks were.
Note 1: After the electrolysis procedure, you have to treat the surface of the parts with a turbine. All this is outright bullshit, that the black coating comes off “like a cobweb” and is “scraped off with a fingernail.” If in the case of brake discs this is quite easy, then parts of complex shapes, such as a caliper, are not so easy to clean with a turbine. I’m already silent about a simple metal brush; in my opinion, it’s a perversion to jerk off with it. Of course, you don’t have to do this if you don’t intend to paint the part. I also read somewhere that black coating changes the characteristics of the metal. In mechanisms where these properties are extremely important, it is better not to leave a residue. In particular, we were talking about thin springs. Note 2: After cleaning the parts, you should not leave them, it is better to immediately paint or cover them with something else. In our climate, motherfucker, on a dry part lying at home, the next day a rusty coating appears again.
As I already wrote, I broke the turbine on my left hand, cleaning my hand. I repaired the turbine, but yesterday the fucking dog chewed up my other hand. So I’ll assemble these damn calipers who knows when.
Caliper parts after electrolysis and cleaning with a turbine:
Calipers after cleaning before painting. Additionally treated with acid, you can see in the photo.
One fitting was unscrewed with a wrench after I flattened it with a hammer and watered it with VD for a couple of days. On the second, the edges were licked off. He also got a good hammering and was doused with WD-40. The pliers didn't help, so I took a size 6 wrench (one size smaller) and hammered it into the licked edges with a hammer. The asshole got loose. You need to hit it carefully with a hammer; a piece of the caliper may break off if it rests against something hard.
I ordered 2 ATE fittings for 120 rubles from emex. In the end, I couldn’t wait and bought these two sets:
Simply cleaning the calipers did not help with the jamming. Left
The piston barely entered the caliper. It turned out that the spacer rings in the caliper swell over time. This was vehemently denied by another asshole in the LAL-AUTO spare parts store, shouting that on the contrary they were shrinking. I bought two repair kits and installed them. I compared the rings with my own - mine were even a little larger in diameter, apparently because they had swollen. Now everything goes in and out as it should. I used a special lubricant for the guides and spacers under the boot (liquimoly.ru/product_view2.php? >
I checked the brakes on a stand at a car service center. Rear brakes are excellent, 1% discrepancy. This means your efforts were not in vain. I didn’t do the front ones, there is a 20% discrepancy there, a skid may occur. 20% is the maximum allowable value. I'll do it later. It turns out that if you take a repair kit, then there will be 2 for one axle. Otherwise, the brakes will slow down one after the other, which is not good.
Receipts: Rye converter 100 RUR Paint 150 RUR Fittings (6) 240 RUR + 172 RUR: