There is nothing permanent in the world. And even the most beautiful ceiling made of foam tiles can get boring. You will want to remove it, and here the question arises: how to remove all the glued foam plastic tiles from the ceiling?
Before we tell you how to clean the ceiling from tile adhesive, we’ll figure out in what cases this needs to be done. To begin with, let's say that dismantling the ceiling tiles is not required if you decide to install tension coverings, suspended or false ceilings made of gypsum plasterboard, plastic panels and Armstrong ceiling tiles.
All these coatings do not require careful preparation of the base base, because they completely hide it and all existing defects. It is necessary to dismantle the tiles only if there are poorly fastened elements that could fall onto the tension fabric and damage it.
You will have to remove old tiles and thoroughly clean the surface of tile adhesive in the following cases:
The most incredible way to get my hair back!
This is just a DISASTER ! And after all, my hair did not start falling out in one day, but systematically - day after day I watched how the hair left my head: while combing, washing, even while sleeping. (read more…)
- If you decide to paint the ceiling with interior paint or whitewash it. In this case, the question often arises of how to level the ceiling after tiling, because painting requires a perfectly smooth and even surface. The only way to prepare the surface for painting is to dismantle the coating, clean the ceiling of glue and putty it.
- The question of how to clean the ceiling from foam tiles should also concern you if you decide to cover the ceiling surface with wallpaper. In this case, thin paper and vinyl wallpapers require especially careful preparation of the base. Thicker non-woven coatings, embossed wallpaper for painting, liquid wallpaper and products made from cork or bamboo do not require careful leveling because they hide minor defects in the base.
- If you decide to tile the ceiling with ceramic tiles or cover the surface with a new foam coating, then you should know how to remove the ceiling tiles and remove the glue, because you cannot glue a new coating over such a finish.
- You will also have to dismantle the old coating, clean off the glue and level the surface if you decide to cover the ceiling with self-adhesive film.
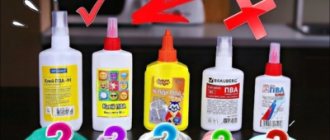
Which adhesive is best for foam ceiling tiles and its cost
Important! If new plastering and puttying of the surface is carried out, then there will be no need to thoroughly clean the ceiling of glue, because its remnants will be removed along with the old plaster.
How to clean the ceiling from the adhesive of ceiling tiles and remove them: dismantling and how to level them
- Visually assess the integrity of the coating. If necessary, update the parts in the manner described above.
- Feel the lamellas with your hands, checking the strength of adhesion. If necessary, glue the slabs by squeezing the adhesive composition from a syringe - this is a convenient option for spot gluing.
- Remove the skirting boards and ensure the integrity of the parts. Sometimes moisture accumulates behind the ceiling plinths and mold appears - in this case, the base will have to be cleaned and soaked with an antiseptic, then dried well.
- The gluing technology is simple: on the back side of the element, apply 4 glue dots in the corners, 1 in the center, then, in accordance with the instructions, press the part to the ceiling, hold for a while and release.
The third rule that must be followed is that any composition for removing glue must be tested in advance on scraps of material. It will take a maximum of half an hour to test it, but you can be completely sure that this glue has its own antidote, you can always wash off or remove the drops if necessary.
Cleaning methods
During cleaning, the tray must be kept under a roller or sponge to prevent drops from falling on the floor.
What tools can you use to clean ceiling tiles? One possible method would be vacuuming. Vacuuming ceiling tiles is very convenient because it does not dirty the floor and saves time on cleaning. There is a significant drawback to using a vacuum cleaner. It is impossible to clean rust stains or marks left by neighbors' floods or roof leaks. In this case, it is necessary to use detergents to clean the ceiling.
Of course, it is good to wash ceiling tiles using a soft fluffy brush, which allows you to clean dirt even in hard-to-reach areas of the ceiling pattern. Using this cleaning method, it becomes necessary to wash the furniture and floor, since dust from the top will fall down.
The ceiling is washed using a damp sponge or rag, but do not forget that when wet cleaning, each type behaves differently.
In order to wash the ceiling, various detergents that are used in everyday life may be suitable. Do not use detergents or powders with abrasive particles. Such particles can leave marks and cause great damage to the coating. It is better to wash the ceiling using gel detergents or soapy water.
How do samples behave during wet cleaning? Injected and extruded withstand moisture and mechanical stress during cleaning. It is not recommended to wash stamped ceiling tiles as they are fragile; cleaning in this way is allowed only when absolutely necessary.
The process of washing the ceiling is carried out using a sponge or cloth. For wetting, prepare an aqueous solution with detergent. All elements of the pattern are filled with soap composition, then the composition is washed well with clean water. If there is any water left in the pattern relief, it is very easy to get rid of it using paper napkins or toilet paper. It is imperative to remove moisture, as once it dries, it can leave dirty marks. It is not recommended to wash the ceiling using chemically active, aggressive detergents - this can destroy the structure of the material.
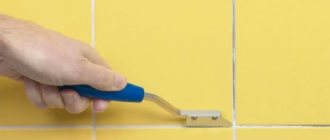
You can wash the tiles from glue or putty during repairs using a spatula. If the putty has not yet dried, you can do it with a rag.
103583
How to remove wallpaper from the ceiling using special preparations.
If the wallpaper doesn’t work, or you don’t have the strength to diligently rip it off the ceiling for several hours, you can now buy a special liquid for removing old wallpaper in hardware stores. Such preparations penetrate through the fibers of the wallpaper and after application they can be torn off without any effort. The most popular wallpaper removers on the Russian market are QUELYD DISSOUCOL, Zinsser and ATLAS ALPAN.
Do you like guys with long hair?
Not really
Removing old wallpaper with a spatula
But there are cases when, for better reliability, builders mixed wallpaper glue with PVA glue or even glued wallpaper with wood glue. This is the biggest problem when removing old wallpaper. Wallpaper glued using one of these methods does not get wet with hot water and even wallpaper remover removes it with great difficulty. Here you just have to scrape them long and hard with a spatula or drill with a hard wire attachment. You can forget about the integrity of the plaster under the wallpaper.
How to clean the ceiling from the adhesive of ceiling tiles and remove them: dismantling and how to level them
But before you start work, the room needs to be prepared. To do this, cover all pieces of furniture that you decide not to remove from the room and the floor with plastic film. This method of protection is good because after work, the film can be rolled up and thrown away along with the garbage.
Expert opinion
Ekaterina Korneva, expert in the field of care, cleanliness and beauty
I will help you understand all the intricacies.
It is best to apply glue to the center of the tile, pointwise to the edges with an indentation of 5-7 cm, and also coat the ceiling where the replacement will be installed. As a result, you can get a well-groomed and beautiful ceiling that will remain fresh for quite a long time. How to clean a ceiling from ceiling tile adhesive: tools and products If you have any questions, please contact me, I will be happy to answer!
Progress
After the wallpaper is completely removed, the ceiling needs to be wetted again using a large construction brush.
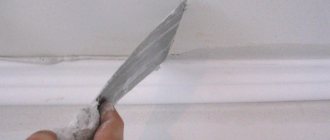
In this state, the ceiling should be left for 3 minutes, and then clean it of glue using a metal spatula. If the glue does not come off, you can use a wire brush with stiff metal bristles to scrape off any problematic residue. How to clean the ceiling from glue? During cleaning, a lot of dust is generated, so do not neglect protective clothing and glasses. Also, after complete removal of the glue, the ceiling must be cleaned of the resulting dust and peelings using a brush or sponge dipped in water.
In addition to tools to clean the surface, you need materials and equipment to level the plane:
There are several types of foam ceiling tiles - stamped, extruded and injection. Before installing a new ceiling finish, the old foam covering must be removed. But if tearing off the products is not difficult, the question of how to clean the ceiling from the glue of ceiling tiles worries many apartment owners. There are several ways to remove tile adhesive. Their choice depends on the type of future finishing.
If you want to achieve ideal smoothness of the base ceiling, then the old tile adhesive is cleaned off especially carefully. We'll tell you how to do it correctly.
Clean the ceiling from glue: the most effective ways - Construction Portal
- It is not always possible to know for sure what kind of glue was used when gluing the old trim. That is, it is difficult to predict what its reaction will be with the composition that will be used when gluing new wallpaper. It is possible that the next morning after the repair, all the wallpaper will be lying on the floor, that is, hopelessly damaged.
- The paint on many old paper wallpapers is not durable. That is, when it gets wet again (when gluing it on top of new canvases), it may well seep through and appear in spots on the fresh finish.
- It has already been mentioned above that the requirements for the evenness of walls in past times are still not comparable with modern ones. Previously, they often tried to hide even very significant surface defects with wallpaper - cracks, chips, sinkholes. And some defects could progress over time. And to close it without even inspecting the wall and without carrying out repair work, if necessary, is not at all businesslike. In addition, there is a high probability that after gluing the new finish, these flaws will appear and spoil the entire impression of the newness of the interior.
- Whatever one may say, the old wallpaper has already become saturated with fumes and odors, and it is hardly worth carrying all this “wealth” with you “to the future.”
- Under the wallpaper, pockets of mold or mildew may appear on the wall. At the initial stages they may be invisible, but in the future they will definitely make themselves felt. That is, it will never be superfluous to check the wall for its “biological health”, and, if necessary, carry out appropriate antiseptic treatment.
To prevent defects, you should carefully apply the adhesive mixture to the corners and in the center of the new part, attach the lamella to the ceiling, smooth it out and press lightly
How can you dissolve and remove different types of Titan glue?
Now you can figure out how to dilute Titan glue for further use or for complete removal. For example, Titan Wild for wallpaper is diluted with water, but it will no longer be possible to dissolve it with this harmless liquid after drying. Let's start by diluting thickened compounds, which is applicable for universal and wallpaper glue, as well as for mastic. For these purposes (with the exception of Titan Wild, which only needs water), it is best to use ethyl alcohol of any purity (which is at hand) - food, medical or technical, with a strength of 96, 95 and 92 degrees, respectively. By the way, the degrees correspond to the percentage composition of pure ethanol - the rest is purified water. For example, food grade wheat ethanol contains 96.6% alcohol and 3.4% purified water, and medical grade 95% and 5%, respectively. Technical industrial alcohol has 92%, but sometimes it can be much weaker, up to 74%, and then you just need to add a little more of it.
More serious solvents, such as 646 or acetone, can completely change the molecular structure of the glue, meaning it will no longer be an adhesive. Therefore, if there is a need to dilute the thickened composition for further use for its intended purpose, then the amount of solvent should not exceed 1/5 of the volume of the thickened substance. But to remove glue, foam, liquid nails or mastic (until they have completely hardened), you need to wet a napkin made of natural fabric (linen, cotton) and wipe the surface until the glue completely disappears. Of course, soaking will have to be repeated several times.
Note: it is already impossible to dissolve completely hardened Titanium glue for any purpose, since the crystallized mass successfully rejects active liquids. You can only scrape it off.
Methods for removing old tiles from the ceiling
Impregnation with a primer and antiseptic is necessary to prevent the development of fungus, mold and improve the adhesion of the surface to the finish, so treatment should not be neglected.
- Provided that the decor is already coming off, you need to pick up the parts with a spatula, carefully removing the elements entirely or in pieces. The spatula should be wide, work should begin from the corner of the room. Pieces of tiles that do not come off so well should be removed with a narrow spatula or pry the edges with a knife.
Advice! Before starting work, it would not be superfluous to remove the furniture and cover the floors with film. The garbage can then be collected and thrown away along with the polyethylene.
- The option of soaking the tiles is suitable only for thin elements that are “tightly glued”. A solvent that is carefully applied to the decor will come in handy. You only need a little money to pry up the corner of the element, and then remove the entire tile from the ceiling.
- How to tear off a tile from the ceiling if it sits firmly and is not thin - a hammer or chisel will help here. Insert the tip of the chisel into the seam, punch it with a hammer, and remove the part.
- Also, durable tiles can be removed using a drill. Drill 4-6 not very deep holes, and then remove the part with a spatula or chisel. This option is useful when the tile seams are too thick and strong - it’s easy to widen the seam with a drill or hammer drill, and then tear off the tiles.
Advice! When using PVA glue, it becomes hard when it dries and can hurt your hands when cleaning the ceiling. Thick thread gloves for work will not hurt.
How to clean the ceiling from the adhesive of ceiling tiles and remove them: dismantling and how to level them
An additional long handle should be installed on the spatula. It will allow you to easily process large areas without moving stepladders, and this will significantly speed up the work process.
Expert opinion
Ekaterina Korneva, expert in the field of care, cleanliness and beauty
I will help you understand all the intricacies.
That is, many layers of old finishing, through which you can trace the history of repairs over several decades. If this is not possible, then it is moved closer to the center of the room, so that there are fairly wide passages along all the walls in which it will be possible to work without interference. How can you wash paint, glue, putty and soot from a stretch ceiling? If you have any questions, please contact me, I will be happy to answer!
Tools and materials
The master will need the following set:
- spatulas with wide and narrow blades;
- hammer, chisel;
- drill or hammer drill;
- knife with a wide blade.
From auxiliary materials, prepare film, garbage bags, do not forget about a durable table or stepladder, gloves and a mask - there will be a lot of dust, so protection of the respiratory tract and eyes will be useful.
In addition to tools to clean the surface, you need materials and equipment to level the plane:
- a grater with emery or a grinder with a grinding disc;
- glue removers;
- solvents;
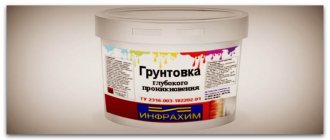
- deep penetration primer;
- antiseptic impregnation;
- starting and finishing putty.
Advice! If you know the composition of the adhesive mixture on which the tiles were attached, it will be easier to choose a remover or solvent.
In what cases do you need to remove old foam tiles?
- Before painting the ceiling. The evenness of application of the coloring composition depends on the smoothness of the base, so you need to not only remove the decor and glue residues, but also then putty the surface.
- Before pasting with wallpaper or self-adhesive film. Here, too, you need a perfectly leveled surface, so the tile trim needs to be removed.
You can use not only electric, but also mechanical tools for work. These include a spatula, chisel, and metal brushes. The main advantage of using this equipment is the ability to process large area ceilings, reducing the immediate time required to complete the work.
What will you need?
To work you need the following set of tools and equipment:
- Chisel and wire brush.
- Sanding machine and sandpaper.
- Putty and spatula, primer.
- Ladder.
- Bulgarian.
- Additional protective equipment - goggles, respirator and gloves.
The work is very dusty, so it is best not to start it without protective equipment. Goggles and a respirator will be required to prevent damage to the visual and respiratory organs. Gloves are required to work with the tool.
How to prepare to remove old wallpaper?
The preparation is no different - it is necessary, firstly, to free up a working space for yourself, so that you have access to all the walls in the room. And secondly, to protect the things remaining in the room, interior elements or already finished surfaces from unnecessary contamination or getting wet (water will be used quite widely during the removal process).
- Furniture, of course, even more so - with the prospect of subsequently covering the walls with new wallpaper, it is better to take it out of the room. If this is not possible, then it is moved closer to the center of the room, so that there are fairly wide passages along all the walls in which it will be possible to work without interference.
- All pieces of furniture are covered with a thin film - such a protective coating, intended specifically for such purposes, is easy to purchase in a store.
- Of course, it is better to cover the floor with thicker plastic film so that it does not tear under the soles of shoes. A thickness of 75 microns is usually quite sufficient. To avoid slipping on the wet film, you can also cover it on top with pieces of packaging cardboard or even just old newspapers.
- Skirting boards are often forgotten. If you do not plan to remove them, then the preservation of the appearance can be ensured with strips of applied masking tape. By the way, they can also fix the film laid on the floor around the perimeter of the room.
If it is not possible to completely empty the room of furniture, then it, like the floors, should be covered with film
- To prevent dust and dirt from spreading throughout the premises, a damp cloth should be placed on the threshold. You can keep the doors closed, or cover the doorway with a piece of damp cloth.
- Removing old wallpaper, preparing walls, and installing new trim involves removing sockets and switches. There are “wet procedures” ahead, so you need to protect yourself from electric shock. Either the room is completely disconnected from the home electrical network, or steps are taken to reliably isolate current-carrying parts and wiring.
You need to immediately prepare the necessary tools so that they are already at hand. It is difficult to give an exact list of all the required “arsenal” - much depends on specific circumstances. So, depending on the type of wallpaper pasted and the strength of its retention on the wall, the following can be used for work:
How I found my ideal hair growth product
Hello dear! I want to share with you my solution to the sensitive problem of hair loss . The problems are very serious, at least for me. I would never have thought that this misfortune would touch me, especially at the age of 29 (read more...)
- Spatulas, narrow and wide (up to 250 mm).
- A container for water, detergent or other ingredients, which will be discussed below. It is convenient to apply water to the walls with a spray bottle.
- Sponges or foam roller, rags.
- To perforate waterproof wallpaper, you will need a needle roller or a special tool - the so-called “wallpaper tiger”.
- Often you have to resort to steaming glued fabrics. Here you can use an iron, regular or, better, with a vertical steam function. Special wallpaper steamers (steam strippers) are very convenient, and if you have the opportunity to rent such a device, you should not neglect it.
- A sufficient supply of garbage bags should be prepared so that the removed linens and rags should be immediately placed in them.
- A considerable proportion of the total volume of work will be carried out at height, under the ceiling. This means that you will need a reliable stepladder or, which is much more convenient, sawhorses.
- It is better to carry out wall cleaning operations while protecting your hands with gloves.
Preparation
- The option of soaking the tiles is suitable only for thin elements that are “tightly glued”. A solvent that is carefully applied to the decor will come in handy. You only need a little money to pry up the corner of the element, and then remove the entire tile from the ceiling.
- How to tear off a tile from the ceiling if it sits firmly and is not thin - a hammer or chisel will help here. Insert the tip of the chisel into the seam, punch it with a hammer, and remove the part.
- Also, durable tiles can be removed using a drill. Drill 4-6 not very deep holes, and then remove the part with a spatula or chisel. This option is useful when the tile seams are too thick and strong - it’s easy to widen the seam with a drill or hammer drill, and then tear off the tiles.
After all the cleaning methods, the ceiling surface will have to be washed, dried well, re-primed, and puttied to get rid of minor irregularities. Only after this is your ceiling ready for a new coating.
The first stage of any construction work is surface preparation. When it comes to the ceiling this can be quite difficult. For example, if there was wallpaper or tiles attached to the ceiling with glue. This type of ceiling design is used due to its positive qualities. Such as low cost, aesthetic appearance, practicality.
About 10 years have passed since the time when ceiling tiles began to be used. The time came when they began to dismantle it due to the fact that it went out of fashion. Or the tiles have darkened, begun to crumble, and look worse. The question arose about how to get rid of glue and its traces.
Solvent washing
How to clean the ceiling if there are only isolated stains of glue on it? A solvent with certain characteristics is suitable for this purpose. Titan glue and other “strong” compounds can be easily removed with solvents for acrylic enamels, which also contain acrylic in the composition. Before work, put on gloves, wet a rag, and wipe the glue stain. Remains of undissolved substance must be removed with a spatula; they will come off easily.
Some people use vinegar as a solvent. You should wet the sponge with 9% vinegar and then apply it to the stains. They will quickly leave. Another way to clean the ceiling:
- Pour hot water into the container.
- Add tile cleaner.
- Wet the brush and sponge in the liquid.
- Wipe the ceiling with the solution using pressure.
- After some time, wash off the stains with water along with the glue.
Introduction to the topic
Adhesive mixtures have high strength, firmly fix the glued fragments and dry quickly. Therefore, it is recommended to immediately wipe off excess glue with a dry cloth. If contamination is not noticed immediately, the stain will be difficult to remove without damaging the surface.
Before wiping off liquid nails, you need to find out the composition of the adhesive substance, taking into account the following features:
- The solvent-based product has improved adhesive properties, emits a sharp, specific odor, and firmly bonds any surface.
- Water-based glue is environmentally friendly and does not have a specific odor, but it glues objects less efficiently and does not last as long.
- To choose a suitable remover and remove residual liquid nails, you need to carefully read the characteristics of the composition on the packaging and the manufacturer’s instructions for removing glue.
To effectively wipe off liquid nails, manufacturers of adhesive products recommend purchasing a special remover along with the polymer sealant. This is not a waste of money, but a quick solution to the problem of how to dissolve liquid nails. The cleaner dissolves dried glue well, after which the softened product is easy to remove from the surface.
Attention! To remove glue, you can use improvised means or solvents. A fresh stain that you notice immediately can be easily washed off with warm water and a foam sponge.
Is the solvent effective?
So, it has been decided that the old wallpaper must be removed. How this is done will be described below. And here, depending on your luck, completing a task may require an hour of time and turn into a very protracted action. But nothing can be done…
Expert opinion
Ekaterina Korneva, expert in the field of care, cleanliness and beauty
I will help you understand all the intricacies.
That is, it is difficult to predict what its reaction will be with the composition that will be used when gluing new wallpaper. The tension surface must be monitored regularly so as not to accumulate dust or other contaminants, which are then much more difficult to deal with. Treatment after cleaning the ceiling from glue If you have any questions, please contact me, I will be happy to answer!
Use of power tools
The easiest way to remove remaining glue from the ceiling is to use a grinder. If you had to glue the tiles using a large volume of glue, this method is better than others. A suitable sandpaper is installed on the machine, and a stepladder is placed at the desired area of the ceiling. Next, the top layer of coating can be removed without difficulty, and together with it you can remove stains of any glue.
What to do if you had to glue the tiles using “liquid nails” type glue? This product is very durable, has high adhesion to the surface, and is not easy to remove from the ceiling. A grinder with a grinding wheel (hard wire disk) is ideal for this purpose. Even stubborn dirt will be removed, after which a new coating can be properly applied.
Working with power tools generates a large amount of dust; you should not work indoors! Hand gloves should be very durable and thick to protect them from injury and vibration from equipment.
Treatment after removing glue
- If the suspended ceiling is matte, then it is enough to rinse its surface with clean water. Stains do not remain on a non-shiny canvas. But if we are talking about a glossy or suede version, they do it differently: they also wipe the canvas with clean water 2–3 times, and then wipe it dry with a napkin.
- Another good way to avoid streaks is to use alcohol-based glass cleaning solutions. The photo shows a working moment of cleaning.
Of course, no one can forbid the owner of an apartment, if he is carrying out renovations himself, to paste new wallpaper without removing the old ones. But then all that remains is to hope that, as they say, it will “carry over”, and the finish will turn out to be both neat and durable.
Folk remedies Recipes for masks At home Hair loss in women How to stimulate growth Causes of hair loss Hair loss in men Review of vitamins Helpful tips
Material care
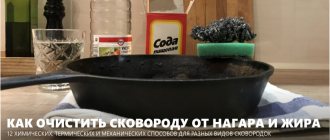
Ceramic tiles are the easiest to care for. It can be washed with any means: dishwashing detergent, powder, and soap solution. The catch is that nowadays few people use ceramics for ceilings. Foam squares are very popular. Under normal operating conditions, foam ceilings can be easily cleaned with a vacuum cleaner. To do this, use a furniture nozzle. Laminated boards can be washed with water after dissolving soap in it. To avoid streaks, the glossy surface should be wiped dry. But how to wash the ceiling tiles in the kitchen if traces of soot appear? Of course, you need to take into account the characteristics of the material from which the ceiling is made. You may have to resort to more radical methods: repainting and replacing individual elements.
For moderate contamination you will need:
- soft sponge;
- cloth for wiping, kitchen napkins;
- liquid detergents appropriate for the type of ceiling surface;
- gloves;
- glasses for eye protection.
You need to wash the ceiling tiles first with a liquid detergent, and then go over it again with a sponge soaked in a solution of water and bleach. We dilute bleach at the rate of 1 tbsp. l. for 4 liters of water. Rinse the tiles and dry them with a soft kitchen cloth. Heavy contamination can be removed with a mixture of ammonia, water, vinegar and liquid detergent in equal proportions. An effective remedy can be made from a mixture of 1 tsp. citric acid, 2 tbsp. l. baking soda and water. Apply the solution to the stains, leave for a few minutes, and rinse with clean water.
The kitchen is the personal space of every woman. This is where most of the free time from work is spent. Every housewife wants her kitchen to be cozy and sparkling clean. To ensure that the ceiling remains clean for a long time and does not require regular repairs, it is better to acquire a high-quality hood. And the main thing is not to leave preparing dishes unattended.
A ceiling made of any material needs care, and for each material there are some means that help keep the ceiling clean by removing dirt from it. To the question, “How should you wash ceiling tiles?”, some answer that they do not, but this is not true, since such tiles are not only cleaned and wiped, but also washed.