Types of problems
Any changes in the canvases occur due to a violation of the installation technology. Despite the simplicity of pasting, you need to carefully prepare and treat the surfaces before fixing the trellises. Even a small deviation from the rules leads to defects.
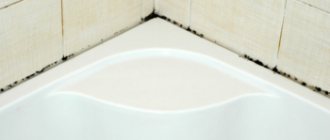
Blackening
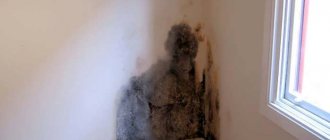
Dark spots on the wallpaper are a fungal colony that has grown under the canvases. Among the causes of the problem, we highlight 2:
- High indoor humidity. Wet air in the room and lack of normal ventilation creates a favorable microclimate for mold.
- Untreated partitions. Before gluing, the walls are carefully primed with antibacterial compounds.
If black spots appeared on the wallpaper, then the contractor ignored the technology of applying a protective solution. When treating with a primer, one layer was used, which is not enough to prevent the spread of fungus. Poorly or not dried primed partitions can provoke the occurrence of mold.
Black spots on the finish Source freegameinfo.ru
Gray
Inconspicuous gray or bluish-green spots occur when installation technology is violated. Wallpaper cannot be glued to rough (unprepared) surfaces. Because the putty coating is too thin, the color of the drywall that is screwed to the partitions shows through. On light-colored trellises, the inconspicuous shade of cement mortar shines through.
Gray spots on the wallpaper can be caused by wet plaster. Before each stage of repair, the walls must be thoroughly dried. If the installation of canvases is carried out in a hurry, then the applied coating does not have enough time to dry, and defects appear.
Alabaster mortar hardens within a week, cement mortar hardens for almost a month. Sometimes craftsmen use forced drying with a construction hairdryer and forced ventilation. The surface dries out a few centimeters, but a wet layer remains inside.
Unsightly defect on the trellises Source freegameinfo.ru
Effective ways to remove rust at home
Rust can appear anywhere - on kitchen furniture, frying pans and pots, furniture surfaces in the bathroom, and even on clothes! Metal fittings sometimes leave rust marks on fabric, especially for items made of light-colored materials. But don’t panic: you can still save your favorite jeans and restore the shine to your frying pan.
Read tips on how to get rid of rust at home.
Best Rust Removers
Household chemicals are not always the best cleaning products. It can not only be toxic, but also harmful to surfaces. Here is a list of the best cleaning products to help remove rust that are not only harmless, but can be found in any supermarket.
Baking soda. It can easily remove stains from plastic, ceramics, earthenware, dishes and even clothes without damaging them. It is hypoallergenic, leaves no residue, is inexpensive and is sold almost everywhere.
Foil. A ball of regular foil from the hardware store can easily remove rust from faucets, sinks, bathtubs, and dishes. Just roll a ball and rub the stain a little.
Cola. This sweet soda is best at removing any traces of corrosion from metal. In the States, it is used to clean the bottoms of trucks, rusty hoods of police cars, concrete walls, toilets and sinks (helps not only against plaque and rust, but also against clogged pipes), asphalt and tools.
Ketchup. Another magical remedy that can remove rust from zippers on bags, dishes and equipment. Few people remember that the popular sauce contains folic acid and vinegar, and yet they perfectly clean traces of corrosion and prevent its further occurrence.
White wine vinegar. Not only does it do a great job of removing rust stains on clothes and caps, but it also neutralizes red wine and coffee stains, and generally whitens things perfectly. They can also easily clean dirty joints on tiles and wash away rust in the shower.
Toothpaste. White toothpaste and tooth powder without dyes or additives (yes, it is still sold in hardware stores) will perfectly clean shoes and remove rust stains from clothes, hats, dishes and even jewelry. It will work especially well if you rub metal greased with paste with regular foil.
Lemon. Fresh fruit, as well as lemon juice and synthetic citric acid, are an indispensable remedy in the fight against rust. They not only quickly remove stains, whiten fabrics and disinfect surfaces, but also leave behind an excellent aroma.
Borax. A cheap pharmaceutical product will fit well into the arsenal of any good housewife due to the fact that it will remove rust from almost everywhere. Especially if you mix it with cream of tartar or lemon juice to form a thick paste.
How to fix
Trellis is a capricious finish, on the surface of which any flaws are visible. Defects on decorative canvases must be properly removed. The choice of technology depends on the problem being solved and the type of building material. Let's look at the main points.
Mold
If dark spots appear after wallpapering, you will have to carefully prepare the room. It is important not only to remove the fungus, but also to prevent its reoccurrence. Mold is very dangerous to human health, so the unsuccessful finish will have to be dismantled. The humidity and air movement in the room are normalized.
First of all, furniture and textile items are removed from the premises. After removing the wallpaper, the partitions are treated with a chlorine-containing solution (“Whiteness”). The substance is left until completely dry.
Clear stains on the surface are thoroughly cleaned with sandpaper. If the fungus has penetrated into the deeper layers, you will have to cut off the problem area. Dust is removed from the room, and the partitions on which you plan to glue the wallpaper must be washed.
Methods for removing stains
Here are examples of proven methods for removing stains from wallpaper:
| Illustration | Description of work |
| Rust. If the contours of the stain do not increase in size, you can try to remove them from the wallpaper with table vinegar. The technology is simple:
| |
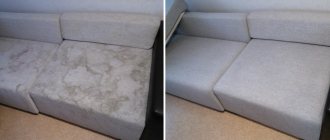
Fat. You can also remove a greasy stain on wallpaper using improvised means, for example, soda or starch, or purified gasoline.
Using starch:
Using gasoline:
Let's look at how to remove grease stains from paper wallpaper. For thin paper wallpaper, it is better to use an iron and toilet paper - apply the paper to the stain and iron it with a warm iron. | |
| Mold. To completely remove mold, comprehensive measures are required, including the complete removal of wallpaper and plaster. And then you will need to treat the walls and ceiling with special reagents. This should be done in the warm season, and as a temporary measure you can use cleaning the wallpaper with vinegar:
| |
| Wine, markers, paint. This type of dirt can be removed from the surface of the wallpaper using dishwashing detergents. Instructions for use are indicated on the packaging. I recommend first testing the product on a small fragment, and if successful, apply it to the entire stain. |
How to warn
To avoid dark or yellow spots on the wallpaper, you must not violate the rules of technology. When gluing trellises, rough finishing takes up 90% of the total amount of work. First, the partitions are cleaned, then smoothed with putty.
Between each new process, a primer must be used. The suspension is applied in 3 layers and dried thoroughly. Deep penetration compositions with antifungal additives create unfavorable conditions for microorganisms. If the coating is thin, the glue will react with the wall. Dark spots will appear on the trellises after drying.
How to use emulsion correctly Source solomonplus.com.ua
There may be electrical wiring running through the partition, or an old nail or rebar sticking out. Translucent metal parts must be carefully insulated. The elements should not react with air, otherwise the glue will start to rust.
The putty must dry completely after application. It’s easier to waste a few days drying than to redo the job later. In the best case, the coating will crack and begin to peel off; in the worst case, fungus will appear under the wallpaper. With any option, new repairs cannot be avoided.
How to prevent the problem Source wallpaper24.com
How to remove pen stains from wallpaper
If pen marks on the wallpaper were left by children, then a wooden frame will be the way out, which will turn the drawings into real works of art. But if the stain needs to be removed, then there are several different ways to do this:
- A mixture is prepared from a solution of potassium permanganate and 70% vinegar essence. This mixture is applied to the lines and left for a few seconds. Under the influence of these substances, the pattern will fade and then disappear, leaving behind streaks. They are removed with hydrogen peroxide.
- Prepare a mixture of citric and oxalic acid. 10 g of this solution is added to 100 ml of water and applied to the stains. The ink will begin to fade and disappear.
If the stains are old, the procedure may have to be repeated several times. If the wallpaper is thin, then act carefully and monitor the change in color and structure of the top layer of paper.
A little advice on how to remove stains from wallpaper if they were not applied very carefully and glue stains remain. Simply sprinkle them with warm water and then gently wipe them with a soft cloth. To remove dark marks around the switches, simply wipe them with a regular eraser that removes graphite.
Frame holders
If there are no special latches on a wooden photo frame at all or they have broken off, this problem can easily be solved with pushpins that are made entirely of metal. You can, of course, use nails, but they will damage the wooden frame.
You can use regular metal snaps to secure photos in the frame.
The edge of the button needs to be bent a little and then “driven” into the wood. It is thanks to this bent tip that the photograph will stay in the frame. If the edge of the button protrudes, it can be easily bent. The photo will be captured securely, and it’s quite easy to get these buttons if necessary.
Experiment result
Of course, you can find a lot more such advice in old Soviet magazines - we checked only a small part of them. As you can see, most of them are quite functional, so you can use them today if necessary, although some may not seem entirely relevant.
How to prevent long-term shrinkage of wallpaper
There are some ways to prevent long-term shrinkage. The main one is the quality selection of glue. Today, there is a special glue on the market from European suppliers, made from natural bio components. Such glue, as a rule, has a beneficial effect on the non-woven base of the wallpaper, allowing it to quickly return to its original position without unnecessary waiting. In addition, the use of such substances is environmentally beneficial. There will be no unnecessary odors in the room, and therefore there will be no need to ventilate the apartment. And, as mentioned above, any draft for freshly hung non-woven wallpaper is a certain risk.
To prevent non-woven wallpaper from shrinking for a long time, you need to be careful when gluing it. Often homeowners are in a hurry, allowing not only obvious technical defects, but also poorly gluing sections of the walls. This fact especially applies to corner joints of walls, as well as ceiling structures. It is best to make repairs slowly, but glue every centimeter as efficiently and accurately as possible. In this case, shrinkage will be minimal and the wallpaper will initially be in good condition. There is also no need to rush when choosing the materials themselves. Not every store complies with the conditions and rules for storing wallpaper, which can be sold with obvious defects and damage.
Finishing the edges will help prevent and hide joints
When wallpapering, the edges of the panels may unexpectedly “rise” due to different properties of the glue or poor adhesion of the edges
If you do not pay attention to the problem immediately, it will be much more difficult to hide the resulting joints after drying. Therefore, in addition to the main rolling of the glued panel with a wide roller, it is imperative to roll it with a narrow, 3-4 cm wide, roller with a rubber base
If the walls are smooth without defects, we additionally go through the joints with a wallpaper spatula made of plastic or hard rubber. With its help, uneven joints can even be slightly straightened.
If after such a procedure the seams and joints do not adhere to the wall, then the glue is very weak. It is urgent to correct the glue, raise the edges of the wallpaper for additional gluing of the wall surface, otherwise the wallpaper will fall off the wall. In this case, non-woven wallpaper with a pre-applied adhesive base has certain advantages over vinyl.
In addition, before you start working, you should pay attention to the different quality of the edge; you may have to cut off a thin colorless strip along the entire length of the unwound roll so that a light dividing line does not appear on the glued panel
How to care for wallpaper after cleaning
After cleaning, it is important to keep the surface in order.
- Vacuum it periodically (monthly), moving the nozzle from bottom to top.
- Use a furniture broom to remove dust once a week.
- Regularly remove dirt around switches, sockets and other areas of frequent hand contact using an eraser.
- Cover the apron above the kitchen stove with acrylic varnish. Wipe it after each cooking with a damp sponge. Treat areas with greasy deposits with a solution of dishwashing detergent.
Liquid wallpaper is durable. You just need to follow the manufacturer's recommendations for caring for them.
Is it possible to wash liquid wallpaper with water?
The manufacturer's instructions prohibit this from happening. Silk wallpaper covering is a water-soluble mixture. It is based on fibers of organic or synthetic origin:
- Cellulose (paper), known as “sawdust”;
- Cotton;
- Silk (from natural or artificial (viscose) silk, mixtures thereof);
- Combined (viscose/silk+cellulose/cotton).
The binding component is water-soluble glue (PMC, PVA, Bustilat), which retains the ability to dissolve after drying. When exposed to moisture, the coating on the wall quickly softens and is easily removed from the surface. Therefore, it should only be cleaned using the dry method.
Silk plaster can be washed with water only after applying a protective layer of colorless acrylic varnish to it. It turns liquid wallpaper into washable wallpaper. A durable film is formed on them, which protects against moisture penetration, mechanical damage, and the harmful effects of cleaning agents. The service life of the varnish is from 10 to 15 years (depending on the composition of the varnish).
How to clean dirt
Before deciding how to clean wallpaper, you need to determine what type it is, since each type requires a different cleaning. The easiest way to clean washable wallpaper is; at home they can be washed with soap. The moisture-resistant top layer prevents liquid from penetrating into the structure. Relatively easy to clean paper-based vinyl.
Expert opinion
Irina Kovtun
Head of a cleaning company
The most difficult task in the house is cleaning paper surfaces. Cleaning should be done dry and carefully. Otherwise, instead of the expected result of cleanliness, you risk getting discolored spots on the wall.
Therefore, it is easier to remove stains from white wall coverings.
Important! The methods below do not guarantee 100% success. In case of some contamination, it may still be necessary to replace the wallpaper (or parts thereof) with new ones.
Methods used to eliminate contaminants are divided into:
- chemical (using acids, alcohols, cleaning agents);
- folk (use of home remedies).
General cleaning rules:
- When contaminated with liquid, it is important to absorb it from the surface as quickly as possible. This is important if you want to wash off wine stains and fruit juices.
- When cleaning paper surfaces (both colored and white), use dry cleaning rather than wet cleaning.
- Do not use chlorine bleaches or abrasives (even during demanding post-renovation cleaning) - they will clean the surface, but at the same time damage it.
- It is best to clean the surface from dust with a vacuum cleaner - a rag can lead to “rubbing” dirt into the fibers or paper, disturbing the color, pattern, and structure of the wall covering.
- It is unlikely that you will be able to wash red wine and some juices (especially from tomatoes and pomegranate) from paper or fleece coverings. In most cases, the damage is irreparable.
Folk remedies
Before using any cleaning product, remove dust and dirt from the surface to be cleaned - this will prevent stains from appearing.
To clean wallpaper from dirt, you can use the following substances:
- Soap solution. You can use it to wash vinyl wallpaper, liquid wallpaper, and detergent wallpaper in the kitchen.
- Bleach. Suitable for removing stubborn dirt from wallpaper (get rid of felt-tip pen, permanent marker).
- Melamine sponge. Helps remove most stains. Not suitable for paper or non-woven wallpaper.
- Bread. Capable of cleaning paper wallpaper (see application below).
- Alcohol based products. Alcohol removes the most stubborn stains, such as dried glue, and can wash off grease and rid walls of iodine, plasticine and other contaminants.
- Tooth powder + refined gasoline (1:1). Helps you get rid of fat. The paste is applied to the stain and removed after drying.
- Wet wipes. Ideal for vinyl flooring.
Professional compositions
A good way to clean walls from heavy dirt is to remove stains with products designed for cleaning furniture. Among these, for example:
- fresh bubble;
- Vanish;
- Pronto and similar substances.
Yellow spots
Recently, complaints from people about the appearance of yellow spots after wallpapering have increasingly begun to appear on the Internet, despite the fact that the technology for finishing the walls was fully observed.
Most often, the cause of their appearance is glue that takes a long time to dry. In this case, there is no need to take any measures, since over time they go away on their own.
If the yellow spots on the wallpaper do not disappear, then it is unlikely that they will be removed. In this case, you should contact the hardware store where you purchased the materials. It is quite possible that they will help you with solving the problem.
In practice, there have been cases when wallpaper with stains was even sent to the manufacturer for examination. Of course, this is possible if the price of the material is high enough and it was purchased in a reputable store.
If the yellow areas do not appear immediately after wallpapering, then the reason for this may be high humidity in the room. They may also be the result of flooding from neighbors or leaking water supply pipes.
In this case, you will have to tear off the wallpaper and remove the causes of these stains. After this, the walls can be pasted over again.
Pink spots on the wallpaper