Icer
24742 1 0
Icer September 28, 2016Specialization: master in the construction of plasterboard structures, finishing work and laying floor coverings. Installation of door and window units, finishing of facades, installation of electrical, plumbing and heating - I can give detailed advice on all types of work.
Many people, when it comes to attaching cornices to plasterboard ceilings or walls, for some reason think that it is impossible to do this and that they must reach a solid base to ensure reliability.
In fact, this is not so, you can perfectly fix the structure on the gypsum board itself, and it is this option of work that we will examine in today’s review. I'll tell you about three proven mounting methods, and you need to choose the one that suits your situation best.
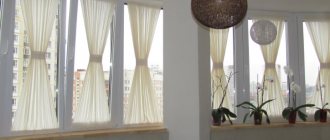
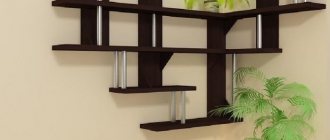
In the photo: even massive cornices can be fixed to plasterboard without any problems
How to hang a curtain rod
Almost every owner of his own home strives to make it as cozy and comfortable as possible.
Using curtains on the windows helps solve this problem. In order for them to serve for a long time and reliably, it is necessary to correctly select and secure the cornice on which they are hung. Despite the apparent simplicity of the question of how to hang a cornice, there are quite a lot of pitfalls. Before starting work, you should decide on three questions:
- choose the type of curtain rod taking into account the size and weight of the curtains;
- determine the type of base on which it will be attached;
- choose the optimal mounting option.
Creating a niche for the cornice
When planning the cornice in advance, you can make it hidden. To do this, the frame must be constructed with a niche along the window, 30 cm wide. The structure can be hidden in it. Curtains in this case will look very attractive due to the lack of visibility of the place where they are attached.
In this case, a niche means a cavity in which the slats or hanging rail will be fixed. This is an excellent option when installing a suspended ceiling, or when making boxes from plasterboard in which the lighting is placed.
Let's look at the installation procedure step by step:
- The ceiling and walls are marked. The depth of the niche should correspond to the level of the suspended ceiling, and the width should be approximately 30 cm. To select the dimensions of the structure, you should be guided by the dimensions of the slats or tires that will be used. It is necessary that the hidden cornice does not turn out to be too large or, on the contrary, too tight.
- Guided by the markings, a starting profile in the shape of the letter P made of galvanized steel is attached to the ceiling with anchors.
- Vertical sections are attached to the horizontal part of the profile, fixed on the walls or screwed to the starting strip.
- Attaching the bottom strip to the vertical parts of the profile.
- Using profile sections, the niche frame is attached to the suspended ceiling frame.
- After completing the installation of load-bearing structures, plasterboard sheets are installed. They are cut to the required dimensions and attached to the profile with special self-tapping screws and a drill.
- The sheathed structure is sealed with putty and painted or covered with wallpaper.
- A rail for fastening curtains is placed in the finished plasterboard niche and curtains are hung.
Possible options for cornices
The market offers a significant selection of the mentioned products, differing in material of manufacture, mounting location (wall or ceiling ) and design features.
All realized models, according to the type of material used, can be divided into three main groups:
- wooden ones are the most popular for decorating residential interiors.
This is explained by a wide range, excellent compatibility with almost any interior and furniture, and the ability to form a complete and visually attractive ensemble.
Such models focus attention on the window opening and create a feeling of home comfort.
- metal – made of alloys based on aluminum or stainless steel.
Look great in Empire or Rococo style interiors. They add laconicism and rigor to the design. They are an excellent solution for decorating a study or office space.
Such models of cornices are often equipped with figured tips, forged elements, and other design solutions. Therefore, their installation will make your window opening visually attractive, memorable and unique.
- plastic ones are the most practical and budget-friendly versions of window design.
The multi-variant color palette allows them to organically fit into the range of any interior, including rooms decorated “under wood”. Easily and simply fixed on plasterboard walls.
According to their design, the following types are distinguished:
- single row;
- double row;
- three-row.
According to the configuration, manufactured cornices are divided into:
- telescopic;
- round;
- profile flexible
- strings (tension)
- tire (skid)
- baguette
- electronic
- integrated into the suspended ceiling (PK5 profile)
Niche calculation, fastening
In rooms with low ceilings, which are made of gypsum plasterboard, the construction of a niche will significantly reduce the visual reduction in space that is created when using plasterboard on the ceiling. The niche looks like a box, which can go either along one wall or along the entire perimeter of the room. Having indicated in advance the dimensions of the niche using a drawing.
First of all, using a plumb line, mark the line of the window sill or radiator on the ceiling. Having made an indentation 3cm deep into the room, draw another line. This line will determine the place where the first row of curtains will go. Next, apply the curtain fabric to the near wall of the line. They look at how close or far it is adjacent to the window or radiator. If there is a discrepancy, make an indent in the required direction. To obtain the desired width of the niche, you should make an indent of 1–2 cm from the outer border of the curtain. The depth and shape of the niche can be different.
According to the markings made, a metal profile begins to be attached to the ceiling and walls. Any type of profile can be used to form the niche frame. On the wall, at the level of the marked line, a PN profile of 27x30 mm is installed. The profile is fastened using dowels, drilled into holes with a hammer drill. It is necessary to take into account the fastening pitch of 40-50 cm. Similarly, install the metal profile PN 27x30 on the ceiling. Near the window opening, the next profile is mounted, parallel to the first, according to the width mark of the created box. Only one row of profile should be fixed to the walls.
The next step will be attaching pieces of PP profile 27x60 mm, which will correspond to the distance to which the box will lower. Cut sections of the profile are installed on the profile, located on the ceiling. The step between the segments is 40-50 cm. PN profiles 27x30 mm should be installed at the lower ends of the segments. On a metal profile fixed to the window, one end of the hangers is fixed. The second is on the profile farthest from the window. Drywall sheets are cut, which must correspond to the width and height of the box. Next, the pieces are secured with self-tapping screws to the metal frame.
The finished box is puttied, and if necessary, reinforcing tape is glued at the joints. The entire structure is painted and decorated with ceiling plinths.
Base type
Cornices can be installed on the ceiling, window opening or wall. The base for installation can be hard and durable (stone or wood materials) or fragile. For example, it is impossible to give the correct answer to the question of how to attach a cornice to drywall on a ceiling without special knowledge. The same can be said in cases where the final alignment of the walls is carried out with gypsum plasterboard sheets.
It is very difficult to attach a curtain or cornice to it. Such work requires the presence of a certain tool, special fasteners, knowledge of the intricacies and sequence of work.
Typical options for attaching a cornice to the ceiling or walls, in such cases, may not be suitable due to their insufficient functionality. But, if the above conditions are met, attaching the cornice to drywall becomes an operation that can be easily performed independently by persons without special training.
Installation of a ceiling cornice to a concrete floor
The procedure for attaching a ceiling cornice is not too complicated, but if the length of the product is more than two meters, an assistant will be required. In addition to the fasteners, you only need a drill and a screwdriver with a suitable slot.
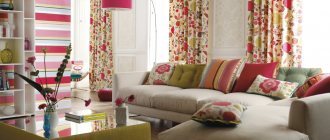
This is what an installed ceiling cornice with curtains should look like
Preparation
Before attaching the ceiling cornice, it is necessary to carry out some preparatory work. The first thing we do is adjust the length. If everything suits you, great. If you need to cut off excess, you will need a hacksaw. It is advisable to use a cloth for plastic, but it is also suitable for metal. If the cornice is assembled, remove the plugs and turns (if any), cut off the excess, then return everything to its place - the turn, the plug.
If the holes for the fasteners are not drilled at the factory, you will have to make them yourself. Let's start with the markings. Mark so that the distance between adjacent screws is no more than 50-60 cm. If there are joints, then retreat 5-10 cm from the joint on both sides. For better load distribution, it is better to stagger the mounting holes.
After the marks are set, we drill mounting holes in the plastic. Use a drill that is equal in diameter to the size of the fastener. More is undesirable, but less is also not good - when twisted, the plastic may crack.
Even for a single-row cornice, it is better to place the holes in a checkerboard pattern
After all the holes are ready, if the cornice is prefabricated, assemble all the parts. You don't have to install the decorative trim (if any). For now she will only get in the way.
How to attach
In most apartments and many private houses the ceiling is a concrete slab. Accordingly, we take a drill for concrete. The diameter of the drill should be taken according to the size of the dowel. Then we proceed according to plan:
- We apply the assembled cornice to the ceiling and level it.
- Use a simple pencil or marker to mark the attachment points.
- We drill holes, trying to hit exactly the marks. The depth is equal to the length of the plastic insert. To make control easier, you can stick a strip of electrical tape on the drill.
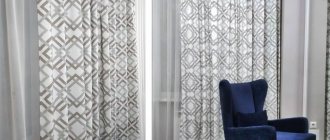
Already fixed, but without curtains
That's all, actually. You know how to attach a ceiling cornice to a concrete floor. If the floor is wooden, everything is even simpler: there is no need to pre-install dowels. After all, wood screws are usually used. In this case, the cornice is leveled and screws are immediately placed in the mounting holes. It’s more convenient to follow the same order: along the edges and in the center, and then - as it turns out.
Preparatory stage
For those deciding how to attach cornice to drywall, the work must begin with preparation.
Having chosen the cornice and decided on the type of supporting surface, you should purchase all the necessary consumables, including fasteners for mounting your purchase on a plasterboard wall, and prepare the necessary tools.
To work you will need:
- ladder;
- perforator (drill) with auger (drill) of the required diameter;
You can use a universal solution, an impact drill.
- Goggles to protect your eyes from possible ingress of dust and crumbs;
- a hacksaw for wood or metal (depending on the material of the cornice and the chosen mounting option);
- hammer, Phillips screwdriver (screwdriver with bits), pliers;
- measuring and control tools (tape measure, square, building level);
- pencil or felt-tip pen for marking.
It is mandatory to purchase fasteners of the selected type, or materials for arranging the lining: wooden beams, ceiling profiles, hangers.
The procedure, in this case, takes a minimum of time. The sequence of operations is initially clear:
- marking;
- drilling holes (in a stone wall), followed by installation of plastic dowels of the required length and diameter (determined taking into account the weight of the curtains with curtains);
- installation at the location of the product being fixed;
- its fixation with self-tapping screws.
If the walls (ceilings) are wooden, then drilling and installation of dowels may not be carried out. After marking, the product is fixed in place with self-tapping screws.
Manufacturers of hardware
The highest quality products are produced by European manufacturers Hilti and Fischer. These products belong to the highest price category.
Hardware from Sormat, KEW, Ekt, and some other European manufacturers are of good quality. Products from Tech-Krep or Bison can also be used without fear.
Mounting options for plasterboard surfaces
There are several possible technical solutions that will allow you to securely attach the cornice to gypsum board sheets (regardless of ceiling or wall installation), without damaging the latter.
In the event that the need for installation arose in a house whose construction and finishing have already been completed, there are several options for hanging a cornice on a plasterboard wall.
On glue
If you are going to attach a decorative cornice, you can use glue.
The procedure for performing the work is simple:
- The installed product is cut to size (if necessary).
In order to do this as accurately as possible, it is recommended to use a pre-made template (usually made if similar trims need to be made for several decorative cornices) or a miter box.
- GKL sheets are primed.
Required Tools
The choice of materials and tools depends on the installation method. If you plan to repair the frame using butterfly dowels, you should purchase these parts. There should be as many of them as there are holes for fastening. It is recommended to buy 1 more as a reserve. Some butterflies do not have self-tapping screws in the kit, so they purchase small fittings; their thickness is within 4 mm and their length is 5.5 cm. The parts allow you to hang the frame on drywall, fixing it securely. Required tools:
- Drill. Allows you to drill holes for fasteners. During the work process, it is recommended to use a drill whose diameter does not exceed 1 cm. Experts also recommend using metal tools. Screwdriver or head screwdriver. Tools will be used to secure the screwed-in elements until they are tight. The nozzle should be selected taking into account the type of screws used.
You may be interested in: How to clean the epson and hp printer head
Types of fasteners
You can hang curtain rods on a plasterboard wall using the following types of fasteners:
Dowel "Butterfly"
It is the most popular solution for attaching cornices to sheets of plasterboard.
The product can have different geometric dimensions (diameter/length). For hanging a cornice, the 10*50 models are optimal.
It is offered in two varieties.
TNF – polypropylene expansion dowel.
Requires a hole with a diameter of 10 mm for installation and allows the installation of a screw with a diameter of (3.0-3.5) mm.
TNF-W – analogue complete with screw.
Allows fixation of a bracket (support angle) up to 5 mm thick. installed in a hole with a diameter of 10 mm. Allows screwing in a hook (screw) with diameters of (3.5-5.5) mm.
The product consists of 2 parts: static and spacer. The second is inserted into the prepared mounting hole. As a result of screwing, it expands and fits as tightly as possible to the back side of the gypsum board sheet, expanding the supporting surface. This increases the load-bearing capacity of such a fastening, and allows it to securely fix a light wall or ceiling cornice.
The material used to make the “Butterfly” is polyethylene, nylon or polypropylene.
For those who are deciding how to hang a cornice on a plasterboard wall, we suggest using this algorithm:
- the installation location of the brackets is determined;
- Markings are made for installation holes (under the level);
To drill interior wall trim made of plasterboard, it is better to use a screwdriver with a wood drill.
If you are drilling into a ceiling, it is advisable to put a disposable cup over the drill to collect debris.
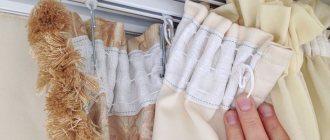
- The dowel, before installation, is slightly compressed with your fingers.
Then it is inserted into the hole up to the cap. After this, the screw is screwed in. This mounting structure is designed for a weight of 17 kg.
- The element that performs the fixation is placed last.
The size is selected taking into account the thickness of the screw. A 3 mm dowel requires a 3.5 mm screw-in element.
- The screw must be screwed in until it stops. This will allow the spacer element to open as much as possible.
You can hang a cornice on drywall using a metal “Butterfly”. This is a Molli dowel. But their use for fastening cornices is impractical.
Driva dowel.
This product will be an excellent solution to the question of how to hang a curtain on drywall. It is intended for fastening products to soft and fragile materials, including gypsum boards. At the same time, the latter does not delaminate or crumble. The advantage of this fastener is that there is no need to pre-drill holes. It is screwed directly into the wall with a screwdriver or screwdriver (there is a cross-shaped hole in the head for this purpose).
The end of the rod may have a sharp tip that works similar to a screw, making it easier to screw the product into the wall.
The screw thread located on the surface provides the necessary strength of adhesion to the base and eliminates the possibility of it falling out.
Made from metal and plastic. Depending on the weight of your curtain rod (including curtains), both the first and second options can be used. Plastic varieties are designed to support a weight of 25 kg, metal ones up to 32 kg.
Methods of fastening cornices (types of fasteners)
To install a cornice on drywall, use the following consumables:
- Self-tapping screws;
- Plastic “butterfly” dowel - after screwing in, its two wings firmly fix the screw, opening on the back side of the gypsum board;
- The carbon steel “Molly” dowel is similar in action to the “butterfly”, but has 4-8 opening elements. It has an original design, can withstand loads of up to 45 kg, and is positioned as the most reliable;
- Dowel “umbrella” – unfolds in the form of an umbrella, which increases load distribution;
- A metal dowel-screw (drive) is independently screwed into the sheet, as it has a screw thread. Used for medium-heavy curtain rods.
Fastening elements can be nails, screws and self-tapping screws.
Advice. Fasteners are used depending on the chosen method of installing the cornice and the material of the walls and ceiling.
conclusions
This article discusses several different options for attaching cornices to walls or ceilings made of different materials.
Practice shows that wall placement of curtains is more reliable due to the greater thickness of the supporting surface. In addition, curtains designed for wall mounting, as a rule, look more status and attractive.
If you do not have the necessary financial resources to purchase them, you can hang the curtains on a curtain rod mounted on the ceiling. And cover the latter with a decorative panel (usually the width of the latter is taken to be 200 mm), which is spaced from the wall at a distance that ensures convenient use of the curtains. Another option is to put it in a specially equipped niche.
The main thing is that the niche and panel do not interfere with opening and closing the window sashes.
Which mounting option to choose is up to everyone to decide for themselves. we tried to talk about the main ones. If you have any questions, ask them in the comments. We will definitely give a detailed answer to everyone.
What is drywall characterized by?
Drywall has recently become extremely popular for finishing interior surfaces in apartments and private houses. With its help, you can build smooth structures and create unique interiors in terms of design and architecture in premises for various purposes.
Sheets of plasterboard can be used to decorate the surface of walls and ceilings, to create partitions and decorative structures. The material requirements are established in GOST 32614-2012.
Advantages of using drywall:
- This material is easy to work with. In addition, it has flexibility, which allows you to create any curved shapes.
- GCR is endowed with acceptable fire resistance ; moreover, by using special types of sheets with increased combustion resistance, this characteristic can be significantly increased.
- By attaching plasterboard sheets, you can hide surface defects , disguise unsightly interior elements, and hide various communications laid along the walls and ceilings.
- The most important thing is that gypsum plasterboard sheets form a perfectly flat surface , which, after minor finishing, which consists in processing the joints and fastening points, can be lined with any materials suitable for the design of the room.
At the same time, drywall is characterized by insufficient strength and poor ability to withstand objects suspended on it, for example, equipment. It is especially vulnerable to loads applied to one point.
But this does not mean that it is impossible to hang any decor or interior items on a wall made from sheets of plasterboard. Of course, the strength of a material is largely determined by its density, thickness, number of layers of sheets, and installation method.
It should be remembered that in any case, it is not recommended to hang massive structures on walls or ceilings covered with gypsum plasterboard sheets. It is also better to refrain from installing cornices without using embedded elements in rooms where there are active small children, who can damage the decor and injure themselves. One of the most acceptable options in this case would be curtains placed directly on the window sashes or frame.