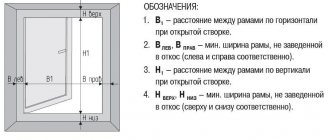
When getting ready for work, school or just for a walk, it is important to know what the weather is like outside in order to dress properly and feel comfortable while being outside for a long time. To do this, we resort to using an outdoor thermometer. Previously, thermometers were attached to small nails, since windows everywhere were made of wood. Today, it is rare to find wooden windows. They were replaced by plastic windows, and accordingly the method of installing an outdoor thermometer on a window has changed.
Let's look at step by step how to hang a thermometer on a plastic window. For clarity, we will accompany all the stages with photographs, although it is difficult to make a mistake here.
Return to content
How to hang a thermometer on a plastic window?
When getting ready for work, school or just for a walk, it is important to know what the weather is like outside in order to dress properly and feel comfortable while being outside for a long time.
To do this, we resort to using an outdoor thermometer. Previously, thermometers were attached to small nails, since windows everywhere were made of wood. Today, it is rare to find wooden windows. They were replaced by plastic windows, and accordingly the method of installing an outdoor thermometer on a window has changed. Let's look at step by step how to hang a thermometer on a plastic window. For clarity, we will accompany all the stages with photographs, although it is difficult to make a mistake here.
Options for installing a thermometer on a plastic window
1. Standard option - Velcro fastening.
2. Installation of the thermometer with double-sided tape.
3. Installation using glue, for example, “Second” or “Moment”.
4. Thermometer with suction cups.
5. Fastening with rubber seals.
Velcro installation
Before you start attaching the thermometer, you need to buy an outdoor thermometer with Velcro. An example of such a thermometer is shown in the photo below.
Now you need to decide on the installation location. The thermometer shown above can be turned in reverse by rearranging the lower and upper legs.
Next, remove the mosquito net from the window, holding it by the “ears” located on the sides.
Mosquito net for plastic window
Clean the entire window or just the part that will be installed. After the dirt has been completely washed off and the glass has dried, it is necessary to wipe the glass unit with alcohol or window cleaning liquid. They will degrease the window and improve adhesion.
Window cleaner
We remove the pieces of paper from the Velcro and install the thermometer, pressing the Velcro tightly to the glass. It is not recommended to glue the thermometer to a plastic profile for two reasons. Firstly, the glue can leave marks on the profile. Secondly, the distance from the thermometer to the glass unit should be minimal to ensure good visibility of the thermometer readings from the room, especially at night.
Remove the film from the thermometer's Velcro strips
That's all, all that remains is to install the mosquito stack back.
Technology of gluing protective film on windows
Adhesive tape
An adhesive layer is applied to the protective film on one side; the use of third-party glue is not required. That is why the film is often called “self-adhesive”
.
Initially, the adhesive layer is covered with a “liner” (technological thin film). To adhere to glass, the liner is gradually removed from the film.
To ensure that the film does not immediately stick to the glass when touched and can be leveled and placed on the glass, a liquid composition is used that neutralizes the glue. After placing the film, the composition is squeezed out from under the film with scrapers and the adhesive layer attaches the film to the glass.
Complete drying (the process of gluing and evaporating the neutralizing layer through the film) can take 2-4 weeks, but after 8-12 hours the film is securely attached to the glass.
Sticker process
The application technology comes down to the following steps:
- Preliminary cutting of film with the necessary margin
- Cleaning glass from serious stains
- Cleaning glass with a washing-neutralizing solution
- Applying a washing-neutralizing solution to glass
- Preliminary placement of the film on the glass
- Partial removal of the liner from one edge of the film, temporary fastening of this edge to the glass
- Removing the liner from under the film, simultaneously with wetting the exposed adhesive layer with a washing and cleaning solution
- Fixing the film on the glass by squeezing the cleaning solution from under the film using forcing and scrapers
- Trimming the edges of the film
Where is the protective film applied?
Protective film on glass is usually applied from the side of the protected area
.
This is due to the mechanism of glass strengthening: upon impact, the glass bends under the influence (these microdeformations cause the hard and brittle glass to break), but “rests” against the film. The tensile and flexible film “springs” and “returns” the glass to its place, preventing it from deforming sufficiently. If the impact is too strong and the film’s efforts to soften it are not enough, then the glass will still crack and break. But the resulting fragments (attached to the film with an adhesive layer) cannot penetrate the room through the film. Broken glass can only fall as a whole, glued to the film.
If the impact comes from the side of the film, then the impulse is transmitted through the film to the glass. In this case, the glass bends to the side where there is no film and can come off the adhesive layer (its strength is many times less than the strength of the film itself). Therefore, protection from impacts from the film is many times weaker. This is used when replacing steel bars on windows with protective film: with the same protection from attacks from the street, glass with film from the inside can be relatively easily broken for evacuation from the premises. Grates that do not open make evacuation impossible, but those that open can seriously slow it down.
In the vast majority of cases, people and valuables inside the building are protected from attack from the street and the film is applied from inside the premises
. For this reason, most films are not designed for outdoor conditions (not resistant to precipitation and temperature changes), although there are rare exceptions.
Protective film in double glazing
Since the purpose of the protective film is to protect not glass, but people and objects (including from fragments), the most correct way
installing a protective film in a double-glazed window - on the glass closest to the room. In the case of armored glass, this is mandatory.
However, this has a number of disadvantages: glass closer to the street remains completely unprotected and breaks during an attack; the double-glazed window will have to be replaced. In addition, there are some restrictions when washing glass: the film cannot be scratched.
Therefore, in some cases, the film can be applied to two glasses: “the innermost” and “the outermost” (the only disadvantage of this option is the higher cost), or (which is not very desirable: glass closer to the room can break from an impact if the street glass remains intact). ) only on the one closest to the street - from inside the air gap between the glasses.
How to attach an outdoor thermometer to a plastic window?
A street thermometer was simply screwed to wooden windows, but how to properly attach a thermometer to a plastic window?
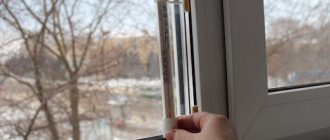
You shouldn’t spoil a plastic window; you don’t need to glue a thermometer to it, or drill it and screw it with screws or self-tapping screws. It is enough to carefully use a knife or a thin screwdriver to lift the sealing rubber that presses the glass, and slip the top of the thermometer under it first, and then the bottom. The elastic band will press it and hold it very securely; no wind will blow it away. And the plastic frame is intact. But this method is for an ordinary thermometer, which used to be nailed to a wooden window with nails (Fig. 1). Now you can buy a special device for plastic windows, with Velcro, the choice is huge (Fig. 2 and 3).
At the beginning I would like to give advice, you don’t need to attach anything to the plastic window, just drill two holes in the outer slope, hammer in the dowels and secure the thermometer with screws.
If it’s to the window, it’s better to glue the thermometer, although if you bought an outdoor thermometer like this,
We applied the thermometer to the plastic window at a distance from the double-glazed window (from the double-glazed glass beads) of approximately 20 mm, no less.
We made markings through the holes of the thermometer (by opening the window sash).
We marked (for example, with an awl, so the drill “doesn’t go wrong” at the entrance) the approach.
Drill at low speeds, the drill is slightly smaller than the diameter of the screw (it is clear that we do not need a hole to the depth of the length of the screw, a through hole).
That's it, the same “fleas” (two self-tapping screws) were screwed into the prepared holes through the thermometer mount.
If you glue it, then take glue that can be used for exterior work (Moment has such glue), but the thermometer must have a “platform” (that is, for an adhesive mount).
Marking, then degreased the surface, dried it, applied glue to the “platform” (see above), slightly retreating from the edges, pressed, waited, released.
Or immediately take a thermometer with self-adhesive, but in any case, degrease the surface first.
Double-sided tape is the least reliable option.
When installing a thermometer on a window, it is important to follow the rules, because if you do not follow them, it will not last long, or we will show incorrect data.
We fix the thermometer so that it is at the required distance from both heat and cold sources. Heat can come either from direct sunlight or from the window itself. This must be taken into account.
Related article: Ideas for decorating windows with curtains
So, you need to take all this into account and install the thermometer on a window on the north side.
In order for the mount to be reliable, it is necessary to install the thermometer in warm weather and with minimal humidity.
It is possible to install a thermometer without using any additional means. This method is suitable for you if the thermometer is equipped with flat taps. So, use a knife to pry up the rubber window seal and insert the thermometer leads under it.
If not, then you can use glue. This method can be used if the thermometer is not bulky. In order to install the thermometer, first of all you need to degrease the surface, apply glue and attach the thermometer to the place. In order for the thermometer to fix well, you need to press it, holding it for some time.
Another way is to use Velcro or 2-sided tape.
There is another way - using suction cups, but this is usually not a reliable method of fastening.
General installation recommendations
The question of how to attach a thermometer to a plastic window worries many after a purchase has been made. Before attaching an outdoor thermometer for plastic windows, decide on the installation location so that it is convenient to view the readings . To avoid measurement errors, attach the outdoor thermometer away from heat sources and direct sunlight. For example, vents, ventilation systems, and external parts of the air conditioner will have an unnecessary impact on the thermometer readings.
The sun's rays have a similar effect, so try to install the thermometer on the north side of the building . This will make it possible to obtain more accurate readings and increase the service life of the device. Only the electronic thermometer does not depend on the location.
It should also be remembered that an outdoor window thermometer is an inertial device; the time period for establishing its data readings is about 10 - 20 minutes. Therefore, when it is taken out of the package and installed, do not expect it to change its reading immediately.
Remember: an outdoor thermometer for plastic windows must be installed at positive outside temperatures and a minimum level of relative air humidity.
Attaching a thermometer is usually not technically difficult. But before that you need
just follow a few simple steps:
- The surface of the plastic window must be cleaned of dirt and degreased at the fastening points using solvent or turpentine. This must be done even on a new window. The thermometer will not last long on dirty glass.
- Wipe the surface of the glass dry, as the thermometer holders will not stick to wet surfaces.
How to securely fasten an outdoor thermometer without damaging a plastic window?
Having an outdoor thermometer makes the life of a modern person much easier, but only if the installation was carried out according to all the rules. To attach the device to a plastic window, you do not need to have specific skills. In this case, it is necessary to remember a number of nuances, otherwise the thermometer will produce unrealistic numbers or will not last long. In addition, it is recommended to choose fastening methods that cannot harm the plastic window by reducing its tightness or spoiling its appearance.
The nuances of hanging an outdoor thermometer
Even before purchasing a functional product, you need to decide on the place where it can be attached. In this case, one should be guided not by the decorative appeal of the exposure being created or the convenience of taking readings, but by the possibility of obtaining the most accurate data. Any modern thermometer that can be installed on a plastic window must be mounted according to the same rules. Compliance with which does not depend on the features of the model:
- The thermometer must be fixed in such a way that it is located at a sufficient distance from sources of heat or cold. Ventilation systems, external parts of air conditioners, pipes and even vents are taken into account (the heat coming out of them can significantly distort the data.
- The thermometer should not be exposed to not only direct sunlight, but also direct artificial light from the apartment.
Advice: According to experts, if you take into account all external factors, the optimal place to mount the thermometer is a window on the north side of the house. If it is impossible to use such an arrangement, the product should be placed on the east or west side, but on the condition that it will always be in the shade.
- You need to choose the right time to attach the thermometer. It is best to carry out the manipulation on a warm summer evening with a minimum level of air humidity.
Contrary to the popular belief that modern electronic thermometers are the most accurate and convenient to use (they can be glued directly to the glass), in practice they are much inferior to traditional models. They are too strongly influenced by external conditions, and the poor quality of the batteries used can distort the data.
What to do to prevent the thermometer from lying?
It is almost impossible to obtain absolutely reliable information about air temperature from an outdoor thermometer located on the frame of a plastic window. The first reason is thermal radiation emanating from the house. If it is known that up to 30% of heat is lost through windows, then, accordingly, the radiated heat will make adjustments to the thermometer readings in the direction of increasing the temperature.
The second factor is incorrect installation of the thermometer. They are usually mounted on windows that provide the easiest and most constant access. These are kitchen windows or bedroom windows. At the same time, few people think about checking with a compass or 2GIS program before installing a thermometer and determining in which direction your plastic windows are oriented. If in the east, the thermometer will “lie” in the morning, if in the west, in the late afternoon, if in the south, throughout the day. This is due to solar activity. Even in cloudy weather, the southern wall of the house will warm up more strongly and the heat emanating from it will not allow your thermometer to show a reliable temperature.
The most accurate readings possible are given by street thermometers located on the north side. They are objective because they are not exposed to direct sunlight. The third mistake that affects incorrect readings is ignoring the thermometer shielding requirements. It must be covered from the outside with a reflective screen, which will protect it from the influence of direct solar radiation.
The fourth condition is that there is sufficient clearance between the thermometer and the wall (not even the frame or glass) of the house. It follows from this that without observing these conditions, you will always receive very approximate readings in the range of +/- 3-5 ° C.
The safest and simplest methods for fixing a product
First of all, it is worth considering options for fixing the thermometer to the window, in which installation will take only a few minutes, and the frame material will not be subject to aggressive influence.
- Without the use of aids. The simplest and safest method for a window, which can be used if you need to secure a thermometer with flat elbows. You just need to use a knife or a thin screwdriver to pick up the rubber seal that holds the glass and push the upper part of the device under it first, and then the lower one.
- On glue. This composition will also not spoil a plastic window, but it is better to use it when working with very light and oversized objects. The difficulty is that for reliable fixation you will have to wait several minutes, creating increased pressure on the thermometer, only then will it stick securely.
- With Velcro or double-sided tape. Simple and quick approaches that, subject to process technology, guarantee reliable and long-lasting results. However, if the first time it was not possible to stick the product onto the plastic window evenly, nothing can be corrected.
- On suction cups. Not the most reliable option. Most often, a thermometer with suction cups is glued only under conditions of minimal exposure to external irritants, for example, on a closed but unglazed balcony.
Before fixing the thermometer with a sticky base, you must do the following:
- Wipe the working surface with turpentine, alcohol or other degreasing solution. This rule applies even to newly installed windows.
- Wipe the surface dry with a lint-free cloth, otherwise the structure will not even stick.
- Once the product is pressed to the window with the sticky side, it is prohibited to move it.
- If the item is glued so unevenly that it simply needs to be removed, it is best to use a knife on which we place a cloth soaked in solvent. Carefully remove the Velcro or tape, being careful not to scratch the material. After this, it is better not to glue the device to the same area; you will have to select a new zone.
Related article: Slot ventilator for plastic windows
Of course, such approaches will not hold the thermometer if there is a hurricane wind outside, but in other cases you can count on the device’s many years of service without any failures.
How to glue the suction cup?
- How to securely glue the suction cup? Fixation methods
- Installation from the street
- Attach to windshield
- Video materials
- Similar materials
- Comments and reviews
How to glue the suction cup? It doesn’t matter whether it’s new or an old one that you’re sorry to part with, the device must be properly and securely fastened. Nowadays, in almost any supermarket you can see a variety of different devices or simply decorative devices on suction cups. Before purchasing, few people think about how high quality the suction cup itself is and how long it will last. But when the installation processes begin, then we begin to indulge in reflection: will this structure withstand the “responsibilities” assigned to it?
In the interior, of course, such things look bright, positive and comfortable, and they are also quite practical in terms of fastening and dismantling. Mostly, small shelves for the kitchen or bathroom are equipped with suction cups: soap dishes, all kinds of holders for hair dryers, combs, toothbrushes, washcloths, hooks, towel rings and other things. As well as various devices that are attached to windows and glass in the form of thermometers, recorders or any other gadgets. The devices are often small in size and designed to hold light weight.
How to secure an outdoor thermometer as securely as possible?
It is not recommended to damage a plastic window with nails under any circumstances; if you really need maximum fixation of the thermometer, it is better to use self-tapping screws. We take the shortest elements with a hemispherical head, according to their dimensions, pre-drill holes in the holder legs, otherwise the material may split. We choose the most thorough site, remote from other elements and details.
In addition, when thinking about using self-tapping screws, it is worth considering the option of fixing the thermometer on one of the window slopes. In this case, you will have to make your own fasteners from durable metal and drill into the wall, but the plastic window frame will remain intact, and the thermometer will be fixed as reliably as possible. It is important to take into account the technical features of the process. For example, holes for fixing can be drilled no closer than four centimeters from the edge of the slope, otherwise the corner may simply break off.
When choosing a suitable outdoor thermometer, it is recommended to avoid the so-called “souvenir products”. Although it is intended for measuring temperature outside, it can give erroneous readings down to 2-3ºС even if the device installation technology is followed.
Outdoor thermometers for a plastic window - features of selection and installation
A weather forecast on TV or a temperature widget on a smartphone is what people look at every day when getting ready for school, work or a walk. But weather forecasters often make mistakes and give approximate data or data that is not suitable specifically for your area. That is why many still use such a device as an outdoor thermometer on the window. Let's try to figure out which type of thermometer is most accurate, how to choose a place to mount it and carry out installation.
Content:
A little about thermometers (thermometers)
Traditionally, in everyday life, two types of thermometers are used to measure outdoor air temperature: alcohol and bimetallic. The first are a hermetically sealed capillary tube with colored alcohol, which, as the temperature rises or falls, the air either expands or contracts, sliding along the capillary along the applied metric scale.
Bimetallic thermometers are a spring consisting of an alloy of two metals with different expansion coefficients, at the end of which an arrow is installed. When heated or cooled, the spring either compresses or unwinds. In accordance with this, the arrow located at the end of such a spring also moves, showing a certain value on an arcuate degree scale.
The third type of outdoor thermometers are electronic ones, which receive signals from a sensor located outside the room and transmit it to an electronic device that displays the temperature digitally on an LCD display.
Currently, these three models are distributed to approximately the same extent and serve as the subject of endless complaints from owners about the quality of the devices and the reason for mathematical calculations of the arithmetic average in the event of a discrepancy between the readings on two or more thermometers.
Types of street thermometers
Modern technologies are now making their way into all areas of human life, and even thermometers that are ordinary at first glance have managed to receive several “upgrades”. Let's figure out what kind of street thermometers there are and how they differ.
Liquid thermometers
Perhaps these thermometers are the most common option for windows. Most likely, before replacing the old frames with new plastic ones, this was exactly what hung in your apartment. In appearance and operating principle, such a thermometer is similar to a medical one (mercury):
- on the base (made of plastic or wood) there is a scale with temperature values;
- a glass flask is attached to it, inside of which there is tinted alcohol;
- When heated, the liquid inside the flask expands; when cooled, it decreases in volume.
By changing the level of liquid in the flask, we can find out the current air temperature indoors or outdoors. This type of thermometer has its pros and cons.
Among the advantages of liquid thermometers are:
- Low cost (from 100 rubles). Moreover, the price will not affect the quality of temperature measurement, but may affect the durability of the device;
- Inconspicuous and uninteresting for robbers. This item will especially please residents of the first floors;
- Easy installation - fastening to a plastic window is done using Velcro.
Naturally, such a thermometer cannot boast of an aesthetic appearance. It is not suitable in cases where the window is designed to match the interior of a room or balcony, and any prominent details will spoil its design.
A few more disadvantages of such thermometers:
- The Velcro of the thermometer loses its properties when re-attached, which can lead to the loss of the thermometer or its breakage if dropped;
- The low price of the device is often a consequence of the manufacturer’s use of low-quality materials, which is why the thermometer quickly fails;
- Small divisions and numbers. This becomes a problem for older people or people with poor vision.
In general, this is the most budget-friendly and simplest option for a thermometer for a plastic window. But it will have to be periodically replaced with a new one.
Bimetallic thermometers
Another popular type of outdoor thermometer is bimetallic. It differs from liquid both in structure and principle of operation:
- The temperature scale of a bimetallic thermometer is located in a semicircle;
- the pointer is an arrow that rotates due to the heating or cooling of a metal spring;
- the spring is made of two metals with different temperature coefficients of linear expansion.
The pros and cons of this device are generally similar to the characteristics of an alcohol thermometer. But you can add some of its features:
- The transparent plastic case does not cover the scale from sunlight, which leads to errors in temperature measurements;
- The scale has more values than the previous version of the thermometer;
- The shape and appearance are more interesting and may suit a certain window design.
Related article: Is it possible to enlarge a window in a panel house
The mounts for such a thermometer are still the same, and the price of the model depends on their quality and reliability.
Experts note that the temperature measurement error of such thermometers is no more than one degree. This is not a critical value if the thermometer is used for domestic purposes.
Electronic thermometers
A less common type of window thermometer is electronic. Their main feature is their modern appearance and convenient presentation of information.
Operating principle of an electronic thermometer:
- temperature information is displayed on the LCD screen;
- The design is based on two metals with different electronegativity values. When heated or cooled, they affect the change in potential difference, thanks to which we can find out the exact air temperature;
- Such devices operate either from ordinary batteries or from a solar cell.
Solar-powered electronic thermometer
The most accurate in measuring temperature are those electronic thermometers that contain platinum in their design.
The advantages of such thermometers:
- Modern appearance, some models have a stylish design;
- High accuracy of temperature measurement;
- A clear interface that is perfect for children and the elderly;
- Some models have large symbols.
The downside is the need to think about where to attach the electronic thermometer. This is due to the fact that proximity to the room (window) creates inaccuracy in measuring the temperature outside.
Thermometer with outdoor sensor
The device of a glass thermometer
An outdoor glass thermometer is designed as follows. A graduated scale is installed in the glass tube, to which is attached a glass tube with a very small, calibrated in size, internal hole (capillary tube), to which is welded a small glass reservoir filled with alcohol. When the air is heated, alcohol expands; when the temperature drops, it decreases in volume (compresses). This is what we observe in the capillary tube in the form of upward or downward movement of a colored column. The alcohol is transparent, and in order to make the column better visible, a dye, usually red, is added to it.
How to ensure the accuracy of the thermometer readings?
In addition to choosing a good model of outdoor thermometer, it is important to consider some nuances when placing it on a window.
Here are the main ones:
- The thermometer should be placed in a place where there is no direct sunlight;
- Another important nuance is protection from wind, rain and other weather conditions;
- Ice should not freeze on the thermometer in winter, it should not fall into the snow;
- Avoid contact with metal;
- For electronic models, it is important to place it as far as possible from the frame.
The surest way to ensure accurate readings from an outdoor thermometer on a window is to place it in a small box that is well ventilated, but protected from the sun and weather conditions.
Decorative thermometer in the form of a bee
How to calibrate (check) a thermometer at home
If there are doubts about the accuracy of the readings of a thermometer, not necessarily an outdoor one, then the accuracy of its readings can be easily checked at home. There are two methods to calibrate a thermometer: using a thermometer that is known to accurately indicate and using water.
Checking with a reference thermometer
The first method is simple to use; it is enough to place a standard thermometer next to the thermometer being tested, which shows accurately. After at least half an hour, compare the readings. If the thermometers show the same temperature, then everything is in order.
Test using melting snow or boiling water
Since the thermometer has a linear scale, to check the accuracy of the readings it is enough to check any one point on the scale, zero or the 100˚C point.
The second method does not require a reference thermometer and is based on the law of kinetic energy of molecules. It is no secret that if a container filled with snow (ice) is placed in a room with a positive temperature, the snow will begin to melt and water will appear. The water temperature will remain constant and equal to 0˚C until all the snow melts. This law can be used to calibrate a thermometer that has a zero mark.
It is enough to lower the end of the thermometer into melt water and wait until the thermometer column stops moving (a few minutes is enough). The thermometer should show 0˚C
. Snow can be scraped from the walls in the refrigerator or frozen into ice cubes.
If the thermometer has a mark of 100˚C, then you can calibrate it by dipping it in boiling water. As you know, at normal pressure the temperature of boiling water is 100˚C
.
Based on the physical properties of water, the Swedish scientist Anders Celsius invented a thermometer scale, dividing into one hundred divisions the area between the readings of a column of alcohol in a glass tube when it was first placed in melt water with snow, and then in boiling water. In honor of his name, the temperature measured on his scale is called degrees Celsius, which is denoted ˚C
.
Methods for attaching a thermometer to a plastic window
Now let's talk about ways to attach a thermometer to a plastic window. The fact is that many thermometer models are equipped only with holes for mounting with screws, and this is not suitable for plastic windows.
Alternative options for mounting a thermometer on a plastic window:
- Velcro. They may be included with some thermometer models. The downside is that this method of fastening leaves noticeable marks on the glass, but you won’t be able to attach the device to a wall or ledge of the house using Velcro;
- Double sided tape. The principle is the same as with Velcro. Suitable if the first option is not provided in your thermometer model;
- Super glue. A radical fastening method, suitable for a window frame, house wall or cornice;
- Suckers. They also come included with some thermometer models. The downside is that over time, the suction cups can come off the surface of the window, and re-gluing leads to a deterioration in the adhesion of the suction cup to the glass;
- Fastening with rubber seals on the window. This method is suitable for thermometers that are light in weight. Part of the seal is moved aside, the mounting part of the thermometer is inserted into it, then the rubber band is put into place.
Remember that the mounting area should be cleaned and degreased in advance. This can be done using a special spray for cleaning windows or an ordinary soap solution, clean water and a wad of newspaper.
General installation recommendations.
After purchasing a household thermometer, you need to decide on its future location. Any model can be mounted on any part of the window. When choosing a location, remember that ease of installation and easy reading is not what you should strive for! The main thing in this matter is that the thermometer provides accurate temperature measurement. When installing such a temperature meter, follow some simple rules.
Attach the thermometer to the window so that it is simultaneously at a certain distance from heat sources and from direct sunlight. Heat sources that influence the correct operation of the thermometer outside the window can be in the form of a ventilation system, the external part of the air conditioner that emits heat during operation, and even in the form of a window - the level of heat release from them is quite high. Factors such as these can have a direct impact on whether a window thermometer accurately determines the temperature.
- As you know, in winter the temperature difference outside the window and indoors can reach 50 degrees Celsius. Due to this, infrared radiation emanating from the house can affect the readings of the thermometer located outside the window.
- Also, the correctness of the measured temperature values depends on the absence of direct sunlight on the fixed device.
Due to the two factors described above, the correct location for installing a window thermometer should be on the north side of the house .
Existing thermometers for plastic windows can also be used on modern wooden windows with double-glazed windows. Due to the fact that they are attached to the adhesive tape (supplied in the kit) on the outside of the glass.
What types of thermometers are there:
1. “SUNNY”
Outdoor window thermometer for plastic and wooden windows with a bimetallic spring. The case is matte. Recommended application: pad printing. Size: 75 x 75 mm. Fastening: 4 Velcro. Manufacturer: Russia .
2. “BARON”
Outdoor window thermometer with barometer for plastic and wooden windows with a bimetallic spring. The case is transparent. Recommended application: pad printing. Size: 90 x 90 mm. Fastening: 4 Velcro. Manufacturer: Poland .
3. Outdoor thermometer MU121878
When installing this measuring device, it is necessary to take into account that it is inertial - it takes about 10-20 minutes to “adjust” to the street temperature.
If possible, you should avoid installing a thermometer on a window that opens too frequently - this will help avoid the risk of accidental damage.
In addition to attaching to glass, the thermometer holder can also be glued to plastic, but not every type of plastic. Therefore, to ensure reliable installation, it is still better to attach the sticky holder directly to the glass itself.