- November 11, 2018
- Needlework
- Irina Kotova
The ponytail is considered one of the most popular hairstyles, and a beautiful scrunchie can complement any look. There is a huge assortment of different elastic bands in stores, but it is much more interesting to create such an accessory with your own hands, and this will allow you to take into account all individual wishes. Many fashionistas ask the question: how to make elastic bands with your own hands? To do this, you only need available materials and a little imagination. In this article we will look at how to make beautiful elastic bands with your own hands.
Which material to choose?
When making hair ties, you can use any material. It could be:
- leather;
- atlas;
- cotton;
- velvet;
- felt and more.
Don't throw away small scraps of fabric - they will come in handy when creating an elastic band. For decoration you can use:
- beads;
- fringe;
- beads;
- buttons;
- rhinestones and much more.
The following materials and tools will help in production:
- scissors;
- needles;
- pins;
- threads;
- pins;
- Some products may require glue and wire.
What is required and how to choose glue
Chewing gum for hands at home is very easy to prepare. Even a child can master the process, because the recipes are easy and no special conditions are required. Kitchen appliances will require a microwave, refrigerator, and stove. Also prepare a plastic or glass container and a stir stick.
Instructions for making hand gum often mention glue. This component provides the mass with the desired consistency. Silicate (stationery) glue will do. Handmade chewing gum from it turns out glossy and shimmers with mother-of-pearl. You can use polymer “Titan” or PVA.
You should not add glue for clothes and shoes, “Moment” and other specific varieties. They are toxic and hazardous to health.
Easy way to create
How to make an elastic band with your own hands? This option is one of the easiest to manufacture. To create such an accessory you will need:
- fabric of arbitrary width (length 40-50 cm);
- linen elastic (15-20 cm);
- needle;
- pin;
- scissors.
Process of creation:
- A piece of prepared fabric should be folded in half and sewn along the edge.
- We fold the stitched product with its edges facing each other and stitch it, leaving a small hole for turning it inside out.
- Turn the workpiece inside out.
- Insert the elastic band and tie it.
- Sew up the hole.
The finished accessory can be decorated with various stones and beads, but it is also suitable as an independent product.
More complex schemes
For several seasons now, knitted elastic bands and “Athenas” (elastic bands-headbands for creating a hairstyle like a Greek goddess) have been on trend. They take some work to make, but the results are worth it.
Crochet
What do you need:
- a simple elastic band as a base;
- hook;
- shiny (or other yarn of your choice);
- beads, beads.
How to do
- Tie the base with a single crochet, the second row with a double crochet.
- Decorate the yarn accessory with beads: they are strung along the knitting process or sewn on.
The openwork accessory looks beautiful. You can use any pattern for knitting napkins. Needlewomen will be able to tie a simple elastic band in just ten minutes.
Wicker "Athena"
What do you need:
- centimeter;
- old elastic T-shirt;
- scotch;
- thread, needle;
- scissors.
How to do
- Measure the circumference of your head with a centimeter. Measure in the place where you plan to wear the accessory (“Athens” are worn on the forehead, in the middle of the head).
- Cut five identical strips from an old T-shirt. The width of the parts is approximately 2 cm, the length is equal to the circumference you measured.
- Gather the strips into one bundle and tie a knot at the end.
- Glue the base with tape to any surface. This is necessary for ease of use.
- Braid the strips into a braid. At the end there is a knot.
- Keep in mind that the finished braid is half the size of the strips.
- You need to sew the edges together with a strip cut from a T-shirt. You can “sharpen” the braid with a regular elastic band: it will be located at the back, and the Greek hairstyle assumes that the back of the “Athena” is covered with hair.
“Athena” can be done in different ways. The easiest option is to sew a lace ribbon and a linen elastic band. The only difficulty is that you need to take the measurements correctly: those around you should only see the delicate lace on your hair. Of course, this option is only suitable if you plan to wrap the strands around the “Athena” and not wear the accessory over your hair.
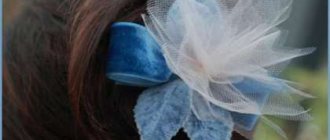
How to make elastic bands from ribbons with your own hands?
Making your own rubber bands from satin bows is considered not a labor-intensive process. How to make rubber bands with your own hands from ribbons? There are a large number of options.
In order to make an elastic band as in the photo, you will need:
- five satin ribbons of different widths and colors;
- threads;
- scissors;
- button or round brooch for decoration;
- glue;
- regular rubber band.
Stages of work:
- We cut off the widest tape, 45 cm long. Next, you need to make cuts at an oblique angle on both sides.
- Each subsequent ribbon should be 2 cm shorter than the previous one.
- The edges of the ribbons should be treated with a lighter so that they do not fray.
- We collect the strips together as the width of the strips decreases. Thus, the widest one should be at the bottom.
- Tie the ribbons in the middle with thread or suitable fabric.
- Pull the thread down and attach a regular elastic band to it.
- Glue the decor of your choice to the center of the product.
Original approach
Very interesting and original DIY rubber bands for girls - ears. They will require a base made in advance and a small piece of bright fabric. The material can be any, for example cotton. You will need to cut out 2 parts from the fabric according to the pattern.
Since the pattern only shows half of the piece, the fabric needs to be folded in half along the fold line before cutting.
Elastic band in the shape of a rose made of fluffy wire
The main attribute of creating such a decoration will be chenille wire. This is often used in the design of bouquets.
To do this you will need:
- fluffy wire of two colors (green - as a leaf, and the second in the form of a flower - at your discretion);
- regular rubber band.
Work stage:
- You need to take six wires of the color you chose for the base of the flower.
- We thread them through the elastic band, as shown in the photo.
- To fix in the center of the wire, make one revolution around the axis.
- The ends of the wire must be completely bent in a spiral. This procedure must be carried out with each one to obtain the shape of the petals.
- To create a bud, straighten the wire in a circle.
- To make leaves, take a green blank, fasten it in the middle and twist the ends on both sides.
No glue needed
Now let’s talk about how to make gum for your hands at home without using glue. You will need many components, and the process itself is not fast. Therefore, adults will need to help the kids prepare the desired toy. It consists of the following components:
- colorless film mask;
- thick hand cream;
- shaving foam (gel will not work);
- corn starch;
- any dye;
- sparkles.
In a deep bowl, combine one tablespoon of film mask and cream, squeeze out about half a tube of foam. Stir the mixture until smooth.
Fill a glass (200 ml) with water and dilute 3 tablespoons of starch. You will get a thickener. It is possible to use liquid starch for washing. Add 2 tablespoons of the resulting mixture to a bowl and stir until the mass becomes airy and homogeneous. At this stage add thickener.
The fluffy chewing gum is ready. You can start playing or modify it a little to get a slurping sound. To do this, put the mixture back into the container and cover with a layer of foam. You don't need to squeeze out a lot of product because it becomes voluminous.
Add a little more paint of any color and leave for a day. No need to stir. After a day, the chewing gum is ready. If you put your hand into it, you will hear a slurping sound.
Elastic flower made of fabric
To make an elastic flower you will need:
- textile;
- a small piece of suede;
- button or rivet for decoration;
- threads;
- needle;
- scissors;
- regular elastic band;
- glue.
Creation method:
- Cut a strip of approximately 5 cm wide from the fabric.
- On one side of the prepared strip we cut out the shape of the petals. The fabric must first be gathered onto a thread.
- We cut out a circle from suede and glue the finished strip onto it with the petals facing out.
- Glue a rivet, button or brooch into the middle as decoration.
Before trying this decoration in action, wait until the glue has completely dried.
Materials for hair-fixing elastic bands
You can use various available materials to make decorative elastic bands to secure your hairstyle:
- ribbons;
- braid;
- grosgrain ribbon;
- satin fabric;
- velvet;
- any other beautiful fabrics.
For additional decoration, it is easy to use beads, beads, buttons, lace, and rhinestones.
A non-standard approach to work will help you make stylish and beautiful hair ties from any leftover fabric.
For the base of the product, it is easy to use existing rubber bands, old hairpins, or purchase an inexpensive option for remodeling.
Often, underwear elastic is used for crafts. Much depends on the design of the future product.
It’s easy to make elastic bands to decorate your hair and hold your hairstyle in place. Making baby rubber bands will take no more than an hour. Detailed master classes will help you cope with the work.
Hair ties in the shape of a rose
To make a hair tie with your own hands, you can use three types of braid or grosgrain ribbon: two pieces 15 mm wide, and one 5 mm wide. For the flower that will be in the middle of the product, pink or red satin ribbons are best suited, as well as green ones for the leaf. You can use an old rubber band as a basis or buy the simplest one in the store. So, for work you will need:
- rubber;
- needle;
- thread;
- braid - 35 cm;
- ribbons - 60 and 35 cm;
- a little ribbon for the satin flowers.
Creation stage:
- We mark the prepared strip of 60 cm into 7 equal parts of 8.5 cm each. We divide the second strip into the same number of parts, but 5 cm each.
- Then we assemble and stitch as shown in the photo. We do the same with the other tape.
- As shown in the picture, we sew two pink bows together.
- From satin we sew a small rose with leaves.
- We fold the narrow braid so as to form a bow and sew it to our product.
- Sew or glue the elastic band with glue.
What is hand gum
Chewing gum for hands is a plastic mass (inorganic polymer) that easily takes any shape, wrinkles, stretches, breaks and tears. This mass has several names:
- Handgam;
- Nanogam;
- Neogam;
- Smart plasticine;
- Gum for hands;
- In the US it's called stupid putty;
- Happygam.
What is smart plasticine? What are its properties? What can you do with it? Answers in the video Chewing gum and slime are not the same thing. Chewing gum for hands has a denser consistency and has a number of contradictory properties :
- It tears and stretches . Take the chewing gum and pull it sharply in different directions - it will tear, but if you stretch it smoothly, it will stretch.
- It spreads and sticks . It is easy to sculpt various shapes from handgam; it is soft and flexible. If you leave this figurine on the table for a while, it will spread.
- Jumps and crashes . Roll a ball out of smart plasticine and throw it on the floor - it will bounce like a ball. But after hitting it with a hammer, the ball will break.
Hand gum can act as a liquid or as a solid (properties of a non-Newtonian fluid). In the first case, the property manifests itself when you act on it slowly or not at all - it becomes pliable or blurred. In the second case, the handgam, when you act sharply and apply force, tears, breaks or jumps.
Table 1. Pros and cons of chewing gum for hands
| pros | Minuses |
| Develops fine motor skills of the hands. | Easily gets dirty and difficult to clean. |
| Relieves tension and stress. | It is difficult to clean handgum from things made of synthetic fabric and a little easier from clothes made from natural materials. |
| It is harmless, but it is important to ensure that a small child does not swallow it. | Not recommended for children under 3 years of age. |
| Does not dry out because it is made on a silicone basis. | |
| Long shelf life. With proper care it will last up to five years. | |
| It does not require special care. |
Elastic band with ears
Currently, this type of hair elastic is popular among both little fashionistas and older girls. But how to make an elastic band with ears with your own hands?
To make it you will need:
- elastic base;
- textile;
- thick paper (for stencils);
- pencil;
- ruler;
- scissors;
- pins;
- matching threads;
- needle;
- wire.
The work stage includes the following actions:
- We cut out a strip of fabric measuring 46 cm by 8 cm.
- Fold it in half lengthwise, right side inward, and secure.
- It is necessary to make another pattern for a strip of fabric 30 cm by 13 cm.
- Fold it in half crosswise, wrong side out.
- Now fold the fabric in half lengthwise again so that the strip is folded four times with the right side facing inward.
- Draw half of the ear according to your taste.
- Excess fabric must be cut off and the product unrolled.
- We fold the parts in half lengthwise and secure with pins.
- We sew the blanks along the edge, leaving a small hole.
- We turn all the parts right side out and iron them.
- Using a safety pin, insert the elastic band into the strip of fabric and tie the ends into a knot.
- The areas left earlier for eversion should be sutured.
- We pass the ears through the elastic band and tie them.
Any fabric is suitable to create such elastic bands, but it is preferable to use silk, cotton or velvet.
Scrunchy elastic band (step by step instructions)
A scrunchie is a ribbon accessory made from materials such as suede, faux fur, velvet and very rarely cotton.
For production, scraps of stretchy and thin fabric will be used. A little hint: an old sweater or other warm knitwear can serve as an auxiliary material for creating an elastic band; they will serve perfectly for making this accessory and will hold your hair securely.
Steps to create a scrunchy elastic band:
- We divide the fabric into strips 42 by 10 cm, folding the narrow side face down. We sew on a sewing machine or by hand into a tube shape. Iron and smooth the seams, turning the pipe right side out.
- Take a piece of elastic and insert it inside the fabric tube. Next, you need to sew a fabric tube into a ring. When using a sewing machine, it is worth remembering that this step can be done more accurately by hand.
- The result was the very best scrunchy elastic band; its creation stage included only two manufacturing steps.
How to make elastic bows with your own hands
When creating bows, it is not necessary to adhere to the color and texture of the product indicated in the picture.
The finished bow will consist of three elements:
- three-layer base of the same color;
- two-tier model of a different tone;
- two pieces of the thinnest tape that will hang down.
In our case, to make bow-shaped rubber bands you will need:
- satin ribbons of medium and thin thickness in different colors;
- thin pieces of tape;
- threads
Work stage:
- Form a wide ribbon so that you get a three-layer bow base, and fasten it in the middle with a thread.
- To prepare the upper part of the elastic band, we take two separate ribbons of the same color and separately fasten the ends of each, and sew them together in the middle with threads.
- Place the bows next to each other and tie them tightly with a ribbon.
- We attach a regular elastic band with glue - and our product is ready.
This option can be used as a basis for hairpins or as an independent decoration for styling hairstyles using bobby pins.
What is hand gum used for?
This polymer was a by-product of an experiment to produce a synthetic rubber substitute. But later they found a use for it in the form of a toy for children. Fans of smart plasticine have come up with several more ways to use it :
- To relieve stress and tension.
- Development of fine motor skills.
- Development of dexterity.
- Take impressions of keys and fingerprints.
- Use as plasticine.
- Use as a massage product.
- Replace the expander with it.
- Playing with pets (not a very good idea, the animal can get poisoned and the handgum can get dirty).
- Create a unique waterproof phone case.
- Some doctors prescribe it to develop arms after injuries.
- Clean your computer keyboard from dirt.
Tips and tricks
When making accessories, you should adhere to the following recommendations:
- At first glance, it seems that making a hair elastic is a simple matter. But some options require certain skills, so if you have no experience, you should start with simple basic models.
- When making it, it is better to take a little more fabric than required to be sure that there is enough material.
- In order to evaluate the harmonious combination of fabric and threads, you should sew a small piece before the creation process and select the appropriate color.
- Professional hairdressers recommend that when using a hair tie, secure it with bobby pins. Thus, the hairstyle will not change shape for a long time.
- Not every girl focuses on choosing a hair tie. But as with other accessories, it is important that it matches and harmonizes with your look.