Children love to build houses, using everything they can get their hands on. The only negative is that such structures quickly fall apart and everything has to be started again. An excellent way out of the situation is special children's play tents and houses, decorated with bright drawings and favorite cartoon characters.
Such designs are simple and inexpensive, but will bring your child many pleasant play moments. You can install such houses not only in an apartment, but also during outdoor recreation. It remains to figure out how to properly fold a children's tent so that the structure is strong and reliable. You will find the answer to this question in today's article.
Options for creating a tent
Related article: Beautiful false window with lighting for an apartment
There are two options:
- stretch a piece of curtain or curtain across the entire room, thus separating part of the balcony;
- make a children's tent from the same curtain with your own hands and place it on the balcony.
First option:
It is easiest to implement: in the upper part of the balcony we install a cornice on which the curtain will be attached. The separated space can be in the shape of a square or triangle.
Second option:
- We knock together a frame for the future tent from boards, cover it with a piece of curtain, and secure the edges of the fabric with a construction stapler or small nails. One side of the tent should open.
- A suspended structure is even easier to make. We fix a small hook on the ceiling. We take two hoops (hula-hoops or metal hoops), one with a diameter of approximately 0.5 m, the second - 1-1.5 m. You will need a piece of a wide curtain or curtain, and a 4-meter piece of nylon rope. We tie the ends of the segments to a large hoop so that there is an equal distance between them, and fix a small hoop in the middle of each rope. We connect the free ends of the ropes with a strong knot. We secure all connections with super glue so that the nodes do not slip. We take a small piece of rope, connect one end to the top knot of nylon ropes, and make a loop from the second. We assemble the curtain and fix it on a knot, its edges should fall freely to the floor. At the junction with the large hoop, we sew the edges. The tent for the child is ready.
You can come up with your own version of a curtain tent. For example, knock down 4 boards at the top and cover with a curtain, you get something like a wigwam.
Stages of folding different types of products
All types of tents have their own assembly features. Thus, semi-automatic types, with the correct force applied, curl themselves into a circle or a small oval. And older types of tents will take longer to fold, removing pegs and removing guys. Of course, before folding the tent in a figure eight, you need to remove all things and clean the product from dirt.
Tourist
Initially, the structure must be laid so that it becomes flat. For this purpose, opposite sides are captured and brought together, closing them like a book. Since the frames are semi-automatic, they easily take a flat shape during the folding process. Regardless of the dimensions and other parameters, the result should be a rectangle, square or triangle.
After this, holding the structure with your hands, place the narrow part on the floor as a stop. Then the bottom is pressed with the feet, and the top is tilted, as if trying to fold it in half. After the arcs are closed, the joint is fixed by hand. Next, the right and left corners need to be folded together. As you assemble, the corners will curl on their own.
Automatic tent
Such products are most often called semi-automatic. They are distinguished by minimal weight, as well as ease of installation and assembly. When removed from the cover, the structure unfolds and takes the form of a finished tent - all you need to do is shake it slightly.
Some tourists easily create entire campsites using this type of tent. They do not require long installation, and assembling the structure is not difficult in any weather.
But there is a peculiarity of such products: they are difficult to assemble if you do not know the technology. Experienced users recommend first practicing folding the structure with someone in pairs, while remembering all the folds.
First you need to fold the tent into one plane. You should end up with a square, rectangle or triangle. Then connect the two sides together and lay them on the ground. Then you need to pull one end towards you and press it to the opposite edge. The design will take the shape of a figure eight, then you need to tighten it and fix it. When folded, the product should be packed in a special case for storage or transportation.
Children's
Children love a variety of games, using all kinds of houses, huts, and sheds. Therefore, special play tents are a real godsend for parents. Such products will be actively used both at home and on playgrounds or in preschool institutions.
Such designs are inexpensive, weigh little, and have a rather attractive appearance.
It is only important to choose a high-quality product made from durable materials. They unfold easily when removed from the case
At the same time, it is very easy to assemble a children's tent:
- First you need to fold all sides into one plane.
- Then grab the bottom with one hand and the top of the folded product with the other.
- Next, you need to wrap the frame in opposite directions until it forms a circle.
The assembled tent needs to be packed.
Rybatskaya
Before folding the fishing tent, you need to remove all things from it. After which the structure must be folded into a plane. Next, you should step on one of the sides with your foot so that the assembled product is in a vertical position.
After this, the upper part of the structure is twisted 180 degrees. In the process, a ring will be formed, which should be bent to the surface. At this moment, a ring is also formed in the upper part, which must be connected to the first one. Then the product must be packaged.
Chinese
Tents produced in China are in demand among tourists. They are lightweight, easy to assemble and operate. However, not everyone knows how to properly assemble such a tent, although the process does not require any special skills. It is best to start the task together. First you need to connect two side faces together. After which the resulting figure must be gradually rolled into an oval or a small circle. If there is no pair to assemble the structure, then the second part can be held with your foot.
A tent is an invariable attribute of tourists, fishermen, hunters and simply lovers of outdoor recreation.
In order for the process of its operation to invariably please, it is important not only to choose the right product, but also to properly care for it. The assembly procedure is part of the care of the item
Therefore, correct, careful assembly ensures long service life of the tent.
Varieties
Play tents come in many different forms. Most often they look like small houses, but models made in the form of cars, buses, and ladybugs are also popular. There are also more complex designs in which several individual tents are connected to each other by a textile tunnel pipe. But despite all this diversity, all playhouses can be divided into two groups:
- frame play tent. This tent is installed using special tubes. Individual frame elements are inserted into special grooves in the textile house and secured with ties or Velcro. Approximately the same principle is used in the manufacture of large tourist tents;
- a wire tent does not require frame assembly. It is made of thin but durable wire, and is already sewn into the tent. Due to these stiffening ribs, the playhouse keeps its shape.
The process of assembling a house depends on the features of its design. The frame house is quite easy to put together. You just need to untie the ribbons and remove the base sticks. All frame parts are packed in a box, and then the canvas is simply folded.
Preparing the balcony
The child should play in the room both in summer and winter. There is no point in equipping a summer version of the playroom with your own hands. After all, with the onset of cold weather it will have to be dismantled and the apartment will again be loaded with a mass of children's things and toys. What you should do is simpler - insulate the balcony or loggia where the tent is located.
The following work needs to be done:
- floor insulation;
- installation of a plastic window frame;
- wall insulation;
- installation of an additional heat source. Perhaps it will be a warm floor.
Do you think that insulating your balcony will be too expensive? But these measures will help to insulate the entire apartment, which will allow significant savings on additional heating in the future. Moreover, children grow up, and then the toys can be removed and the loggia can be turned into a full-fledged office where the child can do his homework. There are many options.
How to fold a children's tent into a ring?
A children's tent is very similar to a tourist tent, only smaller and simplified. Accordingly, it is assembled in a similar way, but there are some differences. Assembly directly depends on the shape of the children's tent, which can be hybrid or highly modified. We will look at how to assemble all types of children's tents a little below.
Children's tent “house”:
- The first thing you need to do is stand facing any wall of the house and grab the ribs of both sides with your hands.
- Push the edge that you hold in your right hand forward - to the opposite corner of the tent.
- We hold the folded tent by the side ribs with the floor towards us and the roof away from us. We move our hands towards each other so that the wire ribs form a figure of eight when you connect both hands.
- We place the upper and lower circles on top of each other to form a tent ring.
The process is completed, the tent can be postponed until the next games!
If suddenly the figure eight does not work out or the structure of the house does not want to fold, then there is another option:
Place the book-shaped house on a flat surface. Move the lower part of the metal structure upward, towards the ceiling
With your right hand, hold the lower part of the house, and with your left hand, hold the side of the wire arch in the middle. Gently press the side piece against the top area so that it extends towards the top of the house.
- In the next step, we press the tent with our right hand and roll it into a ring so that the second half is above the first.
- Now we have in our hands a compact circle that can be put in a case.
Children's triangle tent
So, let's start putting together a children's pyramid tent:
- First, we stand facing one side of the structure. We insert one edge inward and push it towards the opposite one.
- Afterwards, we tuck all parts of the canvas inward towards the central part, obtaining a flat triangle.
- We take the middle part of the base by the top of the triangle and rotate our hands so that we get a figure eight and our hands are connected.
- Secure the resulting tent with an elastic band.
- Place the tent in a special cover.
Children's tent “Princess Castle”
Do you think that it is impossible to assemble such a large and luxurious lock into a small round case? You are wrong to think so. It is quite possible!
Confusion often arises, especially among inexperienced travelers, when assembling and folding a tent
It is important to disassemble it correctly so that the structure is compact, does not take up much space and fits into the case. The figure-eight folding principle is very helpful for compact storage and easy carrying.
A video and a detailed diagram will clearly show you how to assemble a tent in a figure eight pattern.
How to assemble a figure eight tent - Diagram
Winter tent
Winter tourist tents come with external and internal frames, as well as with zippers and Velcro. Velcro designs are slightly different from regular ones. To fold this type, you need to close all the locks and Velcro, and then press one of the corners inward to make a kind of book. Then it needs to be positioned so that one of the corners is turned towards itself. The lower ribs should be pressed to the floor, and the upper ones should be tilted forward and down, and then packed in a case.
A tent with an internal frame, i.e. with arches hidden under the awning, you need to disassemble as follows:
- Remove all pegs around the perimeter of the structure.
- Remove the awning and dry it well, take out the arcs and fold them separately.
- On the ground, fold both layers together, seam to seam, roll into a tube. You can put the inner layer on top of the lower one and twist it. If the folded tent does not fit into the cover, it means it was not assembled correctly.
The structure with an external frame (the arcs are located on top of the awning) is assembled in a similar way: all the pegs are removed, the awning is removed, the arcs are pulled out, and the structure is rolled up.
We put winter things away for storage. Instructions on how to fold a figure eight tent
Spring has come. It's warm outside and the hard water fishing season is coming to an end. I decided to dry and put away things that would no longer be needed this season. Among them is my tent eight. They called it that because of the peculiarities of assembly and disassembly. So I remembered last year’s vacation, which I spent with my parents.
My father and I went to the Vyatka River. My brother had a new figure eight tent. Friends had the same tent. In the morning it was fun to watch the men try to set up their tents. Many people returned their tents to the store after their first fishing trip. They just couldn't put them together. So I thought that a little instruction on how to assemble a figure eight tent would be useful.
Anyone can figure out how to set up such a tent. Everything is very simple. We take the tent out of the cover and it unfolds itself. All that remains is to stretch it and install it.
But collecting for those who are doing it for the first time seems difficult. Assembling the tent is actually simple. First of all, open the door and window to let air out. My tent has no bottom, so I don't have to open the door or window. Fold the scarf in half.
We put the top of the tent, the one without the arches, inside.
And we fold the tent in half a second time. With all these actions, we do not bend the tent's arcs anywhere. You will get what is in the photo below.
Next, we insert the floor and corners of the tent between the two halves, just as we did with the top of the tent.
Now comes the hard part. You need to bend the tent poles. The arches are elastic and strong, breaking them is of course possible, but quite difficult. We step with our feet on the arc at the bottom of the tent.
We grab the top of the tent with our hands.
Connect the middle of the bottom and top. Don't be afraid to bend the arches, they will hold up if you do everything correctly.
The result will be something similar to a butterfly. Without releasing the connection between the bottom and the top, you need to bring the left and right arcs of the tent together. We place the left arc down and the right one on top. My foot is always at one point.
Now the most important thing. There was a circle in front of us. The lower part of the arc (the leg was on it) of this circle must be pushed under the bottom. At the same time, the arc of the bottom of the tent remains in place.
All that remains is to align the edges of our circle.
Then the tent is placed in the cover. Without a cover it will simply fall apart.
I've had this tent for two years now. Its price was 900 rubles. It does not save much from the cold. She took it from the wind. It can also be used in conjunction with a summer tent, as a second layer.
DIY children's play tent-house
As already mentioned, you can make absolutely any type of tent, it all depends on your desires, for example, this model of a children’s play tent is completely different from the others that I have already described, and it looks quite beautiful and original.
Making such a children's play tent-house with your own hands is not difficult! To do this you will need the following materials and tools:
- Thick beige cotton fabric 2×1.5 m;
- A piece of gray fabric 0.5 cm long for edging;
- Threads to match the color of the fabrics;
- Scissors: straight, curly and manicure (or you can use a stationery knife);
- Sewing measuring tape;
- 14 eyelets with a diameter of 1.2 cm;
- Hammer;
- Black acrylic paint for painting on fabric;
- Sponge;
- Brush;
- Stencil paper;
- Pencil;
- 5 screws;
- Tailor's pins;
Children's play tent diagram
First you need to take measurements from the table, this will be the frame of your tent. Next, according to the diagram (but with your own dimensions), cut out parts from the fabric with allowances: 1 cm on the sides and 3 cm on the lower edges (where the parts will be edged, allowances are not needed). These allowances are folded in one direction and secured. Sew all the parts into a single fabric that you will use to cover the table. It is advisable that the walls of the tent lie on the floor. For the window, cut a square hole on the side, and separately make a frame from gray edging. Install eyelets in the tent: 1 pc. on the upper edges of the walls and 4 more pcs. - in places where the table legs will be located. Screw the first screw onto the front crosspiece of the table itself (under the tabletop). Having hooked one upper edge of the tent onto it, wrap the table legs with cloth and fix the second edge of the product with the same screw. Screw other screws through the remaining eyelets. Sew the buttons to the tent and you can fasten the finished flap door with a pattern onto them. Photo source: https://kak-svoimi-rukami.com/2016/01/detskij-domik-palatka-svoimi-rukami-foto-shemy/
Types of tents
Tents are different. Let's look at the main categories:
- Tent. Quite light (3-4 kg). However, they are not so quick to assemble. Tent tents are most often installed on central stakes and stretched using guy ropes.
- Tunnel. somewhat similar to hemispherical ones, but longer. In addition, they are significantly less stable.
This is interesting: What local signs can you use to navigate in the forest?
Tents are also divided into tourist, storm, ultralight and camping. The first ones are light and durable, weighing on average up to 3 kg. This tent is suitable if you are going camping for a day and just need to spend the night in it.
The last, special type is camping tents. They may be needed if, for example, you are going camping with a large family.
These tents have a lot of space, corridors and windows. They can be used for overnight stays or just for outdoor recreation.
A significant disadvantage of such options is the price. In addition, they weigh a lot and do not warm up well due to their size.
So now you know how to fold a tent correctly. We hope our tips will be useful to you more than once on your hike.
Tent installation
Gradually we came to the main thing - how to assemble a tent correctly. Many people trust the instruction manual. However, the assembly instructions include a design diagram but do not describe installation in different locations. The most common option for temporary housing is a tourist tent with an internal frame.
Installation consists of the following steps:
- Flooring on the ground. In this case, it has the shape of a rectangle;
- Installation of the poles and fixing them in the eyelets on the corners of the inside of the tent. These are fastenings in the form of metal rings pressed into fabric;
- Ceiling installation. We recommend starting from the top hook, holding the material with your hand;
- Installation of the awning. It is attached to the ends of each of the arcs;
- Attaching the stop pegs to the ground surface;
- Turning the side and entering the tent;
- If gusts of wind are expected, then wind braces of the frame are installed.
The first time it will be easier and easier to assemble a tent with a friend.
A tent soldier's army tent is installed in a similar way. The main thing is to correctly position the awning stretchers to obtain a stable structure.
The assembly of a winter tent is discussed separately. Fishing enthusiasts and travelers will find this information useful this season. Fast and reliable installation depends on many features. Assembling a winter tent can be divided into the following stages:
- Determining wind direction. The most streamlined side must be oriented towards the flow;
- Sealing the shelter in the cold. At first glance this seems reasonable. However, keep in mind that closed ventilation openings will lead to condensation and increased humidity. When assembling a winter tent, ventilation is required;
- Reliable fastening of the tent, especially on ice. According to the rules of the tent order, installation is carried out using both standard fastenings and additional ones;
- Fixing the awning skirt while assembling a winter tent. Both trampled snow and objects around it are suitable for this: branches, stones.
If you follow these recommendations, assembling a winter tent will not cause problems; it will reliably protect you from any weather conditions.
Types of Chinese tents
Products from the Middle Kingdom are in demand all over the world - they are cheaper than analogues from other countries, and sometimes are in no way inferior in quality. This also applies to tents. There are 3 types of them:
- Automatic or semi-automatic. Their advantage is fast, simple installation, taking only a few seconds. You just need to take the mini-tent out of the case. The rods will straighten, the fabric will stretch - everything is ready. They differ in bottom area and number of places.
- Fishermen's. It is an indispensable attribute of winter overnight fishing. They have more durable material, an insulated bottom and additional compartments for gear.
- Tourist tents. Great for camping in any conditions. There can be both automatic machines and stage-by-stage assembly.
Keep in mind that the characteristics of the tent will also depend on its material.
How to fold a children's tent
To fold the tent into a round cover, you need to twist it correctly. The diagrams that come with almost every tent will help you do this. Following the step-by-step pictures, you can fold the tent in a few minutes.
The square product is folded according to the following pattern:
- Fold the awning like a book and place the structure on the floor.
- The base goes up. The lower structure is supported by the right hand, the wire rib by the left.
- The side is pressed against the top. You can focus on your right palm, which should be in the center of the roof of the product.
- When folded, the sides of the square will become rounded. The side part is assembled by twisting.
All that remains is to press down the structure with your palm, rolling the awning into a ring, placing one part on top of the other. You should get a small circle, which just needs to be placed in a special bag.
How to fold a children's triangular tent: detailed instructions
This house resembles a pyramid in shape. The assembly algorithm is as follows:
- You need to go up to the tent, grab it with your hand and insert one side inside, pushing it towards the edge that is opposite. When performing this procedure, you will have to make an effort, because the wire will bend back.
- Tuck all the fabric towards the center to form a flat triangle. In this case, the fastening ties must remain outside.
- Grasp the top of the triangle and the center of the base with your hands. Make a figure eight in a circular motion.
- You can press the top towards the bottom to round out the ribs. If you wrap one circle towards the middle, the second one will fall on its own.
- The resulting circle is secured with ties.
Now you can put the product in the case.
How to fold a tent in a figure eight
First, the structure is converted from three-dimensional to flat. To do this, opposite sides are connected as if a book were closed. The semi-automatic frame quickly becomes flat if it is twisted correctly. In this case, the original shape and size are not important.
The resulting geometric figure is placed with the narrow part on the floor as a stop, and the wide part is clasped with the hands. Now the lower parts are pressed to the legs, and the upper parts to the floor. When the tent is folded, you need to press the joints with your hands. Now the corners are folded on top of each other.
In semi-automatic houses, the frame takes the shape of an oval. If you bend the ribs correctly, they will begin to curl in the right direction on their own. In the end, you will only need to tuck some parts of the tent inside and put the fixed product into the cover.
How to fold a children's square tent house: step-by-step instructions
There are 2 ways to roll up a tent that looks like a house. First option:
- You need to stand opposite the wall of the house and pick up 2 walls that are located opposite each other.
- The rib in the right hand is pushed to the opposite corner. This action will cause the product to fold.
- The house is placed in such a way that the base is turned towards itself. The hands are joined, then the right one rises above the left, which allows you to fold the tent into a figure eight.
- The resulting rings are placed one on top of the other, after which the product is fixed in this position and put away in the bag.
If you can’t make a figure eight, you can assemble the tent using the second method:
- The walls of the house are being folded. This is not entirely easy to do; you need to make an effort to get the wire into the desired position.
- The floor rises, and with your left hand you hold on to the wire rib.
- The wall should be pressed against the raised part, which is supported by the right upper limb, and twisted in a circular motion.
- It turns out to be a circle to which you need to press the second part.
The finished ring, secured with rubber bands, is folded into a case.
How to assemble a “princess castle” tent: action diagram
A princess castle is a product that has a frame inside, which is assembled according to the following algorithm:
- Remove the axle from the structure that holds the tower straight. This long pole consists of several small tubes that are put on an elastic band.
- Fold the other frame sticks according to the previous pattern.
- Now you need to connect the 2 round parts of the lock and fold the fabric inside.
- Take the resulting circle in your hands and make a figure eight, turning one hand up and the other down. Connect 2 circles and secure the structure with rubber bands attached to the base of the product.
How to assemble and remove a “bus”, “car”, “train” tent
All toy tents, regardless of shape, are assembled according to the same pattern. First you need to make the product flat, then in one motion twist the number “8” and fold it in half. Secure the resulting circle with special elastic bands or ties and place it in a case.
How to assemble a children's round tent “Princess Castle”: action diagram
Is it really possible that such a large and luxurious castle can also be hidden in a small round container bag? Exactly.
The Princess Castle belongs to the category of frame tents that are assembled according to the principle of adult tourist tents.
- Remove the vertical stick from the frame. They hold the turret cylinder in a vertical position.
- This long stick consists of several small ones, attached to an elastic band. Fold them up.
- Do the same with the rest of the frame sticks of your castle.
- You are left with a round base and a round top of the tower. Connect them to each other. Tuck the cylinder panel inside.
- Grasp both sides of the circle with both hands. And again make a figure eight - turn one hand down and the other up.
- Connect two figure eight circles.
- Use an elastic band attached to the base of the tent to secure the resulting structure. The lock is ready to “hide” in a round case.
Types of tents, their classification
According to their purpose, modern tents are divided into:
- trekking or flat – designed for simple conditions of stay, for example during outdoor recreation;
- camping - suitable for those who like to travel by car, they are spacious and functional;
- expeditionary - have similar characteristics to flat ones, but with increased resistance to rain and wind;
- assault - used in difficult conditions, for example in the mountains;
- special purpose - military tents, winter tents, children's tents.
According to their form they are divided into:
- hemispherical with arcs crossed in half - the most popular and universal, convenient for simple trips on vacation;
- barrel – is spacious, but has low stability;
- a coffin is a favorite form of single tourists; it is compact in shape and light in weight;
- a tent is a favorite type of professionals on expeditions;
- gable design - standard design of Soviet designs.
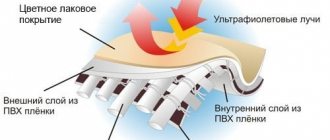
Tents are equipped with a different number of awning layers:
- Double-layer models provide increased comfort. The outer layer is an awning that serves as a “shell.” It does not allow moisture to pass through and is quite durable. The second layer is a kind of filter. Thanks to the “breathable” structure of the material, condensation does not accumulate inside the tent;
- Single-layer structures are characterized by low price, lightness and compactness. But here other factors come to the fore - moisture removal inside the product and wind permeability. Manufacturers solve this problem with membrane fabric. However, the price of such models is much higher.
We invite you to familiarize yourself with: Texture roller - decorative models with designs and designs for DIY decoration, features of the tool for applying paint - Service-Tool
Having an idea of the types and classifications, you can safely go to a travel goods store and choose the appropriate model. But the acquaintance is just beginning, because it’s not enough to buy a tent - you need to know how to use it.
General Description of Wire Tent
If you don’t have a children’s tent yet, you’re probably wondering what such a structure is. Typically, children's tents are packed in a round case, which is convenient to transport by car or simply in your hands.
The frame is based on a strong and thin wire, which gives the house a certain shape. Detailed step-by-step assembly instructions are not required for such products. Thanks to elastic wire stiffeners, the installation process takes one minute, since the structure itself takes the required shape (Figure 2).
Figure 2. The modern market offers a huge range of children's tents of different shapes and sizes
Unfortunately, manufacturers do not always provide their products with detailed assembly instructions, and parents are afraid that careless movement may damage the stiffeners and the house will break. Especially for such cases, we have compiled detailed assembly instructions.
What is a children's frame play tent
Frame products are made from durable but lightweight materials. This type of awning is easy to store because when disassembled it takes up little space. The parts that make up the supports and the fabric are placed in a small bag.
Frame tents can look different. There are houses, ladybugs and other shapes. At the same time, they look like small tourist tents that are installed using tubes. Long tubes are built from short tubes, and then inserted into special holes in the panels and secured in pockets or tied with ropes.
This tent is easy to disassemble - the ropes are untied, the frame is removed, and the fabric is folded. The frame is also composite, so it doesn't take up much space when folded. A special bag allows you to keep all the parts in one place, which eliminates their loss.
How to assemble a winter tent with a figure eight
Winter model shelters are made from more advanced materials. Mostly synthetic fabric is used - lavsan, polyester, nylon.
To fold a Chinese winter tent, a similar method is used as for an automatic one. The corners are folded diagonally towards the middle. The shape is a square. The diagonal ends are taken in the hands - the upper left corner with the left hand, and the right corner with the right. Next, a circular movement is made - left away from you, right towards you. The tent rolls up into a circle and fits comfortably in the cover.
How to assemble a camping tent
Automatic tents, often called semi-automatic, are characterized by minimal weight, as well as ease of installation and dismantling. When pulled out of the case, the structure itself opens up in the air, taking on the appearance of an assembled model if you shake it a little. Some outdoor enthusiasts have learned to create entire campsites using similar tourist tents. Moreover, they can be installed and disassembled at any time of the day, in any weather conditions. However, there is one drawback associated with the manufacturability of the product, since its advantage turns into a real problem if you do not know how to assemble a figure eight tent. The scheme is very simple, but if you are dealing with a double or triple structure, with a vestibule and an awning, experts recommend practicing doing the procedure together, remembering all the bends and applying the appropriate efforts.
Initially, fold the model, giving it a flat shape. Depending on the type of tent, the end result should be a square, rectangle or triangle. Then fold all the sides into one and lay them on the ground. Pull one end towards you, pressing the tent towards the opposite edge. As soon as you see that the arcs take the shape of a figure eight, twist them to form a circle.
It is worth noting that if a left-handed person does not know how to assemble a tent with a figure eight, the dismantling scheme should simply be carried out in the opposite direction. Practice a little at home, after which you can easily do all the necessary manipulations in nature.
How to fix a tent
The main type of failure that can occur during camping conditions is damage to the panel. It is usually made from polyamide and polyester fibers. They are resistant to stretching and tearing, but do not tolerate fire or punctures.
Experienced tourists advise carrying reinforced tape with you; with it you can easily repair any microdamage.
At home, you need to carry out more thorough repairs. You just need to find the right fabric and glue. The best adhesive is Moment Crystal (it is specially designed for working with synthetic materials). Any piece of synthetic fabric will be suitable for the patch.
Before applying the glue, the surface around the puncture is degreased. Next, glue is applied in an even layer and a patch is placed.
After installing the patch, wait 10 minutes at room temperature.
The main stages of manufacturing the structure
In previous sections, we have already looked at how to cut the base for a tarpaulin tent. Now let’s look in more detail at how best to sew a product so that it can withstand strong gusts of wind and not get wet in the rain (Figure 6).
To strengthen the tent structure, follow these instructions:
- All panels are sewn together with a double seam. To further strengthen its edges, it is advisable to coat it with rubber glue. This is guaranteed to protect the interior of the shelter from moisture penetration.
- A pre-washed braid should be secured to the ridge. In this case, it will not shrink and will serve as the basis for a reliable roof.
- Any stripes that are on the surface of the awning must be sewn along the edges, capturing both the fabric and the loop. This will provide a reliable connection and at the same time protect the awning from moisture.
- It is advisable to provide a ventilation hole with a sleeve in the rear wall.
Figure 6. The main stages of making a homemade shelter If you were unable to get waterproof fabric, you can sew a tent from ordinary tarpaulin and additionally make an awning from film, which can be thrown over the shelter in case of heavy rain.
DIY children's tent
If you don’t want to use wood to build your children’s play tent, then this DIY version of a children’s tent made from a hoop is perfect for you. Everything is made simply and quickly, and if you make such a tent together with your children, you will also get a lot of positive emotions and pleasant memories, and besides, it will strengthen your relationship with your children. To make a children's hoop tent, you will need:
- fabric for drapery (5.5 m for a large hoop, 3.5 m for a small one)
- fabric for the top of the tent (about 2 m);
- hoop;
- textile fastener, Velcro;
- a hook for hanging the tent from the ceiling;
- pins;
- scissors;
- pencil ;
- template for decorating the dome;
- sewing machine.
When you have collected all the necessary materials, you can start assembling (for this model of a children's tent, select all the necessary elements rather than assembling the tent itself). Using the photo instructions attached to the article fragment, you can easily and quickly assemble the structure with your own hands.
How to fold a children's square tent-house: step-by-step instructions
- Stand facing the wall of the house (any one) and grab the ribs on both sides with your hands.
- Push the edge that you hold with your right hand (or left, if you are left-handed) forward - to the opposite corner.
- Now the house looks like a book, which you fold, closing the pages.
- Hold the folded house by the side ribs in their lower third (“floor” towards you, roof away from you). Move your hands towards each other, as if moving one towards the other. The wire ribs will form a figure of eight when you bring your hands together.
- Place the two “heads” of your figure eight on top of each other.
- In your hands the house has formed into a ring. Now it can be easily stored in a round case.
The video illustrates the addition process in even more detail:
If the figure eight is not easy for you or the structure of the house does not want to fold in this way, try another option:
- Place the flat house folded into a “book” on the floor or any other surface.
- The lower part (“floor”). The right hand holds the lower part of the house, while the left hand holds the side panel in the middle with a rigid wire rib.
- Gently press the side piece against the top piece. Landmark - the right hand is in the center of the upper part of the house. Pull the sidewall towards it.
- Since the tent has stiffening ribs, when folded in half, the house has rounded sides. When folding the side part, turn it slightly, like a steering wheel, around its axis.
- Press it also with your right hand, rolling it into a ring.
- The second half is placed on top of the first.
- You have a comfortable circle in your hands again. Put it in the case.
And a couple more detailed videos on folding a square children's wire house; in the second, the process of folding the frame into a circle is presented in detailed slow motion:
The principle of assembling wire houses
The main advantage of houses with this design is the ability to quickly set up a tent. All you need to do is take it out of the bitch, unfold it and the house is ready. But to fold it you will need to put in a little more effort:
- Take the house by one of the stiffening ribs and fold it so that one wall fits snugly against the other. Then fold again. The result should be a flat structure in which each of the walls of the house will fit snugly against each other.
- Tuck the bottom and roof inside the house. Try to distribute the fabric evenly.
- Take the folded house with both hands by the top and bottom, and then twist it exactly in the middle. As a result of this action, the wire frame will take the shape of a figure eight.
- Fold the resulting figure eight in half and pack the tent in a bag.
The process of assembling a wire tent seems complicated only at first glance. It is enough to do this once, and in the future you will not have any difficulties.
Children love to build houses from any available material: chairs, armchairs, sofa cushions, blankets and rugs are used. In such houses it is so wonderful to play with dolls, hide from the evil Baba Yaga and turn on a flashlight in the dark.
One thing is a pity, this house is not strong. One move and the roof has already broken. And even the walls along with it. The children are upset. But the parents are worried: how safe is such a house?
Children's play tents that went on sale became an excellent way out of the situation. Lightweight and durable, they can look like a real princess castle, a house with a tunnel, or even a car.
As a rule, they are installed literally in one motion. But collecting them after the game turns out to be not so easy. How to fold a children's tent to put it in a small cover? So this tent stands in the corner of the room for months. Or on the balcony.
But the inscription on the case states that you can pack a gaming tent into the case in one minute. What are we doing wrong? Let's figure it out together.
How to fold a children's triangular tent: a detailed algorithm
- It would be more appropriate to call this house a pyramid. Stand facing one of its sides. Insert one rib inward, pushing towards the opposite one.
- Tuck all parts of the panel inward towards the center and get a flat triangle.
- The elastic band located on the bottom of the house must remain outside.
- Grasp the top of the triangle and the middle part of the base. Using a rotational movement of your arms, making a figure eight, connect both hands.
- OR press the top to the base. The side parts of the resulting structure, as in the case of the tent-house, will become rounded. Fold one circle towards the center of the base. The second one will develop on its own.
- Secure the resulting circle with an elastic band.
- You can put the folded tent in the cover.
The folding algorithm is presented even more clearly in the following videos:
What is a bathhouse with sheets?
Remember what a standard bathhouse looks like: steam room, washing room, relaxation room. It may have a second floor, attic or attic.
A bathhouse with floorboards differs from traditional buildings in that it does not have a horizontally lined ceiling; only the steam room and washing room have one, and the ceiling is made of floorboards. The resulting space most often houses a bedroom. You can get into it through a staircase located in the rest room or dressing room.
Sometimes they make a place for rest on the floors, and also use a room for storing things.
At the same time, from the outside, a bathhouse with floors looks similar to a bathhouse with an attic.