Icer
7008 0 0
Icer August 2, 2018Specialization: master in the construction of plasterboard structures, finishing work and laying floor coverings. Installation of door and window units, finishing of facades, installation of electrical, plumbing and heating - I can give detailed advice on all types of work.
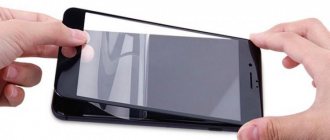
Telescopic guides are the most reliable and convenient solution for drawers, baskets and other furniture elements today. But sometimes there is a need to remove a box from furniture, and many do not know how to do it correctly, which leads to damage to the furniture. In the review, we will tell you how to remove the element quickly and easily, and also briefly examine the main types of telescopic guides.
Telescopic guides are used in various furniture
Drawer design with guides
The device consists of 2 “P”-shaped profiles, external and internal. The first is mounted on the wall surface in the interior of the headset. There are two grooves - upper and lower, into which plastic strips containing bearings are carefully placed. It is thanks to them that the profile slides inside. To prevent it from popping out completely, a special plug is installed.
At first glance, this seems incomprehensible, but if you follow the simple instructions given below, then everything will become extremely clear.
Two profiles are nested inside each other, and inside there is a carriage that ensures the sliding of the bar thanks to bearings - balls. The bar is attached to the drawer itself. So, the bar with profiles folds into one mechanism, and when they fold out again, the shelf completely slides out of the niche. The system is convenient, because this way you can get an item from the farthest corner of the furniture.
Expert Tips for Removing Drawers from Dressers
If you have difficulty performing all of the above steps at the beginning of the article, try carefully lifting the box itself to make the steps easier when performing them. Sometimes resistance may appear. It is then that it is advisable to extend the mechanism all the way and try to place it again in its original position.
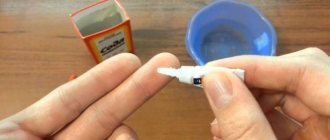
REFERENCE! It may also happen that you have to unbend the fastener along with the elastic band, but you should understand that it will eventually fall off. To obtain slip, you can resort to special solutions that are designed specifically for this. The main thing is that their number should not be large.
Subscribe to our Social networks
Types of telescopic guides
To understand how to carefully pull out a drawer in a kitchen or other unit, you need to understand the classification of telescopic guides.
In modern furniture sets, various rail guide systems are installed for ease of use.
There are several types:
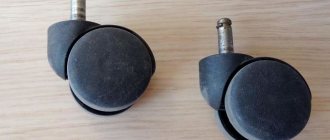
- roller and ball, determined by the type of moving mechanism. Rollers have a shorter service life, withstand much less load and become noisy over time. They cost less than ball systems;
- full or partial extension, which depends on the degree of extension.
Important! If a partial extension system needs to be repaired, the back of the dresser will be obscured from view. Such guides have a budget price.
Typically, only the most comfortable models are found on the modern market.
Metaboxes have been developed based on roller systems. Tandem boxes are considered the most expensive option. The last criterion: location of installation. You can purchase products that are installed on the side or bottom of the drawer, the so-called hidden installation.
They usually cost more, but they are very convenient and practical.
Repair tool
The required set of tools for working with a chest of drawers depends on the nature of the problem, therefore, first carefully inspect the product and make a list of breakdowns.
But it’s a good idea to keep the following on hand: Show hidden content
| Tools | Consumables |
|
|
How to remove a drawer
It is not difficult to pull out the structure: black clamps (tongues) are visible on the surface of the guides on the left and right sides. To completely release it, just hold these “flags” on both sides and lightly pull the handle in your direction.
The system may differ slightly on different pieces of furniture.
For example, if the furniture has telescopic guides with wheels, you just need to lift the bar so that the wheels come off the rail - the structure will slide out perfectly with minimal effort.
By performing each action sequentially, you can easily pull them out of the guides without damaging the structural elements.
If there are no “antennae” and wheels, the rail will simply have to be disconnected. The screws are unscrewed from one side and the other, and the shelf is pulled out.
In order to return everything to its place, follow the steps of this instruction in reverse order.
From the chest of drawers
Most often, you have to remove a shelf from a chest of drawers when there is a thing or object inside that does not allow the structure to be completely closed.
Having lowered the plastic holders on both sides and holding them in this position, begin to smoothly push the drawer to the end, pulling it out in this way.
It doesn’t matter whether there is a closer or not, the following actions are performed:
- pull the shelf towards you as much as the guides allow;
- press and slightly turn the plastic latch, which is located in the place where the hardware strips meet each other;
- Repeat the steps for the other side, pull the mechanism a little and pull it out.
You can only understand which model you have by trying to release the arrow. If it does not go down, then do not press harder, otherwise you will break and damage the structure. Just lift it up and everything will work out.
Note! If the latch is made of plastic, do not yank it too much - this will break the latch. You can use a thin screwdriver, but it is better to do everything carefully with your fingers. Do not pull the clamp completely out of the guide system!
On the retractable part there are special stoppers in the form of plastic tabs that prevent the structure from fully extending on its own.
Kitchen set
To open or remove a shelf on kitchen furniture, you will have to perform a number of these steps:
- empty the items and open the structure all the way;
- on the inner slot there is a black flag, made of plastic;
- press out the “tendril” using a small flat-head screwdriver: press it onto the flag and pull it towards you.
Important! The element should not be clamped too tightly - this could break the plastic. The flag can move either down or up on one side or the other.
- when the “tendril” goes beyond the end of the body, you cannot pull it out further. Try to lower the flag down; if that doesn’t work, move it up;
- simultaneously press the clamps on both sides and pull the box towards you.
You need to pull it out carefully so as not to bend the guides. The middle section should come out of the strip mounted to the wall of the compartment. Be sure to check the condition of the balls: they must be lubricated. If they are dry, lubricate them with the simplest grease.
Only with a correct understanding of how a thing works can you use it correctly.
Exactly the opposite: installation of kitchen wall furniture
After purchasing a furniture set for the kitchen, you need to completely disassemble the entire set of parts. It must have standard canopies (especially if the furniture manufacturer is IKEA). The installation of the headset must be done reliably, and to achieve this, you need to work smartly. To do this, it is important to follow the instructions listed below.
Deciding on the height
The first and most important thing in installation is knowing the exact height. Traditionally, it is not recommended to deviate from standards, however, there is such a need. It is necessary that the upper modules and the countertop be separated from each other at a distance corresponding to the generally accepted GOST, which is 45 cm. Modern kitchen furniture is hung above the countertop at a height of 60 cm. This is due to the fact that the installed household appliances acquire larger dimensions than before.
In addition, you should definitely take into account human height, especially those who will regularly use the headset. For example, if the height of the kitchen owner is 155-160 cm, then it is necessary to install a wall cabinet so that the height of the top shelf does not exceed 175 cm. A person must be able to reach its contents with an outstretched arm.
On a note! The height varies depending on the height of the person, but the topmost shelf should not be higher than 30 cm.
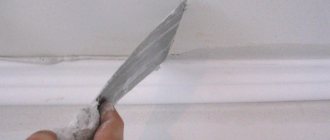
Preparing the walls for work
The first thing that needs to be done is to level the walls, otherwise there is a high risk that the design of the cabinet will begin to distort and the facade will look uneven, and the doors may even begin to sag. Therefore, first the walls are adjusted to the optimal level (if necessary, they are leveled using drywall). In this case, the angles must also strictly correspond to the 90 degree mark.
Alignment of walls for hanging furniture in the kitchen must be done Source krasnodar.mosplitka.ru
Choosing tools and accessories
Upon completion of the construction work, it remains to decide on the type of fittings with which the kitchen wall cabinet will be held. So, for this purpose it will be useful:
- tape measure, building level;
- drill, hammer drill;
- hand screwdriver and screwdriver;
- clamps;
- hammer, wrench.
Also, the choice of type of fasteners also depends on the type of surface. For example:
- tree. Then hardened screws with a rounded head will come in handy;
- concrete or brick. In this case, it is necessary to prepare a dowel, plug or anchor bolts;
- drywall. This is the only time when hanging cabinets in the kitchen that you will need Molly dowels.
When installing furniture on the chosen wall, you need to be sure that the surface is strong enough to withstand the long-term impact of the weight of the furniture on it.
Pendant options that can be used for fastening
There are two types of cabinet hangers: simple universal ones and complex ones that can be adjusted. It is important to know the details about each type in order to hang the headset correctly in the future.
Simple furniture hanging Source fastbox.su
Advantages
The doors have a complex design just to create maximum comfort for the owner in the house. There are several advantages of using such an interior element:
- Compactness. Due to the fact that the doors do not swing outward, you can open them without taking up space in the room. This advantage is especially important for small spaces.
- Large capacity. In such a closet you can install both shelves and hangers, which can accommodate a lot of things.
- Versatility. This piece of furniture will fit into almost any room interior. Due to the fact that there are many shapes and colors of cabinets, you can choose exactly the one that will harmonize with other furniture.
- Mirror doors. In addition to the fact that you can show off in them all day, a mirror also creates additional visual space in the room.
Large furniture and its disassembly
If small items, such as a bedside table or a small chest of drawers, manufacturers of furniture structures often offer to purchase already assembled, in the case of large-sized objects this approach is initially doomed to failure.
But a cabinet or wall can get boring, break down, and require dismantling when moving. And here we will have to solve problems as they arise. Dismantling an Ikea cabinet, like other large-sized furniture, always begins with searching for instructions. Of course, professionals already know all the technological processes. But those who decide to act independently will have to spend some time in the preparatory stage. Disassembling an Ikea cabinet must be done:
In a prepared room. It is better to cover the free space of the floor with special paper or plastic film. Taking into account the manufacturer's recommendations
If you need to use a screwdriver rather than a hand tool, it is better to use this tip. It’s simply impossible to hold large parts together if only one person works. Carefully. Any mistakes will lead to the fact that it will no longer be possible to reassemble the structure. With part numbering
This will make subsequent assembly easier.
Basic mistakes in unprofessional work
- inaccurate unscrewing of screws from fastenings - crumbled chipboard will not allow you to reassemble the furniture without gaps and play;
- fall, breakage of structural parts due to non-compliance with the sequence of dismantling stages;
- using the wrong tool;
- lack of experience in performing the work - in this case, you can damage both the cladding of the structure and the entire structure itself.
Why choose us?
Professional disassembly of Ikea from SBMEBEL is not just a quality guarantee for all types of work performed, but also an individual approach to the matter, which allows us to guarantee each client a high level of services provided. We carefully approach issues with personnel selection, offer a convenient schedule for visits - from 10 am to 20 pm, and provide travel throughout the Moscow region.
The most common breakdowns and remedies for them
In order to structure possible cabinet defects, it is necessary to decide on its design. Repair of each category has its own specifics.
A standard wardrobe consists of:
- Frame (side walls or so-called “backing” made of chipboard 10 cm wide, if the cabinet is not built-in, but free-standing, the system is mounted inside a regular cabinet with a roof and plinth);
- Fillings (shelves made of chipboard, hanging rods, pantographs, hooks, baskets, retractable hangers, microlift, drawers, etc.).
Photo: option for filling a sliding wardrobe Repair of the frame consists of either a complete replacement of parts, or a partial one.
As a rule, repairs are required if the edge has moved away from the material, cracks or abrasions have appeared. Partial replacement involves the difficulty of finding material that matches what is already available. This is why it is recommended:
- Dismantle the old structure, having previously measured every detail;
- purchase the required amount of chipboard and PVC edges;
- use a jigsaw and a grinder to make parts;
- use the hot processing method to glue parts and edges (this is not necessary on invisible parts);
- use a screwdriver to assemble the structure.
Breakdowns of sliding doors are associated with the failure of the sliding system. The cause of wear may be a long period of use.
To select remedies for a defect, it is necessary to accurately determine the cause:
- Replacing rollers;
- Door adjustment;
- Replacement of the profile if it is severely scratched or damaged;
- Replacing guides, etc.
In some cases, only a thorough cleaning of the system is required.
Regarding the repair of the internal reorganization of the product, we can advise the following:
- Dismantle the failed part;
- Take its dimensions;
- Manufacture and install new elements.
In some cases, a complete update of the contents is required (the number or nature of stored items has increased), then you should first decide on a new configuration and carefully consider the location of new shelves and drawers.
Blum tandems. Calculation and installation. TANDEM BLUMOTION.
| This article describes the principle of calculation and installation of drawers on the TANDEM BLUMOTION partial extension system from Blum. Those. tandem guides with built-in closing closers. Article number in the Blum catalog: 550Н5000В. |
The dimensions for fastening the guides on the side of the cabinet will be given taking into account the possible interchangeability of the drawers. The calculation and example are given on the basis of a three-drawer kitchen cabinet section (Fig. 2.). At the end, a fully parametric model of such a cabinet with all the fittings will be given for more detailed acquaintance. Model PRO100 in “*.sto” format.
! All calculations are made on chipboard with a thickness of 16 mm.
| Fig.2 | Cabinet parameters: Width 400 mm. Height 720 mm. (without legs), Facades - 3 pcs. Guides - 500 mm. Facade dimensions: 140x396 mm. - upper 284x396 mm. - lower ones. The very principle of assembling this cabinet. To begin with, the theory and diagrams are from the official Blum catalogue. |
Drawer length.
Fig.3
where, NL is the nominal length of the guide. SKL - box length. SKL = NL - 10 mm.
Drawer width.
Fig.4
where, LW is the internal size of the cabinet (between the sidewalls). SKW is the length of the front or back part of the drawer (provided that this part is placed between its sides).
Drawer height.
Fig.5
Diagram for calculating the height of the box.
Practical part. Calculation and installation.
In practical application, we will move a little away from catalog diagrams and make a diagram for ourselves. See Figure 6. Black numbers are the dimensions of the body, drawer sides, fronts and gaps. Red - dimensions for attaching guides. Blue - the size of the front and back panels of the drawers. Green - gaps in the drawer body between other parts.
Fig.6
With this scheme, the lower and middle drawers turned out to be interchangeable.
Tandem box diagram.
Fig.7
The Blum catalog suggests making boxes with a groove for fiberboard in all four parts, and then making cutouts in the front and back parts for the clamps. For what? It is enough to make only grooves in the sides of the box, and reduce the height of the front and back walls accordingly.
Fig.8
We take the length of the side of the box as according to the catalogue. Those. 500 mm - 10 mm = 490 mm.
Then, the dimensions of the drawer parts:
- The sides of large drawers are 490 x 210 mm.
- Front and back parts of large drawers - 326 x 194 mm.
- The sides of the top drawer are 490 x 100 mm.
- The front and back parts of the top drawer are 326 x 84 mm.
Cabinet depth.
When mounted to the side of the cabinet, the guides are fastened by 4 mm. from the front edge of the sidewall. Hence, the minimum depth dimension (width of the side of the cabinet) should be = Length of the guide + 4 mm. For convenience, the depth of the cabinet should be considered as follows: Length of the guide + 10 mm. In our version, with a guide length of 500 mm. the depth of the cabinet will be = 510 mm.
Assembly.
1. Fastening the guides.
| TANDEM BLUMOTION partial extension slides from Blum | Marking. |
| The guides are attached with an indentation of 4 mm. from the front end of the sidewall of the cabinet. |
| Cabinet frame with guides. |
2. Assembling boxes.
Groove for fiberboard in the sides of the drawers. Such a groove can be made using a hand-held plunge-cut saw. Cutting depth 9 mm.
| Box details. | Croaking box. |
| Installing the bottom of a fiberboard box. |
| Tandem front locks. | The clamps are attached to the front panel of the drawer. |
| Fastening the clamp. | The clamp is in operation. |
In the back panel of the box, on the left and right, blind holes with a diameter of 8 mm are drilled. to a depth of 12-13 mm. The hole is drilled at a distance of 8 mm. below and to the side of the corner of the part.
The box is installed on the guides and pushed in until the latch clicks. In order to remove the drawer from the guide, just lightly press the orange locking flag.
Cabinet with drawers on Tandems assembled.
Bottom line. General formulas.
In order to calculate the detailing of a product for using Tandem guides, we present the general procedure for universal calculations.
- Sidewall of the cabinet = Tandem guide length +10 mm.
- Drawer side = Tandem guide length - 10 mm.
- The length of the front and back panels of the drawer = the width of the cabinet - 32 mm. (thickness of the sides of the cabinet) - 42 mm. (catalog size).
- The height of the side of the drawer (for facades with a height of 200 mm.) = The height of the facade is 40-41 mm. (gap at top) - 17 mm. (gap from the lower edge of the facade or from the bottom, connection).
- The height of the front and back panels of the drawer = the height of the drawer side - 16 mm.
- Height of the drawer side (for facades less than 200 mm high) = Front height - 23 mm (gap from the top of the facade) - 17 mm. (gap from the bottom of the facade).
- The bottom of the box is made of fiberboard. Width = Length of the front and back panels of the drawer + 14 - 16 mm. (for placement in the grooves of the drawer sides). Length = drawer side.
- Dimension for marking the fastening of the guides to the side of the cabinet. 40 mm. from the lower edge of the facade or from the connection, bottom.