For more than a century and a half, jeans have not gone out of fashion. Tastes change, preferences and models change, but the basics remain the same. The clothes are simple and versatile; moreover, they are so comfortable that they become a “second skin” for the wearer.
And how frustrating it is for the owner to see scuffs and tears in his favorite pants. It's a shame to throw it away, but it's inconvenient to wear.
Installing patches on jeans between the legs
There are several options for fixing holes. You can make the patch by hand or using a sewing machine. It can be either an invoice or a lining.
Repairing Holes with an Overlay Patch
- Cut off any loose threads from the hole.
- Use a buttonhole stitch to stitch the hole to give it a neat look.
- Choose the material of the desired color.
- Cut a flap of a certain shape, which should be larger than the size of the hole.
- Tuck the cuts in it by 1 cm.
- Baste the prepared patch from the front side.
- Sew on the patch using a sewing machine.
The hole can be treated with a patch, which is decorated with fringe on all sides.
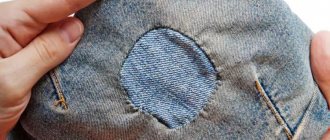
Repairing holes with a backing patch
- Cut a patch of a certain shape, larger than the size of the hole.
- Baste it from the wrong side with the right side facing up.
- Select threads of a certain color and zigzag along the hole several times. The selected color of thread will make the patch on the jeans between the legs invisible.
You can also bend the cut edges of the hole to the wrong side. Sew from the right side of the folded edge of the product.
Read more: how to sew pants between your legs and prevent the formation of new holes.
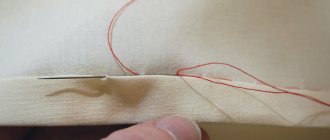
How to darn with a hidden seam
A blind seam is used if it is necessary to sew up a hole in a product so that it becomes invisible. To do everything correctly, you should follow the recommendations:
- thread a needle and make a small knot;
- turn the product inside out;
- pass the needle inside out through the hole so that the knot remains there;
- sew up the hole;
- finish the seam.
After the hole is sewn up, you need to pull the thread until it goes into the seam and becomes completely invisible from the front side.
Blind seam
Repairing holes in jeans at the knees manually and using a machine
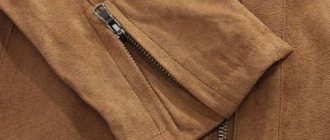
Today, scuffs or cuts in a product are not a problem; they are a trend in youth fashion. A beautifully designed hole in jeans can turn the product into a stylish and unusual addition to a modern look. To hide imperfections, you can use leather appliqué, ethnic style or factory-made thermal appliqué.
Master class: how to fix a hole in jeans using a leather patch
- Trim the excess threads and sew the hole edges using a buttonhole stitch by hand, overlock or zigzag.
- Prepare a leather patch of the chosen shape.
- Place it at any angle and sweep it.
- Sew with a machine artistic stitch along the edge of the patch or make a stitch.
In order for the applique to have an aesthetic appearance, its sections can be processed with zigzag scissors.
Video on the topic
Master class: how to fix a hole in jeans using ethnic style
- Give the hole a certain shape. Cut off any protruding threads or make a fringe along the edge.
- Choose a colored piece of cotton or linen fabric for a patch on the knee.
- Cut the fabric patch 1-1.5 cm larger than the hole.
- Baste from the wrong side so that the front side of the patch is visible through the cut.
- Sew the patch along the contour using a machine stitch or sew it on by hand.
- Around the outline of the patch, lay several rows of embroidered stitches with a Bulgarian cross, which looks like a snowflake.
Select the thread for the cross to match the color of the patch. For embroidery, it is better to use acrylic threads or floss.
Master class: how to repair a hole in jeans with factory-made iron-on appliqué
- Choose a sticker and interlining larger than the cut in the product.
- Flatten the cut. Glue the non-woven fabric on the inside with an iron so that the adhesive layer is on the front side of the product.
- Apply a sticker to the problem area.
- Baste with thread or pin it with tailor's pins.
- Apply a damp cloth to the thermo-application and iron on the patch.
- Iron the napkin until completely dry.
- Give the sticker time to cool.
- The product is ready!
You can use parchment paper instead of a wet wipe. To prevent the sticker from coming off and the product losing its aesthetic appearance, it is advisable to sew it along the edge to the jeans.
Curly darning – squares, flowers
Masking defects on fabric using embroidery is a very extensive part of needlework. Dreaming craftswomen have come up with and use many options for such figured darning. The simplest of them are geometric figures and plant motifs, which can be completed in a few minutes.
To create a square at the tear site, we make cross stitches. With each new step, making a puncture next to the previous one, we will “move”, closing the hole and interweaving the threads.
The patch can not just be sewn on, but secured with stitches in the shape of a flower. We fasten a piece of fabric with running stitches and begin sewing. We make a puncture with a needle in the center of the patch, bring the needle outside it and wrap the tip with thread, pulling the needle out. We get a curly loop stitch that imitates a flower petal. We repeat the actions in a circle. We secure the middle with yellow threads. The charming daisy patch is ready.
On leather that doesn't fray like regular fabric, making a flower is even easier. We place petal stitches around the hole, fill the center using the Japanese technique of darning - we make a “frame” of threads, then intertwine them with transverse stitches, bringing the needle either from above or from below.
More details in the video tutorial:
Don't rush to throw away things that have small holes or scuffs. Take advantage of the experience of experienced craftswomen and turn old T-shirts, jackets, jeans into designer items.
Japanese technique "Boro"
The technique originated in the Middle Ages in the Land of the Rising Sun. Boro art consists of numerous parallel stitches of equal length, hand-crafted. They resemble darning with coarse threads. For ease of use, needlewomen advise using long needles.
- To repair damage to jeans, choose thin denim, cotton or linen fabric.
- To work, choose a flap of any shape. The seam allowance should be 3-4 cm.
- Finish the outline of the cut or hole with forward stitches using a needle. In this case, the damage will not stretch further.
- Parallel to the outline of the hole, use a washable felt-tip pen to draw parallel lines for future embroidery. The distance between them can be 0.6-0.8 cm.
- From the wrong side, baste the prepared patch.
- Apply smooth stitches along the marked lines, which should be longer on the front side than on the back side.
- You need to turn the stitch onto the next row from the wrong side. Continue embroidering in the opposite direction.
- Make several rows of stitches on the bottom and top of the patch of different lengths, as well as on the sides.
The cuts on the flap can be slightly frayed if the flap is sewn on the front side of the product. To add style to the patch, you need to choose different stitch lengths and thread colors.
Video about Boro technique
Using a sewing machine
If you have a sewing machine at home, the process of sewing up torn items is greatly simplified. In this case, the seams are more invisible and neat, and the final result can be obtained in a shorter time compared to the manual method.
If damage to the product occurs along the seam, then there is nothing easier than restoring it along the existing holes from the needle.
Lace patches on jeans
Ripped jeans have been trending for a long time. Craftswomen are trying to transform them and make them more stylish. Lace is used for women's trousers. If the holes are on the hips of the product, buttocks or in places above or below the knees, then patches will make the jeans special.
Master class: masking a hole in the thigh with a patch
- Take measurements of the hole.
- Prepare a lace patch. Cut out a motif from it, which should be 3-4 cm larger than the cut.
- Give it a neat look. To do this, you need to process the sections manually using a buttonhole stitch or a zigzag stitch.
- Iron the hole with a damp cloth to even out all the cuts.
- Place a lace patch on top. Baste it or pin it with tailor's pins.
- Sew a patch along the edge of the hole.
Small floral designs can be cut out of the lace fabric and patches placed around the damage or down the side seam of the pant leg.
Master class: filling a hole in jeans with a lace patch
- Give the hole a certain shape. Rip all the edges in it. The fringe should not be more than 0.5-1.0 cm.
- Cut out the lace flap. Its size should be no less than 2-2.5 cm than the hole.
- From the wrong side, place the patch on the hole and baste.
- Turn the product inside out. Sew a lace patch along the edge of the hole on the front side.
- The product is ready!
Craftswomen do not recommend using lace patches to repair damage in the fold areas. They wear out quickly.
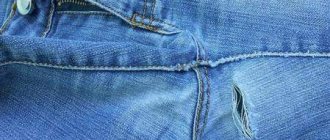
Why do abrasions appear?
Clothes wear out quickly for a number of reasons. Abrasion, a hole between the legs are the most common defects that appear on comfortable things that we wear every day. As a rule, such shortcomings arise due to the fact that:
- The trousers were bought in the wrong size - they fit too close, or, conversely, the item is too loose. In both cases, excessive friction occurs, which will then lead to damage to the fabric and inevitable repair of the product.
- Between the legs, abrasions most often occur in low-waist jeans.
- Improper washing or ironing of clothes. Before putting items into the washing machine drum, read the information on the label to find out at what temperature it is allowed to clean stains, and what spin task is recommended to be turned on.
- Hot water leads to premature wear of the fabric, and as a result, to the rapid appearance of abrasions on the material.
- Jeans cannot be dried in a washing machine. The best option is in the fresh air. This way, the pants will last longer and the fabric will deform less often.
Pants can tear at any time and in any place, so it is advisable to know in advance how to repair jeans that are frayed between the legs and how to carefully apply patches to clothing. The correct way to get rid of a defect that has arisen, making it invisible, is to use patches or stripes. Try to give your favorite clothes a second chance - make things original, exclusive, and continue to wear them with pleasure.
How to properly seal a rip in jeans with a machine tool?
Beginning craftswomen are interested in the question: how to sew a patch beautifully so that it is invisible. To do this, you need to decide on the patch that will be located on the wrong side of the product. This can be a factory patch with an adhesive base or a piece of thin fabric to match the jeans. For darning you need to use polyester thread No. 60.
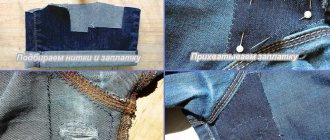
Rip in jeans between legs
Selecting the adhesive for the patch
Glue the patch with an iron
We carry out the piece from the front side
View and back
Finished jeans after repair
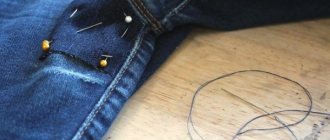
Master class: invisible patch on jeans
- Select a textile patch of a certain size.
- Baste a fabric patch or glue a factory patch on the wrong side. Glue the adhesive-based patch using an iron and a damp cloth.
- From the front side, straighten the threads on the cut and iron.
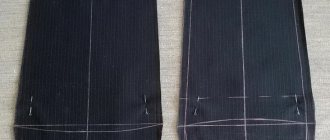
- Adjust machine stitching. It should not be wide – 0.1-0.2 cm.
- Lay the lines perpendicular to the cut, extending beyond it by less than 0.7-1.2 cm. To do this, you need to use the forward and reverse function in the machine, which will form a zigzag. The distance between them should be 0.1-0.2 cm.
- Sew the entire cut with parallel stitches.
- Expand the work. Place parallel lines along the cut.
- The product is ready!
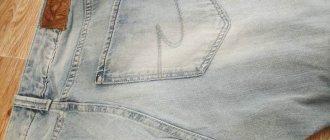
Seamstresses recommend using this method to seal holes between the legs on trouser legs. Correctly selected thread color will make the patch unnoticeable, without any discomfort.
No matter how you fill the holes, they will make the product trendy and decorate your wardrobe. You can combine several hole repair options in one product. To give the trousers a glamorous look, the patches can be decorated with rhinestones or beads.
Materials for patching
Specialized stores offer beautiful and original blanks of various shapes, sizes and shades, fabrics and leather. If it is necessary to repair the product as discreetly as possible, then pieces of original fabric are sewn on.
The material is taken from the leftovers after cutting long legs or cut out under the pockets, replacing it with fabric of a similar color and density.
To mask abrasions and extend the life of denim, adhesive material is used. The part is glued like this:
- cut out a piece of fabric covering the problem area;
- put an adhesive pad and a new patch on the wrong side of the jeans, iron them with a hot iron;
- To add strength, the part to be repaired can be stitched.
Torn pants have not gone out of fashion for several years. Such models are decorated with a variety of patches.
Old clothes will look feminine and attractive if you attach lace or guipure fabric to the inside. The material should match the color of the main fabric.
You can decorate women's or children's pants with satin stitch embroidery. These can be floral ornaments, flags, figures of animals or birds.
Cartoon characters are a great design option for little children. The main thing is that the decor looks harmonious and emphasizes the image of the owner.