Photo: topnewsrussia.ru We are all accustomed to the fact that protective glass protects the phone screen from scratches, other mechanical damage and shocks. It evenly redistributes the load over the entire surface to weaken it as much as possible. Therefore, due to the tight fit, quickly removing the protection is a real challenge. We'll tell you how easier it is to do this and what available tools will help you!
Why do you need instructions for removing glass?
Incorrect, careless removal of the protective glass can lead to a sad outcome: at a minimum, you will damage the surface of the smartphone screen, which you took such care of, and in the worst case scenario, you may injure yourself.
Many active smartphone users use improvised means when removing protective glass - knives, scissors, or simply tear the glass off the screen with a rather sharp movement.
These actions are fundamentally wrong, and we will tell you how to properly remove protection from the screen and not cause unpleasant consequences!
Step-by-step instruction
The process of removing the protective glass should not cause any difficulties for anyone. Unlike installing a security layer, dismantling is carried out using improvised means. Sometimes you can even do without them, but in this case there is a risk of harming your health. For example, in a situation where a person tries to remove glass with his nails. Therefore, it is recommended to act strictly according to the instructions:
- Place your smartphone on a flat and clean surface.
- If possible, wear gloves to avoid injury.
- Take a plastic card, a pill blister, or any other thin plastic object (ideally, a special spatula is used).
- Pressing the smartphone to the surface, slide the blister a few millimeters under the side of the glass.
- After the plastic element has been driven in, walk around the entire perimeter in this way.
- As soon as the gaps become larger, place a thicker object under protection - a plastic card.
- Moving from the edge to the center, remove the accessory completely.
If the protective element does not want to separate from the surface of the smartphone, use a suction cup.
Of course, this is not the only way to remove glass. As an alternative, you can suggest using thread. But not ordinary, but dental, since it has greater density. In this case, you will need to thread the thread under one of the edges of the glass, and then continue moving to the opposite part of the phone. This process is illustrated in more detail in the video.
How to replace old glass with new one
After you manage to remove the old protection, you will probably want to install a new one. If you have not performed such an operation before, you will have to carefully read the requirements of the instructions. Otherwise, the accessory will not fit correctly and will quickly become unusable.
Usually, all the necessary tools are already included in the protective package. This is the item itself, as well as a couple of napkins. One is needed to disinfect the surface, and the other to dry it. If only the glass itself is available, it is recommended to look for a napkin and an alcohol-containing liquid.
Once everything is ready, follow the instructions:
- In the packaged video, place the glass on the screen. This will allow you to “try it on”.
- Wipe the surface with an alcohol-based liquid, and then dry the screen with another cloth (such as a microfiber cloth).
- Bring the accessory to the screen and remove the protective film.
- Gently place the glass on the surface and then smooth it to remove any air bubbles.
If you were unable to apply the protection the first time, it is recommended to remove the glass and then apply tape to the screen to remove any remaining dust. Next, all that remains is to repeat the operation.
Why remove the protective glass?
Glass protects your smartphone from shock if you drop it. The same goes for tablets. The likelihood of scratches, cracks and chips can be significantly reduced thanks to the protective glass, which in most cases takes the blow. So, why bother removing the protective glass from the screen?
- You've found a more durable screen protector.
- The protective glass is cracked.
- You are cleaning a device (possibly for sale).
As you can see, there are several reasons why you might want to remove the protective glass from your phone or tablet. But how easy is it to do?
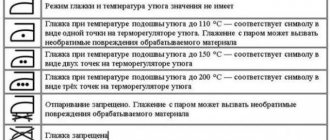
Warning: Be careful when removing the tempered glass protective film.
Old plastic protective films can be removed quite easily. The same goes for a tempered glass screen protector, but it requires additional care, especially if it has already developed cracks.
So how do you safely remove your screen protector?
The easiest method is to stick tape over the crack. This will prevent the risk of cuts when removing the protective film. You can also use rubber gloves to provide an extra layer of protection. Ultimately, however, you just need to exercise extreme caution.
Types of liquid glass
Liquid glass produced by NANO HI-TECH is predominantly found in domestic spaces. Overseas, the variety of manufacturers is wider - HomeLifairy, DOTSOG, QMADIX, TILTECH, etc. There are no significant differences between manufacturers. The kit usually includes a bottle with liquid and a dropper, 1-2 wipes for treating the screen before application, and stickers for removing dust.
Liquid glass produced by QMADIX.
Liquid glass produced by HomeLifairy.
Features and types of protective glass for phones
To understand how to properly handle safety glasses, you need to understand their features. Such accessories are designed to protect the smartphone screen from damage. When dropped, the glass absorbs the entire impact, so the display remains intact and unharmed in almost any situation.
Unlike protective glass, films cannot fully protect the display from falls. They can only minimize the risk of scratches on the surface.
Safety glass is a multi-level component, which does not only consist of a transparent and hard layer. Each such accessory has several layers underneath:
- Silicone. The bottom layer is soft enough for the protection to firmly adhere to the surface of the smartphone. Thanks to it, the glass continues to stay in place even if the owner actively uses the device.
- Safety. Perhaps the main layer, which is glass. This is a solid pad that absorbs shock when the phone falls and other damage occurs.
- Anti-glare. One of the additional layers, which is not found in every model of protective glass. Designed for comfortable use of a smartphone in bright sunlight.
- Containing. Another hard layer whose task is to stop the occurrence of cracks. It prevents the process from spreading, so the protective glass does not crumble into small pieces.
- Oleophobic. A special water-repellent coating that is applied to the top of the glass. Designed for comfortable sliding of your finger across the screen.
Not every protective glass can boast of having all the layers considered. Cheap models can only offer the buyer silicone, safety and containment layers, which perfectly protect the smartphone screen, but at the same time do not have a sufficient level of comfort during use. And to feel more comfortable, you can think about buying a new iPhone. The best offer is on iPavlik.
Also, accessories to create a sufficient level of display security differ in different areas. For example, according to form factor, protection is divided into:
- 2D – ordinary flat glass;
- 2.5D – flat with curved edges for more pleasant gliding of fingers;
- 3D – fully curved. Designed for models with waterfall screens.
Protective glasses in 4D, 5D, 6D and so on are nothing more than a marketing ploy by the seller and misleading the buyer.
Also, the protection may differ in the type of top layer. This is the oleophobic coating mentioned earlier, matte, private or glossy (the simplest). Finally, glass differs in strength and thickness. All these indicators affect the safety of the display during falls and other physical impacts.
Precautionary measures
Use only plastic scrapers or cards for removal, and do not use a knife or similar tools that could damage the device screen. If the corner you have chosen is difficult to peel off from the display, go to another one.
Remember that the display is connected to the protective glass due to two factors - electrostatic force of attraction and an adhesive base. To separate the glass and the touchscreen, you will need the force of two tools at once - a suction cup and a plastic card, which will significantly reduce the likelihood of damage to the display.
How to choose
Since the pricing policy is not unitary, it can be assumed that the glasses differ in some internal properties and type, and not just in size in accordance with the smartphone.
There is no single and suitable advice for all cases on which protective glass to choose, since to a large extent this is a matter of taste and preference. But there are several positions that you can focus on when choosing.
- There are two types of protective glass: glossy and matte. The first ones are inexpensive, withstand impacts well, but cope less with scratches. The latter are distinguished by their reliable durability, do not give glare in the sun, but are purchased at a significantly higher price.
- You should always study the characteristics of the glass you choose. Greater thickness determines better protection, especially during falls. It is also worth checking it to ensure that it does not bend too much. Good glass should have the same oleophobic layer, otherwise the screen will be constantly covered in smudges and fingerprints. Expensive glass should also include special napkins for gluing and spare glass.
- If your display has rounded edges, you should choose protective glass with a 3D effect. They are less common, but provide high quality protection on the sides of the smartphone.
What is needed for removal?
Protective glass does not become unusable so often that every gadget owner has special tools on hand to make replacement easier. However, such tools or part of them may come complete with the protective glass itself. If you didn’t have anything else included with the protection, don’t despair, you can remove the glass using some items that are easy to find in any home.
In order to peel off the protective glass and carry out the entire procedure without damaging the display, you will need to prepare in advance:
- Napkins. Choose napkins that are lint-free, such as microfiber. After wiping with these wipes, you should remove shards and glue residue from the screen, and not add new debris.
- Sucker. A regular silicone suction cup will make it much easier to remove even broken glass. You can do without this auxiliary tool, but its use is advisable.
- Plastic scraper. Alternatively, you can use a card, pick, or similar items. The main condition is that the material should not damage the touchscreen during the procedure.
- Alcohol-containing liquid. Cologne, glass cleaner, or even vodka - any of these liquids will work to remove any remaining adhesive and completely clean the display before replacing the protector.
- Gloves. This item is optional, but it will allow you to change the glass with the least chance of debris or grease stains appearing between the new screen protector and the display.
Removing the glass - what you need for the job
For work, you should prepare the following set of devices in advance:
- A pick or a narrow plastic card - it is better to take 2 pieces for greater convenience;
- Suction cup with silicone base is an optional choice;
- A napkin with a lint-free surface;
- Glass cleaner - it is advisable to choose a composition containing alcohol;
- Medical gloves are an optional choice.
How to remove a screen protector without tools
If for some reason you don't have a credit card or toothpick on hand, you can try removing the glass with your fingers. Typically, a fingernail can “climb” between the protective film and the device’s display. However, even more caution must be exercised when using this method, especially with glass.
- Start by running your fingernail along the corners of the protective film.
- Select the corner that is closest to the display and move your fingernail.
- Once the screen protector begins to peel away from the display, run your fingernail along the edge.
- As air gets trapped under the glass, lift it slowly, carefully and with equal force along its entire length.
So you should have already removed the glass. If there are any pieces left on the screen, follow the steps above again.
Gluing glass using UV glue
Gluing glass with UV glue is an indispensable technology in cases where you need to fasten glass so that the joint is not noticeable. The bonding process occurs when the adhesive hardens under ultraviolet rays, resulting in an incredibly strong bond.
In order for the products to be fastened firmly and efficiently, several conditions must be met, in particular, the most important thing is that the products are properly cleaned and dried. For this purpose, before the bonding process, the glass goes through a stage of thorough and high-quality preparation.
This includes taking into account temperature conditions, moisture resistance and transparency. All these requirements are aimed at obtaining high-quality glass bonding using UV adhesive compounds. An equally important criterion is the capillarity of the adhesive polymer - the better this indicator, the higher the ability of the glue to penetrate into the cracks, which guarantees truly strong and durable bonding.
Smartphone display elements
Before studying the direct instructions, you should understand what modern displays used in most smartphones consist of. Their components include:
- Matrix - a panel of liquid crystal or LED type that contains an array of pixels that form the final image. On the back side there is a stainless steel case, and the front part is covered with thin glass. The design includes a cable connecting the screen to the board of the mobile device.
- A touchscreen is a panel that is placed on top of the matrix and registers the user’s touch. The software combines the received information with the arrangement of elements on the screen and performs the appropriate action. When dropped, it often takes the blow and, as a result, cracks. Replacing this element is cheaper than replacing the matrix.
These components can be attached to each other in two ways:
- Through the air gap. This simpler design, previously used, allows for easy replacement of glass without the use of special tools.
- Without an air gap - the so-called OGS display, which is a single whole, combining a matrix and a touchscreen. Replacement can be done independently, but it takes more time and requires the use of special tools.
How to determine the type of fault
The main faults are divided into three types:
- No image, but full screen. 50% to 50% the screen module, or the microcircuit that is responsible for powering the screen, is faulty. Also, do not rule out a software failure if the smartphone turns on at all.
- Cracks on the screen. Usually in this case the screen itself works; there are only cracks that are purely visual. Or the screen does not respond to touches, in which case the sensor (touchscreen) is damaged and needs to be replaced.
- The screen works, but there is no image and there are cracks. The display shows small parts of the image, pixels that light up during operation. Only a complete replacement of the module will help.
Installing a new protective glass on your smartphone screen
There are two ways to install protective glass on your smartphone screen. They provide for dry and wet glass installation, respectively. The first method is for protection using tempered glass, which does not come with a special solution.
First, you need to clean your phone screen with a lint-free microfiber cloth. Then you need to detach the glass from the sticky side from the factory protective film. After that, you need to carefully attach the protective glass to the screen, making sure that the Home button, speaker and camera holes are located exactly in their places. You can use a credit card or other tools to ensure even coverage and prevent bubbles.
Wet installation is designed to be protected by tempered glass, which comes with a spray bottle (usually containing alcohol) to assist with installation. Some people prefer to use protective films and glass this way because it completely prevents the penetration of dust and small hairs. Then you should repeat all the steps from the previous method.
Sources
- https://mikomo.ru/articles/how-to-take-off-glass
- https://SetPhone.ru/stati/kak-bezopasno-snyat-steklyannuyu-ili-plastikovuyu-zaschitnuyu-plenku-s-ekrana/
- https://KakOperator.ru/lifehacks/kak-ubrat-zashhitnoe-steklo-s-telefona
- https://geekon.media/zashhitnoe-steklo-na-telefon-obzor-instrukcija/
- https://vseplus.com/article/kak-snat-zasitnoe-steklo-s-ekrana-telefona-675
- https://mobila.guru/faqsingle/kak-pomenyat-osnovnoe-steklo-smartfona/
- https://www.1rre.ru/166372-zashhitnoe-steklo-so-smartfona-mozhno-snyat-samostoyatelno-prostymi-sposobami.html
[collapse]
Bottom line
This article discussed in detail all the main options for replacing the screen on a smartphone or tablet yourself. Depending on the type of device and the malfunction, the difficulty of repair varies in direct proportion. This does not mean that you cannot repair your phone at home. The main thing is to take your time, do everything without sudden movements and, if possible, take breaks while working. Of course, don't forget to check the parts before installation. Therefore, changing the screen on your Xiaomi, Samsung, LG or iPhone is not as difficult a task as it seems at first glance.
All repair methods described above for smartphones are similar for tablets. The fundamental difference is only in size.
Cost of work
As a rule, the average price in service centers starts from 1,000 rubles. The price depends on the complexity of the repair. For example, restoring the original module and gluing the original glass can cost from 2,000 rubles. Service centers and workshops have professional equipment and consumables (separators, tweezers, UV lamps, adhesives, etc.) that speed up the replacement process. And at the same time, a guarantee of at least one month must be provided for the work performed.