T-shirts, dresses, and pullovers purchased in a store are hemmed using a cover stitching machine. You can buy such a household assistant, but not everyone can afford it.
In one of the master classes we talked about. Today you will learn how to properly hem the bottom of knitwear without the help of a cover machine.
The hem of the bottom and sleeves of knitwear can be hemmed using a sewing machine or an overlocker.
On an overlocker, this can be done using a special foot for blind stitching. For details, see the video tutorial "".
A hidden seam made on a machine or overlocker will be practically invisible on voluminous, knitwear with a relief pattern and printed fabrics.
But if you want, on the contrary, to make the hem seam noticeable, you can highlight it using double or triple decorative stitching. Moreover, it is fast, beautiful and reliable, since the stitching is durable. The optimal stitch width for this hem is 2.5 mm.
Hand blind stitch
Finish the bottom of the garment and the sleeves with an overlocker.
Turn the hem allowance to the wrong side and press. Hem with a cross stitch "goat". To do this, grab with a needle one or two threads of the fabric from above and below from the cut of the allowance (edge of the overlock stitch). Make sure that the stitches do not go to the right side of the fabric. The distance between the grips should be no more than 1 cm. Before finishing the stitching and securing the thread, slightly stretch the fabric.
The finishing seam “goat” is most often used to hem the hem allowance for items made of thin, delicate, silk and elastic fabrics.
Machine blind stitch
Turn the hem allowance to the right side so that on the wrong side the cut of the allowance protrudes 0.7 cm. Set a blind stitch on the sewing machine and adjust the stitch width so that the needle only slightly catches the fabric on the fold. Try it on a scrap piece.
Then stitch along the exposed edge of the hem allowance. The optimal stitch length is 1 mm.
Finish stitch or double needle stitch
Finish the bottom of the garment and the sleeves with an overlocker.
Turn the hem allowance to the wrong side and press. Stitch with a double or even triple needle. Using these needles allows you to maintain the elasticity of the finished seam.
If you are sewing from thick or low-stretch knitwear, you can sew one or two or three parallel straight lines with one needle.
The raw edge should be cut close to the stitching on the wrong side.
- On knitted items, the hem is pressed by raising and lowering the iron to prevent stretching of the fabric.
- If the stitching comes together or is uneven, adjust the thread tension and release the pressure of the presser foot on the fabric.
- To ensure that the needle on the right side hits exactly the edge of the seam allowance, place a basting stitch along it with contrasting threads.
Sometimes the purchased dress turns out to be too long and you need to shorten its hem. To do this, you can contact a studio or do the work yourself. From this article you will learn how to hem a dress correctly, whether it can be done without a sewing machine and what methods of hem hem to use for products made from various fabrics.
How to hem a dress correctly?
How to hem a dress yourself
If the dress is too expensive and you don’t want to trust someone to shorten the product, you will have to do the work yourself. Hemming options will depend on what fabric the product is made from.
Knitwear is considered a difficult material to process, so a knitted dress cannot simply be overcast with a classic seam. To shorten a dress, you will need a flat-stitch machine that processes the hem of the dress with a double seam.
But not everyone has such a machine, so to shorten a knitted product you can use parallel stitches made on a sewing machine
For items made of thin and flowing fabrics, you can use the invisible hem method. Such a seam requires additional time and materials, gives some thickening to the hem, but is well hidden.
To hem the hem using this method, you need to take a lining (organza or soft knitted fabric), make a pattern shaped like the bottom of the dress, sew the bottom of the dress and the lining pattern together, turn the seam inside out and iron it. Next, sew the top of the lining to the seam on the waistband of the product.
It is important to make the lining longer than the product itself (a couple of millimeters) so that it does not drag
Here's how to hem a dress without a machine: when hemming items made from woolen and suiting fabrics, a blind seam is used. Needle punctures will not be noticeable on such products. You need to hem using this method with a thin needle and one thread. The work should be done from right to left, with stitches of approximately 0.7 cm. The thread should be carried below the overlock stitch, then the hidden seam will be strong and securely hidden from prying eyes.
Most women at least once in their lives have a question: how to shorten a dress? There can be many reasons for this. Here are some of them.
- On a thinner figure, the item fits looser, making it longer.
- An outdated model can be revived by making it shorter.
- Boring length of the product.
- Change of style.
If you have chosen a dress to shorten and made a firm decision to modify it, you need to know the main points, using which you will get an excellent result. This is especially true when you need to shorten quickly. We'll tell you how to turn a long dress into a short one.
The sequence of hemming with an invisible seam
Sew the side seams of the skirt and lining. Iron the seam allowances as shown in the photo. There is no need to overcast the seam allowances as they will all be inside.
Place the lining and skirt right sides together, matching the bottom edges of the lining and the dress. It is important that the lining is not narrower than the width of the dress, otherwise you will not be able to sew it on without “seating” the hem fabric of the dress.
If you can't cut out the lining exactly, let it be slightly wider. The excess can be placed in small folds, for example near the side seams of the dress. Align the edges of the bottom of the dress and the bottom of the lining and stitch them.
Turn the product right side out. The lining in this form should be 2 cm higher than the bottom line of the product.
Baste the edges of the skirt and lining along the waistline. The lining should not “pull”. Lightly press the hem of the skirt.
Materials and tools for shortening a dress
Before you begin, you should prepare the tools and materials that will be needed for shortening.
- Spool threads that match the color of the dress and match the fabric. For example, for a chiffon dress it is better to use thin synthetic threads with glitter.
- Sewing machine.
- Overlock.
- Ruler, square.
- Flexible meter.
- Chalk on the fabric or you can replace it with a thin piece of soap. Take into account the color of the fabric, since the mark left by the chalk may not be visible. You can use a special water-soluble marker.
Important!
The line from a water-soluble marker can only be washed off with cold water. If you wet it hot, the mark will remain.
- Sharp scissors.
- Pins with heads for lining the bottom.
- Needles.
- Special adhesive tape (for certain cases).
Straps for dresses and tops - we make them ourselves
In this article I will tell you how to sew and properly sew straps to clothes yourself.
You'll also learn how to make adjustable straps—those that can be lengthened or shortened. So, let's start with a simple regular strap...
How to sew a strap.
Firstly, I’ll immediately make a reservation that if it is not important for you that the straps are made of the same fabric as the dress itself, then the straps can be made very quickly from bias tape (sold in the fabric departments of stores or in the sewing accessories departments).
Bias binding looks like a half-finished strap, that is, an even strip of fabric with the edges bent inward (Fig. 3 in the diagram below). This way you will simply save time by not having to cut out a long strip, bend it and smooth its edges with an iron.
But if this option doesn’t suit you, or you haven’t found the bias tape of the size you need, then we’ll try to make it ourselves. Here's how it's done
Take a strip of fabric of the required length. The width of the strip should be 4 times wider than the future strap (Fig. 1).
We bend the edges of the strip inward to the middle (Fig. 2, 3) so that the bend holds, and iron it. This is how the bias tape turned out. This is what it looks like in the store. The same edging can be used to trim the armholes and neck of the dress.
Now for the edging to become a strap, you need to fold it in half again, edge to edge (Fig. 4) and stitch it (Fig. 5).
That's it - the strap is ready, you can sew it to the dress. We fasten one end of the strap in front, and the other in the back.
How to sew a strap to a dress.
First way. You can simply sew it with stitches tightly. Hide the ends of the straps behind the edge of the dress and sew them tightly - such a simple, rough way.
Second way. You can sew beautiful decorative rings in the places where the straps will be attached to the dress and then insert the strap into them and secure them. Here's what I mean:
Nowadays there are many decorative rings and buckles studded with rhinestones on sale. And the strap with such a ring will become more elegant.
First we need to sew a piece of the strap in the place we need (where the strap will be attached to the dress). And attach a ring to this piece (Fig. 1, 2, 3). And then we thread the end of our long strap into the sewn ring, bend this end and sew it to the strap (Fig. 4, 5, 6).
Or you can buy several rings, cut the strap into pieces and connect each ring to each other with a piece of strap (Fig. 7).
The third way is to sew on a strap (when it is still in the piping stage) so that the piping covers the neckline and smoothly turns into a strap. Here's what I mean:
Use bias tape to process the armholes separately (Fig. 2).
And then we take our bias tape of such length that it is enough to finish the neckline and make 2 straps. Find the middle of this piece of bias tape and apply this middle to the center of the neckline.
And now, leading the bias tape from the center of the neck, we begin to process it (the neck) with this bias tape first to the left side - the tape goes to the left along the neck (processes it) reaches the left edge of the neck and there it already turns into a strap (that is, the folds of the bias tape are sewn together together with the same line with which we just sewed the neckline). And the same thing now to the right side.
That’s it, the binding that covers the neckline on the right and left of the neckline smoothly turned into a strap – Fig. 3.
You can do the opposite - the neckline was treated with a separate piece of binding, and the binding that was used to process the armhole smoothly flows onto the strap. Whatever you think is more beautiful.
How to trim the edges of armholes and necklines with trim is shown and described in the diagram below:
The strap is adjustable.
If we want the strap to be shortened or lengthened as we wish, we can make an adjustable strap, like in bras.
We will need a buckle with a jumper (Fig. 1), a ring (Fig. 2) and a finished strap with extra length (Fig. 3).
The end of the strap must be pulled into the buckle so that it simply bends over the jumper and returns to the strap, to which it must be attached after that (Fig. 4, 5, 6).
Now on the back, in the place you have planned, we attach a piece of the strap (Fig. 7), into which we thread a ring (Fig. 8, 9), secure it well with several lines (Fig. 10).
Now we thread the end of the strap (the one without the buckle) into the ring, and we pull it through the buckle (Fig. 11, 12). The entire strap is ready - we attach this free end that came out of the buckle to the front of the dress. You can simply sew it on, or you can also attach a ring to the front and secure our end of the strap to this ring.
Nowadays you can buy ready-made adjustable straps in stores - however, their color is limited, and they are usually all narrow. More often they are simply black and white, some are transparent, and some are strewn with starziki, with buckles in the shape of butterflies or flowers.
There are also a bunch of beautiful ribbons and decorative buckles on sale - and from all this variety you can come up with many interesting straps yourself, which will decorate a simply tailored dress.
You just need to remember a sense of proportion. If your dress already has a decorative element (bow, complex drapery, intricately sewn flounces), then additional decor in the form of decoration on the straps will be superfluous.
That's probably all I wanted to tell you about the straps. I will be glad to see all questions, wishes and advice from you, dear readers, in the comments to the article . There you can also place photographs of the products you have sewn.
How to properly shorten a dress made from different fabrics
Once everything is selected, you can start working.
Length Determination
First of all, you need to decide on the length.
- Put on the dress, make a mark for the future edge, and pin it with a pin.
- After removing the dress, fold the edge along the mark and secure it along the length of the entire hem.
- Try on the outfit again to make sure it is the right length. Then remove and mark the line with chalk so that it runs 1 - 2 cm below the desired edge. This is hem reserve.
Important
! This procedure must be carried out regardless of what fabric the dress is made of.
- Cut the fabric along the marked line.
Slice processing
Lightweight natural fabrics
The easiest way to process the bottom of a dress is made of light fabrics (cotton, thin linen, etc.). It is necessary to make a hem and perform a machine stitch or overlock processing.
Dense heavy fabrics
If the fabric is thick enough, such as suiting or jersey, you can sew trouser tape or bias tape along the bottom edge
.
- Attachment is carried out on the front side. Then fold the hem inward and gently steam with an iron. It is better to carry out the procedure through damp gauze or thin cloth. This will prevent the dress material from sticking to the iron. The bottom can be reinforced by sewing a straight seam, or you may not need to perform this action.
Knitwear, silk
A knitted dress requires special finishing on the bottom
. This will allow you to avoid stretching the seam lengthwise. Processing is carried out either with a cover (flat) seam or with an overlock stitch.
- Overlock processing
is very simple.
The only condition is that you need an overlocker. The product is cut 0.5 cm below the desired mark
. Then a stitch is made along the edge, without any folds. It is better to use a medium stitch width for knitwear; for chiffon and silky fabrics, use a narrow stitch with frequent stitches. - The cover stitch needs an additional hem of 2.5 cm
. Along the bottom edge of the hem, the seam is processed using an overlocker. Then a hem is made along the marked line. And along the wrong side, a second seam is made, spaced 1 cm from the edge of the product. Then, stepping back the width of the foot (0.5–0.7 cm) from the edge upward, the second seam is sewn. After this, carefully iron through a damp cloth or using a steamer.
Processing a dress with decor at the bottom
If there is a need to sew braid or lace to the bottom edge, then cut off the excess fabric from the beginning. Then the edges are processed and the lace is sewn on the front side.
, placing it on the fabric of the dress.
Necessary equipment
To ensure that the process of hemming clothes does not cause difficulties, you first need to prepare the necessary equipment. Agree, it is much easier to work when you have all the necessary tools at hand. So, you will need:
- sewing thread;
- sharp scissors;
- sewing needle;
- pins;
- ruler or pattern;
- chalk or a piece of soap;
- thimble;
- iron.
When choosing tools, focus on the fabric. The thickness of the sewing thread and needle should correspond to the density of the fabric. For silk and satin, use threads with the same composition. For thick, woolen or suit clothes - thicker ones. The same applies to needles: for denser fabrics, choose a tool with the appropriate diameter; for delicate, light fabrics, choose the thinnest ones.
Chalk or soap is needed to measure seam and cut lines. For convenience, make the ends sharp, so you can measure a thin line.
When sewing by hand, especially if the fabric is thick, use a thimble to protect your fingers from injury from the needle.
How to shorten a dress at the waist
For skirts or dress hems, where there is decoration with stones at the bottom of the product or pleats, shortening is done along the seam at the waist. The work is performed according to the following algorithm.
- Steam the belt or skirt.
- Measure the length at the waist on the cut piece, so that you can then combine it with the seam or waistband.
- Taking into account the seam allowances, markings are made.
- Trim off the excess.
- Try on the waist of a dress or the belt of a skirt.
- Subtract the smaller from the larger size and divide the result by two. The resulting number is the centimeters that need to be subtracted along the side seams. Otherwise, you won’t be able to match the top with the bottom of a dress or a skirt with a belt.
- After aligning the seams, parts of the product are ground down.
Universal method
The cut edge of the product is folded 1 cm and attached with a straight seam along the front side, departing from the edge by 0.5–0.7 cm.
Regardless of the style and composition of the product, you can shorten a dress in a short time without experience or special equipment. The tips below are especially relevant if you are suddenly invited to a party or other event, and your favorite dress seems old-fashioned. Thanks to our recommendations, you can change your outfit in just 15 minutes, emphasizing your figure.
Patterns
When creating a dress with a frill at the bottom, the pattern is made as follows. For this it is convenient to use a basic pattern.
First you need to reduce the shoulder line and outline the new outlines of the armhole.
Then you need to widen and make the neckline deeper.
Now you need to shorten the dress to the desired length. In this case, you need to trim the front and back of the pattern.
The bottom should be widened.
After this, you need to transfer the resulting patterns onto thick paper. This procedure is not difficult even for beginner craftswomen. In the future, based on the patterns, it will be necessary to cut the dress.
Creating parts
Dress with braid
This method is suitable for dresses made of suiting or other dense fabric with a straight cut. The braid will give a smooth cut, forming straight, even edges. Mark the desired length and secure the hem with a pin. Make a mark with chalk or soap, draw a hem line. Don't forget about the allowance. In this case, it is about 1 cm. Sew the trouser braid along the top edge on the front side of the dress. Then make a hem and carry out a wet-heat treatment of the seam. Secure the bottom with a straight machine stitch along the wrong or right side. Similarly, you can finish the bottom of the dress with bias tape if the fabric is thin.
How to level the bottom?
When it comes to sewing curtains, most often the hem line is straight. If we are talking about a skirt, especially a flared one, then the bottom line is aligned directly on the figure, while the belt and clasp should be well adjusted.
To carry out this operation, stand on a flat surface in the shoes with which this item is supposed to be worn. In this case, an assistant, using a vertical wooden ruler, one end of which is placed on the floor, marks the corresponding level with chalk along the entire circumference of the hem.
However, this operation can be done independently if you fix a rope thickly rubbed with chalk in the doorway at the required height (Fig. 1). To the marked line it is necessary to add an allowance for hems and seams, the width of which will depend on the method of processing the bottom.
How to mark the hem line of a skirt yourself
Knitted dress
If your outfit is a floor-length dress, then the bottom of the product can be processed in two ways: the first is with a cover stitch, the second is with an overlock stitch. In the first option, the seam is made by a special machine, which is not available in every studio. But it can be done at home, spending a little more time.
Cover stitch
Measure the length of the product, leaving 2.5 cm for the allowance. Process the cut on the overlocker, make a hem along the intended line and lay the first line along the wrong side 1 cm from the edge of the product. The second line should be made the width of the foot (0.5–0.7 cm) from the first line. When finished, iron the item using the steam function.
Overlock stitch
Everything is very simple here. Measure the length of the product, adding 0.5 cm. Cut off the excess fabric along the marked line and sew an overlock stitch of medium width.
Who suits the flounced style?
When people talk about flounces, they mean strips of fabric that drape on a dress in various places. Their use is common in the lower or upper parts of clothing. Vertical shuttlecocks are also used. Some models may use a combination of these.
Dress with flounce at the bottom
This style is suitable for women who want to look more romantic. In such dresses they look more feminine and flirty. Using a flounce helps a woman look special. Pairs well with an a-line dress.
The use of this detail allows you to create a feeling of volume. Therefore, it is important that when choosing a woman, she takes into account what kind of impression she is trying to make. For example, for those whose overall body shape is close to an inverted triangle or rectangle, the flounce located below will give certain adjustments that will make them look more harmonious. For those with wide hips, this dress will make them look even more voluminous. Therefore, in this case, you should not choose such a model. In this case, you should pay attention to a dress with a flounce on top.
Style with flounce at the bottom
For those who are short, flounces are suitable if the dress is short. For tall girls, this detail will look harmonious on dresses of any length. Wrap dresses may be suitable for them.
Dresses with frills are very popular. You can find suitable patterns on the Internet. You can also use those offered by Burda.
Dress for girls
Dress for the occasion
The bottom section of the dress can be trimmed with lace. This method is relevant for elegant items or clothes that already have trim. Measure the length and cut off the excess fabric along the marked line. You can sew lace in two ways:
- First: overcast the cut along the front side and stitch the lace.
- Second: place the lace on the fabric “face to face” and sew 0.5–1 cm. Secure over the lace and iron the seam. Place a finishing stitch along the front side of the dress by 0.1–0.2 cm.
Dress with pleated skirt
It happens that you need to shorten a dress, the bottom of which is embroidered with stones, decorated with lace, embroidery, or is a complex technological process. In such situations, shortening occurs at the expense of the waist. Step-by-step instructions:
- Determine the length.
- Flog your skirt.
- Measure your current waist circumference.
- Mark according to the seam allowance.
- Trim off excess fabric.
- Measure the circumference of the skirt at the waist.
- Subtract the smaller from the larger number.
- Divide the final number by 2.
- The result is the number of centimeters you need to remove along the side seams.
- Line up the seams and sew the skirt to the top of the dress.
- Overcast the seam and perform a WTO.
Recommendations for choosing fabric
To create such dresses, thin fabrics that will flow beautifully are best suited. Silk, chiffon, satin, gauze, organza, lace or guipure are often used.
For short or medium length dresses, chintz, cotton or cambric may be suitable. It is worth paying attention to the use of modern materials. For example, neoprene works well for a dress with a ruffle. It is pleasant to the touch and allows air to pass through well.
You might be interested in Sewing sleeves into the armholes of dresses, jackets or coats for beginners
Important! Since such dresses attract attention, jackets or jackets made in a classic style will look good with them.
A dress with a flounce emphasizes the romance of a woman
Impromptu method
If you do not have sewing and cutting skills, and you do not have a sewing machine, then use this method. Determine the length of the dress as indicated above. Leave a 2.5 cm seam allowance from the marked line. Double fold, press or baste the seam. Take a needle and sewing thread of the desired color, then secure the fabric with blind stitches. The hidden seam is made carefully, using a needle to pry up the upper threads of the two parts of the fabric. The stitches should be made oblique, small in size and at the same distance.
Remember: it is very important to visually imagine the entire process (sequence of actions), and then get to work. This way you can avoid mistakes and shorten your dress correctly.
If the dress is too expensive and you don’t want to trust someone to shorten the product, you will have to do the work yourself. Hemming options will depend on what fabric the product is made from.
Knitwear is considered a difficult material to process, so a knitted dress cannot simply be overcast with a classic seam. To shorten a dress, you will need a flat-stitch machine that processes the hem of the dress with a double seam.
But not everyone has such a machine, so to shorten a knitted product you can use parallel stitches made on a sewing machine
For items made of thin and flowing fabrics, you can use the invisible hem method. Such a seam requires additional time and materials, gives some thickening to the hem, but is well hidden.
To hem the hem using this method, you need to take a lining (organza or soft knitted fabric), make a pattern shaped like the bottom of the dress, sew the bottom of the dress and the lining pattern together, turn the seam inside out and iron it. Next, sew the top of the lining to the seam on the waistband of the product.
It is important to make the lining longer than the product itself (a couple of millimeters) so that it does not “drag”
Here's how to hem a dress without a machine: when hemming items made from woolen and suiting fabrics, a blind seam is used. Needle punctures will not be noticeable on such products. You need to hem using this method with a thin needle and one thread. The work should be done from right to left, with stitches of approximately 0.7 cm. The thread should be carried below the overlock stitch, then the hidden seam will be strong and securely hidden from prying eyes.
Also, for products made of dense and woolen fabrics, you can use the method of processing the hem with a special braid (braid). You just need to sew one edge of the braid on the wrong side, and on the front side, fixing the braid with pins, sew it, retreating 1 mm from the edge.
These are the ways you can bend the hems of various dresses. And if you are wondering whether it is possible to hem a wedding dress, then folk signs do not advise doing it yourself. Moreover, a wedding dress is a very complex product, so it is better to entrust its shortening to professional craftsmen in the atelier.
Shallowing and trimming the bottom.
The product is turned inside out, laid out on the table, bending the front and back in the middle, side seams, darts, and bodice-skirt seams are aligned on the right and left sides of the product. Then, having specified the length of the product, use chalk to mark the cutting and hem lines for the bottom using an auxiliary pattern. Excess fabric is trimmed. In products made from thick fabrics, the side seams and seams connecting parts of the skirt panels are cut at a distance from the bottom; equal to the width of the hem plus 2 - 4 cm, and the seams in the area from the bottom to the notch are ironed.
Processing the bottom using a stitching machine.
In products made from cotton and linen fabrics, the bottom of dresses and blouses is processed using a stitching machine (Fig. 87, a) with a device that provides a certain width of the hem.
When processing the bottom without a device, the bottom is bent along the intended line towards the wrong side, the cut of the bottom is folded inward by 0.7 - 1 cm and stitched at a distance of 0.1 - 0.2 cm from the folded edge. When processing the bottom on a stitching machine with a device, the hem line is not marked. The bottom of dresses and blouses widened at the bottom, which are worn under a skirt, is processed on a sewing machine with a narrow hem seam with a closed cut with two lines or using a special device - a switch (Fig. 87, b). The finished seam width is 0.2-0.3 cm. Processing the bottom of the blouse using a special machine.
The cut of the bottom of the blouse is bent towards the wrong side by 0.5-0.7 cm; when making products for individual orders, the folded edge is ironed.
Then the folded edge is stitched on a special machine (Fig. 87, c). Excess fabric around the stitching is trimmed. Processing the bottom of items made of dense fabrics.
In products made from thin wool and silk fabrics that fray easily, the bottom section is overcast using a special machine, then folded to the wrong side along the intended line, folded inward and basted. In products with a straight silhouette, the bottom is covered with one line. In products that are slightly widened downwards, the bottom is covered with two lines: the first at a distance of 1 cm from the fold of the bottom, and the second is attached to the folded edge. In products that are widened downwards and have a hem allowance, the bottom is basted in three lines: first, the cut is folded in and basted at a distance of 0.5 cm from the fold, and then the bottom is folded along the hem line and basted at a distance of 1 cm from the bottom fold and the last line attach the folded edge. The swept bottom is hemmed using a special blindstitch machine. In products with a straight silhouette, it is allowed to hem the bottom using a special machine without preliminary basting. When manufacturing to individual orders, the swept edge is hemmed manually with hidden stitches (Fig. 87, d), invisible from the front side. In products made from dense woolen fabrics, from thick cotton fabrics (such as corduroy and corduroy), as well as in skirts with pleats, pleated and corrugated, the cut of the bottom after chamfering and trimming the parts is stitched using a special machine. Then the bottom is folded toward the wrong side along the intended line and hemmed using a blind stitch machine without folding the edge inward (Fig. 87, e). In products made from dense, easily fraying fabrics of high groups, it is recommended to edge the bottom cut (Fig. 87, f) or treat it with a special braid (Fig. 87 g). For edging, take a strip of thin silk fabric, place it on the front side of the product, aligning the cuts, and grind it at a distance of 0.3 - 0.5 cm from the cuts. A strip goes around the seam, forming an edging. The edging is secured with a stitch into the stitching seam of the strip. Then the bottom is folded towards the wrong side along the intended line, basted and hemmed using a special blindstitch machine or manually using stitches that are invisible from the front side. When processing a cut with braid, it is applied to the front side of the hem allowance with an overhang of 0.7-1 cm (depending on the width of the braid) and adjusted at a distance of 0.1 - 0.2 cm from the edge of the braid. Then the bottom of the product is folded towards the wrong side along the intended line, basted and hemmed on a special machine with blind stitches or by hand, the basting threads are removed. The processed bottom of the product is ironed.
Processing the bottom of blouses with a stitched belt
(Fig. 88, a). Before connecting the belt to the blouse, darts or gathers must be processed at the bottom of the blouse. Processing of darts and assemblies is described in Chapter. 1, § 4 and 6. If the belt is closed according to the model, then it is bent across the middle and folded with the front side inward. The cuts are leveled and the ends of the belt are ground down. The width of the seam is 0.7 - 1 cm. The seam is laid out, the belt is turned right side out, folded along the middle with the wrong side inward and ironed. If the belt has a fastener according to the model, then the processing of the belt is similar to the processing of stitched cuffs in the sleeves (see Chapter 1, § 18). In the side seam of the blouse, a cut along the continuation of the seam can be processed. The processing of the fastener located on the continuation of the seam is described in Chapter 1, § 8. The belt is placed on the wrong side of the product with the lining down and stitched from the side of the blouse, evenly distributing the gathers and aligning the control notches. The width of the seam is 0.7 - 1 cm. The belt is bent, the seam is directed towards the belt, the cut of the belt is folded by 0.5 - 0.7 cm and adjusted at a distance of 0.1 cm from the folded edge. In this case, the stitching from the inside of the blouse should pass along the main parts at a distance of 0.1 cm from the seam of the belt (Fig. 88, 6). When making products from woolen fabrics according to individual orders, it is allowed to stitch the belt, and fold the section of the under-belt and hem it with hidden hemming stitches, closing the seam of the belt stitching (Fig. 88, c).
Binder
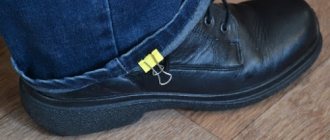
The problem of quickly shortening the hem of a new dress or skirt, just purchased trousers or jeans) often arises before us. After all, there are situations when we really need these things immediately after purchase. How to do this quickly and efficiently?
You will need: contrasting threads for basting, a “centimeter”, a narrow piece of dry soap (if the product is dark) or colored crayons, adhesive tape with double-sided adhesive, gauze (approximately 30x30 mm), folded in half.
Adhesive tape has been used for quite a long time (15 years), which means that it can be easily purchased at any Fabric or Sewing Accessories store. Naturally, a specialized sewing accessories store https://www.atelyefaina.ru/shveinaya-furnitura.php is preferable - since there is always a choice there.
So what kind of adhesive tape do we need? Single-sided or double-sided? I will give several types of double-sided adhesive tapes that give the necessary effect for hemming the bottom of products, as well as for minor repairs (repairing torn clothing and eliminating small holes, for example, when damaged by cigarette ash).
Since the result of their use is the same, and the store may not have the adhesive tape you need, I will give options for the most common adhesive tapes. Glue web is a thin melt of glue in the form of a web of different configurations, on paper and without paper, of various widths.
Feel free to purchase any of the following:
1 Hot-melt adhesive web. Width - 10, 15, 20, 25, 30, 32, 50, 70 mm. white.
2. Cobweb “Mesh”. Width - 7, 10, 15, 20, 25, 30, 40 mm. The “mesh” also comes on a paper basis, which is very convenient for use and storage. It is transparent due to its design.
To hem the bottom of a dress, skirt or trousers, adhesive tape 10 -15 mm wide is required. But this technology is used only for loose fabrics (silk, various synthetic fabrics, knitwear). This technology is not suitable for hemming thick coat fabrics and leather products.
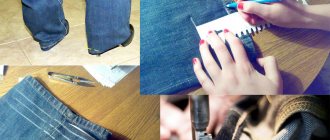
Sequencing
1) We measure the exact length by which we need to shorten the product and add 15 mm. This will be the cutting line for the excess fabric. Let's cut it off. Then, along the entire perimeter of the bottom of the product, 15 mm upward and draw a hem line. Don't forget to allow for 15mm of hem allowance. We draw the hem line with either a dry piece of soap or chalk. I recommend using chalk in extreme cases, since after finishing work, it is not always completely removed from the fabric. Modern fabrics have different structures and can retain chalk residues. 2) Mark along the drawn hem line with a contrasting thread. 3) Bend the fabric 15 mm to the wrong side of the product and iron it. That's it - the preparation for gluing the hem of the product has been completed 4) Then we lay adhesive tape between the main fabric and the ironed hem line. Using a damp gauze cloth placed over the hem, gradually moving along the hem line, iron it to the main fabric, holding the iron on the gauze for 2-3 seconds. Under the influence of steam, the hem is tightly connected to the main fabric.
It is important not to forget that the double-sided adhesive web is placed between the hem and the main fabric, and even then it is subjected to heat treatment (gluing) on the side that will be on the wrong side.
Minor product repairs
Elimination of small tears and holes in the product is achieved by applying a patch either from a piece of fabric from the main product or from a fabric similar in color.
How it's done:
A patch is cut out of a piece of fabric in a size that repeats the shape of the damage, but enlarged by approximately 5 times (it can be less, but it depends on the size of the damage and the density of the fabric of the product). A contour is cut out of the adhesive tape to match the size of the patch. In this case, it is better to use a wider adhesive tape.
The product is turned inside out and a patch is applied to the damaged area; an adhesive tape is placed between the fabric of the product and the patch, repeating the shape of the patch. Wet gauze is applied on top, and the patch is ironed to the product (time 2 - 3 seconds). If necessary, ironing is repeated.
Quite often it is necessary to hem the bottom edge of a product when sewing new clothes or during repairs.
Today we’ll talk about how to hem the bottom of a skirt, dress, trousers, coat, what types of manual stitches exist for hemming the bottom of a product and how to make them. You can also watch video lessons on this topic.
Finishing the edge with a hem
The standard hem width for a skirt is 3-4 cm; for thin fabrics this value may be smaller. To make a neat hem line for a straight cut, it is convenient to use a sheet of paper with a horizontal line drawn at the required distance. Bend the edge of the hem this distance and iron it - you will get a perfectly straight line, and the hem will not be imprinted on the front side (Fig. 6).
In flared lines, the fold is much more difficult to perform. To facilitate this operation, two parallel lines are laid along the bottom of the product (Fig. 7). Then the bottom line is gathered up a little, the fabric is folded inside out along the line of the top line, pinned and pressed.
The simplest method for processing a folded edge, which even those who do not know how to sew can quickly handle, is to use adhesive tape. It is placed in the fold and treated with a hot iron (Fig. 8). For heavy textiles, it is recommended to insert two such tapes.
Professional dressmakers do not recommend using this method of fixing the hem, believing that it makes the fabric more rigid. In addition, the adhesive tape will most likely have to be re-glued after washing. In the time of our grandmothers, traditional stitches were used for products made from suit and coat fabric - blind (Fig. 9) and goat (Fig. 10), which are still made in expensive studios.
Beautiful execution of such a binder requires skill and a lot of time. In professional clothing production, this operation is most often performed with a hidden machine stitch. A simpler solution is to simply stitch the double-folded edge (Fig. 11), which is well suited for sportswear.
For a narrow hem, this stitch can be done using a special hemming foot. For thin fabric, as well as for flared models, a more suitable option is to process the edge with an overlocker, and then stitch it 0.2 cm above the ironed fold line (Fig. 12). To prevent the top edge from sagging, you can make two parallel lines with a wide hem.
One of the most beautiful, albeit complex, methods of hemming thin materials is the so-called Moscow seam. Its width is about 3 mm, with 2 lines on the back side and one on the front side. They are performed in the following sequence (Fig. 13):
- Leaving an allowance of 1 cm when cutting, make a hem of no more than 4 mm, iron and sew the fold as close to the edge as possible.
- Carefully cut the fabric from edge to stitch, leaving more than 1 mm.
- Once again turn the hem to the wrong side so that the stitching is approximately in the middle, and iron it.
- Sew the hem from the inside out as close to the first line as possible. Experienced craftswomen make the first stitch with a contrasting thread, and then remove it to get one seam from the face and from the back.
I can’t call myself such a fan of sewing, but every woman should be able to sew the simplest skirt, much less sew up a hole or sew on a button.
However, sometimes you have to work hard on the product. My headache is stitching on thick areas of the product. For example, when working with denim items.
It can also be difficult to tame a dress
or a skirt that is too long when you want to do it quickly and without the help of an atelier.
Hem of the bottom of the product
Hemming is often done by hand, even when the rest of the garment is sewn on a sewing machine.
When sewing dresses or skirts on the bias, the bottom is hemmed in several stages. The first thing you need to do is hang the product on a hanger for the day, then baste the bottom and turn the raw edge to the wrong side. Moreover, the hemline is marked by making sure to put the product on the person and evenly and patiently measuring the same distance from the floor to the desired hemline. And only after that the excess is cut off, leaving allowances for the hem using the chosen method.
If the fabric frays a lot or is too thick, sew on the right side of the raw edge and sew it as a hem.
Classic allowances on the straight line of the bottom of a skirt or coat are 4 cm, and if the bottom has a curved appearance, then 2 cm. But this is approximately. It all depends on the fabric itself and your wishes.
How to hem the bottom of a dress skirt if the fold is rounded
If you are hemming a flared or rounded hem, use a basting line to gather the fabric slightly. Space the gathered areas at even intervals, pin them in place, and then baste them in preparation for hemming. You can also, after gathering the fabric, sew bias tape to the edge of the product.
When working with thick wool fabric, you can iron the hem, which helps reduce its thickness a little. To prevent a bulge from appearing on the front side of the product, iron the hem onto a fabric or thick sheet of paper. Press the iron very lightly onto the fabric and then lift it straight away - never drag the iron across the surface of a damp fabric.
Hemming stitch
In a hemming seam, the second hem of the fabric should be narrower than the first, its width should be 7-10 mm. Secure the thread with two small stitches at the edge of this fold. Begin attaching the hem by picking up two or three threads from the main body of the fabric, then insert the needle back into the fold. This seam can be made from right to left or, conversely, from left to right.
Blind hem
A blind hem is very similar to a blind stitch. Pick up several threads of fabric with a needle, stick it into the fold and bring it out at a distance of 1 cm from the point of injection to make the next stitch. In the article about hemming the bottom of trousers, you can watch a video on how to make a blind seam by hand - link at the bottom of the page.
Seam "Goat"
This seam allows you to attach hems made of thick, non-fraying fabric without making a second hem. Essentially, the seam consists of large crosses, which are obtained by alternately performing “back needle” stitches on one layer of fabric, then on the other. Suitable for hemming loose fabrics and for coats made of wool and boucle fabrics.
This type of hand stitch is also very often used in sewing clothes when hemming the bottom. And if you don’t know the secret stitch, then master this type of hem and then the question of how to hem a dress or skirt will disappear by itself.
American seam
How to hem the bottom of a skirt, blouse, dress made of chiffon, silk or other transparent fabrics? Use an American seam!
This type of hem is performed on very thin fabrics. Using a very fine needle, sew a basting stitch along the marked hem line. Then cut the fabric 5mm from this line and start rolling the cut with your thumb and forefinger over the seam line you made. Insert the needle into the resulting roll, pick up one or two threads of the main fabric and stick the needle into the roll again. Every few stitches, tighten the thread to secure the bolster to the fabric.
The method and choice of stitch type for hemming the bottom of the product depends on the density of the fabric and the shape of the hem line.
Knowing these basic hand stitches and types of seams, you will always know how to hem the bottom of a skirt or trousers, dress or coat. This will always be useful to you in life. Because we all periodically face the need to shorten a coat or skirt, trousers and other clothes.
Regardless of the style and composition of the product, you can shorten a dress in a short time without experience or special equipment. The tips below are especially relevant if you are suddenly invited to a party or other event, and your favorite dress seems old-fashioned. Thanks to our recommendations, you can change your outfit in just 15 minutes, emphasizing your figure.
Steps
Hem
- Measure and pin the new hem.
Whoever wears the dress must wear it. The second person should fold the hem of the dress to the desired length so that there is excess fabric on the back of the garment. Pin the hem along the entire circumference of the product and check the length.
- One thing to keep in mind is that the wearer of this dress will also wear the shoes to prom. Due to the height of the heels, the length of the product will also change.
- Another person must pin the hem together. If you try to do this yourself while you are wearing a dress, it may skew the length of the garment, resulting in a hem that is either too short or too long.
- Trim the original hem.
Take sharp scissors and cut off the excess fabric from the bottom of the dress. You need to trim enough fabric so that you have about 6mm extra left after the hem is finished.
- The hem seam itself will be about 3mm.
If you can't trim the old hem when the fabric is pinned, mark the new hem with a pencil and remove the pins before trimming the excess fabric.
Use a seam ripper and remove approximately 2.5cm of stitching from the hem side seams.
- These side seams are too bulky and almost impossible to thread through the presser foot of a sewing machine. For this reason, it is highly recommended to remove them before making a new hem.
Place it in the sewing machine and carefully lower the sewing needle, holding the hem there.
- The hem seam should be about 3mm. Fold the fabric under so that the seam is hidden on the inside of the hem and the selvage (edge of the fabric) is hidden under the folded hem.
Hold the needle down and snap the presser foot closed.
- Something to keep in mind is that if you don't have a presser foot that snaps into place and you need to screw it on, you'll need to do this before you insert the needle into your hem.
Slowly sew about five stitches on the machine. All you have to do is start stitching the seam and press it down.
Using your fingers, guide the unhemmed edge of the piece into the curved insert on the front of the presser foot.
- Make sure the needle is in the down position at this time.
This insert will guide the unhemmed edge of the product during sewing, folding it and bringing it to the stitching site. As a result, you don't have to manually roll up the rest of the edge; the machine will do it for you.
Continue stitching the hem along the entire length of the product. The presser foot will do most of the work, but you must manually pull the fabric slowly, carefully and correctly into the curved insert on the front of the presser foot.
- The edge of the fabric should be parallel to the edge of the presser foot, and the edge of the hem should be parallel to the right side of the presser foot.
If you work in parts, you need to start the process all over again with each new section.
Once the hem is done, the side seams should be pinned and sewn together with a straight stitch.
The owner of the product should try it on to see how the new hem looks. After this the process is over.
- Please note that this is the recommended method for hemming. Since the bottom of many prom dresses is not straight, but flared, the length of the product is uneven around the entire circumference. The initial hem may cause wrinkles because there is so much fabric being hemmed. When using this technique, as little fabric as possible is hemmed, therefore the risk of gathering is minimal.
Machine blind stitch
- Measure out a new hem and remove the old one.
The one who plans to wear this product must try it on, the second must measure how much material needs to be hemmed from the edge. After that, trim off the excess fabric with sharp scissors. Leave a 2.5 cm allowance from the edge for processing. The dress must be tried on together with prom shoes. The height of the heels matters when determining how the hem of the dress should be.
- You can measure the length of the hem using a tape measure and cut that way, but if you want a straighter hem, you'll have to mark the desired seam using sewing pins or a pencil around the entire circumference of the piece.
Fold over and press the raw edge. Fold the raw edge of the product inward and hide it on the wrong side of the product. You need to wrap about 6 mm of fabric. Press the new crease with a hot iron.
- There is no need to use sewing pins to secure the hem at this stage.
Fold and press the remaining part. Fold the remaining 1.8cm of fabric in the same direction as the original fold. Press the folded edge of the product with a hot iron.
Again, make sure that the folded fabric is hidden throughout the entire interior surface of the product.
- At this stage it is recommended to pin the new hem. Insert pins along the hem so that the heads are on the inside of the piece, away from the edge of the hem.
Attach the presser foot to the sewing machine. Screw the foot according to the directions on your sewing machine. This presser foot is needed to finish making the hem on the machine.
Read the instructions that come with it to determine how to do this.
- Fold the edges of the hem and place under the machine. Place the product on the wrong side. The folded edge should be placed towards the outside of the presser foot. Fold the edge over, leaving a narrow edge showing.
Place the product on the wrong side. The folded edge should be placed towards the outside of the presser foot. Fold the edge over, leaving a narrow edge showing.
- The heads of the pins will no longer be visible, but they will be facing out from under the fabric towards the sewing machine.
Move the fabric under the presser foot and place the presser foot flange on the new edge. When the needle comes down, make sure it sews up the remaining hem and sticks out the back of the fabric. Sew along the entire length of the edge until finished.
- Most seams will break at the edge, and every third seam or so will end up in the fabric.
The flange is the middle section of the presser foot and is often made darker or painted a different color to make it stand out. This part of the foot acts as a guide for the blind seam.
When finished, unroll the border and straighten the seam, carefully pulling out the hemming stitches so that the fabric remains as straight as possible. Use a hot iron to smooth out the gathers and try on the dress to make sure the new hem looks great. This completes the process.
- A blind seam will hide more sewing threads than a regular seam; this option is better for prom and other evening dresses. If the hem of the garment is too flared, or if you have hemmed the fabric too much, you may notice ruching along the hem.
Hand blind stitch
- Measure out a new hem and trim off any excess fabric.
The one who plans to wear this product should try it on, and the second one, using a tape measure, measure how much fabric needs to be hemmed. Then use sharp scissors to trim off the excess fabric.
- Make sure the dress wearer is wearing prom shoes when you take measurements. The height of your heels can make a big difference.
It will be easier for you to trim away excess fabric if the dress is removed.
- To make the seam even, it is recommended to mark the intended hem with straight sewing pins or a pencil.
- Leave about 1.25 cm of excess fabric beyond the length of the intended hem.
Hemming the bottom is one of those operations that even those who do not like to sew have to deal with. Of course, sewing curtains or adjusting trousers to fit your height can be entrusted to professionals, but almost every woman has had to deal with the problem of a torn hem or the need to shorten a skirt that is too long. This is not difficult to do, and perhaps, having mastered these simple operations, you will love to sew on your own.
Dress with braid
This method is suitable for dresses made of suiting or other dense fabric with a straight cut. The braid will give a smooth cut, forming straight, even edges. Mark the desired length and secure the hem with a pin. Make a mark with chalk or soap, draw a hem line. Don't forget about the allowance. In this case, it is about 1 cm. Sew the trouser braid along the top edge on the front side of the dress. Then make a hem and carry out a wet-heat treatment of the seam. Secure the bottom with a straight machine stitch along the wrong or right side. Similarly, you can finish the bottom of the dress with bias tape if the fabric is thin.
About edgings and underwear (lots of photos and words)
Hi all! Finally, I decided to write about my snails, my impressions and conclusions, a test drive, so to speak. Just had to sew the so-called.
Girls, does anyone sew T-shirts for girls with thin straps using piping? How to calculate so that the straps are the same length? I just can't do it. You have to baste it by hand, and then use the stitching machine, but it doesn’t look as beautiful as with the edging stitcher. Teach if anyone knows how
In the process of edging, I measure with a ruler: I edit the armhole of one main part, for example, the front, then there is an “empty” binding, it is measured from the beginning to the needle, I haven’t sewed for a long time, but something about 15 cm comes to mind (here it depends on what you have your sizes and preferences), then I put the back piece in the ribbon. Then the second strap-taping: first I will make an armhole on the back part, then an “empty” one - the same 15 cm, then I will make an armhole on the front. Of course, before edging the armholes, I first edit both main parts along the top edge (like the neckline), or I process them with lace. I usually make the linen strip from ERASER rib.
| nataazov I sewed “Week” panties for my daughter for kindergarten from a cotton woven bag It’s beautiful, but what is the turquoise and burgundy edging made of? How did they make the elastic in them? I edged all the panties with the same piping, first on one edge on an overlocker, and then with a double needle, I don’t have a sewing machine, and I only sewed a lace elastic on one of them, but I got so tired that I realized that it’s much easier with tape from a piping bag (for me personally). On the top there is elastic everywhere, except for some, 2 cm, there is a soft inside, a regular one on top, it was sold in a local store in different colors, sewn on with an overlocker. Actually, these are my first panties in my life! If anything, ask, I will help as much as I can)) I see, thank you. You so successfully selected the elastic band for the edging from the drawstring. So far, I’ve only used a white eraser to edge the cutouts for my daughter’s legs, and inserted a regular underwear elastic into the drawstring. I want to try sewing something differently, that’s why I asked. And I first attach the binding on the machine with a regular straight stitch, and then turn it back with a double needle, so you can make any width of the edging and the cutout does not stretch, like on an overlocker (or my overlocker needs to be adjusted). And I tried this rubber band. Still, the ones with eraser edging are our favorite ones; we didn’t go with openwork elastic. Perhaps we need to grow up to them. |
Knitted dress
If your outfit is a floor-length dress, then the bottom of the product can be processed in two ways: the first is with a cover stitch, the second is with an overlock stitch. In the first option, the seam is made by a special machine, which is not available in every studio. But it can be done at home, spending a little more time.
Cover stitch
Measure the length of the product, leaving 2.5 cm for the allowance. Process the cut on the overlocker, make a hem along the intended line and lay the first line along the wrong side 1 cm from the edge of the product. The second line must be made the width of the foot (0.5-0.7 cm) from the first line. When finished, iron the item using the steam function.
Overlock stitch
Everything is very simple here. Measure the length of the product, adding 0.5 cm. Cut off the excess fabric along the marked line and sew an overlock stitch of medium width.
Three ways to hem clothes
Sadie sweater in textured knit fabric.
Although the average person's wardrobe consists mainly of knitwear, many seamstresses sew almost exclusively from woven materials. Sewing with knitted fabric can be easy, no matter the type of sewing machine you use. In this tutorial I'll cover three techniques on three different machines for hemming knits.
Sewing machine hem
You don't need to use a specialized machine to embroider knits. When sewing knits on a standard home sewing machine, you will need to use stretch stitches.
Super stretch stitch is a stretch stitch that looks like a straight stitch. Although this stitch looks like a straight stitch, the needle makes small jumps back, which gives this stitch flexibility.
- Press the seam allowance to the wrong side of the garment and secure with a pin.
- Right side up, start anywhere on the round hem - I like to start at the seam. Make sure the needles are positioned so they penetrate both layers of fabric.
- Stitch around the edge of the garment until you return to the beginning of the stitch line, then overlap the stitches by about 1/4″.
- Lower the feed dogs and sew 3-4 stitches in place to secure the stitching.
Fitted edge
Stitching provides a professional finish. Use this technique to create a stitched edge with ease.
- Press the seam allowance to the wrong side of the garment and secure with a pin.
- Right side up, start anywhere on the round hem - I like to start at the seam. Make sure the needles are positioned so that they penetrate both layers of fabric.
- Stitch around the edge of the garment until you return to the beginning of the stitch line, then overlap the stitches by about 1/4″.
- Raise the needles to their highest position, then raise the presser foot. Using a small object such as a seam gauge or seam cutter, pull the needle threads towards you, then cut.
- Pull the garment towards the back of the machine, then cut the bobbin thread (or looper thread). This will pull the needle threads towards the wrong side of the fabric.
- To secure, tie the threads and cut them.
Serrated countersunk edge
On knits, wool fabrics are primarily used to create strong, flexible seams, but you can also use them to create a hidden hem.
- Press the seam allowance to the wrong side of the garment and secure with a pin.
- With the wrong side of the fabric facing up, fold the hem toward the right side so that 1/4 to 1/2 inch of the raw edge is visible.
- Set your machine to make three overlock stitches, lower your needle tension (this will depend on the weight of your fabric, but I like to start with 2) and set the stitch length to 4.
- With the wrong side facing up, place the edge under the presser foot. Pass the fabric through the gland, pushing the needle through the folded edge of the fabric. The closer to the edge of the fold, the smaller the stitches on the right side will be.
ADVICE. There are blind hem feet that will make this job a breeze. Blindstitch feet are available in 0.5 for light to medium fabrics and 1.0 for medium to heavy fabrics
Ready to start your next project?
Expand your wardrobe and your sewing skills with one of our gorgeous knitted patterns.
Put your new knit hemming skills to the test with the Alice Tee.
- The Piedra dress is easy to customize and great for layering.
- Sew a cozy top using Sadie's pattern.
- Every wardrobe needs a classic tee like the Alice Tee.
- Create a vintage-inspired cropped sweater with the Astoria Sweater.
And be sure to check out our helpful guides.
Check out these knitting tips here on WeAllSew.
,
Dress for the occasion
The bottom section of the dress can be trimmed with lace. This method is relevant for elegant items or clothes that already have trim. Measure the length and cut off the excess fabric along the marked line. You can sew lace in two ways:
- First: overcast the cut along the front side and stitch the lace.
- Second: place the lace on the fabric “face to face” and sew 0.5-1 cm. Secure over the lace and iron the seam. Place a finishing stitch along the front side of the dress by 0.1-0.2 cm.
Dress with pleated skirt
It happens that you need to shorten a dress, the bottom of which is embroidered with stones, decorated with lace, embroidery, or is a complex technological process. In such situations, shortening occurs at the expense of the waist. Step-by-step instructions:
- Determine the length.
- Flog your skirt.
- Measure your current waist circumference.
- Mark according to the seam allowance.
- Trim off excess fabric.
- Measure the circumference of the skirt at the waist.
- Subtract the smaller from the larger number.
- Divide the final number by 2.
- The result is the number of centimeters you need to remove along the side seams.
- Line up the seams and sew the skirt to the top of the dress.
- Overcast the seam and perform a WTO.
Agreement for the processing of personal data
Hereby, in accordance with Federal Law No. 152-FZ “On Personal Data” dated July 27, 2006, you confirm your consent to the processing of IP Dunaev N.A. personal data: collection, systematization, accumulation, storage, clarification (updating, changing), use, transfer solely for the purpose of collecting and transferring goods to you in your name. IP Dunaev N.A. guarantees the confidentiality of the information we receive. The processing of personal data is carried out for the purpose of effective execution of orders, contracts and other obligations accepted by IP Dunaev N.A. as binding upon you.
It is hereby specifically stipulated that you consent to the transfer of your personal data to transport companies, Russian Post or another organization through which Dunaev N.A. sends your order.
This consent applies to the following personal data: last name, first name and patronymic, email address, registration address, postal address for delivery of orders, contact phone number, payment details.
The validity period of your consent is unlimited, however, you have the right to withdraw this consent at any time by sending a written notification to the address: 153025, Ivanovo region, Ivanovo, Zvezdnaya St., 33, for IP Dunaeva N.A. marked “withdrawal of consent to the processing of personal data.”
Personal data privacy policy
This Personal Data Privacy Policy (hereinafter referred to as the Policy) applies to all personal data that Dunaev N.A. may receive from the client when the client uses the official website - IvTekstil-shop.ru (hereinafter referred to as the Site), uses services, purchases goods, participates in advertising and marketing campaigns or promotions and/or other interaction (hereinafter referred to as the Services).
IP Dunaev N.A. does not control and is not responsible for third party websites, which the client can access via links available on the website IvTekstil-shop.ru. Third party sites may have their own privacy policies and may collect or request other personal information from the customer.
This Policy explains how Dunaev N.A. processes and protects clients’ personal information.
Using the Services and providing IP Dunaev N.A. information necessary to initiate further interaction, you agree to its use in accordance with this Policy.
For specific Services, Dunaev N.A. may publish additional provisions that supplement this Policy.
1. Personal data of clients received and processed by Dunaev N.A. 1.1. For the purposes of this Policy, “customer personal data” means: 1.1.1. Personal data that the client provides about himself independently when filling out contact information on the Site or in the process of using the Services. The information required for the provision (provision) of Services is clearly indicated. Such information includes: last name, first name and patronymic, email address, postal address for delivery of orders, contact phone number, payment details. Other information is provided by the user at his discretion. 1.1.2. Other information about the client, the collection and/or provision of which is determined by IP Dunaev N.A. to provide certain Services additionally, which is clearly indicated when ordering individual goods or Services. 1.2. The client’s personal data provided by IP Dunaev N.A. is considered unreliable and may be blocked until consent is received from the client or his legal representative to process the client’s personal data in any additionally designated IP Dunaev N.A. form other than that provided on the Site.
2. Purposes of processing personal information of users 2.1. Dunaev N.A. processes only those personal data that are necessary to provide and improve the quality of the Services. 2.2. Personal information of the client Dunaev N.A. may be used for the following purposes: 2.2.1. Identification of the party as part of the provision of the Service. 2.2.2. Providing personalized Services to the client. 2.2.3. Improving the quality of Services and developing new ones. 2.2.4. Conducting statistical and other studies based on anonymized data. 2.2.5. Providing personal data to transport companies for the purpose of transferring goods to the client.
3. Transfer of the user’s personal data to third parties. 3.1. With regard to the client’s personal data, its confidentiality is maintained, except in cases of processing of personal data to which an unlimited number of persons have access provided by the client or at his request. 3.2. Dunaev N.A. has the right to transfer the client’s personal information to third parties in the following cases: 3.2.1. The client provided his consent to such actions. 3.2.2. The transfer is necessary to achieve the goals, implementation and performance of the functions, powers and duties assigned by the legislation of the Russian Federation to the individual entrepreneur N.A. Dunaeva.
4. Measures taken to protect the client’s personal data Dunaev N.A. takes necessary and sufficient organizational and technical measures to protect the client’s personal data from unauthorized or accidental access, destruction, modification, blocking, copying, distribution, as well as from other unlawful actions with the personal data of third parties.
5. Rights and obligations of the client 5.1. Dunaev N.A. takes reasonable measures to maintain the accuracy and relevance of information available to IP Dunaev N.A. personal data, as well as the removal of outdated and other inaccurate or redundant personal data, however, the Client is responsible for providing accurate information, as well as for updating the provided data in case of any changes. 5.2. The client can at any time change (update, supplement, block, destroy) the personal information provided by him or part of it, as well as its confidentiality parameters by contacting IP Dunaev N.A. 5.2.1. The Client has the right to withdraw consent to processing by individual entrepreneur N.A. Dunaev at any time. personal data by sending a written notification to the address: 153025, Ivanovo region, Ivanovo, Zvezdnaya St., 33, for individual entrepreneur N.A. Dunaev. marked “withdrawal of consent to the processing of personal data.” 5.3. The client has the right to receive information regarding the processing of his personal data IP Dunaev N.A. 5.4. To implement the provisions in clauses 5.2 and 5.3 of this Policy, Dunaev N.A. may require confirmation of the client’s identity by requesting the provision of such confirmation in any form that does not contradict the law.
6. Feedback. Questions and suggestions. All suggestions or questions regarding this Policy should be reported to IP Dunaev N.A. by phone 8-800-7000-936 or by email [email protected]
Impromptu method
If you do not have sewing and cutting skills, and you do not have a sewing machine, then use this method. Determine the length of the dress as indicated above. Leave a 2.5 cm seam allowance from the marked line. Double fold, press or baste the seam. Take a needle and sewing thread of the desired color, then secure the fabric with blind stitches. The hidden seam is made carefully, using a needle to pry up the upper threads of the two parts of the fabric. The stitches should be made oblique, small in size and at the same distance.
Remember: it is very important to visually imagine the entire process (sequence of actions), and then get to work. This way you can avoid mistakes and shorten your dress correctly.
How to reduce the size of the table | Home Guides
Whether you're trying to convert a rod desk to a standard size or want to create a low-profile piece of furniture, you can shorten an existing desk by cutting off part of the legs. The trick is to measure properly before cutting and start taking off less than you might need; after all, you can always shorten your table, but it's a little tricky to add height.
Measure your table from the base of the leg to the surface and mark the height. Measuring the entire table, not just the legs, will allow you to determine exactly how much you need to cut off to achieve the desired table height. If you only measure the legs, you may end up with a table taller than you planned due to the thickness of the tabletop.
Determine how tall you want your desk to be and then subtract that number from your measurement. This will give you the amount you should cut from the table legs. If you don't have a specific size in mind, standard furniture table height is usually 30 inches for dining tables, while bar-height tables are usually 42 inches high. So you'll have to remove about 12 inches from the bar-height table counter to make a standard dining table, or larger if you're looking for a low-profile piece of furniture in an Asian or Middle Eastern style. Keep in mind that for comfort there should always be 18 inches between the seat of the chair and the bottom of the table.
Remove the table legs from the tabletop using a screwdriver or drill with a screwdriver attachment. Most legs are attached to the table using basic brackets. Place the hardware in a safe place and measure from the bottom of the table leg up, noting the points where you will need to cut to shorten based on your previous calculations. Repeat this process with each leg.
Cut the leg to your markings with a table saw. If you don't have a table saw, you can use a miter box and a handsaw to make the cut; however, this will likely require more effort depending on the thickness and density of the leg. Repeat this process with the remaining legs until they are all shorter.
Sand down each leg at the cut to remove any splinters, then wipe it down with a damp cloth.
Reattach the legs to the table and turn it right side up. Use a level to check your work. If you measured correctly, you won't have to make any additional adjustments.
.