Sometimes in life a situation arises when you urgently need to shorten the sleeves of a jacket, shirt, dress or coat. If a person has at least a slight understanding of sewing, it will not be difficult for him to cope with the work. The main thing is to correctly determine the new length and carefully carry out the work according to the instructions. For those who do not rely on their own strength, it is better to contact a studio.
How to reduce sleeve length without cutting
Not all women want to cut off the material on their sleeves. Is it possible to reduce the length without cutting? Try this procedure:
- Measure the required sleeve length, fold, baste, and iron.
- Fold the bottom edge so that there is enough space to insert a wide elastic band.
- Insert a wide elastic band. You will get some really cute cuffs.
The stretched sleeve can be shortened through the top. To do this, the sleeve is evaporated and, raised by the required amount, sewn in again. Excess fabric along the edge can be left inside if it is not bulky. You can cut off the excess by processing the seam allowance with bias tape along with the armhole allowance of the front and back.
The first option is the easiest to implement: it is better to take a wide elastic band and apply it thickly to the sleeve. Get a stylish cuff.
This option can be implemented not at the very edge of the sleeve, but a little higher, at the 3/4 level. In this case, you will get an imitation of natural gathering, as if the sleeves were naturally rolled up. The elastic band in this version is fastened with hidden stitches, manually.
How to mark the hem line of a coat
Wear your coat with the clothes you will wear in winter or fall and have someone mark the shortening line with chalk. This is done like this: you should stand in front of the mirror without straining in the position in which you usually wear outerwear, and the other person should make the first chalk mark on the front of the coat. Gradually, you should turn to one side, and your assistant with a long ruler or triangle should remain in place and chalk marks on the front part.
The ruler should touch the floor, and the marks should be placed at the same distance from the floor. A continuous line is drawn along the marked marks, a hem allowance of 4-5 cm is added and the excess part of the coat fabric is cut off.
The hem of any coat is usually uneven (H) as the back stretches over time. This is facilitated by moisture (rain, snow), and since the drape coat is heavy, the back gradually stretches out much more than the side seams. In people with a stooped figure, on the contrary, the shelf stretches out. Therefore, you cannot rely on the factory cut of the coat and mark a new line from the old hem. In a long coat this discrepancy may not be noticeable, but in a shortened version it will immediately catch the eye. The new hem line can only be accurately determined using a ruler, taking measurements from the floor, as mentioned above.
Having altered jackets to a new model
With a complete overhaul, the operating principles are the same as described above. To begin with, the product should be pinned to a flat surface. Then completely open, straighten and smooth out its individual parts. After this, you can start cutting out new parts according to the pattern.
The most difficult operations for inexperienced tailors are joining seams and finishing details. For beginners, the seams are rough, and the corners are thick and sloppy. In general, considerable experience is required here. So, if you are not confident in your abilities, then it is better not to take it. Otherwise, there is a risk that you will hopelessly ruin the item.
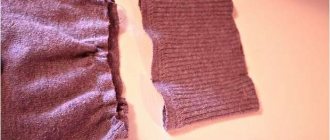
How to sew a chunky knit sweater?
Let's tell you how to do it quickly:
- Turn the sweater inside out.
- Mark the desired width with chalk or soap.
- Sew with large stitches, following the side seams.
- Let's try it on.
- If you are pleased with the result, feel free to sew the seams on a machine.
- We cut off the excess and sew the edges by hand or with an overlocker.
Interesting materials:
How to make a body of revolution in a compass? How to make dark gray? How to make dark green paint? How to make a dark mask in Photoshop? How to make the taskbar dark in Windows 10? How to make dark lipstick lighter? How to make dark lipstick? How to set a dark theme in email? How to make a dark theme in Compass 18? How to make a dark theme in Notepad++?
If the sleeves are long, what should I do?
Every person has knitted items. They are comfortable, practical, and keep you warm in cool weather. But the problem is that their sleeves often stretch or sag.
It's okay, they can be carefully hemmed. Knitted fabric differs from ordinary fabric in its structure, so you need to be patient in order to beautifully process the bottom of this part.
If a machine-knitted sweater has long sleeves, then we will do this work.
- On the product with cuffs, mark the new length. For example, you need to shorten it by 10 centimeters, measure 10 centimeters upward from the cuff with a ruler, draw a cutting line with chalk, leaving 1-15 cm for sewing on the cuff.
- Cut off the cuffs and sleeve along the marked line.
- We put a needle on the machine for sewing knitwear, selecting the “knitted stitch” function. If there is no such needle, then we leave the same needle, put a “zigzag”, the width of the step is 1-2, and the length is 2-3 to get an elastic seam.
- We remove the front part of the car and put the sleeve on the protruding part. We process the cut part.
- If the sleeve is too wide, step back 1 cm from the edge, sew a line in wide increments, and tighten it to the required size.
- Place the cuff face to face on the finished edge and sew with a zigzag stitch.
- We process the cuts using an overlocker or by hand.
What can be made from an old jacket
Depending on the condition of the skin and the presence of defects (cuts, abrasions, burst seams), the jacket is altered into a model with the same size or a reduction in size. You can also hide the damaged area under a decorative piece or restore it with liquid leather.
A relatively new trend is the combination of leather with cashmere, drape and other fabrics. This approach allows you to transform an old leather jacket into a new item of almost any style. The size and condition of the jacket do not matter, since all damaged areas can be easily replaced with fabric. During the alteration process, you can even change the color of the leather, repaint it for a better combination or, conversely, contrast with the color of the fabric.
Sequence of procedure
To ensure that the result of the work does not disappoint, you need to perform several basic actions in a certain sequence:
- Determine exactly the required length.
- Rip off the cuff.
- Shorten the part.
- Re-sew the cuff.
Useful tips
When determining the required length of a shirt, two basic rules must be followed.
- The correct sleeve length is determined by the location of the lower edge of the cuff: the cuff should reach the bone on the wrist that marks the attachment of the thumb to the hand.
- The optimal ratio of shirt and jacket: the shirt should extend beyond the edge of the jacket sleeve by 1.5 - 2 cm.
How to make a jacket smaller?
When a sweater has stretched out, how to return the product to its original appearance - a few simple procedures will help. In order not to completely ruin the clothing, before trying to restore it, it is recommended to pay attention to the manufacturer’s recommendations, which are indicated on the label. The problem is that some procedures will help reduce the size of the sweater, but may ruin its color.
When trying to repair warped clothing, you should consider what material it is made from. For example, 100% viscose is not very susceptible to shrinkage, but in most cases another thread is additionally woven into clothing. It can be synthetic, wool, cotton, etc. Therefore, such things will be easier to reduce in size.
Washing machine
Clothes made from acrylic or wool can be restored by washing them in a washing machine. It is recommended to select a mode that matches the product. The water temperature should not exceed +40°C. If the system device of the household appliance allows you to completely remove the spin cycle, then you should disable this function (draining the water will be enough). When it is completely impossible to disable this function, you should reduce the number of revolutions to a minimum. Automatic tumble drying should be abandoned.
To return the shape of a stretched item, it is necessary to remove excess moisture from it after washing it. You cannot twist the jacket like a doormat. It is necessary to squeeze lightly.
Handwash
Hand washing is a delicate process, but even this method does not exclude the possibility that the product may become deformed. To avoid damaging your clothes, it is recommended to choose a powder that does not contain alkali. The water temperature should be +30°C. Do not rub the product too hard. It is better to soak heavily soiled items in warm (not hot) water for 15-20 minutes.
When rinsing, you can add vinegar to the water. You cannot twist the jacket. If the product is made of thin threads, i.e. It does not absorb a lot of water; after washing, it is laid out on a horizontal surface. When a sweater has absorbed a lot of liquid, you can speed up the process of its release by compressing the fabric into one lump.
Drying correctly
Drying should not take place on a clothesline. The jacket should be laid out on a table (or other horizontal surface), straightened out all the folds, and then try to place all the rows of knitting as close to each other as possible. It is necessary to compress the product, but so that there are no kinks left on it. In this position, the clothes are left to dry. When all the moisture has evaporated, the sweater will retain its shape when dried.
Drying after washing by hand should be carried out according to the same principle as when restoring a deformed product using a washing machine.
Using a towel
If the sweater has stretched after washing, you can try to restore it with a towel. To speed up the drying process, it is recommended to change bath accessories several times. The towel is laid on a flat horizontal surface. The deformed clothing is placed on top and then stretched in the opposite direction from where the stretching occurred. As the towel becomes soaked, it is replaced with another, i.e. dry At each replacement it is necessary to level the jacket.
If the sweater has stretched wide after washing, then at the last change of the lining absorbent fabric, when the product is already semi-dry, it is recommended to fold the clothes and towel together. Such a roll can be placed on a heating device, for example, a radiator.
We use boiling water
If a jacket has stretched after washing by hand, you can try to save it with a sharp temperature change. To do this, the product will need to be soaked in hot water, the temperature of which is close to boiling, and left for 30-40 minutes. To make the liquid cool more slowly, the basin can be covered with a lid or another basin on top.
When the time is up, the sweater is wrung out (not twisted) and immersed in ice water. The product is left in it for 20 minutes, and then drying begins.
How much does it cost to have trousers sewn in a tailor?
TROUSERS
| TYPE OF WORK | Price, rub.) |
| Sew flares (from the knee with stitching) | from 650 |
| Sew the side seams without changing the volume of the waistband | from 450 |
| Sew side seams with waistband (excluding pockets) | from 650 |
| Sew side seams with topstitching | from 600 |
Interesting materials:
In what year did Karelia become part of Russia? In what year did Kaverin paint two captains? In what year of the Hijri did Prophet Muhammad's daughter Zainab die? In what year did Kolchak become an admiral? In what year did the Queen marry Tarzan? In what year was the Red Army renamed the Soviet Army? In what year did Red Square become red? In what year did Lviv become Ukrainian? In what year did the Kent cigarette brand appear on the Russian market? In what year did Mendeleev discover the periodic law?
How can you do without shortening
Even if the length of the product does not require alteration, on hot days there is often a desire to shorten it for a while. There are several ways to help with this.
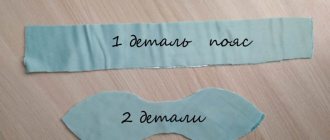
Application of decorative elements
The pata clasp and decorative button will make you feel comfortable and look elegant.
Reference! Pata is a special piece in the form of a strip of fabric that is used as a decorative element and also has a practical purpose.
To do this, you need to select a suitable fabric (you can use a contrasting fabric or companion fabric), cut a rectangle out of it for the pata. Folding it in half, outline the contours of the fastener. You should get a narrow rectangle (width 2 - 3 cm). One edge of the strip is made sharp-angled; this is where the buttonhole will be located. The patch is stitched from the inside, turned inside out, and ironed. A loop is made at the pointed end. Sew the fastener on the wrong side of the product.
Reference! The place where the patch is sewn is determined in the center of the outer side of the sleeve (opposite the side seam). From the shoulder line to the pata leave 10 to 15 cm.
Sew on the fastener using a double stitch. A button is sewn on the front side in the middle of this line. If necessary, the sleeve is rolled up and the pata is fastened with a button.
Rules for beautifully tucking sleeves with and without cuffs
A simple way to change the length is to tuck it.
To make a shirt with rolled up sleeves look beautiful, you need to follow some simple rules.
- Ironed sleeves look better after rolling up than wrinkled ones, so if possible, the shirt should be ironed.
- Rolling the cuff to fit gives the lapel a neat look.
- Having rolled up the sleeve to the elbow, you should straighten the folds so that the shirt looks somewhat careless.
What can you do quickly if it turns out that your shirt has too long sleeves?
A simple method that will not require time for alteration will help to slightly change the length of an important part of the product. You need to unbutton the cuff, fold it once so that the wrong side is on top, and then fasten the button again and straighten out the folds.
Shorten a coat with your own hands
Women are prone to change, and sometimes we are tempted to change something. Why not experiment and make a new, even more attractive one out of an old thing? Many girls have a favorite coat hanging in their closet, the style of which is outdated, or it is simply too long.
For example, by shortening the bottom and sleeves of your long-forgotten outerwear, you can make a stylish product that even the most advanced fashionistas will envy. You can even construct a jacket from a shortened coat, complementing it with various decorative trims. Shortening a coat with your own hands is as easy as shelling pears.
And you don't need complicated tools to do this job.
How to shorten a coat at home?
The services of an atelier will cost you more than shortening a coat yourself. Every girl will be able to trim, tuck and hem the bottom of the product. There's nothing complicated about it. The most important thing here is to correctly mark the line along which the excess fabric will be cut.
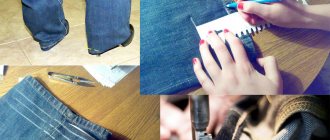
Stages of work:
- First of all, we decide on the length of our converted clothes.
- We pin tailor's pins to the desired length along the bottom of the product.
- Now we measure the cutting line of the material with a centimeter.
- Remove the pins. Lay out the coat on the table surface.
- We mark with chalk along the bottom of the clothing the size that we will remove.
- We draw a straight line along the previously marked points, and then put 4 cm down from it. We have created an allowance for hemming and hemming of our product.
- We secure the ends of the existing seams with a stitch so that they do not tear in the future.
- We duplicate the hem with adhesive tape, since we cut off the previously glued area, and now we need to restore the structure of the coat.
- We overlay the bottom edge of the coat, thereby protecting the cuts from fraying the fabric. If you do not have an overlock machine, then finish the cut with a zigzag stitch.
- Sew the bottom edge, focusing on the previously marked chalk mark.
- Now we sew the bottom of the lining fabric. The top line will be the hem line, the second line will be measured from the first line down by 4 cm, and the third line by 2 cm. We sew the top line with thread.
- We hem the corners along the bottom of the left and right sides. Now let's baste the lining.
- We begin ironing, after which we sew down the lining fabric along the bottom with matching threads.
- We sew the bottom of the coat with hidden stitches using the same 70-thick threads.
- Remove all previously basted threads.
- We carefully steam the shortened hem so as not to leave traces of basting.
- We put on the finished product and fasten the threads. We check that the length of the sides along the bottom edge matches.
How to shorten the sleeves of a lined windbreaker
Do the following:
- Turn the windbreaker inside out. Carefully open the top seam into the lining. Turn the sleeves inside out through the slits and press them away from the lining along the hem. Iron the fabric with a warm iron.
- Place the product on a flat surface, align the cuts. For convenience, they can be pinned together. Use chalk and a ruler to mark the length that needs to be removed. Trim off any excess fabric. Repeat the same steps with the lining.
- On the front side, mark the stitching line for the lining with chalk.
- Turn the windbreaker inside out and baste the fabric of the top and lining with a stitch 0.5 cm wide. Next, from the front side along the marked hem, bend the bottom and baste so that the seam under the lining goes up.
- From the wrong side, sew the hem to the top fabric. Remove the basting thread and stitch the hole made earlier on the front seam.
IMPORTANT! Be careful not to twist the lining fabric. To avoid this, pin the elbow and front seams of the lining to the elbow and front seams of the top fabric.
DIY frog costume for girls and boys
Why do you need a suitcase cover?