- Rubber;
- Textile;
- Thick paper (for stencils);
- Pencil;
- Ruler;
- Scissors;
- Pins;
- Threads to match;
- Needle;
- Wire.
The following steps in the work of creating an elastic band:
- We measure and cut out a strip of fabric material measuring 45 by 8 cm. With the front side, folded in half, we fasten along the entire length.
- The next step is to cut out a second pattern, but this time 30 cm by 12 cm. With the wrong side, fold it in half crosswise.
- Fold the fabric right sides four times so that the strip folds in half.
- Draw a model of the ear, which will serve as a future pattern. It is recommended to cut off excess fabric and unroll the material.
- We fold the resulting parts in half lengthwise and secure them with pins. Sew the finished pieces along the edge, leaving a small section for the hole.
- We iron the resulting parts and turn them inside out. To make it, you need to use a linen elastic band, which will be inserted into the strip with a pin.
- The sections that were left for turning must be sewn up. We pass the ears through the elastic band and tie them.
Requirements for hair bands
Such accessories are a must for long hair. When planning to make hair bands with your own hands, you must comply with a number of requirements:
- The product must be made of elastic and elastic material that can retain its shape well and hold hair.
- The rubber band must be safe to use. It should not injure the hair and scalp.
- For work it is necessary to use materials that are safe for health.
The elastic band for fixing the hairstyle should not catch the hair or have protruding sharp decorative parts. The product should be comfortable and safe for hair.
Tips and tricks
When making accessories, you should adhere to the following recommendations:
- At first glance, it seems that making a hair elastic is a simple matter. But some options require certain skills, so if you have no experience, you should start with simple basic models.
- When making it, it is better to take a little more fabric than required to be sure that there is enough material.
- In order to evaluate the harmonious combination of fabric and threads, you should sew a small piece before the creation process and select the appropriate color.
- Professional hairdressers recommend that when using a hair tie, secure it with bobby pins. Thus, the hairstyle will not change shape for a long time.
- Not every girl focuses on choosing a hair tie. But as with other accessories, it is important that it matches and harmonizes with your look.
Materials for hair-fixing elastic bands
You can use various available materials to make decorative elastic bands to secure your hairstyle:
- ribbons;
- braid;
- grosgrain ribbon;
- satin fabric;
- velvet;
- any other beautiful fabrics.
For additional decoration, it is easy to use beads, beads, buttons, lace, and rhinestones.
A non-standard approach to work will help you make stylish and beautiful hair ties from any leftover fabric.
For the base of the product, it is easy to use existing rubber bands, old hairpins, or purchase an inexpensive option for remodeling.
Often, underwear elastic is used for crafts. Much depends on the design of the future product.
It’s easy to make elastic bands to decorate your hair and hold your hairstyle in place. Making baby rubber bands will take no more than an hour. Detailed master classes will help you cope with the work.
Archives
ArchivesSelect month January 2022 December 2022 November 2018 October 2022 April 2022 March 2022 February 2022 December 2022 July 2017 June 2022 May 2022 April 2022 March 2022 February 2022 January 2017 December ь 2016 November 2016 October 2016 September 2016 August 2016 July 2016 June 2016 May 2016 April 2016 March 2016 February 2016 January 2016 December 2015 November 2015 October 2015 September 2015 August 2015 July 2015 May 2015 April 2015 March 2015 February 2015 January 2015 December 2014 November 2014 October 2014 September 2014 August 2014 July 2014 June 2014 May 2014 April 2014 March 2014 February 2014 January 2014 December 2013 November 2013 October 2013 September 2013 August 2013 July 2013 June 2013 May 2013 April 2013 March 2013 February 2013 January 2013 December 2012 November 2012 October 2 012 September 2012 August 2012 July 2012 June 2012 May 2012 April 2012 March 2012 February 2012 January 2012 December 2011 November 2011 October 2011 September 2011 August 2011 July 2011 June 2011 May 2011 April 2011 March 2011 February 2011 January 2011 December 2010 November 2010 October 2010 September 2010 August 2010 July 2010 June 2010 May 2010 April 2010 March 2010 February 2010 January 2010 December 2009 November 2009 October 2009
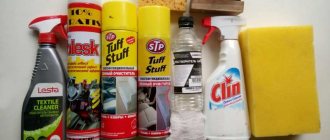
Tools
Working on decorative rubber bands to secure your hairstyle does not require the purchase of special tools.
You will need:
- regular ruler;
- sewing needle;
- small scissors with sharp tips;
- a burning device or a simple lighter;
- glue gun
When creating bows, it is convenient to use stationery clips to fix the workpiece on a piece of cardboard.
A simple elastic band made from a piece of fabric
The simplest elastic band for fixing hair from a shred is a sewn strip of fabric, inside of which an ordinary underwear elastic is inserted.
It’s easy to use a flap for work:
- velvet;
- knitwear;
- suit fabric;
- chiffon;
- silks.
The width of the textile blank varies from 30 to 45 cm. The length of the blank for a narrow elastic band is 7-8 cm, and for a wide one it is better to measure 12-14 cm.
Note!
- DIY satin ribbon bows: photos of original design ideas, step-by-step DIY master class
- DIY shadow theater: step by step how to do it at home! 175 real photos
DIY photo frames | How to make a simple and beautiful photo frame as a gift or for yourself from scrap materials
After cutting the workpiece, it is sewn along the seam by hand, leaving room for threading the elastic. Having passed the elastic inside, it is sewn together with several stitches. The remaining seam is carefully sewn up.
Skirt design
To calculate the design of a model cut on the bias, it is enough to measure the waist circumference and the length of the finished product.
- Prepare paper, pencil, long ruler. The silhouette pattern is built on paper or directly on the material.
- From the left corner, set aside the waist length measurement + 2 cm, divided by the number 6.28.
- Draw an arc to the perpendicular side of the paper. To control, measure the resulting arc with a measuring tape placed on the edge: its length should be ¼ of the waist measurement.
- Place the desired length of the product down from the arc.
- Bring the arc of the bottom edge to the perpendicular edge of the paper and cut out the resulting pattern.
- Fold the fabric lengthwise, creating four layers. Lay out the pattern and add seam allowances.
- Cut out a solid part of the product without side cuts. When unfolded, you should get a full circle with a hole, the length of which is equal to the length of the waist.
Children's master class on making rubber bands
Even a child can beautifully decorate an elastic band from satin ribbons with his own hands. Detailed instructions will help with this.
To work you will need:
- satin lilac ribbon 5 cm wide;
- crimson satin ribbon 2.5 cm wide;
- sewing needle and thread;
- a piece of glass;
- a device for burning;
- steel ruler;
- button or bead;
- universal glue;
- scissors.
Operating procedure.
- Cut 5 pieces of 7 cm length from the raspberry ribbon.
- Treat the sections with a burning device and place them on glass.
- Fold each piece in half, shiny side up.
- Run a running stitch and pull it together a little.
- Combine the petal blanks into a flower.
- Make 5 pieces of 10 cm long from lilac ribbon.
- Repeat the work according to the previous scheme, obtaining a slightly larger flower blank.
- Straighten the resulting flowers, glue or sew them.
- Secure a button or bead in the middle.
- Sew an elastic band on the wrong side.
Reviews
This toy is quite popular among children and their parents, and also arouses interest among teenagers. There are more positive reviews than negative ones; many are satisfied with its properties, colors, and smell. Handgam is great entertainment on the road or in long queues and relieves stress. But there are people who were dissatisfied. For what reasons were customers disappointed?
- Insufficiently elastic, hard. But this also has advantages - hardness develops arm muscles.
- Collects dust and dirt. Yes, handgams are difficult to clean, but you can teach your child to play at the table or there will be an extra reason for cleaning.
- It is difficult to clean clothes, hair and furniture. Such a flaw will help develop accuracy during the game.
- It has a pleasant fruity smell that makes little children want to taste nanogam. Handgam is not intended for children under three years of age, and children under six years of age are recommended to give this toy under adult supervision.
- Some people expected more, and the toy did not live up to their expectations and quickly became boring. The only useful thing here is experience.
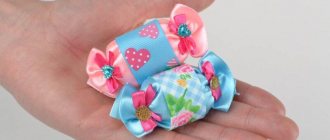
"Strawberries"
It’s easy to make your own hair bands in the shape of berries. The child will certainly be pleased with such decorations.
DIY elastic bands made from satin ribbons look elegant and very attractive.
Note!
- DIY bird feeder - interesting ideas on how to make it quickly and easily from scrap materials
- Do-it-yourself cold porcelain: the best options for porcelain products, step-by-step instructions and recipes for making it yourself (photo + video)
- DIY curtains - types of curtains, choice of materials for sewing and design + step-by-step instructions and simple patterns for beginners
To sew interesting strawberries you will need:
- red satin ribbon 20 cm long and 5 cm wide for a pair of products;
- green satin ribbon 5 cm wide and 10 cm long;
- a pair of elastic bands for the base;
- soft stuffing material;
- beads of light brown or yellow color.
Operating procedure.
- Make two pieces of red ribbon, 10 cm long, and two green pieces, 5 cm long.
- Cut 5 cm twice from a narrow ribbon.
- Carefully process the cuts with a lighter.
- Fold the red ribbon in half, right side inward. Sew the edge by hand so that you get a berry-shaped piece.
- Place the filling inside and sew it up.
- Cut leaves from green ribbon. Burn the edges with a lighter.
- Sew a narrow braid to the elastic band.
- Attach a berry with a leaf to the braid.
- Sew the second strawberry in the same way and sew it to the elastic band.
- Add berries with beads.
It will take no more than an hour to make these berries.
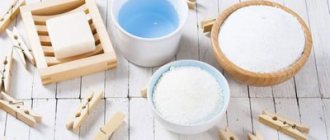
Why add borax?
Let's figure out what tetraborate is and why it is needed. This is another important component. In another way it is called “borax”. This substance is used as a thickener. Chewing gum for hands using it is more durable. The product is sold in any pharmacy at an affordable price.
When using borax, you need to be careful not to get it on your mucous membranes or in your eyes. The drug is chemical and can cause severe poisoning. It is advisable to use gloves and safety glasses.
Elastic band made from ribbon
Using ordinary nylon or satin ribbons, you can beautifully design an elastic band to secure your hair in literally half an hour.
There are many ways to make elastic bands from ribbons with your own hands.
Ribbon rose
To make a lush rose you will need:
- any tape (the longer the better);
- elastic band for base;
- sewing needle and thread.
Operating procedure.
- The prepared ribbon will need to be folded in half along its entire length.
- The edge at the junction of the halves is stitched manually with strong thread.
- The thread is pulled together to form a lush flower.
- The resulting rose is sewn to an elastic band.
Having a pair of identical ribbons, it is not difficult to make a beautiful set of two decorative rubber bands.
The elasticity of materials is the physics of elastic bodies and the beauty of harmony of the finished product
Most fabrics (especially mixed ones) have the property of stretching, tightly fitting the figure. When working with such a fabric, you must remember that the stretching properties are not cumulative. In other words, a more elastic material (elastic band) will fit around the waist. If you do not take this circumstance into account, not nice gathers, but ugly folds may form. Therefore, even with elastic fabric you need to work as with regular fabric, calculating the correct length of the rubber strip.
How it's done:
- We measure the required length, trying it on ourselves, so that the fit is comfortable and does not press anywhere;
- Draw a line at the place where we will sew;
- We mark it into equal sections (5-10 centimeters, so that it is convenient to cover the area with one hand);
- We stretch the tape and repeat the marks from the part on it;
- Sew from the edge.
It is convenient to pin adjacent sections in an extended position, this will allow you to finish sewing faster.
You can hit all the dots right away, and there are plenty of such tips on the Internet. But if the fabric is elastic, while 1-2 sections are being sewn, it may bunch up a little. As a result, the tension will be uneven.
It's better to act slowly. Using your hands, check that there is no stretch in the material and tighten the elastic strip, accurately aligning the marks on it and the area to be sheathed. If you practice on a couple of samples and master the technique, the result will be a great new thing that fits you perfectly and impresses men.
The technique is not complicated, you just need to understand that the elastic strip will shrink in any case when the item is removed. And when we sew, the item is not worn, so it looks a little different.
Therefore, when you decide to sew on an elastic strip, try on parts and things that are not quite ready yet. On the figure they look different and much more attractive than on the table.
Casual option
To fix your hairstyle at home, it’s easy to decorate a boring elastic band with tape.
- To do this, just wrap the elastic band with a ribbon, securing it with hand stitches.
- It is easy to sew a sausage from a wide ribbon, then passing a regular linen elastic band through it. Fasten the elastic band and stitch the edges of the sausage manually.
Elastic band with bow
Various bows are a classic option for decorating hairstyles.
To create an elastic band with bows you will need:
- a pair of rep ribbon blanks 20 cm long, 4 cm wide;
- a piece of tape 52 cm long, 2.5 cm wide;
- a pair of blanks made of narrow 0.6 cm tape, 20 cm long;
- elastic band for the base.
Operating procedure.
- Singe the cuts to prevent material shedding.
- Fold a wide ribbon 20 cm long in half. Iron the fold.
- Unfold the piece and fold the edges inward. Place them overlapping at the fold.
- Sew.
- Using a similar pattern, make a second bow and connect them together.
- Wrap a long ribbon three times around a cardboard blank, placing the turns sequentially.
- Sew exactly in the middle.
- Remove the cardboard to form a bow.
- First sew the first bow to the elastic band, taken as the base, then fasten it on top of the second one and straighten it.
- Make a bow from a narrow ribbon, add rhinestones, and glue it to the center.
Showing your imagination, it’s not difficult to make various bows with decorative additions from grosgrain ribbon.
Easy way to create
How to make an elastic band with your own hands? This option is one of the easiest to manufacture. To create such an accessory you will need:
- fabric of arbitrary width (length 40-50 cm);
- linen elastic (15-20 cm);
- needle;
- pin;
- scissors.
Process of creation:
- A piece of prepared fabric should be folded in half and sewn along the edge.
- We fold the stitched product with its edges facing each other and stitch it, leaving a small hole for turning it inside out.
- Turn the workpiece inside out.
- Insert the elastic band and tie it.
- Sew up the hole.
The finished accessory can be decorated with various stones and beads, but it is also suitable as an independent product.
Kanzashi elastic band
To create a delicate chamomile using the kanzashi technique, you need to prepare in advance:
- white satin ribbon 0.5 cm wide;
- yellow tape 1 cm wide;
- a piece of yellow felt;
- glue;
- elastic band;
- sewing needle and thread.
Operating procedure.
- Make 29 pieces of white ribbon, 8 cm long.
- Fold in half and burn the edges with a lighter.
- Sew a yellow ribbon and assemble it on a thread.
- Sew a circle from the resulting accordion.
- Cut a circle of felt 4 cm in diameter. Cut, retreating half a centimeter.
- Glue the petals in rows to the felt base.
- The first row consists of 16 blanks.
- For the second one you will need 13 petals.
- Glue the yellow piece of tape in the middle.
- Sew an elastic band on the back side.
If desired, you can complement the magnificent daisies with buttons in the shape of butterflies or ladybugs.
Making rubber bands with your own hands is a fascinating process, and it’s easy to involve a child in it. There are a lot of options for decorating rubber bands. They are limited only by the imagination of the master.
In conclusion
If desired, you can even make elastic bands - hair spirals - from the appropriate materials; however, we have only told you about the simplest methods for creating this essential accessory. This process is incredibly exciting and will allow you to create a true work of art, the value of which also lies in the fact that you made it with your own hands.
The additional video in this article will help you better understand the basic principles of making hair clips.
Did you like the article? Subscribe to our Yandex.Zen channel
Text \ Photo Ekaterina Posted 10/11/2015
0
share:
To favorites
To print
If you want to thank, add clarification or objection to the author - add a comment!
Currently being discussed:
- Lyubov Burkina
20.08.2018
What hair color should I choose? Please give me some advice. I don't know which one I have...
- I
19.08.2018
I had eyelash extensions for 6 months and took a break. After 3 months I increased it again...
- Vasilisa
18.08.2018
Cool hairstyle
18.08.2018
Hi, can I dye my bleached hair (currently red) bright purple...
16.08.2018
Hello! I am a dark girl with black eyes. I want to dye my hair dark...
15.08.2018
The photo shows young beauties. Can older ladies have their eyebrows done? Age...
Comments »