Hello, dear craftswomen!
Today, I propose to supplement your knowledge with another master class that will teach you how to fold knitwear.
Let me remind you that we already have several master classes on hems (and not only))) in our collection. Enjoy it for your health!
A store-bought item does not always suit our height. Often the product requires changes. By shortening the length of the sleeves and hem, it becomes more comfortable, fits better on our figure, and this is worth a lot.
How to shorten the sleeves of a knitted sweater by hand and by machine
Hello, dear craftswomen! Knitted items often stretch, especially sleeves, so they need to be hemmed correctly. Experienced dressmakers will quietly and carefully tell us how to shorten the sleeves of a knitted sweater by hand.
If the sleeves are long, what should I do?
Every person has knitted items. They are comfortable, practical, and keep you warm in cool weather. But the problem is that their sleeves often stretch or sag.
It's okay, they can be carefully hemmed. Knitted fabric differs from ordinary fabric in its structure, so you need to be patient in order to beautifully process the bottom of this part.
If a machine-knitted sweater has long sleeves, then we will do this work.
- On the product with cuffs, mark the new length. For example, you need to shorten it by 10 centimeters, measure 10 centimeters upward from the cuff with a ruler, draw a cutting line with chalk, leaving 1-15 cm for sewing on the cuff.
- Cut off the cuffs and sleeve along the marked line.
- We put a needle on the machine for sewing knitwear, selecting the “knitted stitch” function. If there is no such needle, then we leave the same needle, put a “zigzag”, the width of the step is 1-2, and the length is 2-3 to get an elastic seam.
- We remove the front part of the car and put the sleeve on the protruding part. We process the cut part.
- If the sleeve is too wide, step back 1 cm from the edge, sew a line in wide increments, and tighten it to the required size.
- Place the cuff face to face on the finished edge and sew with a zigzag stitch.
- We process the cuts using an overlocker or by hand.
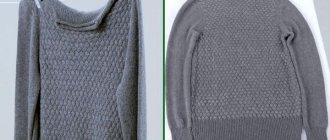
Trimming the sleeves of a sweater
If the sweater is knitted with a large knit, then we will do the following manipulation:
- Measure the required length on the sleeve of the sweater.
- Clinging to one loop, we pull on it until the part in this place gathers “into an accordion”.
- We cut the drawn thread on both sides.
- The part splits into 2 parts.
- We wind the lower part into a ball.
- On the top part we put all the loops on a knitting needle or hook. Close as with normal knitting.
You can crochet new cuffs to finish off the sleeve beautifully.
Little tricks for repairing knitwear
Short women often face this problem: the long sleeves of their favorite dress make it difficult to wear this product. They need to be hemmed using different techniques.
Blind seam
The blind seam, made by hand, looks great.
- First, bend the sleeve to the required length, iron it without smoothing the fabric, but applying the iron so as not to stretch the stitching.
- Then sew a basting stitch.
- Next, choosing one of the hidden seams, fold the sleeve of the dress.
Oblique seam
A running bias stitch is perfect for holding layers of fabric together. The needle goes from top to bottom or bottom to top.
The best choice is a seam where small spaces are left between short stitches.
Seam, needle forward
You can hem this part with a seam similar to machine stitching. This is the most reliable of the hand stitches:
- Insert the needle into the tissue, then after 5 mm bring it forward.
- Insert the needle again, stepping back from the needle exit point by 3 mm.
- Pull the needle out at a distance of 6 mm (= double stitch length).
- Then bring the needle to the point of the first needle withdrawal and bring it out again at a distance equal to twice the length of the stitch, continue in the same way from right to left, as in the figure.
Another type of stitch, which is performed from right to left, will help to hem unnoticeably.
Goat
The finishing seam “Kozlik” is also considered strong and reliable. Its disadvantage is the ability to catch on something sharp.
The stitch should be done from left to right.
- Finish the bottom of the sleeves with an overlocker.
- Turn the hem allowance inside out and press.
- Hem with a goat stitch.
To do the job correctly and accurately, use a needle to grab one or two threads of the fabric above and below from the edge of the overlock stitch. The distance between the grips is approximately 1 cm, but no more. Before fastening the thread, stretch the fabric slightly.
How to make decorative stitching
To decorate a dull project, you can highlight the hem stitches with a different color thread using a double or triple decorative stitch. The optimal stitch width is 2.5 cm.
Finish the bottom of the sleeves with an overlocker. Turn the hem allowance inside out and press.
Use a blind stitch on your sewing machine. Adjust the stitch width so that the needle lightly catches the fabric at the fold. Try it on a separate piece of paper first.
Then sew a seam along the exposed edge of the hem allowance. The best stitch length is 1 mm.
Double seam
Also finish the bottom of the sleeves with an overlocker. Turn the hem allowance inside out and press.
Sew with a double needle. Thanks to the double needle, the finished seam will remain elastic, which is required for knitwear.
How to fix a stretched sleeve
When wearing knitwear, the sleeves often stretch unsightly.
Stretched sleeves can also be shortened. This work can easily be done on the sleeves of a jumper knitted in stockinette stitch.
If the elastic bands on your sleeves just stretch, you can easily use the method suggested in this video.
First, we will determine the length by which we will shorten this part and measure it on the product.
We begin to separate the cuff from the sleeve. We will do this along the 2nd row above the cuff, so that later the upper part of the sleeve can be easily attached to the 1st row of stocking stitch.
Reduce the size of a wool sweater
First you need to determine the type of material from which the jacket is made. There are materials that shrink significantly when washed. So it’s enough to wash the item and not sew it up. These types of fabrics include wool, cashmere, fleece and some types of knitwear.
If the fabric is not of this type, you can still try using a special washing method.
- To do this, soak the item in hot water for one hour, the time is approximate, not exact. You don't have to add powder, although for wool you can use a wool product (preferably a liquid product).
- Then wash it in the machine on the delicate cycle or by hand in water at a temperature of at least 60 degrees. Attention! If you try to correct the size of a sweater in the washing machine, it may not shrink evenly, the wool may change its structure and the overall appearance may change.
- Automatic spinning also contributes to fabric shrinkage! Be careful with delicate fabrics. However, if the jacket is made of particularly delicate fabric, then this should not be done so as not to damage it. Delicate fabrics include cashmere and angora wool.
- Do not hang the item washed in this way on a dryer or line, but place the jacket on a fabric that perfectly absorbs moisture, straighten it and leave it to dry.
After such actions, the jacket should decrease in size. Materials that do not shrink when washed will need to be sutured. This can be done in several ways. To reduce the sleeve part, you need to unravel the seams in the place where you need to remove the excess, and then stitch again, but with a larger margin.
You can also change the size of the sweater by adding darts to it. This method is good if you also want to slightly change the style of the product. Usually darts are made in the waist area. On the wrong side of the sweater, outline the lines of future darts. A mark is made along these lines, after which the jacket needs to be tried on.
If the size is back to normal, then the dart lines can be machine stitched. In addition, you can narrow the waist area by reducing the size of the sweater at the side seams. To do this, simply make a running stitch parallel to the existing seam.
How to make a T-shirt shorter without cutting the length
T-shirt length is a common problem for both women and men. It happens that the width of a T-shirt suits you, but the length turns out to be too big. Usually this happens to people of short stature. In this case, you need to shorten the T-shirt in length.
This is definitely not worth doing manually, as the knitwear stretches along the bottom, and hand hemming will not last long. Ideally, this operation is performed using a special stitching machine, but not everyone has one. It is also missing from my arsenal of sewing equipment. I only have a sewing machine and an overlocker. But even with them you can hem a knitted T-shirt very simply.
Many people are afraid to take on work with knitwear and this is completely in vain. If you know some points, then such an operation will not seem so complicated.
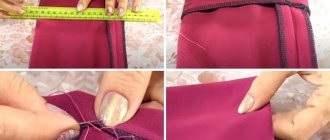
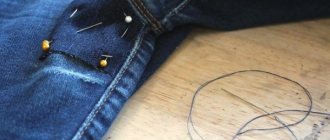
First, you need to decide how long you need to shorten the T-shirt. In this example, it was 5 cm. Then pin the T-shirt along the shoulder seams, folding it in half, along the bottom of the armhole under the sleeve and lay the product on the table. Flatten it so that there are no creases anywhere.
Pierce the bottom of the T-shirt with needles, draw a new length taking into account the hem of about 2-2.5 cm and trim. In this case, the bottom of the T-shirt is not flat, but slightly sagging. If you need to cut the T-shirt evenly, then draw a perpendicular line to the middle of the T-shirt. It is better to do this using a ruler - a square.
Then I overlocked the bottom and ironed it.
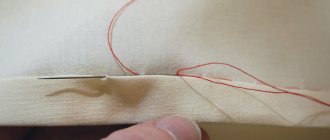
After that, I measured a distance of 2 cm from the cut and drew a new bottom line. I pierced the fold line with needles and basted the seam allowance slightly below the overlock stitch.
She pulled out the needles and ironed the seam allowance.
In order to hem knitwear on a machine, I use special needles for knitwear or stretch materials. I like this brand of needles the most. They are of very high quality and have shown themselves to be excellent in working with knitted items.
My machine has a special stitch for such operations, but I use it in the case of looser knitwear, when the stitch configuration is less noticeable. Here I was dealing with a smooth version of knitwear, so I chose a regular straight stitch.
It is better to lay it along the front side, having previously measured the length from the fold line so that the stitch covers the overlock seam from the inside. That is, a little less than 2 cm.
In order for the stitch to lie flat and have a small stroke as a result, during the operation it is necessary to slightly pull the fabric behind the foot. It's behind, not in front. If you do this slowly, the stitching will turn out smooth and uniform.
After this, you can remove the basting and finally iron the seam allowance along the bottom. This is what the T-shirt looked like after the repair. The long T-shirt became a little shorter.
If you master the simplest operations, then repairing clothes will not be anything daunting for you. With a little practice and time, you can save your family budget thanks to your new skills.
I will be glad if this lesson is useful to you.
Share it with your friends and subscribe to the site news so that you have the opportunity to receive useful and interesting letters from me!
I wish you all success in mastering new skills and successful repairs!
Sewing a T-shirt
If none of the above methods suits you, in order to reduce your T-shirt size yourself, you can try sewing the item. This will be a longer method and you will need to spend a fair amount of time and effort to complete it.
How to properly cut a knitted item or convert a pullover into a cardigan
It happens that there are quite good things lying in the closet. There could be many reasons for this. In knitwear, for example, the neckline may be too small (in children's clothing this occurs at every step) or the size may simply become too small. There is a way to change the model without bandaging and use a simple trick to turn a pullover into a cardigan. To do this you need to cut it correctly.
How to cut a knitted item correctly
What is needed for this
Step 1. Find the center of the front and mark it by passing a thread of a contrasting color BETWEEN THE LOOPS (this is important!)
Step 2. Select threads that match the color (as you can see, contrasting ones look very interesting in this case) and a hook. We bend the product along the intended line and, grabbing the threads of the loop closest to the line, we knit a series of half-columns. How this is done can be clearly seen in the picture. We repeat the same on the other side.
This is what should happen. I think it's very cute.
Now take the scissors and cut the threads of the center line. As you can see, it’s very simple, you just need to do everything carefully.
I simply crocheted the neckline.
Now we just cast on the knitting loops for knitting the straps as we usually do. We knit a bar.
And here is the result. It looks just great!
This method does not require additional fastening of the cut edge; crocheting holds it perfectly.
Did you like the article? Subscribe to the channel to stay up to date with the most interesting materials
Source
Advantages and disadvantages of the noodle dress, who suits the style
Most women at least once in their lives have a question: how to shorten a dress? There can be many reasons for this. Here are some of them.
- On a thinner figure, the item fits looser, making it longer.
- An outdated model can be revived by making it shorter.
- Boring length of the product.
- Change of style.
If you have chosen a dress to shorten and made a firm decision to modify it, you need to know the main points, using which you will get an excellent result. This is especially true when you need to shorten quickly. We'll tell you how to turn a long dress into a short one.
What to combine with
The noodle dress is a universal option for almost any occasion: be it a date, workdays or a holiday celebration. You just need to know a few rules that will make combining such an outfit with other clothes much easier.
In order not to make a mistake and choose a dress that will look good on your figure, follow these recommendations:
- A noodle dress made of fabric with added elastane is perfect for pregnant girls. This fabric has excellent stretch, is pleasant to the touch, and very soft;
- A long noodle dress below the knee is contraindicated for girls with short stature or disproportionately short legs. It visually “cuts” the leg just above the ankle, making it 4-5 centimeters shorter, which reduces height;
- A noodle dress with a slit at the back or side is perfect for a romantic date or photo shoot and will add a sexy, feminine feel to your look. For a winter outfit, the cut should not be more than 10-15 centimeters. Bare thighs will look out of place in winter weather;
- For girls of short or medium height, it is better to choose an outfit that is knee-length or slightly higher in order to balance the figure and make it more proportional;
- A short-sleeve noodle dress is suitable for autumn-spring or summer; it will look beautiful with heeled sandals, pumps or platform sandals;
- A dress with long sleeves is perfect for the winter period; it will look appropriate both at a business meeting and at a birthday party.
If you don’t have much time to choose an outfit, and the desire to conquer everyone with your sense of style is endless, you can draw inspiration from ready-made looks using a noodle dress as the main element:
- To create an office look, a noodle dress can be combined with jackets or blazers made of thick, textured fabrics. Pumps and mid-heeled sandals are perfect for this combination. Accessories include stud earrings or a watch on a wide strap;
- For a bold, unusual look, a noodle dress is combined with a leather jacket, flat boots, and massive jewelry in the form of chains or bracelets;
- For an autumn look, you can add a wide belt to match the dress or a contrasting one, high-heeled boots, a coat with a zipper or buttons. A shawl or scarf, originally tied around the neck, will look beautiful;
- For a winter look, you can add leg warmers or thick leggings to the dress if the dress is above the knee length. Leather gloves will be an original addition.
Using these simple rules, choosing a noodle dress and creating a wonderful look with it will not be difficult!
Beautiful colors and shades
The choice of noodle dress color directly depends on the woman’s color type, her figure and taste preferences. But there are also classic options suitable for almost any occasion:
8 original ideas for remaking a sweater into a stylish and fashionable item
Each of us has a tired or out of fashion sweater. It lies quietly in the closet on the far shelf, but it’s a shame to throw it away. And often we do not associate the concept of an old sweater with a worn item; very often an old item can be in excellent condition, but for various reasons not be used.
One of these reasons is that the sweater has become too small and shrunk after improper washing. We suggest you remake it into something more current and stylish. It will take a little patience and imagination, and you will acquire a completely new stylish thing.
Dress made from an old sweater
If the sweater has become small, you can correct the situation with the help of fabric inserts. Choose a good color scheme and get to work. You will get such a cute dress, very little fabric will be used for such a dress, you can use scraps of fabric after sewing.
Stylish sweater bolero
A thin woolen sweater is suitable for this alteration.
Trim the bottom of the piece in a semicircle to make it a little longer at the back. Cut the front down to the neckline and secure with a beautiful pin or brooch. The result is a stylish bolero that can be worn with dresses. To make such an asymmetrical fastener, you need to take a larger sweater, so the sleeves will also have to be sewn in.
Combination of textures
If you have not only a sweater lying around, but also a jacket made of light material, then you can combine such different wardrobe details - you will get a very interesting, spectacular thing.
Trim the sleeves and length of the sweater at chest level. Sew part of the sleeve from the sweater to the short sleeve of the sweater. Make the bottom of the sleeve from part of a sweater. You will get an interesting cuff, in which the middle is made of fabric, and the bottom and top are knitted. Sew the rest of the jersey along the chest line. Our stylish multi-structure sweater is ready. Depending on the resulting length, the product can be combined with leggings, trousers, jeans or a skirt.
Spectacular embroidery on a sweater
You can update a plain sweater with embroidery.
If you do not know how to embroider, then buy bright appliqués at a craft store; they are easily attached with an iron. Embroidery will depend only on your imagination. The easiest way to embroider is fancy floral patterns and geometric patterns.
Lace grace
Without lace, this gray blouse would look completely boring. To make this alteration, shorten the sleeves of the sweater and sew on guipure of the required length. Cut off the bottom of the sweater in front and sew on the lace, as in the photo, although it is not necessary to cut the sweater; lace can also be sewn on top if you do not plan to widen the product towards the bottom.
Unusual dress
A sweater and, for example, a shirt can make an original dress. Take a plain sweater, shorten the sleeves, and add fabric “wings.” It is better to take a shirt in a contrasting color or with a print. Sew on the skirt and add decorative pockets. It turned out to be an interesting dress. By the way, such dresses can be found on sale in popular clothing stores.
Skirt made from an old sweater
What could be easier to remake an old sweater into a miniskirt or pencil skirt. Cut the sweater to the desired length. Sew knitted fabric, for example from an old T-shirt, to the top part or tie an elastic band - the skirt is ready!
Jacket in the style of Coco Chanel
You will need a sweater and contrasting fabric. For a light sweater, choose a dark fabric; for a dark sweater, choose a light fabric. Cut off the neckline, fold the sweater in half lengthwise, look for the middle and cut it exactly in the middle at the front. The edges are finished with fabric and imitation pockets are sewn on. The result is a fashionable jacket in the Chanel style.
Sofa cushion made from an old sweater
We've already cut up so many sweaters that we have a lot of knit scraps left. You can use them to weave a pillowcase like this for a sofa cushion. Make even stripes, trim the edges by tucking them inward. Then weave the strips in a checkerboard pattern and sew around the perimeter. It turned out to be an original pillowcase for a decorative pillow.
Did you like the article? Subscribe to the channel to stay up to date with the most interesting materials
Source
How to hem a T-shirt yourself?
Every girl at least once in her life has wondered how to hem this or that item on her own, be it a dress, trousers or a T-shirt. Today we’ll look at several ways to hem a T-shirt, both by hand and by machine. This article will be useful both for beginners in this business and for those who have already practiced sewing before. For all T-shirts, the algorithm of actions will be the same and may differ slightly depending on the fabric from which the product is made.
Various fabrics
As mentioned above, the technique of work and the choice of tools depend on the fabric. So, for linen, synthetics and cotton, you need to carefully consider the choice of scissors due to the high cutting resistance of the fabric, while for wool it is several times lower.
For thick fabrics, thicker threads and needles are used, and for thinner ones, vice versa.
The color of the fabric and thread should be as similar as possible so that the seam is not so noticeable.
There are fabrics that shrink after washing, so the product or only the area where it will be cut must first be subjected to a wet-heat treatment.
For silk and other fabrics that tend to fray, you need to leave a larger allowance, which will require an overlocker to process. Many professionals say that the edges of such fabrics should be finished at the basting stage.
Hemming on a sewing machine
Hemming a T-shirt, sweatshirt, top or anything else using a sewing machine is very easy. Need to:
- Measure the required length, mark and cut.
- Fold the T-shirt at the bottom, determining the distance at which the seam will be.
- Place the folded product under the machine foot with the wrong side up.
- Straighten and align so that the edge of the T-shirt is under the left needle.
- Install the stopper and start stitching so that the fabric does not tighten.
- Tie an end knot and hide it.
Manual hemming method
The fastest and cheapest option is to hem the T-shirt yourself at home.
If your product is made of dense fabric that does not fray, then you can safely trim it. And if there is a risk that the fabric may “move” or fall apart, then it is better to pre-process the edge with an overlocker.
After cutting, the bottom of the T-shirt must be finished with a hidden cross-shaped seam, which is usually called a “goat”.
Goat seam
This type of seam is quite simple to make; even a novice seamstress can handle it. One or two threads (at your discretion) are grabbed with a needle from below and above the cut allowance. In this case, you need to carefully ensure that the seam is not visible from the outside.
The item you are going to trim and hem must be clean and ironed.
How to hem a neckline
Sometimes, due to prolonged wear and frequent washing, the neck of a T-shirt can stretch and look different than when purchased. On the Internet you can find a lot of tips on how to hem a neckline. We will talk about several below.
- pins;
- hand needle for knitwear with a blunt tip;
- or a sewing machine.
Collar hemming method No. 1
- Turn the T-shirt inside out.
- Fold the edge of the collar and pin it with pins.
- Sew by hand or on a sewing machine.
It is important that in the end your seam is elastic!
Collar hemming method No. 2
There is another option for hemming a T-shirt collar, which involves cutting it off and then re-sewing it back on.
- Pull the collar away from the T-shirt.
- Spread the shoulder collar about two centimeters.
- Carefully smooth out the entire fabric.
- Cut the seam from the trim strip.
- Stretch the bar by ironing it.
- Finish any of the long edges with an overlocker.
- Place the T-shirt and placket with right sides facing each other.
- Baste so that the neckline and raw edge match.
- Cut off the rest of the strip.
- Sew the placket to the fabric.
- Unscrew the bar and baste.
- Sew the strip and topstitch it at a distance of half a centimeter.
- Sew and finish the shoulder seam area.
How to hem a T-shirt on the sides
Without using a sewing machine, a topstitcher and an overlocker, it is very difficult to hem a T-shirt on the sides. The last two tools can be replaced with a sewing machine that has an overlock stitch.
- Mark on the sides the places where the seams will later be.
- Trim the overlock seam at the sides and armhole, but do not cut the fabric.
- Mark the place where the seam will be (it is better to use a template).
- Fold the product in half, align the cutting lines and pin everything together.
- Mark the future armhole line.
- Pin together the back, hem and armhole.
- Fold the T-shirt along the seams at the shoulders and pin it in place.
- Cut off the excess fabric, leaving an allowance of about 0.7-0.8 centimeters.
- Fold the sleeves together, pinching them at the bottom.
- Mark the highest point on the rim line with chalk or soap.
- Make marks on the front and transfer them to the second sleeve.
- Remove the pins.
- Align the cuffs and armholes, as well as the cuff point and shoulder seams.
- Sew all seams.
It is better to sew the seams on the sides and sleeves in one go.
How to hem a T-shirt at the shoulders
Sewing a T-shirt at the shoulders is easy, since you don’t even have to rip the fabric.
How to properly cut a knitted item or convert a pullover into a cardigan
It happens that there are quite good things lying in the closet. There could be many reasons for this. In knitwear, for example, the neckline may be too small (in children's clothing this occurs at every step) or the size may simply become too small. There is a way to change the model without bandaging and use a simple trick to turn a pullover into a cardigan. To do this you need to cut it correctly.
How to cut a knitted item correctly
What is needed for this
Step 1. Find the center of the front and mark it by passing a thread of a contrasting color BETWEEN THE LOOPS (this is important!)
Step 2. Select threads that match the color (as you can see, contrasting ones look very interesting in this case) and a hook. We bend the product along the intended line and, grabbing the threads of the loop closest to the line, we knit a series of half-columns. How this is done can be clearly seen in the picture. We repeat the same on the other side.
This is what should happen. I think it's very cute.
Now take the scissors and cut the threads of the center line. As you can see, it’s very simple, you just need to do everything carefully.
I simply crocheted the neckline.
Now we just cast on the knitting loops for knitting the straps as we usually do. We knit a bar.
And here is the result. It looks just great!
This method does not require additional fastening of the cut edge; crocheting holds it perfectly.
Did you like the article? Subscribe to the channel to stay up to date with the most interesting materials
Source
How to shorten pants without hemming?
They say there are things, like adhesive tape, for folding trousers using an iron. No hemming. I would really like to buy it. Please help me find out the name of this thing. Thank you! I really hope for an answer!
cobweb? Be careful, sometimes the fabric melts or burns out along with the cobweb.
they say correctly, cobweb. It all depends on the fabric. The cobwebs quickly fell off my stretch pants - I had to hem them like a human being.
The web does not hold all fabric. Stretch, thick and loose - not very good. I glued the bottom of the trousers with fabric glue. Holds up well.
This web doesn't hold up for me either. Tried it 3 times. Take it to a clothing repair shop.
Non-woven fabric, if I'm not mistaken, it's called.
By the way, I have stretch trousers, and they hold up like family ones, no problems.
Alice, non-woven fabric is needed to make the fabric more rigid, and it only sticks to one side; if you need to glue something, you need web. Even earlier they were glued with thin polyethylene (transparent bags). but that was a long time ago))
Author, the cobwebs come off over time, it’s better not to be lazy and hem them.
They say there are things, like adhesive tape, for folding trousers using an iron. No hemming. I would really like to buy it. Please help me find out the name of this thing. Thank you! I really hope for an answer!