How to paint household appliances - refrigerator, washing machine, microwave
1 1 1 1 1 1 1 1 1 1 Rating 5.00 (4 Votes)
| There are situations when an annoying scratch appears on the door of a new refrigerator. Or you bought a new kitchen, and the old silver dishwasher does not fit into the updated color scheme at all. Or maybe there is a young artist in your family who, in a fit of inspiration, painted the microwave with indelible transforming robots? For all such cases, they came up with special paints for household appliances - and we will now tell you how to use them. |
Preparing for work
The very first thing you need to do before painting a piece of household appliance is to decide for what purpose painting is actually required. It's one thing if you just wanted to have an updated refrigerator. It’s completely different if there are deep scratches on the refrigerator through which rust has begun to spread. The work schemes in these cases will differ: in the second case, anti-corrosion cleaning and additional primer for the paint layer will be required.
Article on the topic: Gorenje Sensocare washing machine how to use
The next important step is choosing the right paint. Today, manufacturers offer many types of paints that are also suitable for painting household appliances. However, the use of universal compositions may not bring the desired result: household appliances are heated and cooled, and are constantly exposed to moisture and detergents - not every paint turns out to be durable enough to maintain a fresh look for a long time in such conditions.
For optimal results, we advise you to choose paints created specifically for household appliances. These are epoxy or acrylic aerosol compositions from the brands Decorix, Kudo, Bosny, Veslee and other manufacturers. High-strength aerosol paints in convenient small cans provide not only a fresh look to household appliances, but also high-quality protection from abrasions, damage and scratches. Also suitable for painting household appliances are paints for metal and paints for plastic in a wide variety of color variations: glossy or matte pure RAL shades, all kinds of metallic colors, paints with mother-of-pearl or hammer effect.
In addition to paint of the desired color and quality, you will need:
•
masking film and tape (to protect handles, rubber seals, panels from unnecessary painting);
•
sandpaper for sanding;
•
solvent and detergents (to clean the surface from accumulated household dirt);
•
primer (for filling scratches and leveling the surface);
•
respirator and gloves to protect yourself from paint.
Article on the topic: What brands of washing machines are there?
Preparing for work
Place the household appliance in a well-lit room, on a flat surface, and unplug it from the power supply. The room must be ventilated. It is important that there is enough space around for normal access to all areas that require painting. Clean all parts from dirt, grease, stickers; Use sandpaper to remove the old enamel layer. Instead of sandpaper, you can use a special paint remover: for example, ABRO aerosol remover effectively removes any type of paint, including from hard-to-reach places. If your refrigerator/washing machine/microwave is new and you just want to paint it or completely change the color, there is no need to remove the enamel.
Assess the surfaces to be painted for cracks, scratches and other damage affecting the metal: if any, carry out anti-corrosion treatment (for example, using a rust converter) and level the damaged areas with primer for painting. You can use separate acrylic primers (MOTiP, Veslee, Bosny), or take the Abro rust converter, which combines the properties of anticorrosive and primer. In addition, some ready-made colored enamels (notably Decorix and Rust-Oleum) also contain rust neutralizers. Pay attention to the color: for white, beige and other light paints it is better to use only white primer; for dark colors, gray and black primers are suitable.
Cover with masking tape or film those parts that do not need to be painted: metal logos and nameplates, locks and rubber seals, control panels, handles and buttons. Do not use ordinary stationery tape for these purposes: its adhesive traces are very difficult to clean off later.
Article on the topic: Why the washing machine does not pick up speed during the spin cycle
Prepare the required amount of aerosol enamel: usually manufacturers indicate paint consumption based on the area. On average, one small can is enough for 1.5 sq.m. If your household appliances need a fancy multi-colored design, mark the sketch and attach stencils.
Spray paint is applied evenly, from a short distance (30-40 cm). Keep the sprayer lever in one position - then the paint layer will be as uniform as possible. It is important to protect your respiratory system with a respirator: sprayed paint particles are unlikely to be beneficial to your bronchi and lungs, even if the paint has a non-toxic acrylic composition. Manufacturers advise applying paint for household appliances in 1-2 layers. Each layer of applied enamel must be dried - as a rule, modern aerosol enamel dries quickly.
The new look of your household appliances is ready. Carefully remove the protective films and stencils, check the quality and uniformity of the coloring, check the evenness of the lines, and if necessary, correct the flaws with a new layer of enamel. For a more effective result, you can additionally treat the new paint layer with a fixing varnish, which is available in the Bosny and Veslee paint and varnish lines.
Painting household appliances yourself is not very difficult and does not require significant material costs (compared to buying new appliances). In any case, you get not only an updated look and protection from chips and damage, but also a unique color scheme for your refrigerator or washing machine, which depends only on the flight of your imagination.
Article on the topic: Why urgent repair of washing machines is needed
Visitors to this page most often choose from the online store:
Complex types of pollution
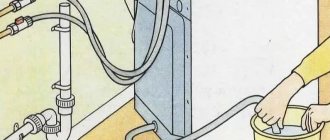
It is not always possible to get rid of rust stains on clothes using the above method. If the washing machine has been used for a long time, but is rarely cleaned, and the operating instructions are not followed, then over time a lot of debris can accumulate inside it. Debris clogs the filter and outlet valve. As a result, the water slowly seeps out, and debris, including rust flakes, remains inside. You will have to clean the filter, tank, valve and cuff from dirt and debris. They can only be removed by disassembling the washing machine.
How to paint household appliances - refrigerator, washing machine, microwave
1 1 1 1 1 1 1 1 1 1 Rating 5.00 (2 Votes)
| There are situations when an annoying scratch appears on the door of a new refrigerator. Or you bought a new kitchen, and the old silver dishwasher does not fit into the updated color scheme at all. Or maybe there is a young artist in your family who, in a fit of inspiration, painted the microwave with indelible transforming robots? For all such cases, they came up with special paints for household appliances - and we will now tell you how to use them. |
Preparing for work
The very first thing you need to do before painting a piece of household appliance is to decide for what purpose painting is actually required. It's one thing if you just wanted to have an updated refrigerator. It’s completely different if there are deep scratches on the refrigerator through which rust has begun to spread. The work schemes in these cases will differ: in the second case, anti-corrosion cleaning and additional primer for the paint layer will be required.
The next important step is choosing the right paint. Today, manufacturers offer many types of paints that are also suitable for painting household appliances. However, the use of universal compositions may not bring the desired result: household appliances are heated and cooled, and are constantly exposed to moisture and detergents - not every paint turns out to be durable enough to maintain a fresh look for a long time in such conditions. For optimal results, we advise you to choose paints created specifically for household appliances. These are epoxy or acrylic aerosol compositions from the brands Decorix, Kudo, Bosny, Veslee and other manufacturers. High-strength aerosol paints in convenient small cans provide not only a fresh look to household appliances, but also high-quality protection from abrasions, damage and scratches. Also suitable for painting household appliances are paints for metal and paints for plastic in a wide variety of color variations: glossy or matte pure RAL shades, all kinds of metallic colors, paints with mother-of-pearl or hammer effect.
Article on the topic: Why the Ardo washing machine does not turn on
In addition to paint of the desired color and quality, you will need: • masking film and tape (to protect handles, rubber seals, panels from unnecessary painting); • sandpaper for sanding; • solvent and detergents (to clean the surface from accumulated household dirt); • primer (for filling scratches and leveling the surface); • respirator and gloves to protect yourself from paint.
Preparing for work
Place the household appliance in a well-lit room, on a flat surface, and unplug it from the power supply. The room must be ventilated. It is important that there is enough space around for normal access to all areas that require painting. Clean all parts from dirt, grease, stickers; Use sandpaper to remove the old enamel layer. Instead of sandpaper, you can use a special paint remover: for example, ABRO aerosol remover effectively removes any type of paint, including from hard-to-reach places. If your refrigerator/washing machine/microwave is new and you just want to paint it or completely change the color, there is no need to remove the enamel.
Assess the surfaces to be painted for cracks, scratches and other damage affecting the metal: if any, carry out anti-corrosion treatment (for example, using a rust converter) and level the damaged areas with primer for painting. You can use separate acrylic primers (MOTiP, Veslee, Bosny), or take the Abro rust converter, which combines the properties of anticorrosive and primer. In addition, some ready-made colored enamels (notably Decorix and Rust-Oleum) also contain rust neutralizers. Pay attention to the color: for white, beige and other light paints it is better to use only white primer; for dark colors, gray and black primers are suitable. Cover with masking tape or film those parts that do not need to be painted: metal logos and nameplates, locks and rubber seals, control panels, handles and buttons. Do not use ordinary stationery tape for these purposes: its adhesive traces are very difficult to clean off later.
Article on the topic: How much copper is in a washing machine motor
Prepare the required amount of aerosol enamel: usually manufacturers indicate paint consumption based on the area. On average, one small can is enough for 1.5 sq.m. If your household appliances need a fancy multi-colored design, mark the sketch and attach stencils. Spray paint is applied evenly, from a short distance (30-40 cm). Keep the sprayer lever in one position - then the paint layer will be as uniform as possible. It is important to protect your respiratory system with a respirator: sprayed paint particles are unlikely to be beneficial to your bronchi and lungs, even if the paint has a non-toxic acrylic composition. Manufacturers advise applying paint for household appliances in 1-2 layers. Each layer of applied enamel must be dried - as a rule, modern aerosol enamel dries quickly.
The new look of your household appliances is ready. Carefully remove the protective films and stencils, check the quality and uniformity of the coloring, check the evenness of the lines, and if necessary, correct the flaws with a new layer of enamel. For a more effective result, you can additionally treat the new paint layer with a fixing varnish, which is available in the Bosny and Veslee paint and varnish lines. Painting household appliances yourself is not very difficult and does not require significant material costs (compared to buying new appliances). In any case, you get not only an updated look and protection from chips and damage, but also a unique color scheme for your refrigerator or washing machine, which depends only on the flight of your imagination.
Article on the topic: How to repair Bosch washing machines when they don’t fill with water
Visitors to this page most often choose from the online store:
Cleaning rust outside
During operation, the question often arises of how to clean rust in a washing machine that has appeared on its external plastic surfaces. Toothpaste can help fight rust. It is applied to the stains and rubbed with a sponge or brush, and then washed with water.
If the paintwork is damaged, as well as if it is necessary to remove traces of corrosion, restoration is necessary. In stores you can buy special white enamel for restoring equipment (in particular washing machines) and zinc primer (preferably in a can).
Work to remove the effects of corrosion is carried out as follows:
- It is necessary to stick a film or masking tape around the surface to be restored to protect the surface around the one being painted;
- Rusty areas of the machine should be cleaned with sandpaper (fine grains) and any rust that is peeling off should be removed;
- Wipe the surface to be treated with a napkin or clean cloth;
- Degrease the surface with a degreaser (for example, “NEWTON”);
- Thoroughly shake the can of primer, spray the primer from a distance of 30 centimeters and leave to dry for half an hour;
- After shaking the can of paint several times, apply enamel from a distance of 30 centimeters to the primed area;
- If necessary, apply a second layer of enamel after 20 minutes and allow to dry completely;
- Remove the protective film and masking tape.
Cleaning rust inside a washing machine
The internal parts of the washing machine are cleaned with vinegar or citric acid. However, this method is applicable only in case of minor damage. The substance is applied to the rusty areas and after one and a half to two hours is wiped with steel wool.
Article on the topic: Repair of washing machines in Tomsk where they repair
Baking soda also helps fight corrosion inside the car. It is applied to the rusty areas and after half an hour is wiped with a washcloth and then washed with water. The internal components and parts of the washing machine can also be cleaned using special products, following the instructions.
If the surface of the machine or the washing drum is too rusty, they will have to be replaced. Most often, parts on the rear wall of the unit rust, so if you notice yellowness, it should be removed immediately.
To prevent corrosion from progressing in the future:
- Rusty stains should be washed with special anti-corrosion agents (apply for half an hour and wash off), stain removers;
- Using improvised means such as vinegar, hydrogen peroxide and lemon juice (or citric acid, but diluted in accordance with the instructions), minor yellowed stains are removed in a 1 to 1 ratio. In cases of severe contamination, use a paste of water and soda. After treatment, the surface is wiped with a sponge and washed;
- The part with rust is placed in a container with Coca-Cola carbonated drink - the rust is quickly corroded due to the phosphoric acid it contains.
If these measures are not taken, corrosion will continue, which will lead to complete failure of the device.
Why is your car affected by corrosion?
Usually, after rust appears on a machine, the owners do not even try to analyze why this happened. Having painted the washing machine, they continue to use it in the same mode, under the same conditions that initially led to the problem. Therefore, the story of metal corrosion often repeats itself.
In fact, everything is obvious. Rust appears on machines installed in rooms with high humidity, or whose body is constantly exposed to water. To prevent the situation from reoccurring, it is necessary to combat dampness in the room.
In general, manufacturers do not recommend using automatic machines in rooms where it is too humid, where steam is generated or condensation appears. Despite this, many owners install washing machines in bathrooms. “Wet” air in such a room is a daily occurrence, so the chance of rust appearing on household appliances is very high.
If the washing machine is installed in the bathroom, then keep the door to the room open at all times. This will help the moisture evaporate. In addition, it is recommended to organize forced ventilation. The lower the humidity level, the lower the likelihood of rust appearing on the automatic machine.