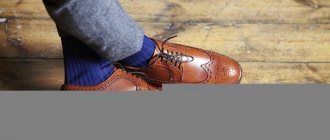
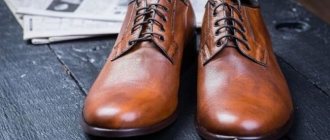
How to repair cracked leather on shoes?
Road dirt, dampness and improper storage - all this greatly wears out even natural leather. The color becomes faded, and cracks and scratches appear along the fold lines. These shoes look untidy. If you don't have time to take your shoes to a repair shop, try solving the problem with the following tools:
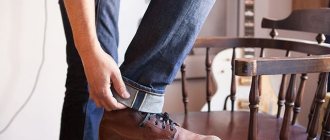
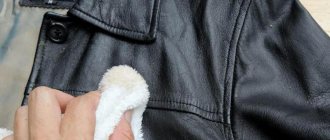
- Transparent nail polish. This method is suitable for gluing large and thin pieces of leather. Apply a little varnish to a cotton swab and apply it to the torn piece on the back side. Gently smooth the skin over the area of the tear and hold for 2-3 minutes. To prevent your finger from sticking, perform the action through a cloth. Upon completion of the procedure, use shoe wax that matches the color.
- Super glue. A shallow crack can be filled with superglue. After drying, all you have to do is paint over the uneven spots and rub the boots with a special polish.
- Acetone. If cracks appear on the shoes in places where there is a natural crease (rise of the toe), use acetone. Moisten a cotton swab with the product, and then use light and slow circular movements to walk along the crack. This action will help smooth the surface of the skin and eliminate minor imperfections.
To prevent the leather from deforming and cracking, pay attention to care. After each wear, wipe your shoes with a damp, clean cloth and then apply water-repellent cream. If your shoes are very dirty and you cannot do without a thorough wash, use a brush previously steamed in warm water. You need to dry your shoes naturally, away from direct sunlight.
Reference! Before the existence of special creams, people took care of their shoes using fish oil and castor oil. These oily products protected shoes from moisture and gave the skin a well-groomed shine.
How to make your skin look puffy: special and handy tools
To renew natural leather that has stains, stains, cracks and other defects that may be affected by the following:
- Skin preparation - it penetrates deeply into the pores, renewing the color, ensuring the vitality of the skin and preventing the appearance of spots upon contact with water, snow and salts, which are included in the de-icing reagents warehouse. In this way, the farb preserves the moisture and vapor permeability of the skin;
- A rare hide, which is a mixture of polymers, helps to effectively repair the hide, dry stains, cracks and other repairs;
- hide cleaners, methods for removing old fabric - stench will come in handy when preparing the hide surface before restoration;
- Vaseline;
- glycerin;
- castor oil;
- vzuttevy visk, natural bazhano bjolinium;
- ammonia;
- nail polish;
- Super glue.
There are a variety of ways to discover that skins are in the home that they transmit vikoristan, in addition to over-inflated products, such affordable products as broccoli or chicken eggs.
Repairing boots at home
Despite the abundance of different workshops, many people prefer to repair shoes themselves. This saves not only money, but also time, because you don’t have to wait in line. Let's consider professional methods of “resuscitation” of shoes, which can be applied at home.
Using Liquid Skin
Liquid leather is a polymer mixture based on rubber resin, alcohol and water that fills the “voids” on the surface of the shoe, creating a new, elastic material. A repaired product takes on the appearance and properties of a new one.
The product visually resembles gouache, packaged in metal tubes or plastic “washers”. Unlike the usual shoe polish, liquid leather is intended specifically for repair, and not for daily care. The operating rules are as follows:
- Choose a color. Modern ones have a fairly wide color palette, but if your boots are a rare color, you can try mixing several shades.
- Clean your shoes. Remove all dirt and degrease the surface of the shoes. This step is necessary for better and better adhesion of the composition to the skin.
- Protect your hands. “Liquid skin” is a very sticky and viscous substance that easily settles on the palms at the slightest contact. Be sure to wear disposable medical or household gloves. If contact with skin cannot be avoided, immediately wash your hands with soap.
Instructions may vary depending on the manufacturer and the specific product, but the main points are the same in most cases.
- Scuffs . Cover problem areas with a thin layer of “liquid skin” and smooth with a piece of cloth or a dry sponge. Leave until completely dry. Repeat if necessary.
- Cracks . Use your fingers to connect the edges of the crack and apply the compound with a brush. Level, and without waiting for complete drying, repeat the procedure.
Important! Remember that “liquid skin” dries out very quickly, so make sure that the container with the product is tightly closed. Two to three hours is enough for the tube to dry completely.
Restoring leatherette after reagents
In winter, roads are sprinkled with special anti-icing agents. These chemicals have the most detrimental effect on the condition of shoes, especially if they are made of leatherette. Even new boots can take on a worn and worn look. During this period, special attention should be paid to preventive measures: daily cleaning, treatment with water-repellent compounds and drying. If you cannot avoid damage to your shoes, adhere to the following rules:
- Try to keep the original drawing . A small damaged area can simply be painted over with a thin brush. If we are talking about treating a large area, use a dry sponge - it better imitates the roughness of leatherette.
- Apply “liquid leather” in two stages: the first layer will fill the voids, and the second will level the surface of the product and create a water-repellent film.
- Don't neglect protection . If you need to use an aerosol pigment, wear a respirator or protective mask. You can wear plastic gloves on your hands.
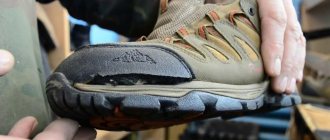
Sole repair
Cracked soles are a common occurrence and, although it is no longer possible to properly restore shoes at home, it is still possible to extend their life for several more months. To do this, use one of the following methods:
You will need:
- sandpaper;
- open the knife;
- degreaser;
- glue "moment"
Step-by-step instruction:
- Bend the shoe, exposing the crack. Using a knife, scrape off all the dirt and remnants of factory glue.
- Degrease the crease area - acetone or gasoline are suitable for this purpose.
- Apply instant glue to the walls of the sole and press them together. Fix for 3-5 minutes.
Note! To repair soles, professional shoemakers use Desmakol and Nairit glues. In the absence of such, it is permissible to use “Moment”.
Patch from a bicycle tube
You will need:
- shoe knife;
- sandpaper;
- rubber glue;
- piece of bicycle tube;
- degreasing agent (gasoline or acetone).
Step-by-step instruction:
- Clean and degrease the surface of the sole.
- Trim 5mm along each torn edge.
- Measure the depth of the break in the sole and add 15 mm to this measure - this is exactly the width you need to cut a strip from a bicycle inner tube.
- Degrease the cut strip and apply rubber glue to it.
- Bend the sole so as to completely open the crack, and holding it in this position, coat it with glue.
- Bend the prepared strip from the chamber in half, insert it into the crack and straighten the sole to its previous position.
- Press down the edges of the strip protruding from the crack and place under a press for about a day.
Types of glue that are often used for shoe repair
Before answering the question of how to glue boots, you need to decide which sole glue will be better in a particular situation. Manufacturers offer a wide range of high-quality products, thanks to which you can easily and reliably repair any defect. What glue should I use to glue damaged shoes?
- Desmokol is a transparent polyurethane-based option recommended for gluing PVC, suede and leather elements. Professionals have already proven its reliability and actively use it in their work.
- Adhesive Moment was created specifically for eliminating defects on boots, boots and other wardrobe items. Moment for shoes is a water- and frost-resistant product that will allow you to securely fix the main element. It withstands the negative effects of the environment. However, it is not suitable for gluing products made of polyethylene, polypropylene and styrofoam. It is often used as glue for repairing shoes at home, because it is available for purchase at any household store. Within a day after gluing, you can put on your boots.
- Epoxy resin . This is the optimal composition that will help glue a broken sole. After all, after hardening, it turns into an elastic layer that does not allow moisture to pass through. However, the hardening process is quite long. If we glue shoes with it, we need to wait until it hardens completely, and this can take up to two days.
- Shoemaker. It contains rubber, organic solvents and special adhesive enhancers. Designed for gluing shoes, because it reliably fixes the rubber sole and leather upper. It can also be used to glue linings and insoles.
- Bonikol . A unique composition created specifically for shoe factories and workshops. Benicol provides reliable adhesion of all elements made of various materials.
It is worth noting that the well-known PVA glue and superglue, contrary to the opinion of many, are strictly forbidden to be used for restoring footwear. These products are intended for fixing completely different materials, and therefore do not provide reliable gluing of holes and the bottom of the shoe. Moreover, these substances can cause irreparable harm to your boots.
Removing scratches from shoes
It is better to get rid of scratches on shoes immediately, even if they look like very small stripes. They tend to increase over time and spoil the appearance and quality of the shoes. You can do this in several ways:
- Acetone . Soak the sponge in a small amount of acetone and squeeze. Rub the damage with light, circular movements. When the leather is smooth, wash the boots with soapy water and wipe dry.
- Candle wax. This method is suitable for patent leather shoes. Apply a small amount of wax shavings to the scratches and use a directed stream of hot air to melt it with a hairdryer. When the wax becomes soft, take a cotton cloth and begin to rub it into the surface of the shoe. After the shoe wax is absorbed, warm the shoes with a hairdryer again and polish with a dry cloth.
- Olive oil. Soak a cotton swab in the oil and rub into the damaged area using soft, circular movements. Leave for an hour to take effect. After time has passed, wipe off excess oil with a dry cloth.
- Using an iron. This method is suitable for restoring small creases and scratches. Moisten the cloth and apply it to the damaged area. Walk the heated iron over the surface, holding it in one place for no longer than 5-10 seconds. Repeat the process until the scratch disappears. Upon completion, thickly lubricate the shoes with cream and leave for 12 hours to soak.
Drying shoes is also important
After cleaning your shoes, it is important to dry them. Take a clean piece of cloth and wipe the skin thoroughly. It will help quickly remove residual soap and water. Rub it in a circular motion until it is completely clean. Pay special attention to cracks. They need to be wiped most thoroughly, because it is in these creases that hard-to-reach dirt accumulates. If it is not removed, you will not be able to properly fill the cracks. After this, leave the shoes to dry for 8-12 hours.
How to remove wrinkles from leather shoes: 8 effective ways
There are at least 8 ways to make shoe leather smooth. They can be divided into two categories.
Minor dents and creases
Method 1. Fat cream
Shoes or boots are cleaned and tightly stuffed with paper. Next comes the thick cream. Its task is to make the skin more pliable. The cream is applied in a thick layer to the surface of the shoe. After which the owner of the damaged pair waits until the cream is absorbed into the skin and applies it again, sparingly, to the damaged area.
Method 2. Milk
If the shoes have minor creases and the leather from which they are made has a light shade, you can use the proven method of stuffing shoes with paper, only use regular milk instead of cream.
The leather pair is impregnated with it several times until the product acquires the necessary softness. And then it’s a matter of time. You will have to wait at least a day for the skin to smooth out.
Method 3. Glycerin “mask”
It will also help update “folded” shoes. To do this, all dents are filled with glycerin, after which it takes time for it to be absorbed. It is enough to spend 15 minutes on this procedure. Then the excess glycerin is removed with a cloth, and the shoes are sent to “rest” for two days.
Method 4. Painting
It is possible to soften the leather on shoes or boots and smooth out wrinkles using regular paint. The surface should be painted in 2 layers. This will update the product and rid it of all irregularities.
Method 5. “Liquid skin”
Matches the color of the product. Apply to cleaned and dried shoes. First, the place where the fold has formed should be cleaned with sandpaper. This procedure should be performed carefully. Also, the area to be treated must be degreased with alcohol.
Significant folds
If the creases are very noticeable, much more effort will be required to correct the situation.
Method 6. Castor oil
The oil is known for its softening properties. But in the case of shoes, you should be careful when choosing its type. Some vegetable oils corrode paint and, while solving one problem, can create another.
Method 7. Wax therapy
Beeswax or shoe wax is heated to a liquid state and poured into the folds formed on the shoes. After the wax mass has hardened, remove its excess with a cloth and let the shoes stand for several hours.
Method 8. Ironing
A wrinkled shoe can be ironed. The laces are first removed and the shoes are stuffed with paper or rags to give them shape. Next, you should prepare an iron, and in addition a rag made of durable fabric. Microfiber is ideal.
The rag must be thoroughly wetted with water. After which it must be squeezed out so that water does not drain from the surface. Cover the top of the boot with a dampened rag and leave for a couple of hours. Then all that remains is to heat the iron and add steam. Using a household appliance, rub the shoes through microfiber for 3-4 minutes. Due to the steam shock, the skin will begin to even out.
Use leather filling
Leather filling can be purchased at any shoe store. It can be used to fill even large cracks. The composition of the product usually includes colorless acrylic paints on a water base. They cope well with small and medium-sized creases. Don't expect to be able to completely remove a crack from your shoe. Unfortunately, you can't get rid of it, you can only disguise it.
Miracle or legend: Samara local historians conducted an investigation into “Zoya’s Standing”
Bob is still at the peak of fashion. Ideas for fashionable and stylish bob haircuts
Restore blood vessels after coronavirus: recommendations from a therapist
Apply the filler to the skin and leave it to dry for half an hour. The exact drying time will depend on the product chosen. You can find out by reading the instructions. I prefer to leave the shoes to dry for 24 hours. During this time, the filler completely hardens. Spare no expense. If the crack is still visible, apply more filler. Each hall must be filled. You can leave the shoes on for 30 minutes and see how they look. If cracks remain, add the product again and leave the shoes to dry. Repeat the procedure until they become less noticeable.
Useful tips
When restoring shoes that have lost their original appearance, you should know some of the subtleties of the procedures themselves.
- So, wax is used only in metal jars. If it is offered in the form of an aerosol, then in this case this thing is absolutely useless.
- It is best to use kitchen paper towels as shoe filler.
- To speed up drying of shoes, you can use a hair dryer.
- Before you start treating the surface with “liquid leather”, you should test it on a small area.
How to renew leather shoes using an iron
“Flying as if on wings” is possible not only when everything comes together as if by magic.
There is no time for flying in tight or uncomfortable shoes! That's why we so value that pair of shoes that allows us not to think about ourselves throughout the whole day, but gives comfort and convenience. But the appearance of the shoes changes over time, “wrinkles” appear on the leather, and it looks wrinkled. Don't put off your favorite shoes! You may be surprised, but they can be restored to attractiveness again by smoothing out the skin . Yes, yes, exactly by smoothing it out, using an iron.
What you need for work
The procedure does not require any special preparations. But you need to prepare something.
Here's a short list of everything you need.
- Iron.
- Rags (newspapers, or wrapping paper) and cardboard that are placed in shoes.
- Old towel or cloth napkins.
And, of course, the shoes you want to update. Before processing, shoes or boots should be thoroughly washed and dried. Shoe laces must be removed during the procedure.
Advice! Before you perform the procedure on your favorite shoes, practice on unnecessary things: old sneakers, children's shoes that the baby no longer wears.
This way you will understand how it is more convenient to work with your iron model.
How to iron shoes
- We cut out inserts from cardboard and insert them into the shoes. We stuff the shoes with paper rags so that they are placed between the cardboard and the sole. The cardboard should fit snugly to the top of the product.
- Place a napkin or towel on the right or left shoe . You can put her towel on both items at once. If you have a regular iron, without a steamer, first dip the napkin in hot water . We use this function in an iron with a steamer.
- Gently stroke the skin in places where there are wrinkles.
How to glue the sole
All elements of the shoe body are sewn together; only the sole can be glued. Even if it is additionally stitched, it will not prevent it from coming off if you trip or get caught badly. Before gluing shoes, you need to choose an adhesive. It should be:
Some types of glue, such as super glue in small tubes, boil upon contact with leather and leatherette, forming a hard, brittle joint. The skin seems to burn, and a hole forms at the joint at the first use. If you need to glue the joint between the sole and the leather upper, we recommend using:
rubber glue – universal and suitable for all types of materials;
Nairit (polychloroprene glue) – a special composition for professional use, recommended for gluing leather to rubber;
polyurethane glue - allows you to both glue leather and repair textiles, approved for PVC, rubber and polyurethane.
You can buy material to glue the soles of shoes in hardware stores and places that sell consumables and furniture fittings. If you haven’t found a suitable option, turn to compositions for household use - Moment adhesives, for example. Compare the descriptions on the packaging to correctly choose which glue is best for gluing - the manufacturer indicates the scope of application.
How to update leather shoes at home
Before restoring shoes, they must be cleaned of dirt. You can do this as follows:
- Remove dust and dirt with a soft shoe brush. Walk over the surface of the product and the sole. Proceed carefully so as not to damage the skin.
- Take out the laces. If necessary, wash by hand or in a machine (before this they must be placed in a laundry bag).
- Wet a cloth with warm water and squeeze thoroughly. Apply a small amount of liquid soap or leather cleaner. Gently wipe your shoes.
- Remove soap residue using a clean damp cloth. Place shoes in a cool place, as far away from heating appliances as possible (exposure to heat can cause discoloration and cracking).
How to remove streaks
To remove salt stains, use a solution prepared from water and vinegar, taken in equal proportions. When oily spots appear, treat the skin with talcum powder or corn starch. The first is left for 2–3 hours, the second for 7–8. After this time, sweep away the powder with a soft brush.
Bringing back color and shine
If the skin has lost color and shine, you can use one of the following methods:
- Treat a clean, dry product with Vaseline, baby cream or glycerin. Vaseline not only adds shine to the skin, but also removes traces of mold caused by dampness. To consolidate the result, the procedure is repeated for several days in a row.
- Apply a small amount of castor oil or natural beeswax to a soft cloth (you can use an old towel). Rub thoroughly into the skin and leave until completely dry.
- Take a chicken egg and beat thoroughly with a fork or whisk. Apply the composition to the skin using a foam sponge and leave overnight.
- For matte skin, a composition of turpentine and milk, combined in equal proportions. Apply the mixture with a sponge and wait until it dries. Lubricate the surface with moisturizing hand cream.
- If brown shoes have lost their shine, add a small amount of ground coffee to water and mix thoroughly. Rub the resulting mixture into the skin using a cotton pad or cloth. When the coffee is completely dry, remove the residue with a soft brush.
- If the skin is red, use red or onion to remove stains and add shine. Cut the head into 2 parts and rub the shoes until the bulb is dirty. Wipe the product with a soft cloth and leave until dry.
- If the white skin has become dull, prepare a solution of 1 glass of skim milk and 1 tsp. sodium bicarbonate (baking soda). Soak a cloth in the solution, rub the shoes and leave until dry. Milk will give the skin a white color, making it clean and soft.
The natural dyes listed above are short-lived, so they need to be used on a regular basis. If you don’t have much free time, you can buy a special paint for natural leather in the form of a powder, spray or cream. It will refresh the color, disguise damage, and make the material shiny and elastic. Products in powder form are suitable for professional use, as they require preliminary dilution to ensure the required concentration. At home, it is recommended to use cream paint or aerosol. The latter is characterized by a short-lived result and requires preparation of the room (the spray can splash the walls and floor, so they need to be hung and covered with old newspapers).
Painting shoes
Instructions for applying paint to leather products:
- Clean and dry shoes.
- Degrease the surface using soap solution or alcohol.
- Fill the shoes with paper or rags so that the paint applies easily and evenly. You can use newspapers if the lining is dark. Otherwise, it may become stained with ink.
- Cover colored parts and decorative elements with tape to prevent paint from getting on them.
- Wear gloves. Take a brush or soft sponge. Shake the container with the coloring composition. If necessary, you can pour the product into a separate container.
- Dip your brush or sponge into the paint. Apply the composition to shoes with light and gentle movements.
- When the entire surface has been treated, leave the shoes to dry at room temperature (usually this takes 40 minutes). It is important to place it in a place that children and pets cannot reach.
You can put on your shoes 13 hours after painting (this time is enough for the paint to completely dry and absorb). If the product needs to be repainted, you should choose a paint color that differs from the existing one by no more than 3 tones. In such cases, the product is applied in several layers.
Getting rid of creases
To remove wrinkles on the skin, you need to proceed as follows:
- Stuff the shoes with rags or paper so that they keep their shape well.
- Wet the cloth with water and wring it out until it is damp but not wet.
- Cover the boot with a cloth and leave for a few minutes to moisturize the leather.
- Turn on the iron, select medium power. Iron the creases on the shoes through a damp cloth.
- Remove the cloth and dry the product at room temperature without removing the contents.
If scratches appear, you can fill them with superglue, and after drying, apply paint of a suitable shade. Tears are repaired with a small amount of glue or nail polish on a toothpick or cotton swab. After applying the glue (varnish), the torn area is smoothed, pressed and held for 2–3 minutes. To prevent the finger from sticking to the shoe, it is wrapped in fabric.
What to do to make leather shoes last longer and maintain a presentable appearance
Owners of leather shoes should follow the following recommendations:
- Immediately after purchase, treat the product with a protective water-repellent impregnation.
- Have at least 2 pairs for each season. If the product gets wet, you can dry it calmly and without haste. This “rest” allows the shoes to last longer and maintain their original appearance.
- Use special shoe trees to store products (this will prevent loss of shape, kinks and cracks).
- Clean shoes from dirt after each wear. You can remove dust and dirt with a brush, and then wipe the skin with a damp cloth or sponge.
- Dry wet items at room temperature using paper and special shoe spacers. After drying, lubricate with cream. It is prohibited to dry shoes on a radiator or near other heating devices, or with a hair dryer. Such drying spoils the products and makes them unsuitable for wear.
- Buy professional shoe care products, taking into account color, material and texture.
Careful care of leather products ensures long-term use and preservation of a presentable appearance. Restoring shoes is more difficult than preventing the appearance of scratches, cracks, abrasions and other visual defects.
Sand your shoes to get rid of cracks
Don't be afraid to fill the cracks with more filler. Its excess can always be removed with sandpaper. It should have a slight grain so that it does not scratch or spoil the natural leather.
Press the sandpaper onto the area filled with filler. Sand the cracks to better camouflage them. If you did everything correctly, they should become invisible. After this, wipe the shoes with a dry cloth to remove any remaining dust and filler.
How to remove wrinkles from leather shoes in a simple way
When a person likes his shoes or sneakers, even a small crease in them that cannot be straightened out can cause frustration. Sooner or later everyone has to deal with this. Let's look at one way to remove wrinkles and creases.
Important : to iron leatherette, which is essentially the same leatherette, the cotton mode may be too hot. It’s better to turn down the power a little with the thermostat wheel.
What is needed for this
- iron with steam function;
- small towels;
- ironing board or table;
- backing fabric;
- water.
Instructions
- Make thick rollers out of paper and cardboard and secure them with tape. They should follow the shape of the sole as much as possible - this way you can achieve the greatest effect.
- Insert the inserts into the shoes so that they fit tightly into the space under the area where wrinkles accumulate. You can smooth out sneakers or boots using the same method: the main thing is that the shoes retain their shape as much as possible in the area of the foot and the curve of the head.
- Place the pair to be restored on a table or ironing board, having previously covered the backing, and cover the head with a towel (it should only be made of natural fabric).
- Plug in the iron, setting the thermostat to o or to the position that you use for such fabric. When the sole is warm, begin stroking the surface of the head as you would a wrinkled shirt or trousers - without much effort. You can straighten the material only if the “steam” function is turned on, but your electrical appliance may not have it. In such a situation, there is a simple way out - generously sprinkle a towel, through which you will begin to straighten wrinkles.
- When you finish the procedure, do not rush to pull out the earbuds and remove the protective material. Wait until the shoes cool down completely so that you don’t feel any heat under your palm—this is a necessary condition.
- Treat the surface with shoe polish and you will be able to enjoy the results of your labor for a long time.
Tip : There may be cardboard inserts left in a preserved shoe box that can be used to make inserts.
How to remove cracks, scratches and dents from shoes, sneakers or boots
As a result of improper care or its complete absence, not only wrinkles, but also cracks and scratches may appear on the surface of suede, natural or artificial eco-leather. In such cases, you should not be too upset, since the problem has a solution.
What do you need for work?
- “Liquid Skin” product of a suitable color;
- small rubber spatula;
- wax or paraffin (for scratches);
- sandpaper grit P200-P240 - marking according to the new GOST 3647-80 or diamond mesh;
- technical or medical alcohol (white spirit is possible);
- shoe cream of the desired color.
How to get rid of cracks
- Let's figure out how to smooth out folds on leather shoes in which cracks have appeared (they can form between wrinkles or at the top of the crest of the deformation). First you need to find and buy a special restoration product called “Liquid Skin”. But it must match the color of your shoes, otherwise there will be stripes on the surface, which is also a defect.
- Thoroughly wash your boots, boots or shoes from dirt and grease, and dry your shoes at room temperature. You should not keep it near a radiator or open fire - it may warp.
- In the section “How to smooth out (remove) defects” you have already learned how to remove wrinkles from leather shoes, so first you need to smooth out the wrinkles with an iron. Allow time for the surface to cool to room temperature.
- Sand the damaged areas with sandpaper to smooth out the jagged edges (just be careful - if you overdo it, you will make the problem worse). Treat the surface for degreasing with alcohol or white spirit.
- Apply “Liquid Skin” in the right places. To do this, use a rubber spatula and the “scrape” method so that the product fills the recesses, but does not remain on the surface.
- Wait 5-10 minutes and evaluate the result, but if it turns out to be unsatisfactory, repeat everything again, starting with sanding.
- After drying, treat the shoes with a suitable cream and wear them for your pleasure, without remembering the previous problem.
Tip : when you have sandpaper at home, but you don’t know the grit number, you can determine it yourself. Try sanding a small section of a plastic or wooden student ruler. If there are no deep marks left, then everything is in order - the abrasive is suitable for you.
How to get rid of scratches
Such defects can appear from wire, glass, sharp branches, stones, etc. Assess the depth of the damage by running your fingers, and if you don’t feel anything, you can repair it with shoe polish. Otherwise, use this algorithm:
- Just like a crack, clean the scratch with sandpaper and degrease with alcohol or white spirit.
- Warm the wax until it is pliable in your hands. Rub the damaged area and remove excess with a soft cloth.
- If the scratch turns out to be too deep, then treat it in the same way as with a crack - repair it with “Liquid Leather” using a rubber spatula.
- Treat with a cream of a suitable color and continue using the pair.
How to revive an old skin: ways to repair cracks and tears
The most effective method for restoring old furniture that may be damaged, such as deep stains, severe abrasions, damaged scraps, cracks or tears, is treated with a rare skin. Penetrating into the pores of natural skin, it polymerizes and creates a complete structure with it.
To restore a surface that may have cracks, tears and wear, using thin skin, it is necessary:
- wash and dry well;
- clean the surface containing the defect with a special cleaner, alcohol or mild rubbing alcohol, and dry again for 15 minutes;
- clean up the troubles with an emery paper or scissors;
- put on casual or medical gloves, scraps of rare skin will add a knitting substance;
- Select the desired color for the skin. If its tone does not match the color of your choice, mix different colors or add farb (no more than 10%) to achieve an absolutely identical color;
- Apply the polymer compound to the damaged surface using a sponge, cloth, spatula or knife and leave until completely dry. To speed up the process, you can use a hair dryer;
- remove excess skin using an emery paper.
You can get rid of other cracks and large stains by filling them with superglue and filling them with farb, and you can carefully glue the skin cracks with a barless nail polish, after which you will treat the area with high-quality wax. Uniform color.
Now you know how to get rid of skins, and you can buy products and other tools for checking skins in the online store “Vzuttya-Komplekt” in Kiev.