By processing the bottom of the skirt, its tailoring is completed; you may also need to shorten the product by converting the knee-length skirt into a mini. There are many ways to hem a skirt and they depend on the model: sun, pleated. The material of the skirt plays an equally important role: knitwear, leather. Shortening a skirt is easier if you have an overlocker and a good sewing machine, but even by hand you can hem it with a beautiful blind stitch. Let's look at all the options. If you have any comments or want to share your method, write in the comments.
How to shorten a skirt
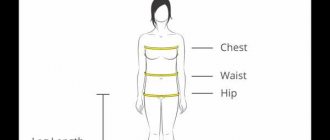
The proportions of the figure and, of course, the type of the product itself will depend on how to shorten the skirt. Before cutting off the skirt, let's try it on in front of the mirror. There are a few important things to pay attention to.
- Is the belt in place? If you are also going to sew in the skirt, then do this first so that the belt sits at the waist.
Does the skirt ride up at the back or front? Stand sideways to the mirror. The presence of slanting creases on the side, horizontal gathers at the back under the belt, and a non-vertical side seam are signs that the slope of the skirt’s waistline and the distribution of the depth of the darts are not for your figure. In this case, the upper part of the skirt needs to be adjusted. Simply leveling the bottom is a quick way, but it's the wrong way. Before shortening the skirt, in this case it is necessary to eliminate any defects in the fit. Shortening at the top is also possible.
If there are no fitment defects described above or they are insignificant, look at the bottom line from the side. To level the hem of the skirt, it is ideal to take measurements from the floor to the hem of the skirt from the front, side and back. When comparing, you will see where to cut more and by how much. Useful tips - How to straighten the bottom of a flared skirt.
- Only now can you bend the bottom of the skirt to the desired height, pin it with pins and make sure that this length suits you. Put on shoes or a jacket - this changes the proportions of the figure. Try changing the length a little - some 3-4 cm can greatly change the picture.
- skirts with beautiful trim at the bottom, which is difficult to transfer
- skirts made from fabrics with a pattern that you don’t want to disturb
- skirts with flaring at the bottom to maintain this flaring
- skirts with asymmetrical hemline
- skirts that require elimination of defects in the upper part, that is, we combine the elimination of defects with shortening
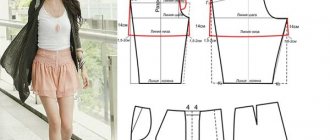
So, we have a mark for the future length of the skirt. It should be in front. Lay out the skirt on the table, the folds are in the center of the front and back, the side seams match.
How to shorten an a-line skirt
Measure the distance from the bottom of the skirt to the new length mark. At the same distance, we place marks along the entire edge of the skirt and smoothly draw a new bottom line.
In the photo, the skirt is a-line, the bottom line is slightly rounded. To properly shorten the skirt, repeat this rounding.
If the bottom line was initially uneven, we put marks taking this into account.
For example, the side and back of the skirt was 1 cm shorter (measurements from the floor are 1 cm longer). Then shorten the sides and back less by this amount.
Leave 1-3 cm for the hem, depending on the processing method. We cut off the excess fabric.
How to shorten a straight skirt
For a straight skirt, everything is much simpler - we draw the bottom line along the ruler (Fig. 3).
Before cutting off the skirt, we step back down, leaving an allowance for the hem. The width of the seam allowance depends on the model and fabric.
If you need to shorten a skirt with a vent, a photo with explanations is here.
How to shorten a pleated skirt
If the skirt model has pleats, then before shortening the skirt, close the folds, align their internal folds, and then do everything in the same way as for a skirt without pleats.
If we shorten the skirt a little and the cut falls on the hemmed allowance, then it needs to be ripped open, ironed, and then cut off.
About shortening at the top
In some cases, it is better to shorten the skirt at the top. That is, rip off the belt, cut off the top to the desired size, adjust the darts and side seams if necessary, move the zipper, and sew the belt back in.
Very labor-intensive, but for some models the only possible option.
Shorten the skirt at the top if:
What to wear with?
Torn skirts are a very shocking and extravagant product, requiring a special approach when composing an ensemble. What to wear with such a thing? Clothes of youth and street style, hippie, retro and informal styles will be useful. The classic combination is a skirt + a white cotton T-shirt, a blue knitted top or a blue denim vest.
What elements can be used when combined with a torn skirt?
- Plain blouse without sleeves.
- A bright T-shirt with an open shoulder.
- Multicolored.
- Stretch combidress.
- Top with a logo, abstraction or large pattern.
- Long cardigan in chunky knit.
- A denim biker jacket.
Whatever wardrobe elements you use, the main thing is that they all match in style and direction
. As for the choice of color, blue and light blue shades of denim go well with white, black, gray, chestnut, turquoise, and yellow. Fashion designers offer bright denim skirts - green, red, burgundy, purple, orange, which are ideally combined with white, black, brown and beige tops.
General tips before shortening your skirt
Do not wash the product before shortening, and if it has already been washed, is new, or has been in the closet for a long time, hang it on a trempel a day or two before cutting and shortening.
Wear the skirt with a blouse or jacket with which you plan to wear it in the future. Don't forget about heels. Stand straight in front of the mirror without slouching.
Fold the hem to the expected length and take a critical look at your image: perhaps by adjusting the length a few centimeters up or down, you can visually balance your figure or make the outfit more harmonious.
How to shorten a skirt: sun, half-sun, oblique, bell
The surest way to trim the length of a skirt evenly will require you to have a long ruler and an assistant. The method described below is suitable for all fabrics except knitwear.
After the skirt is sewn on the bias or sun, half-sun, you need to hang it hanging, and you need to attach weights quite tightly (clothes pegs, etc.) to the bottom line, especially where the bias thread goes.
After a day or two, you can move on to shortening the hem of the item sewn on the bias.
Putting on a skirt and shoes, stand up straight. Make sure that the belt is not twisted and is at the desired level - at the waist or hips, and the side seams are in place.
Ask the person assisting you to mark the required length on the skirt with chalk or a pin. Then he marks this level on a ruler standing strictly vertically next to you, i.e. The ruler is placed on one side on the floor, and the opposite side touches the hem of the skirt. This is how you measure the distance from the floor to the future bottom edge of the skirt.
Now you need to mark this distance along the entire circumference of the hem, placing a ruler with a level every 4-6 cm.
Remove the skirt, carefully lay it on the table or floor and connect all the marks with a smooth line, add an allowance for the hem of the bottom.
Flared skirts often suffer from uneven hemlines, so draw a line of the desired length using the method described above. It will also be the cutting line, because to process the edges of the hem of flared skirts, as a rule, they use techniques that require virtually no allowance:
- edging with bias tape;
- processing with a zig-zag machine seam, overlock or manually along the cut itself;
- undercut facing - a separately cut tape is hemmed to the cut with a seam inward, taking into account the rounding of the hem, which serves as a hem.
What's happened?
The wedge skirt features a feminine flared hem with a tapered fit at the hips. This effect is achieved due to wedges at the bottom. Their number (despite the above-mentioned “popular” name of the model) may be different: 4 (four-blade), 6 (six-blade) and even 12. The attentive reader has already noticed that the only condition here is an even number of parts. Five-bladed ones are less common.
Wedges are:
- set-in - when they are sewn into the cloth,
- one-piece.
The second type is more common and is characterized by longitudinal relief seams. This distinguishes the design from two-seam options.
Inserted elements complicate the sewing technology. Beginners should hold off on them.
How to shorten a pleated or pleated skirt
In well-equipped ateliers, the folds at the hem of a skirt made of thin pleated fabric are smoothed out with an iron, the excess length is cut off, hemmed or processed on an overlocker, and only then, using a special press, the fabric is crimped again.
At home, it is much more convenient to shorten such a skirt by cutting off the excess length not from the bottom, but near the waist, i.e. above.
Because if you cut off the bottom of the skirt, then the pleated folds will already be “broken” and will not become the same as they were before you cut them off.
To do this, lay the skirt on the table. From top to bottom from the base of the belt in several places, measure a distance equal to the excess length of the product. Without breaking the folds, connect the resulting marks with a straight line.
At this level, carefully, aligning along the folds, secure all the folds with pins or sweep them away. Stepping 7-10 mm up from this line, draw a cutting line parallel to it.
Undo the belt or elastic band. Using sharp scissors, cut off the excess length along the top line. Sew the edge of the skirt into the waistband or baste it to the elastic along the remaining line, without moving the folds apart. All that remains is to sew a machine or hand seam and remove the basting and pins.
A skirt with large pleats can be shortened in the same way, or you can use the standard “bottom” technique, process the cut in a way suitable for the fabric, fix the folds and steam them with an iron through a cloth soaked in a solution of table vinegar (100 g of vinegar per 4 liters of water).
Treatment with oil or similar substances
You can smooth out wrinkles and creases using oily substances. For example, regular Vaseline. They rub the folds with it and straighten them slightly. The skin becomes more elastic and pliable, and deformations disappear.
After treating with Vaseline or cream, the product should be left for 2-4 hours, and then the item is ready to wear.
How to properly shorten a lined skirt (with and without vents)
A classic pencil skirt has a straight hemline, so you can mark the level of the desired length with one pin or a stroke of chalk in the middle of the front during fitting.
Lay the skirt out on your work surface so that the side seams align with each other. If the skirt is tapered at the bottom, then you will see that its edge forms an angle with the apex at the seam when folded in this way.
Measure the distance between the desired length mark and the edge of the skirt along a strictly perpendicular line. Mark the same distance from the bottom on the side seam and on the opposite fold of the skirt. Connect these points with a straight line - you should get exactly the same angle as the edge (round it slightly at the seam).
Carefully pin the skirt panels along the resulting line, then mark the hem allowance parallel to it - 2-4 cm down.
Cut off the excess length, turn the product over with the unchalked side facing you and mark on it, guided by pins, a line of the future length.
Remove the pins and finish the cut using an overlocker, sewing machine, or by hand, securing the cut side seams.
To get a smooth, beautiful edge, you need to carefully fold it along the line to the wrong side, iron the fold and hem the finished cut with a blind seam by hand or on a machine.
The lining should be 2-5 cm shorter than the skirt. Cut it parallel to the bottom of the skirt, finish the edge with a hem seam with a closed cut or using an overlocker. Secure the lining to the skirt with a few invisible stitches along the back (if there is one) and side seams.
When shortening a pencil skirt with a vent , you need to tear off the lower 1-3 cm (that is, slightly less than the flap of the hem edge) of the lining fabric from the already cut vent.
At this level, shorten the lining parallel to the cut of the skirt. Make sure that both parts of the vent after cutting and tucking the hem are the same length, and there are no hem cuts visible on the front side. Then connect the folded edge of the lining to the hemmed edge of the product with a blind seam so that the lining hangs slightly over it.
After this, all that remains is to iron the skirt well from the inside out. Of course, the most valuable advice remains the same: measure seven times, cut once. This is the only way you can achieve a truly worthy result.
Subtleties of shortening a skirt
Sometimes there is a need to reduce the length of clothing - to shorten it. How easy or difficult it is to do this depends on the style, but in any case, in order not to spoil the product, you need to know all the intricacies of the process. They are the ones that are discussed in this article, and the process of reducing the length itself is shown using the example of a straight skirt. The article was written for people with minimal sewing skills.
So, you tried on a skirt and decided that it would look better shorter! Next we proceed as follows:
Step 1. Mark the required length along the front (you can use a pin).
Step 2. We analyze the balance of the product on the person’s figure (if it is not ideal, now there will be an opportunity to correct it): you need to look at the bottom line of the skirt and its position relative to the floor level from all sides. Due to the difference in a person’s figure from the standard one due to individual characteristics, the level of the skirt can be, for example, lower in the front, and more upturned from the back. In case of imbalance and the need to achieve parallelism of the bottom of the skirt to the floor level, mark the desired length in front, on each side and in the back while the skirt is on the person.
Step 3. Analyze the shape of the bottom line of the skirt. In my case, the bottom is curly and I plan to leave it that way. We build a new bottom line at the level of the marks. We're not cutting anything off yet. We bend along the constructed line, baste, try on, make sure that this length (on all sides) suits us completely, or we make adjustments. Remove running stitches.
Step 4. We analyze the shape of the skirt at a level of ±2 cm from the new hem line (expansion/constriction in this area), the presence of seams and skirt parts that intersect the new hem line. In my case, these are 2 side seams, 4 vertical relief seams, and vents. There is a lining in the skirt, but it ends above the new hemline. In the section of the skirt under consideration, the width does not change. Thus, for processing the bottom, in which the edge is processed on an overlocker, folded and stitched with two straight parallel lines, an allowance of 1.5 cm is sufficient (in the case of more “loose” fabric, the allowance can be increased). Stepping 1.5 cm down from the line of the new bottom of the skirt, we build a parallel line of the allowance.
Step 5. Cut along the allowance line.
Step 6. Use needles to fix the direction of the vertical seam allowances. We wrap the corners of the slots over the face and also fix them with needles or running stitches. Don't forget to remove the needles before the overlock knife. We process a cut of fabric on an overlocker.
Step 7. Fold the seam allowance to the wrong side along the line of the desired length. We make the corners of the slots as shown in the photo. Let's baste. Sew with a straight stitch at a distance of 0.7 cm from the edge. Stepping 0.5 cm up from it, we lay another straight line.
Done - the skirt has the desired length. Now you know what you should pay attention to in order to shorten your skirt yourself at home without ruining the product.
Model selection
Take a close look at the photo below:
Yes, yes, this is all the same variety with its own model features! That's how different she is - god!
Having mastered a simple sequence, every sewist will be able to create a design to her liking. From a construction point of view, the appearance is influenced by the width of the wedge and its symmetry. The easiest way to understand this is by comparing the diagram of the model and the sketch depicting it in the material:
There is an asymmetrical silhouette: with an extension at the back. In this case, you can get a very elegant semblance of a train.
Useful tips for shortening a skirt
If for some reason you need to shorten your skirt, proceed as follows. Put the product on yourself and for a fuller look, use any high-heeled shoes, this will allow you to evaluate the appearance yourself. Then visually imagine yourself in a new product in the mirror and at the same time make a few lines, or simply marks. Next, remove the skirt and turn it inside out. Draw a cutting line, then step back a few centimeters and draw a second line.
To avoid making a mistake with the length, fold the bottom of the skirt along the first line and pin it in place. Put it on for the second fitting and look in the mirror, while twisting in different directions and try to sit down. If everything suits you, then feel free to cut along the second line. Then hem the edge of the product.
Cosmo recommends
Gel polish won't stick! What other procedures cannot be done during menstruation?
Anti-trends for spring 2020: which boots are no longer in fashion (beware, bad taste!)
Have you lost weight or rushed to buy a skirt and it turned out to be too big at home? There are several ways to fit an item to your figure without resorting to the services of an atelier.
How to shorten a skirt with your own hands
Depending on the skirt model:
- A-line skirt. To begin, measure from the very bottom of the skirt to the required length and make preliminary marks using chalk or soap. Preferably on both sides. Then try it on yourself and let someone else look at it. This is required so that the new product does not look too short on you. Then remove and draw a cut line, but add a couple of centimeters on the fold when sewing the bottom. Without this allowance, the new product will not only be short, but will simply be damaged. ATTENTION: In a trapezoid, the shape of the line is always rounded, so the line must be the same in shape as the previous line of the lower part. If one of the parts was long and the other short, then add exactly as many centimeters from the bottom and sides as required to make both sides even. Cut off the excess fabric and feel free to hem it on a sewing machine, but first make a test hand seam, this will allow you to more accurately see the discrepancies in the length of the sides of the skirt, and if these facts are identified, quickly eliminate them so as not to rip out the product again;
- Directly. It is easiest to shorten a straight style skirt than any other. Place on a flat surface, carefully fold the edges tightly together. We measure from the bottom to the desired length and draw a straight line. You can use a ruler for convenience. Next, take special sharp scissors and cut off the unnecessary part.
Attention! Don't forget to leave 2cm allowance for new seams to finish the bottom.
- With folds. Before you begin to shorten a pleated skirt, you need to let the product hang for a couple of days. We recommend washing new, worn items first, and only then cutting them. In a regular atelier, I iron the product along the folds with a special iron, and then shorten it. And only then the fabric is corrugated again. You can't do this at home, so do it this way. Undo the belt. Pull out the old seam threads. Remove the length from above, leaving the folds as they are. Pin and try on. Look in the mirror from the outside. Put on a blouse and jacket and look again. If everything suits you, then shoot. Place the product on a flat surface. Fold the folds in an overlay way to their original position and pin them in the second circle, only 5 cm lower, this is required so that when cutting, the folded folds do not separate. Use sharp scissors to cut off excess fabric. Make a preliminary hand seam so that each fold is in close contact with the base of the skirt. Sew along the edge using a sewing machine. Place the hemmed edge inside the waistband in its original place. Use pins and secure the starting position. Make a hand bait stitch again. Sew along the same lines on the waistband. After sewing the waistband to the skirt, remove the second bottom pins. Next, use a steam iron to iron the waistband area. This is necessary so that the product of the hemming area does not bulge and cause discomfort. Let the new product hang for one night, after which you can safely wear the item.
Reference! If you shorten this product from below, then the folds will be damaged due to the disruption of the structure.
- Pencil skirt with vent. We cut the slot. We rip the bottom and retreat up to 3 cm, but do not forget to leave 1.5 cm for the hem. The slot can be inserted higher or completely narrowed. If the product has a lining, then the skirt needs to be shortened to the new length. Check that the length of the product and the slots are the same and that the hem cut is not visible from the front side. Connect the edge of the hem and the lining to the hemmed edge of the blind seam. The lining should hang over the hidden seam. Turn the product inside out and iron it.
Tips for shortening a skirt at the top
In most cases, the best way is to shorten the skirts at the top. Let us describe in more detail what types this is suitable for:
- With continuous trim at the bottom.
Attention! If you cut off the bottom, the structure of the design will be disrupted.
- Expanded at the bottom. Allows you to save the extension format.
- With decorative elements along the bottom.
- Pleated. In this case, there are simply no options; only the method from above at home is suitable.
The method from above always starts with a belt spacer or elastic insert. Only then according to the usual standard. You need to know this. Also, it is quite important to pay attention to the fabric, because each material has special different properties that come out sideways after the first wash. Imagine that a new product was altered, then washed, dried, ironed, and it shrunk. And your work, which was done correctly, including fittings, shortened the skirt significantly. So, to prevent this from happening, we strongly recommend that you wet and wash it before alteration. There is nothing complicated about this, and extra reinsurance won’t hurt.
Use the services of a professional seamstress and the problem will be solved quickly and efficiently. After all, any craftswoman from the studio knows exactly what to do and what to do in this case. It’s simple enough so that you don’t have to rack your brains, but trust the master.
In special cases, when there are two patterns on the product, below and above. What to do in this case? Either you leave the bottom, or the lower part, it won’t work any other way. But if the design is on the insert part of the trapezoid according to the figure, in the form of a straight diamond, then simply rip apart the part with the decor into a shortened product. And then choose options for shortening.
Attention! You can also sew and shorten along the connection line. Much depends on the style.
Multi-tiered styles are shortened as follows:
- Pull apart entirely along the seams. Then start shortening from the main base along the top, then from the bottom tier, and only then move on to the top edge.
- The upper tier is usually simply altered just below the original place, if the figure requires it. This applies to overweight women with non-standard shapes of hips and waists. Make sure it doesn't turn out to be a square. But you need to connect the upper part first, and then the lower tier.
Attention! Multi-tiered styles require initial ripping of the seams if the side parts are sewn in and do not go around the base itself.
Before you shorten skirts yourself, carefully study the sequence of work. This will protect your product from unnecessary damage. Take advice from professional seamstresses who know exactly how to properly shorten any style of skirt.
Summarize
- To sew high-quality products from artificial or eco-leather, study the properties of the material and take into account the processing features.
- Use special devices and tools that make it easier to work with the material, use those discussed in the publication or look for your own alternative replacement methods.
- each unfamiliar processing technique on a piece of material .
The main thing is to apply the recommendations discussed in practice , and feel free to try sewing from new materials. Take the experience of those who have already encountered similar things and develop your own.
Only practice will help you easily sew high-quality items from different fabrics, fabrics, including eco-leather, leather and other materials.
***
Did you like the article? Share with friends, send to your social media feed. networks to return to it at a convenient time.
I'm always glad to hear your comments.
Note:
Please note that some pictures of accessories and tools for sewing are clickable. By clicking on them you will find out the details.
With faith in your success and wishes of good luck, Elena Krasovskaya