Due to the known quality of fuel at domestic gas stations, there is a need to change fuel filters more often, change or clean the fuel pump screens. No matter how high-quality filters you equip your car with, they really clean gasoline and diesel from dirt and dust efficiently, but they have to be changed much more often than specified in the manufacturer’s regulations.
Let's figure out how to clean the fuel pump and coarse mesh yourself, how often this needs to be done, and what symptoms indicate the need for this operation.
Fault diagnosis
There are several signs that indicate that the fuel pump is clogged. Each of them individually may not indicate this one hundred percent, but taken together they are sufficient grounds to begin cleaning. These are the signs:
- the engine stalls when you press the accelerator;
- the acceleration dynamics of the car decreases;
- the engine responds poorly;
- starting with the starter is somewhat difficult;
- When the gas pedal is pressed sharply, jerking occurs.
Depending on how badly the fuel pump is clogged, these problems can vary greatly in scope. For example, if the pollution is very high, then when you press the gas pedal, the car may hardly accelerate.
Cleaning the fuel pump screen can solve these problems, but it is important to remember that there are other reasons that can cause them:
- The injector has failed.
- The fuel pump is not working correctly.
- The fuel filter is dirty.
If the filter and mesh are still easy to change on your own, then for the rest it would be better for a beginner to contact a car service center. This will allow you to avoid gross mistakes that an inexperienced car enthusiast may make during the repair process.
When and why you need to change/clean the fuel pump screen
Let's start with the fact that general problems with the fuel system (fuel pump in particular) should be divided into the most common groups:
- the fuel pump mesh and fuel filter are clogged;
- the fuel pump itself has failed;
- injector problems;
Let us add that we should also not exclude the possibility of air leaks, that is, airing of the power system. Another culprit of problems may be the pressure regulator in the fuel rail. In this case, engine malfunctions may be partially similar to some of the symptoms mentioned above. For example, a slight ingress of air into the fuel system results in the engine not starting for a long time after parking.
We also recommend reading the article on how to determine airing of the power system using the example of a diesel engine. From this article you will learn how to check the fuel system for leaks yourself.
Let's go back to the fuel pump. Its malfunction means that the performance of the fuel supply system is reduced. If the fuel pump breaks down, then the car becomes unsuitable for normal use. Signs of a fuel pump malfunction are as follows:
- It is impossible to start the engine, the fuel pump does not pump;
- the engine starts, but runs with serious interruptions;
In this case, the service often recommends diagnosing, repairing or replacing the fuel pump. It should also be taken into account that the fuel pump mesh filter may become clogged inside the device. Let us immediately note that it is impossible to accurately answer the question of when to clean the fuel pump stack. Some car enthusiasts clean/replace the fuel pump mesh as needed or as a preventative measure every 50-70 thousand km. mileage, while others are faced with the need to clean the fuel pump grid for the first time at mileages of 150 thousand km or more. and more. Let us add that the operating manual for some models specifically states that it is recommended to replace the fuel pump stack once every 120 thousand km.
It should be added that the loss of dynamics and the appearance of symptoms of a clogged mesh occurs gradually. For this reason, each driver decides to clean the fuel pump himself. On powerful naturally aspirated engines, the gradual deterioration in acceleration is not felt as strongly as compared to highly accelerated engines with a small displacement. For this reason, many owners of large-volume trucks begin to solve the problem after noticeable complications appear. Also, the condition of the pump grid is greatly influenced by the quality of the fuel being filled and a number of other factors and individual operating conditions, which we will talk about a little later.
Frequency of procedures
There is no set time frame for cleaning this part.
Some are forced to clean the mesh every 50,000 kilometers, while others have to do this no earlier than the car has traveled 150,000 kilometers. However, there are cases when the manual for using a particular car indicates a specific number of thousands of kilometers, after which it is worth changing this part. However, even before this point it may also be necessary to clean the fuel pump mesh. It is not difficult to make it yourself.
Cleaning method
The procedure is carried out in several stages. First, the rear seat cushion is removed and half of the sofa is reclined. Then remove the plastic cover of the fuel pump. Then you need to relieve pressure in the fuel system.
Now you can remove the negative terminal from the battery. It is necessary to disconnect the tubes from the pump (gasoline may spill). A special clamping ring-cover is unscrewed. The remaining gasoline should be drained from the fuel pump housing and the sealing ring should be removed. The pump can now be removed.
You will need to disassemble the pump to clean it. First, the lower part is removed, and only then the mesh. To dismantle the latter, you need to pick up the filter with a screwdriver at the place where the pump is attached to the housing. Usually the mesh is very dirty.
You can replace the part with a new one, but you can also clean it. As for cleaning the fuel pump mesh, it is better to choose one designed for cleaning the carburetor. If there is a need for mechanical action, it is better to clean the part with a soft brush. Then the mesh is dried and blown. At the end of the process, it is recommended to wash the mesh itself and the bottom of the fuel pump housing with gasoline. All that remains is to put everything back together.
It is not difficult to clean the fuel pump screen yourself. However, as with all repair work, all prescribed safety precautions must be followed. If you don’t want to do the replacement yourself, you can take the car to a service center, where they will do it for little money.
How to clean the fuel pump yourself
So, the fuel pump is located in the fuel tank. Modern cars are equipped with a fuel station, where a large plastic “glass” on which the pump and fuel level sensor are mounted, also acts as a filter. A coarse filter is attached to the pump, on which dirt and other large deposits remain.
So, the process of cleaning the pump and mesh occurs as follows:
- Since the fuel pump is located directly in the gas tank, you need to get to it through the passenger compartment or trunk. Depending on the design, the fuel station cover may be located under the seat of the rear sofa, or under the false trunk floor. For this procedure, you need to equip yourself with a minimum set of tools;
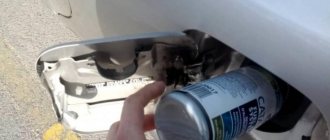
- Next, we find the cover, and before removing it, be sure to clean it of dust and dirt, as well as the area around it, so that nothing gets into the gas tank;
- Then we relieve the pressure by releasing the fuel pressure. On the cover you will see the fuel pump power connector, which must be removed. Now we operate the starter for a few seconds until all the fuel is pumped into the cylinders;
- Now we remove the negative terminal from the battery in order to remove the connectors from the fuel pipes (one pipe is the fuel supply, the second is the return). How to properly remove the tube clamps - refer to the repair and operating instructions for your car;
- If your hatch is structurally equipped with a pressure ring, then it is impossible to unscrew it by hand, so you will have to use a special puller. If there is no such device, then the cover can be removed by adding a flat-head screwdriver and tapping it with a hammer, the main thing is not to overdo it, so as not to break the cover. Stock up on the cover gasket in advance;
- before removing the fuel pump, allow the fuel to drain into the tank, and then cover the tank to prevent unwanted products from getting into the fuel;
- start disassembling the pump. For the pump, it is necessary to remove the lower part of the housing, where all the dirt settles;
- then remove the mesh from the pump; to do this, just dig under the filter retaining ring;
- Assess the condition of the fuel grid; if it is completely clogged, it is likely that the fine fuel filter will have to be changed, and it is advisable to wash the injectors. Remember that due to a clogged filter, the fuel pump overcomes strong resistance, causing it to overheat and fail;
- if the mesh is dirty on the surface, then clean it with a special spray, such as carburetor cleaner, rinse it until the outside of the mesh is clean. Next, blow it out with compressed air. In another case, we simply change the grid to a new one, preferably the original one;
- The final stage is the assembly and installation of the fuel station in its place. We install the pump in the reverse order, and if the level indicator, after turning on the ignition, begins to show the wrong amount of fuel - do not be alarmed, after one refueling the sensor adapts itself.
Also, after assembly, the car will not start immediately, so turn on the ignition several times so that the pump pumps fuel through the line, then start the engine.
User Experience
My engine rarely stalls. A couple of times there were simply problems with the fuel, but once there was a problem with the pump. I figured out how to take it apart myself. I realized that there was no damage, it was just pollution. I had to change the grille - before I had no idea that they could be cleaned. Since then I have driven a hundred thousand kilometers and so far everything is fine. When another 20-30 thousand are added, then I’ll look under the hood. This time only for preventive purposes.
I'm new to driving, but have already encountered this procedure. When the car didn't want to start the first time, I thought the problem was with the battery. But then the engine began to behave strangely - it either would not start or suddenly increased speed. Friends suggested that we need to disassemble and clean the pump. As it turns out, it's not difficult at all.
I became a motorist five years ago. Since then, I have never needed to repair or change anything - my husband usually does this. He simply cleans the grille for himself, but always installs a new one for me. The answer to my questions is that it is safer.
I clean the grille every 150 thousand kilometers traveled. I have a sedan made by Nissan, and I almost never drive it outside the city. Although there are no particular problems, I should do this after about a hundred kilometers. Focus on the ignition - if everything is fine with the battery, then the pump is probably dirty.
I never do this myself and I don’t recommend it. Any car service center will do this procedure almost free of charge. In addition, mechanics spend less than half an hour on it, and when you do it yourself, you don’t know exactly how much more digging you’ll have to do.
Source
Volkswagen Tiguan S&S 170 HP Full › Logbook › Cleaning the fuel pump screen or what we drive
It all started on a beautiful Friday evening in June. Having escaped from the Moscow traffic jams onto the highway, I pressed the gas as usual, the tachometer needle quickly reached 4000 rpm and... bounced back! At the same time, the car jerked, as if I had suddenly hit the brake and released it. After that the car drove off as if nothing had happened. This rather puzzled me. The next day I drove the car in acceleration mode to hundred in 8 seconds - everything was fine. The situation repeated itself on another Friday, again it was hot, again I had been driving for a couple of hours, again there was a sharp acceleration and jolt. It looks something like this. I always pressed on the gas, but you can see how the tachometer needle twitches around 4 thousand and the camera twitches after the car:
In general, this bothered me, but all hands did not reach, as usual. Until I happened to go from Dmitrovskoe Highway to the south of Moscow in September. There wasn't much traffic, but there were a couple of bottlenecks. The tremors began already at 3000 thousand, and after the next narrowing, the car simply stopped accelerating, I drove to the side, stopped and stalled. The car wouldn't start. While I was talking with the service about the tow truck, the car cooled down a little and started up, giving a Check Engine light. I started to drive towards the service, but decided to look at this error first, since the laptop and Vasya are always with me:
008851 - Fuel pressure regulator P2293 - 000 - mechanical fault - Intermittent Freeze frame: Fault status: 00100000 Fault priority: 0 Error frequency: 11 Forgetting index: 255 Mileage: 48319 km Timing: 0 Date: 2028.14.09 Time: 14:17 :04
By the way, does anyone know what date this is?
In the end, I decided that since the problem is not permanent and the car is moving, I will not go to the service center, but will go home. I drove home normally, without acceleration or jolts. Along the way, I took logs (red - fuel pressure requested; green - actual):
It is clearly seen that during acceleration the pressure increases and then drops to zero. It’s as if the fuel injection pump can’t cope. So, the fuel injection pump is fine, it just has nothing to produce, because... it does not receive fuel. Thanks to the forum, I found out that 90% of problems with fuel are caused by the fuel pump mesh.
Remove the rear right seat. To do this, take a 17mm spanner and unscrew the two nuts in the front (under the plugs), move the seat forward and unscrew the bolts at the back:
Fault diagnosis
There are several signs that indicate that the fuel pump is clogged. Each of them individually may not indicate this one hundred percent, but taken together they are sufficient grounds to begin cleaning. These are the signs:
- the engine stalls when you press the accelerator;
- the acceleration dynamics of the car decreases;
- the engine responds poorly;
- starting with the starter is somewhat difficult;
- When the gas pedal is pressed sharply, jerking occurs.
Depending on how badly the fuel pump is clogged, these problems can vary greatly in scope. For example, if the pollution is very high, then when you press the gas pedal, the car may hardly accelerate.
Cleaning the fuel pump screen can solve these problems, but it is important to remember that there are other reasons that can cause them:
- The injector has failed.
- The fuel pump is not working correctly.
- The fuel filter is dirty.
If the filter and mesh are still easy to change on your own, then for the rest it would be better for a beginner to contact a car service center. This will allow you to avoid gross mistakes that an inexperienced car enthusiast may make during the repair process.
Pump operation and malfunctions
From the name you can understand that the fuel pump supplies fuel from the tank to the engine injectors. Accordingly, if the unit is faulty, then there will be no gasoline injection, and the power unit will not start working. There are options for injector and carburetor. The VAZ 2110 is equipped with an injector; therefore, the fuel pump must be suitable for this system. If the “ten” was modernized by installing a carburetor, then the unit will have to be taken out of stock. The unit is located in the fuel tank - under the left rear door, the electrics go under the rear row seats.
It is quite simple to understand that there are faults in the pump or its network:
- The car won't start. There are many reasons for this malfunction, but before performing a full diagnosis, you need to check whether the pump mesh is clogged or clogged.
- There are noticeable jerks in first gear. There are also many options here, but one of them is a non-working fuel pump.
Frequency of procedures
There is no set time frame for cleaning this part. Some are forced to clean the mesh every 50,000 kilometers, while others have to do this no earlier than the car has traveled 150,000 kilometers. However, there are cases when the manual for using a particular car indicates a specific number of thousands of kilometers, after which it is worth changing this part. However, even before this point it may also be necessary to clean the fuel pump mesh. It is not difficult to make it yourself.
Do-it-yourself fuel pump screen cleaning.
To carry out the work, you need to stock up on the following materials:
- Compressor.
- Fuel pump gasket.
- Nozzle seal.
In order to clean the hard filter, it is necessary to dismantle the fuel pump.
- Turn off the car's power source.
- Unscrew the holders and remove the cover.
- We remove the electric drive.
- We disconnect the fitting and the conductor through which the fuel circulates.
- We also remove the fitting and remove the fuel outlet hose.
- Remove the seal.
- Raise the gasoline compressor and remove the float. Next, together with the mixture level analyzer, we dismantle the fuel pump.
- At the bottom of the pump there is a mesh (coarse filter).
It is quite difficult to determine the contamination of the mesh by visual inspection. Small particles can interfere with the proper functioning of the fuel, while remaining almost unnoticeable. To successfully wash the mesh, you need to let it soak in a special solution. To do this, you need to dilute the detergent one to ten with water. Next, you need to place the mesh in a tank with the prepared composition and leave it there for one hour.
After this, you can proceed to the main cleaning stage.
- To do this, uses the same composition and a brush with fine bristles. Using the specified materials, thoroughly rinse the mesh.
- After this, you need to clean the filter with a stream of air. To do this, we use a compressor.
- Next, you need to wait until the filter is completely dry. After which, you can assemble the fuel pump.
After washing the element, it is necessary to carry out repeated visual diagnostics. The network must not have mechanical damage. Otherwise, further use of the element is impossible and the filter must be replaced.
Cleaning method
The procedure is carried out in several stages. First, the rear seat cushion is removed and half of the sofa is reclined. Then remove the plastic cover of the fuel pump. Then you need to relieve pressure in the fuel system.
Now you can remove the negative terminal from the battery. It is necessary to disconnect the tubes from the pump (gasoline may spill). A special clamping ring-cover is unscrewed. The remaining gasoline should be drained from the fuel pump housing and the sealing ring should be removed. The pump can now be removed.
You will need to disassemble the pump to clean it. First, the lower part is removed, and only then the mesh. To dismantle the latter, you need to pick up the filter with a screwdriver at the place where the pump is attached to the housing. Usually the mesh is very dirty.
You can replace the part with a new one, but you can also clean it. As for cleaning the fuel pump mesh, it is better to choose one designed for cleaning the carburetor. If there is a need for mechanical action, it is better to clean the part with a soft brush. Then the mesh is dried and blown. At the end of the process, it is recommended to wash the mesh itself and the bottom of the fuel pump housing with gasoline. All that remains is to put everything back together.
It is not difficult to clean the fuel pump screen yourself. However, as with all repair work, all prescribed safety precautions must be followed. If you don’t want to do the replacement yourself, you can take the car to a service center, where they will do it for little money.
Assembly
The fuel pump must be installed so that its outlet fitting coincides with the recess in the top cover. Therefore, first, disconnect the insert with a coarse mesh from the flask (held on by several small latches).
Install the fuel pump into the flask, not forgetting about the sealing ring in the grooves of the lower and upper parts. A small ring is put on the body of the gas receiver. Snap the mesh onto the flask, aligning the fuel return drain fitting with the fitting on the mesh body.
Secure the plastic cover with 3 clips, put on the fuel pump hose, connect the power wires and screw on the part of the housing with the fuel level meter. The remaining components of the system are assembled in the reverse order of removal and do not cause any difficulties.
Tips and tricks
In the case when the gas tank is heavily contaminated, cleaning or replacing the fuel pump mesh will only be a temporary measure, and the rate of subsequent contamination of the mesh will not greatly depend on the quality of the fuel being filled. In such a situation, it is necessary to remove and wash not only the mesh, but also the gas tank.
To keep the fuel pump screen clean, try not to lower the fuel level in the gas tank below ½ unless necessary. Dirt and deposits that clog the mesh are usually located at the very bottom and are the last to be drawn in by the gas pump.
User Experience
My engine rarely stalls. A couple of times there were simply problems with the fuel, but once there was a problem with the pump. I figured out how to take it apart myself. I realized that there was no damage, it was just pollution. I had to change the grille - before I had no idea that they could be cleaned. Since then I have driven a hundred thousand kilometers and so far everything is fine. When another 20-30 thousand are added, then I’ll look under the hood. This time only for preventive purposes.
I'm new to driving, but have already encountered this procedure. When the car didn't want to start the first time, I thought the problem was with the battery. But then the engine began to behave strangely - it either would not start or suddenly increased speed. Friends suggested that we need to disassemble and clean the pump. As it turns out, it's not difficult at all.
I became a motorist five years ago. Since then, I have never needed to repair or change anything - my husband usually does this. He simply cleans the grille for himself, but always installs a new one for me. The answer to my questions is that it is safer.
I clean the grille every 150 thousand kilometers traveled. I have a sedan made by Nissan, and I almost never drive it outside the city. Although there are no particular problems, I should do this after about a hundred kilometers. Focus on the ignition - if everything is fine with the battery, then the pump is probably dirty.
I never do this myself and I don’t recommend it. Any car service center will do this procedure almost free of charge. In addition, mechanics spend less than half an hour on it, and when you do it yourself, you don’t know exactly how much more digging you’ll have to do. Aleksey Ivanov
Replacing the fuel pump filter
VAZ 2110 fuel pump filter
Now we finally come to the most important part, replacing the fuel pump filter. Replacing the fuel pump is usually done with your own hands and takes no more than thirty minutes.
First you need to disconnect the wires from the battery (usually the wire with minus voltage is disconnected); Then we move into the car interior and remove the passenger seats, since the fuel pump is located directly under them (electric); When we finally see the fuel pump, we need to carefully remove two screws from it and lift the cover; We see the power supply; it must be turned off; Then we take out the entire fuel pump and unhook the filter from it; We install a new filter, carefully attaching it; We put the fuel pump back in its place.
That's all, a new filter for the fuel pump has been installed and we did it ourselves. A fuel pump filter usually does not cost too much and its maximum price is 200 or 500 rubles. If these instructions are not clear enough, you can watch a video or photo and figure it out.
snag
In the snag areas of reservoirs you can find pike almost throughout the year, both in open water and in winter (photo 7). This is due to the fact that snags of various shapes and sizes perfectly camouflage the toothy predator during its hunt for small fish from ambush. By the way, in those reservoirs where I have to catch pike with winter baits, in snags the best bait is perch.
In my opinion, this is due to the fact that the striped robber is the most numerous here - in contrast to roach, bream and other fish, which are quite rare here. But further I would like to note one pattern that I was able to derive from two (I will emphasize here) low-flow suburban reservoirs. In the first half and middle of winter, the toothy predator was always present in the snags, often delighting me with its confident bites.
In the second half of winter, there was practically no pike bite here. This did not happen every year, but only in frosty, severe winters with almost complete absence of thaws. I believe this is due to the fact that even with the minimum positive values of water temperature inherent in the winter period, processes of rotting and decomposition still occur in the aquatic environment. And under a thick layer of ice in the snags, numerous woody remains rot, and as a result, the amount of oxygen dissolved in the water is significantly reduced.
Of course, during this period, pike and other fish leave these places unsuitable for life to areas of the reservoir with a more acceptable oxygen regime.
Hunting for pike in snags is fraught with certain difficulties and requires making some changes to the equipment of the trap. When fishing for toothy fish in such places, I use exclusively tees of relatively small size (I like Kamasan Pike No. 6 and 8 according to the Japanese classification), while catching the bait on the back. This allows you to immediately make a hook after the pike bites, when the fishing line is just starting to come off the reel. This practically eliminates the possibility of the predator getting the entire rig into a pile of snags at the bottom and then breaking it off on a dead hook.
Also, when fishing in snags, I try to be in close proximity to the placed girders in order to make a timely hook when a bite occurs and begin timely fishing.