There is a situation where the automatic washing machine does not fill with water. This malfunction appears quite often. What happens is something like this: the SMA turns on, there is an indication and a program is selected, but when starting, water does not flow into the drum and a hum is heard. Repeated attempts lead to nothing.
Note that this breakdown is typical for all brands, for example: Samsung, LG, Bosch, Electrolux, Zanussi, Ariston, Indesit, Virpull, Candy, Hansa , Gorenje, Ardo, Beko, AEG, Miele, Siemens, Kaiser and Atlant.
- Reasons for lack of water supply
- Water supply valve is closed
- Filler system clogged
- Fill valve malfunction
- Wiring damage
- Control module malfunction
- The pressure switch is faulty
- The hatch is not locked
- Drain pump broken
- The washing machine does not draw water well
- Washing machine catalog
Reasons for lack of water supply
Water may not be collected for the following reasons:
- the valve on the pipe is closed;
- clog in the inlet hose or filter;
- valves are faulty;
- wiring is damaged;
- control module failure;
- the pressure switch is not working properly;
- the hatch is not tightly closed;
- the drain pump is broken.
Washing machine without water
Let's consider each item in detail, as well as corrective measures.
Low prices
| Service | Price |
| Diagnostics | |
| When ordering repairs | For free |
| In case of refusal of repair | 1 standard hour |
| Full product diagnostics (functionality check) | 2 standard hours |
| Major renovation | |
| Replacing the electric motor | 1.5 standard hours |
| Replacing the drum pulley | 2 standard hours |
| Replacing shock absorbers without removing the tank | 1.4 standard hours |
| Replacing the electrical harness | 2.2 standard hours |
| Replacement of supports, crosses | 2.2 standard hours |
| Replacement of drum, tank | 2.5 standard hours |
| Replacing bearings | 2.5 standard hours |
| Installation of counterweights | 1.3 standard hours |
| Replacement of housing elements | 2 standard hours |
| Repair of medium complexity | |
| Sealing or replacing pipes | 1 standard hour |
| Replacing the drain pump | 1.2 standard hours |
| Removing clogged drain pumps and hard-to-reach pipes | 1.2 standard hours |
| Replacing the solenoid valve | 1.5 standard hours |
| Replacing the heating element | 1.5 standard hours |
| Replacing the pressure switch | 1.2 standard hour |
| Replacing the level sensor | 1.1 standard hours |
| Replacing the display unit, electronic module | 1.7 standard hour |
| Replacement (installation and dismantling) of KSMA | 1 standard hour |
| Electrical circuit repair | 2 standard hours |
| Configuration (firmware) of the electronic unit | 2 standard hours |
| Replacement of signal lamps of the dispenser, front panel | 1 standard hour |
| Belt replacement | 1.1 standard hours |
| Cleaning the dryer | 1.5 standard hours |
| Replacing the drying heating element | 1.5 standard hours |
| Replacing the thermostat, drying timer, suspension springs, hatch lock | 1.5 standard hours |
| Closing the drum curtains | 2.5 standard hours |
| Removing foreign objects from the tank | 1.6 standard hour |
| Minor repairs | |
| Removing the transport fasteners | 1 standard hour |
| Replacing the hook, hatch handle, hatch fastening, glass | 0.8 standard hours |
| Replacement of door seal, hatch cuff | 1.6 standard hours |
| Opening the loading hatch door | 1 standard hour |
| Replacement of the power button, capacitor, surge protector, power cord, repair of the KSMA indicator | 0.7 standard hours |
| Replacing the drain hose | 1.2 standard hours |
| Replacing the aquastop (hydrostop) | 1.2 standard hours |
| Minor repairs (without disassembling the machine) | 0.5 standard hours |
| Maintenance | 1 standard hour |
| Related | |
| Repair of units, modules | 50% of the price of new |
| Installation and dismantling of the built-in device | 1 standard hour |
| Cleaning the system | 1 standard hour |
| Markup coefficient | |
| Embedding | 1,8 |
| Premium model | 1,8 |
| Urgent departure (within 15 minutes) | 1,5 |
| Cramped working conditions | 1,5 |
| Any repairs involving complete disassembly of the product | 2,5 |
| Basic values | |
| Standard hour (rounded up to half an hour) | 1000 |
| Final provisions | |
| ● When repairing the control board, the technician takes the board, after the repair he returns it and installs it ● Spare parts and consumables are paid separately ● Travel outside the city - 40 rubles/km ● The final price of the repair is determined by the technician, based on the complexity of the breakdown and the volume of work performed | |
Water supply valve is closed
The situation seems banal, but it happens all the time. Perhaps work was being done on the water supply, or the valve was closed by mistake. It happens that they close everything off to be on the safe side, and then forget to open it.
The machine hums, but the water does not flow. The solution in this case is obvious.
Inlet hose
The filter mesh is clogged
A common factor that influences the machine not drawing water or doing it very slowly is a clogged filter mesh. It is located in front of the inlet valve and is designed to protect the unit from small debris that may enter from the water supply. But, since the quality of water often leaves much to be desired, this mesh can become clogged and prevent liquid from passing through. Or the pressure will become very weak.
What to do?
You can call a technician to clean the filter mesh, or you can try to deal with the problem yourself. To do this, you need to turn off the valve and disconnect the hose at the place where it connects to the washing machine. Then clean the mesh from any accumulated dirt and rust. After this, rinse the hose itself under high pressure.
Filler system clogged
It most often occurs in the summer, when the water is turned off for prevention. After restoration, debris flows through the pipes, and above all rust. It clogs the inlet hose and most often the filter mesh, which is located on the valve of the washing machine.
The solution is simple:
- turn off the water;
- dismantle the hose and clean it;
- Use a screwdriver and pliers to pull the mesh out of the valve and wash it.
Expert opinion
I work in the household appliance repair industry. Extensive experience in restoring washing machines and dishwashers.
Ask a Question
Installing filters on your water supply will help avoid this problem. But they also need to be cleaned periodically.
Clogged valves
“Climbing” under the top cover
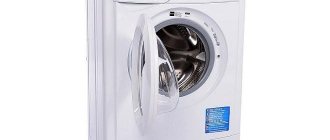
The most common culprit for a missing kit is a faulty fill valve. To solve the problem, it is enough to dismantle the old device and install a new one in its place. The only question is the price - in the service center the repair will be estimated at 4-5 thousand rubles, and a replacement with your own hands will cost a maximum of 500 rubles. You can meet the last amount even when purchasing high-quality spare parts.
The upcoming scope of work will not frighten even a beginner - everything is done simply, quickly and without unnecessary risks. You just need to follow the instructions.
- Disconnect the washing machine from the network and water supply.
- Disconnect the inlet hose from the body (do not forget about the residual water, which is best drained into a previously prepared container).
- Unscrew the bolts holding the top cover and remove the panel.
- Find the valve and take a photo of the connected line (this will help avoid problems when connecting back).
- Disconnect the wiring.
- Release all 4 hoses connected to the valve.
- Unscrew the valve fixing bolt.
- Remove the part from the housing.
- Install a new valve in the free space.
- Secure the part with a bolt, bring in the previously removed hoses, tighten with clamps and connect the wiring.
- Replace the cover.
To avoid mistakes when connecting the wiring to the inlet valve, it is recommended to photograph the terminals before dismantling.
All that remains is to attach the inlet hose back to the Bosch and open the tap. After that, the washing machine is connected to the network, and any fast program is selected. If the drum begins to fill, it means the replacement was successful.
Interesting:
- Which Bosch washing machine is better to buy?
- The washing machine hums, but does not draw water
- Error codes for AEG washing machines
- Whirlpool washing machine errors without display
- Indesit washing machine displays error F07
- Ardo washing machine does not fill with water
Reader comments
- Share your opinion - leave a comment
Fill valve malfunction
We diagnose filler valves using the following algorithm:
- We check the resistance using a multimeter. A working one should be around 4000 ohms. If there is infinite resistance, or a multiple of the difference, we change it.
- If the first method does not reveal the problem, then manually connect the voltage to the valve using “carrying”. If there is no water supply to the tank, and provided there is no blockage and the valve is closed, we install new valves.
These devices differ:
- method of attachment to the body;
- angle of inclination to the pipe (90 or 100°);
- number of valves in the device (from 1 to 3 pieces).
Expert opinion
I work in the household appliance repair industry. Extensive experience in restoring washing machines and dishwashers.
Ask a Question
Important! They are always supplied with a voltage of 220 volts.
Filling valves
Useful tips
To wash without problems with water supply, carry out regular preventive maintenance.
Here are 5 simple tips to prevent common problems:
- pay attention to the sounds the machine makes to identify the problem in time;
- do not run the machine dry: check the presence of water in the taps and open the shut-off valve of the inlet hose;
- every 10 washes, clean the rubber seal, the hatch door and the latching mechanism;
- do not allow high levels of humidity to maintain the functionality of the board;
- Explain to children the dangerous consequences of playing with the programmer while doing laundry.
Following the recommendations will extend the life of the washing machine and fully preserve the functionality of the device.
Wiring damage
Manufacturers of washing machines are quite economical in their use of components. This often leads to the following situations:
- The wires are stretched tight. Sometimes at an angle of 90°. The result is a break.
- The thickness is very small, and overloads or power surges cause damage.
- The weak point is the terminal chips.
These breakdowns lead to the fact that electricity is not supplied to the contacts, and therefore water does not flow into the drum.
Important! The MCA valves are in a permanently closed state.
Are you using citric acid?
Oh yes! No
Prevention
In order not to encounter a situation where water does not fill into the Bosch washing machine, preventive measures should be used.
These include the following:
If the water in the water supply is heavily polluted and has foreign inclusions, then it makes sense to install a water filter in your apartment.
This will prevent scale and other contaminants from entering the washing machine, which will extend the life of the machine.- Frequent power surges in the electrical network can lead to burnout of elements in the control unit and to expensive repairs.
Installing a voltage stabilizer and connecting Bosch to the network through it will help prevent equipment breakdowns. - Compliance with the rules for using a washing machine is the most basic preventive measure.
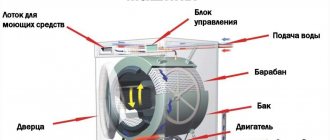
Control module malfunction
The electronic module of modern washing machines is a small computer with a processor, memory and software. It is he who controls all the nodes and gives commands or supplies voltage.
In the event of a breakdown, there are two options:
- Purchase of a new module corresponding to the SMA model with subsequent firmware.
- Repair.
SMA control module
The second option is more preferable in terms of money, but to implement it you need an experienced electronics engineer who also understands the principle of operation of washing machines. In addition, it is not always possible to find a new unit, due to unavailability from nearby suppliers or the model being discontinued.
Expert opinion
I work in the household appliance repair industry. Extensive experience in restoring washing machines and dishwashers.
Ask a Question
Important! In the West, no one restores modules. Just installing a new one.
The lock of the laundry loading hatch is broken or not closed
One of the main protections for new generation washing machines is the lock on the door hatch. If it does not fit tightly or closes without a characteristic click, water will not be poured into the unit and the washing program will not start. Make sure the door is tightly closed. To do this, open and close it again. Start the washing program again.
In some cases, the door may not lock, and the corresponding error icon will light up on the electronic display. This means that your lock is broken: the problem is in the locking tongue or latch located inside the body of the machine itself. Open it and look carefully: perhaps the rod that serves as a fastener for the latch has fallen out of the tongue on the door. It can be inserted by carefully disassembling the hatch. A mechanically broken lock and damaged door will need replacement.
If the door is not closed tightly, the machine will not draw water.
With frequent and long-term use, the hinges in the washing machine hatch that connect it to the washing machine body may become loose. This will cause the door to latch tightly. You can screw the hinges with your own hands using a screwdriver.
The pressure switch is faulty
The pressure switch detects the water level in the tank, and its breakdown causes it to send incorrect signals to the control board.
For example, that the drum is full. As a result, voltage is not applied to the valves, and water flows. Level sensors cannot be repaired. The adjustment is carried out at the factory and sealed.
Important! This is a reliable device that rarely fails.
Water level sensor
What to do
There are several recommendations that will help normalize the operation of the washing machine and restore the flow of water.
Checking the water tap
If liquid is not supplied, you need to check the tap responsible for the flow of water. When checking, you need to make sure that it is installed in the correct position. Sometimes people turn off the water themselves and forget to open it.
If during the inspection a breakdown of the tap was discovered, you will have to replace it with a new one and then check whether the machine will pump water into the tank.
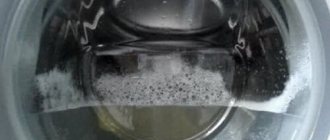
Drain the water, check the hose
Sometimes the water doesn’t come out because there is some liquid left in the machine system that needs to be gotten rid of. To drain the water, follow these steps:
- disconnect the hose that connects the washing machine to the sewer;
- lower it into an empty basin or bucket.
After draining the water, you can check the inlet hose and clean it if there is a lot of debris inside. If you cannot clean it properly, you can replace the hose with a new one.
Cleaning the washing machine filter
A filter is installed in the inlet hose, which clears the water of debris. Over time, it becomes clogged, which leads to a deterioration in the flow of fluid. When inspecting the filter, it is better to use a flashlight to better see how dirty it is. If there is a lot of debris on it, you will have to remove it, clean it with a brush and put it back in place.
See also
Making butterflies on the wall with your own hands using a paper stencil and how to stick them beautifully
To prevent the filter from becoming too dirty, you need to clean it once a month.
Contacting a service center or technician
People who are not knowledgeable about washing machine repair should not try to fix it themselves. Especially when it comes to expensive models from Samsung, Intesit or LG. It is better to entrust such work to professionals who have been repairing washing machines for many years. You can contact an individual master or use the services of special service centers.
Online diagnostics of a washing machine
If your machine stops washing or rinsing clothes normally, then some kind of malfunction or breakdown has occurred.
You can try to find the problem yourself. Run diagnostics
Select which operation your washing machine does not perform:
1. Doesn’t drain 2. Doesn’t rotate the drum 3. Doesn’t spin clothes 4. Noises, knocks, buzzes when spinning 5. Doesn’t turn on
Checking the operation of the drain pump Is the drain pump of the washing machine working? Yes No I don’t know << Back
Clogged hoses in the washing machine If the sound corresponds to the normal sound that has always been observed when the device is working, the cause is probably a clog.
Was there a blockage in the drain hose? Yes
<< Back
The drain pump does not work! If the sound matches the normal sound of the drain pump, it is recommended that you check the drain filter first.
After cleaning, does the drain pump work and does the washing machine drain water? Not really
<< Back
Operation of the drain pump The sound of the pump is usually immediately audible and noticeable. If there is no sound, the pump is not working. We are looking for how to separately enable the water drainage program. As a rule, this is a separate option. After the program has been turned on, the pump should start working in 1-3 seconds. If everything is done correctly and the pump is operational, a buzzing sound will appear. If you hear no buzzing or other sounds when you turn on the program, the pump is probably faulty.
Is the washing machine drain pump working? Not really
<< Back
Clogged car hoses If you have identified a clog in the hoses, you need to disassemble them, clean them, and then reassemble everything.
Does the washing machine drain well? Not really
<< Back
Hurray, you did a great job, you fixed it.
<< Return to the beginning of diagnostics
The drain pump is faulty, call a professional.
<< Return to the beginning of the diagnosis.
The washing machine does not rotate the drum. During the operation of the washing machine, such a problem may occur. Each model has a different drum operation. It rotates according to a given algorithm, which is set by the program. This principle applies to spinning and washing. If you are not sure whether the drum is not spinning or whether it is working, put the laundry in the washing machine. Start the spin program. If the machine is running, it will first drain the water and then start spinning. In this case, a rotational process will be observed. If rotation is not visible, then check the belt. First, turn off the program, then unplug the wire from the outlet so that power does not flow into the device. Now you need to remove the back cover. You will need to carefully inspect the drum belt. It is quite easy to determine whether it is in the wrong position or damaged.
Is the washing machine belt torn or stretched? Not really
<< Back
Broken drum drive belt If the belt breaks, it will be immediately visible. There are also often cases when the belt simply stretches, which is why the drum, accordingly, does not rotate. Do not allow the machine to operate if the belt breaks. It is important to check whether it has wound around the engine pulley or broken the wiring to the engine. The heating element and temperature sensor may also be damaged if the belt does catch the wires. It is imperative to ensure that the belt model is original. If you choose an unsuitable or low-quality product, this will affect the performance of other devices. How do you know what kind of belt you have? There will be a marking written on the old one, compare it with the one indicated on the belt offered to you. You can also find out belt information by car model.
<< Return to the beginning of the diagnosis.
Washing machine motor malfunction If a malfunction is not found, the block with wires must be disconnected from the electric motor. Carefully remove it. We visually evaluate the engine. It may have melting, cracks, or other effects that clearly indicate damage. We call the windings of the tachogenerator and the engine. It is important to understand that you can fully study how correctly the engine operates and whether there is a malfunction only at the stand. If rotation does not occur, there may be a problem with more than just the motor. Sometimes the cause is a malfunctioning electronic module. If a short circuit occurs in the engine, the module could be damaged, while the engine remains operational. Also, the wires could be damaged.
<< Return to the beginning of the diagnosis.
Repairing a washing machine that does not spin clothes After completing the washing process, the washing machine may not spin properly or may not start spinning. Firstly, look, perhaps another mode is set, which does not involve turning on the spin cycle at all. This happens, for example, with programs related to washing woolen items and delicate fabrics. To check, run the spin cycle separately. If the washing machine does not drain water, we proceed to check the pump.
Does the washing machine now spin clothes? Not really
<< Back
Congratulations, you have solved your problem!
<< Return to the beginning of the diagnosis.
Repair of washing machines, imbalance Modern washing machines place the laundry on the drum before spinning. This is necessary for quality work. Check if this feature works. Sometimes a situation occurs when things get wrapped up in a ball that cannot be unwound automatically within a certain time. At this point the work stops. You need to unwind this laundry yourself, lay it out and continue operating the washing machine. In this case, it is important to turn off the machine, and then, when the laundry is laid out, turn on a separate spin program.
Does the washing machine now spin clothes? Not really
<< Back
Washing machine repair, drum drive repair Now you need to check the drum drive belt. We remove the cover and visually assess the condition of the belt. There should be no damage. If the tension is weak, the spin may not turn on. If you need to replace the belt, you should only replace it with the original one. After replacing, we try the program again.
Fault found, does the washing machine spin? Not really
<< Back
The engine or electronic module is faulty, call a repairman to your home.
<< Return to the beginning of the diagnosis.
The washing machine hums, makes noise during the spin cycle, rumbles, and makes a jet plane noise. If the washing machine makes noise during operation, making unusual sounds, it’s time to pay special attention to it. In this case, a visible breakdown or lack of functionality may not be observed, but the appearance of strange sounds indicates that it is time to look for a malfunction. It is important to understand that a new car that has just been delivered should be inspected for shipping bolts. If you forget to remove them, noise and vibration are inevitable. So, let's begin! We turn the washing machine drum and listen to extraneous sounds.
When rotating, do you hear extraneous noise, hum, balls rolling, does the drum move unevenly with slight jamming? Not really
<< Back
If the drum rotates and uncharacteristic sounds appear, including vibration, it’s time to check the bearings. If they malfunction, they will have to be replaced.
<< Return to the beginning of the diagnosis.
The counterweight of the washing machine has come loose. The fastening of the counterweights must also be of high quality. If they are “loose”, it’s time to eliminate this defect. In some cases, you can notice that the bolts that secure the stones are completely missing. In this case, the connectors for mounting will be visible. The bolts need to be found and put in place - they probably simply came loose. A rumble heard while the washing machine is operating may indicate that the bolts have partially loosened. To check the bolts, you can simply push the drum. If it is secure, the bolts are fine. If it moves, there is a defect.
Do you hear any noise, clanging or rattling noises when moving the washing machine tub? Not really
<< Back
The counterweight has come off
<< Return to the beginning of diagnostics
Checking the shock absorbers of the washing machine Checking the shock absorbers. If you hear vibration or excessive noise during the spin cycle, there may be a problem with the shock absorbers. Sometimes the washer moves. Now let's check the functionality. Remove the top cover. Click on the tank, move it five to seven centimeters down. A normal reaction will be observed if the tank rises sharply, jumping a little and stopping in its normal place. If this does not happen, the shock absorbers need to be replaced.
Are the shock absorbers of the washing machine working? Not really
<< Back
If a visible defect has not been identified, check whether a foreign object may have entered the machine. Replacing shock absorbers. The problem with shock absorbers wearing out occurs quite often over time.
<< Return to the beginning of the diagnosis.
Replacing washing machine shock absorbers. Malfunction and wear of shock absorbers is a fairly common phenomenon.
<< Return to the beginning of the diagnosis.
The washing machine does not turn on. It is worth trying to find the cause of the problem yourself and fix it. We start by connecting the device to the network. Next, click on the “network” button. In different car models, different indications are triggered: here either the display will start working, or, on the contrary, some other button.
Does the washing machine have an indicator? Not really
<< Back
Hatch lock lock (UBL) You can check it by turning on any of the programs. We choose what we will use. Click on the corresponding button. Don't forget to pay attention to the inclusion. As a rule, the process of activating a function is characterized by the presence of a certain sound, for example a click, with which the device makes it clear that pressing again is not necessary and the machine is already working. If there is no sound, the button may be broken. In this case, the main thing that must be done is to block the hatch and start working. If this happens, everything is fine.
The washing machine is blocking the hatch and the UBL is triggered? Not really
<< Back
Water fill valve malfunction
<< Return to the beginning of the diagnosis.
The washing machine hatch does not lock
<< Return to the beginning of the diagnosis.
No indication Checking the electrical circuit. If you notice that the washing machine does not respond to being turned on, it is first recommended to check the power supply. The outlet may be faulty. Try connecting another device. If the outlet works, you need to check whether the circuit that conducts energy through the washing machine from one element to another is intact. To do this, you will need a multimeter, which will help you fully analyze the ability to respond to an electrical signal at several stages of operation. If there is no network connection anywhere, this is probably the problem. We carry out this manipulation until we reach the electronic module. If we are talking about an old washing machine, here it will look like the device’s program. When you turn on the button, there should be no breaks in the circuit. If the circuit works, everything is fine electrically.
Is the washing machine's power supply OK? Not really
<< Back
Repair of electronic module (unit)
<< Return to the beginning of diagnostics
Contact circuit fault
<< Return to the beginning of diagnostics
Failure of individual parts
If a visual inspection and cleaning of contaminants do not give a positive result, most likely, the machine is signaling the breakdown of certain parts responsible for drawing water to the required level.
In most cases, you can get by with cleaning or restoring them, but sometimes it is necessary to replace failed elements.
No. 1 - malfunction of the water supply valve
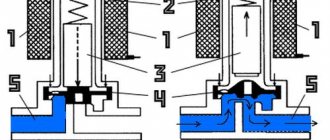
Water flows from the water supply into the washer tank due to high pressure, and this pressure is regulated by the inlet (fill) valve. It works like this: a current is supplied to the coil, creating an electromagnetic field, under the influence of which the shutter opens and allows access to the flow from the water supply.
When the tank is filled, the control module sends a signal to stop supplying energy to the valve winding, causing the valve to lower and block the water.
Modern appliances are equipped with valves with two/three coils, which direct the flow of water to a specific section of the detergent dispenser, while parts with one coil remain only on older washing machines.
To inspect the valve, you must first remove it. To do this, turn off the power to the device, remove the inlet hose and mesh, and at the same time wash the filter.
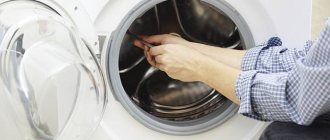
Then open the cover of the machine, disconnect the wiring and pipes from the part and, depending on the type of fasteners, bend the latches or unscrew the bolts. All that remains is to turn the valve and pull it out of the machine body.
For front-loading machines, you should look for the valve at the top of the back wall, while in top-loading models it is most often located at the bottom of the body. To get there you need to remove the side panel
Detailed information about disassembling washing machines of different models is presented in this article.
Now you can check the functionality of the element. First, connect the inlet hose to the valve, supply water and inspect for leaks - a working valve will not leak. Then measure the resistance on each coil with a multimeter. A value of 2-4 kOhm is considered normal.
You can also verify the correct operation of the valve by applying a voltage of 220 V to each section in turn: the valve should open, and the de-energized valve should close.
Of course, you can try to give a “second life” to the part by replacing the burnt-out winding, but there is no guarantee of the success of such a repair. Therefore, it is much easier to buy a new valve, because it is inexpensive, and it is easy to change - just assemble the structure in the reverse order.
But if the electronics are working properly, the valve may be clogged or a foreign object has entered it and is interfering with normal operation. In this case, you can disassemble the part and clean it.
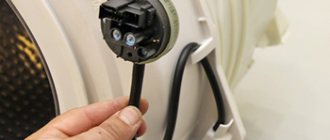
No. 2 - breakdown of the pressure switch and replacement instructions
The filling of the tank of the machine is controlled by a water level sensor - a pressure switch. This is a small round-shaped element made of plastic, to which a cable of wires and a tube leading from the high-pressure tank are connected.
It works like this: when filling the tank, pressure is supplied through the tube corresponding to the required water level for each mode, depending on which the relay opens/closes the contacts.
If the pressure switch breaks down, the machine may simply not take in water, refusing to work on the washing and rinsing program, or, on the contrary, constantly drain it without keeping it in the tank.
To get to the water level sensor, remove the cover of the machine and you will see a round element located at the top of one of the panels
To check the operation of the pressure switch, unscrew the mounting bolts, disconnect the wires and hose. It is held in place by a clamp, which should either be pressed out with pliers or simply unscrewed.
Then inspect the device itself and its tube for mechanical damage and blockages. If the hose is clogged, it should be removed and washed, and the dirty pressure switch contacts should be cleaned.
Diagram of the pressure switch device. To save water, the sensor can be “programmed” at your discretion by tightening the adjusting screws, but without the proper skills and understanding of the device circuit, you should not experiment
If no blockages are found, you can check the pressure switch using a small piece (10-15 cm will be enough) of a hose of the same diameter as the tube removed from the sensor.
To do this, you need to connect one end of the new hose to the sensor input, and blow or immerse the second input in a container of water - clicks will be heard from a working element.
You can also use a multimeter to check - conductivity readings should change as pressure increases.
If the pressure switch fails, you need to buy a new device suitable for your washing machine model. You can check the markings indicated on the part itself. Then connect the tube, insert the contacts and secure the sensor with bolts, that is, reassemble and check the operation of the machine.
No. 3 - board failure or programmer failure
If there is a problem with the control device, the machine simply does not receive the “order” to draw water. The easiest way to fix an electronics failure is to turn off the power to the device for 10-20 minutes, then plug it in and try to restart the desired program.
Perhaps the controller will reboot and the machine will start working. But take note that such a failure is the first bell indicating an upcoming repair of the washing machine in the future.
To make sure that the reason lies precisely in the “brains” of the device, make sure that the pressure switch, the water supply valve are working properly, that there are no blockages on the inlet filter and the inlet hose itself
Most often, the electronics of a washing machine fail for the following reasons:
- High humidity in the room where the device is installed causes the contacts to become damp and come off. You can try to remove and dry the board (even blow it with a hairdryer at low speed) and subsequently make sure that the humidity level does not exceed 70%.
- Water penetration into the control unit . Here a lot depends on the brand and manufacturer of the machine. In some models, for example, Samsung and LG , the “brain” of the device is completely sealed and protected from such troubles, while in the same Indesit or Ariston the board may get wet during washing or when carrying the device.
- Power surges or low voltage . For the washing machine, you need to provide a dedicated outlet, and connecting through a stabilizer will help level out the differences.
- A kinked power cord, an old socket or plug with faulty contacts - all these nuances need to be eliminated and, if necessary, worn parts replaced.
If you suspect a malfunction of the main microcircuit, you need to use a multimeter to ring all the elements that are responsible for controlling the water supply.
The most common problem is the breakdown of the fill valve control triac - the element upon whose signal the machine starts drawing water. But traces and solders can also burn out, and diodes, relays or resistors in the valve control circuit can fail.
To remove the module with the board, you need to remove the cover of the machine, remove the powder receptacle and disconnect the fasteners holding the dashboard, and then the clamps of the module itself
A malfunction can be visually identified by the following signs:
- The microcircuit has areas of discoloration, darkened tracks, carbon deposits or marks.
- Burnt varnish coating was found on the damping coils.
- The “legs” of the microcircuit have darkened or marks are visible where the processor is installed.
- The caps of the capacitors have become convex or torn at the cross notch.
If you have experience working with microcircuits, you can try to clean “suspicious” connections using contact cleaning fluid.
If the problem is only carbon deposits or contamination from soap solution, the conductivity of the contacts should be restored.
But if this does not help, you should replace the elements that did not pass the multimeter test, re-solder the burnt tracks and solders, and, if necessary, reflash the board.
Self-repair of electronics is worth undertaking if the warranty period of the device has already expired and you are confident in your skills in working with a soldering iron and multimeter.
But if you have no experience in such “reanimation”, you can completely replace the board with an identical one or contact a service center for help.
Drain pump broken
It would seem that there is a non-obvious reason for the lack of water supply. But the SMA contains the following algorithm: if the machine cannot drain water, then it should not flow. Automatic washing machines have a built-in fault diagnosis mode, which is expressed in informing users in the form of error codes.
If the drain pump is broken, then water will not flow, and the corresponding fault will appear on the display. After replacing the pump, the problem will go away and the washing machine will work fully.
Drain pump inside the washing machine
Fault signals for popular models
If water does not flow into the machine at all, the essence of the problem is clear. But sometimes the appliance simply does not receive enough water to fully wash or rinse: we see that the drum is not empty and cannot determine the cause of the problem.
In this case, the signals from the machine itself will help, which are displayed on the display immediately or after starting the diagnostics.
In many washing machines, if the supply is insufficient or the water intake system is broken, the chemical formula of water is displayed on the display - H2O
Problem codes with water intake for some popular models:
- Asko – Water inlet fault or E01;
- Zanussi and Electrolux – E10 or E11;
- Candy – E02;
- Ariston, Hotpoint Ariston and Indesit – H2O;
- Samsung – E1;
- – PE or IE;
- Whirlpool – F01 or FH;
- Bosh - F01 or Aquastop.
If the washing machine is not equipped with a display, the causes of the malfunction will be indicated by flashing lights on the panel. This code is programmed at the factory, so its meaning depends on the specific model, and a decoding table is included in the product instructions.
The washing machine does not draw water well
There are situations when water flows slowly into the drum. Sometimes this results in an error. The fact is that the control module allocates a certain time to achieve the desired level. And if it was not reached, then an error occurs and the work is blocked.
Causes:
- Weak water pressure. It can be caused by a general drop in pressure in the house. Then you need to contact the appropriate service. But the water supply valve may also be partially blocked, and as a result the pressure is insufficient.
- The second reason is a clogged inlet hose and/or filter mesh of the water supply valves. This issue was discussed above.
As you can see, some of the reasons can be eliminated on your own, but for some you need to invite a qualified specialist.
Water level sensor (pressostat)
Another reason for water not filling is a breakdown of the pressure sensor (pressure switch). It controls the amount of water supplied, and in the event of a malfunction, the washing machine cannot measure the amount of liquid, and without this, the wash will not start. You can test it in one simple way. The water supply hose is disconnected, and a piece of tube of suitable size is placed in its place. Blow into it, and if you hear the springs switching clicks (usually three times), then you need to look for the problem elsewhere.
Heating element malfunction
If the heating element responsible for heating the water breaks down, the washing machine stops drawing water, and many other functions stop working. In this case, the rinse mode should work, because it does not require heating. If the problem really is a breakdown of the heating element, then you will notice this by other signs: after washing, the laundry remains dirty and has an unpleasant odor, the door remains cold.
What to do?
To solve the problem, you need to replace the heating element.
Hatch door
If the washing machine does not draw water, the reason may be that the hatch door is not closed. The problem is eliminated by removing things that interfere.
Often the doors do not close for other reasons:
- Skewed hinges;
- Deformation of the plastic guide;
- The electronic shutter is broken;
- The door lock does not work;
- Dirt or small objects have gotten into the locking holes;
- The control module is broken.
The machine does not draw water if the door is not completely closed until it clicks.
Table. What to do?
| Cause | Troubleshooting |
| Skewed hinges | Buy a new hinge and replace it. Take a screwdriver and disconnect the hatch door from the washing machine body. Remove it carefully. Unscrew the mounting bolts. Remove the old part and install the new one. Screw everything back and lubricate it first with sunflower oil, if there are no special lubricants, after a couple of days with grease or something else you buy in the store. |
| Deformation of the plastic guide | Some models of washing machines are equipped with a plastic guide that is installed under the tongue. It wears out and becomes deformed due to the misalignment of the hatch door. The plastic guide must be replaced. Repair is not possible. |
| Failure of the hatch lock | The door lock can be replaced. If it is faulty, disconnect the device from the power supply and remove it. Go to the store and buy a similar one. |
| Foreign body in the UBL hole | Dirt and small objects can penetrate the lock opening. Even a piece of thread prevents blocking. Inspect the lock carefully and remove it. |
| The control module is faulty | Often the board fails. The contacts on it burn out due to voltage surges or moisture. In this case, diagnostics of the control module is required. It can be repaired, reprogrammed, or will have to be replaced with a new one. |
After repairs, water should flow into the tank. Plug in the machine and run a new wash cycle to check the serviceability of the hatch door.