The choice of roller blinds is almost limitless. Having chosen the appropriate color, size, and transparency, you have to decide how the structure will be fixed. This choice determines how comfortable it will be to use the curtains and how long they can be used.
The article describes various installation methods: on plastic and wooden window frames, on the wall, on the ceiling. Each method has its own characteristics. We hope the information in this article will help you find a roller blind that will work properly and be pleasing to the eye for many years.
Types of fastening of roller blinds
The roller blind can be held on a special mount or on adhesive tape. Can be fixed:
- on the window profile;
- to the slope inside the window opening;
- above the window opening on the wall;
- to the ceiling.
The choice depends on the size of the canvas, the characteristics of the room, and personal preferences.
It is preferable to hang massive rolls on special fastenings that are held on with self-tapping screws. Small, lightweight structures will be held on without any problems with special adhesive tape or double-sided tape. As a rule, a package with a finished roller blind contains 2 different mounting kits, and the buyer chooses at his own discretion. When ordering according to individual sizes, you can choose fasteners according to the manufacturer’s recommendations.
It is advisable to screw large massive rollers to the ceiling. When mounted on ceilings, deformation of structures is less likely due to the rational distribution of the load (the center of gravity will be under the screws, and not to the side of them). A niche can be provided for ceiling mounting.
Attaching it to a slope will help to visually hide the size of a large roller. When deciding to fix the roller blind on the slope, make sure that the material of the slope can withstand the load. For example, on plastered and puttied slopes there will be no problems with fixation. Slopes made of sandwich panels will not be held by self-tapping screws.
A small window, especially without a window sill, will look stylish with a curtain attached to the wall above the window opening.
Light and compact rolls can be fixed on the window frame. This solution will allow you to make the most efficient use of the window sill surface.
IMPORTANT! When choosing a fastener, make sure that the windows open and close smoothly.
When using roller blinds with curtains and drapes at the same time, it is important to provide sufficient space for all window decor elements.
Guides for roller blinds significantly extend their service life. They provide movement without displacement or deformation.
How does the type of curtains affect the installation process?
The table briefly summarizes the installation features of the main types of roller blinds.
| Type of curtains | Installation features |
| Fabric | Such curtains are relatively light in weight, which is why they can be easily attached both to walls and ceilings, and directly to the window frame. |
| Plastic horizontal blinds | Plastic is also often lightweight and can be installed using any type of installation. |
| Horizontal wooden blinds | Typically, this type of blinds is not hung on a frame due to its significant weight, in order to avoid deformation of the window. It is better to turn to the ceiling mounting method. Or use the side surfaces of the opening for this. |
| Smooth roll | This type can be mounted in any way. |
| With pleats (classic) | It is not recommended to mount the classic version directly on the doors, in the immediate vicinity of the glass - the folds require distance. In this situation, it is better to choose to install the curtains on the top of the opening or on the walls. |
| Open (without eaves) | Such curtains do not impose restrictions on the method of fastening. However, they should not be used in areas with harsh operating conditions. An unprotected mechanism can be damaged by large amounts of dust, dirt or moisture. |
| Closed (with cornice) | They can also be installed anywhere. True, for them the installation process is somewhat more complicated than for open analogues. |
The fastening method must be chosen before purchasing a roller blind.
Each type of curtain is characterized by its own specifics, which should be taken into account when making the final choice of the appropriate option.
Mounting on plastic windows
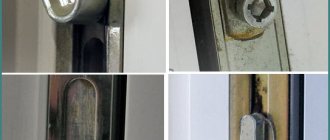
For plastic windows, it is preferable to mount without using self-tapping screws, since later, when deciding to remove the decor, it will be problematic to disguise the holes.
If for some reason you decide to install the structure on plastic windows using self-tapping screws, our recommendations are detailed in the next section on mounting to wooden windows. The only peculiarity is that before screwing the screws into the plastic frame, it is better to drill holes in it with a drill.
Without drilling into a plastic profile, roller blinds can be fixed using spring brackets or plates, which are fixed with a special adhesive tape or double-sided tape.
Each curtain model may have individual features, which will be reflected in the accompanying instructions. Perhaps the most significant difference will be the choice of fastening depending on whether the window sash opens. Spring brackets are used for opening sashes, and plates for blind sashes. However, the principle of fastening without drilling is the same for all canvases and is as follows:
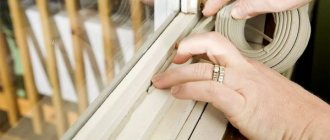
- We prepare all the components for curtains and a pencil, and if there is no special adhesive tape included, double-sided tape.
- The fastening elements and the surface of the profile on which the roll will be attached must be thoroughly washed, degreased with alcohol and dried.
- We glue pieces of tape onto the fasteners, leaving a protective film on the side that will be in contact with the window profile.
- We assemble the roller blind design completely.
- We fix it on the window with our hands, without gluing it to the tape.
- Mark the boundaries of the fastenings (brackets or plates) with a pencil.
- We remove the structure from the window, disconnect the roller with the canvas.
- Remove the protective film from the fasteners and firmly press the fasteners into the marked place.
- We put the chain mechanism on the gear.
- We fix the roller in the holders.
- We check whether the mechanism works properly: open and close the curtain.
With spring bracket
Installation can only be carried out on an opening sash.
Another significant advantage of this method of fastening is the ability to use a roller blind with a spring mechanism.
The installation algorithm is as follows:
- Assemble the curtain and attach it to the frame, marking the attachment points.
- At the marked points on the frame, hang the bracket.
- Secure the side covers of the bracket.
- Place the roller with the fabric in the mount, making sure that the curtain is positioned correctly and moves without problems in both directions.
- To make it heavier, install clamps and a lower position limiter.
Mounting on wooden windows
For wooden windows, it is preferable to fasten roller blinds with self-tapping screws. They provide high structural strength. If you refuse them, there will be no sticky marks left after the self-tapping screws, which require a lot of effort to remove.
Holes in wood can be filled easily and without leaving a trace. If you decide to install roller blinds on wooden windows using double-sided tape, you can read our recommendations in the previous section.
Self-tapping installation principle:
- We lay out all the components for the curtains on a flat surface, and make sure that the kit includes screws. If not, we get ours. You will also need a drill and a pencil.
- We assemble by connecting the roller with the fasteners.
- We attach the structure to the window profile, without screwing anything, and fix it with our hands.
- Mark the holes with a pencil. They should coincide with the holes, that is, you mark them as if using a stencil.
- We remove the structure from the window.
- We disconnect the fasteners, apply them to the marked place, and fasten them with self-tapping screws.
- We put the lifting mechanism on the gear.
- We fix the roller in the holders.
- We make sure that everything is working properly: we lower and raise the curtain.
With Velcro
The advantage of this mounting option is that Velcro can be used to mount the curtain even in the absence of a cornice and without drilling.
When purchasing, take into account the size of the window opening.
In addition, it is suitable for decorating a room in any style, is easy to install and maintain, and has a long service life.
The design of such sun protection systems is as simple as possible.
Before attaching the roller blind to the window using Velcro, you need to determine the place where it will be placed.
Determine where the curtain will be installed before attaching it.
Further:
- Cut a strip of fabric. Its width will depend on the density of the curtain.
- Fold the strip in half and iron.
- Sew Velcro to the top edge of the curtain.
- Fold the fabric and stitch it as close to the Velcro as possible.
- The front side of the fabric will be covered with a strip. It also needs to be secured with a seam.
- The rigid side of the fastener is applied to the window frame and glued.
- The correct operation of the roller blind is checked.
Wall mounts
Roller blinds are attached to the wall only with self-tapping screws.
- We prepare all the parts of the curtain, self-tapping screws with dowels, a pencil, a level, a hammer drill (perhaps a drill will be enough).
- We assemble the structure.
- We attach it to the wall.
- Mark the locations of the holes. It is advisable to use a level. While installation on a window frame occurs almost along the edge of the frame, and it itself can be considered a level, on the wall it is recommended to align the roll and mark it according to the level.
- We drill holes according to the size of the screws. It is highly likely that you will have to use a hammer drill, especially in a multi-story building. As a rule, windows are located in load-bearing walls. They often contain metal fittings. The likelihood of hitting the fittings with a drill increases significantly if you drill a hole directly above the window where the lintel is located. An ordinary drill will not cope with this task.
- We hammer the dowels into the holes.
- We screw the fasteners onto the self-tapping screws.
- We put the chain mechanism on the gear.
- We hang the roller in the fastener.
- We check the operation of the mechanism, lower and raise the roller blind.
How do roller blinds work day and night?
The curtain canvas consists of alternating stripes - thick fabric (“night”) and transparent mesh (“day”). In length, it is twice the height of a regular roller blind, since it is thrown over the shaft and wound onto it. As it moves, the dense fabric either covers the mesh, completely darkening the room, or opens it.
Interesting materials:
How to remove ink from a leather bag? How to remove blackness from an aluminum pan? How to remove double-sided tape from the refrigerator? How to remove the on-screen keyboard without a mouse? How to remove glitter from clothes? How to remove deep scratches on a plastic bumper? How to remove bitterness from Gruzdyanka? How to remove bitterness from salted milk mushrooms? How to remove bitterness from salty Volnushki? How to remove bitterness from Volnushki?
Fastening without drilling
The method of decorating a window with roller blinds without drilling involves the use of adhesive tape. This mount is suitable for windows with plastic frames. In rare cases, the roll can be fixed to the upper slope of the window. To do this, the slope must be made of PVC.
IMPORTANT! Attaching to a PVC slope poses some problems:
- the slope may not be perfectly smooth, and a deviation from the level of even a couple of millimeters causes the entire roll to skew, which can cause damage to the edges; deformation of the slope can also occur as a result of installing a structure on it;
- the quantity and quality of adhesive tape must correspond to the weight; If you make the wrong choice, the structure may fall.
Double-sided tape can hold a roller blind on a wooden window, but this is not rational. For wooden structures, a self-tapping screw connection would be more suitable.
Fastening to plastic frames is described in detail above in the 3rd section of our article; to wooden ones - in the 4th.
Magnetic tape
This mounting option is only suitable for a small product. It can be installed either on the wall or directly on the window. To do this, magnets are attached to the surface using a self-tapping screw or double-sided tape. They are placed on the curtain at the same distance. Next, the roll structure is applied to the fastener on the wall or frame.
Magnetic tape is a good device for attaching curtains.
There are many options for attaching roller blinds to a wall or window.
Roller blinds made from the right fabric allow you to achieve the desired level of illumination in the room
The choice depends on the type of structure, its weight, availability of tools for installation, etc.
Choose a curtain that matches the design of your room.
You can clearly see the whole process in the video.
Attaching roller blinds to the ceiling
Roller blinds are attached to the ceiling with self-tapping screws, similar to the wall:
- We prepare all the structural elements, screws and dowels, a pencil, a hammer drill.
- We assemble the curtain.
- We attach it to the ceiling.
- Mark the holes with a pencil.
- We drill them out.
- We hammer dowels into them.
- We fix the fasteners in the holes with self-tapping screws.
- We put the chain mechanism on the gear.
- We fix the roller in the holders.
- Let's check how the mechanism works.
IMPORTANT! It is possible to fix curtains on the ceiling only if it has sufficient strength (for example, concrete or wood). If the room has a suspended ceiling, it is advisable to choose a different installation method or wait for repairs and change the ceiling.
Self-tapping screws
To do this you will need the following tools:
- drill;
- screwdriver;
- building level;
- screwdriver.
You will have to use a lot of construction tools.
Installation instructions look like this:
- Determine the location of the fasteners. To do this, double-sided tape is glued to the back of the structure and applied to the frame in the position in which the curtain will be fixed. All mounted elements are assembled with tape.
- Install the guides and secure the ends of the threads.
- Using a drill, drill holes and screw screws into them.
- Mount the roller roller, place the roll of fabric in the grooves and press until it clicks.
- Install tensioners. To do this, use a level to mark the place where they will be located on the frame. Secure the ends of the fishing line, drill holes by inserting self-tapping screws.
- Check how the design works.
Follow the window measurement instructions.
Common installation errors
Despite the simplicity of the design, typical errors occur during installation. Let's describe them so you can avoid them.
- When choosing, it is important to remember that the width of the fabric is a separate characteristic, and the total width of the curtain is the distance from the edge of one connection to the edge of the second.
- Having chosen the installation position of the roll, lower the curtain and twist the window handles in all directions, open and close the windows. Very often, after installation, it turns out that the canvas interferes with the functionality of window handles or frames.
- When choosing the installation position, it is necessary to take into account the full length of the canvas so that its top does not end up being raised unreasonably high, while the bottom does not cover the window and allows light to pass through unhindered.
- When using adhesive tape, it is important to thoroughly wash and degrease the surfaces. Neglecting this rule significantly reduces the strength of the structure. She can fall at the most unexpected moment.
How to hang a roller blind on a wall or ceiling with your own hands
When there is a small window in the room, a roller blind installed above the window to the ceiling will help to visually enlarge it. Also, this installation method should be chosen if your roll structure is quite heavy and the frames may simply not support it. Or you want to hang one large canvas across the entire width of the window, while allowing it to open freely. A screwdriver and self-tapping screws are not enough here; you will need a hammer drill and dowel nails.
Installation procedure for roller blinds
Assemble all the fasteners and install the curtain on it, while immediately deciding on which side the control chain and the mounting location will be.
Next, if you have a good eye, place the product against the wall, assess whether it is slanted relative to the horizon and whether it is normally centered relative to the window itself. Mark the attachment points with a pencil. If you are not sure, then take a tape measure, measure the width of the curtain between the mounting holes, divide by two, then measure this number left and right from the center of the opening. There will be attachment points, mark with a pencil.
Don’t forget to also check that when lowering the curtain does not cling to the window handle, and if the curtain is installed inside a window opening, then its brackets should not reach the wall a few millimeters.
Drill holes on one side for the dowels and secure the bracket without fully tightening it.
Next, take a building level and, for example, a wooden plank. With their help, determine exactly where the second bracket will be located relative to the horizon and mark the locations of the holes.
Drill a hole in that place and attach the second bracket.
Install the shaft with the curtain on the holder brackets, and check that the curtain falls without displacement. If everything is fine, then pull out the dowels and put on the decorative plugs.
Adjust the height of the chain and set the lower position limiter for the curtain