It is especially important to be careful in dressing for people who want to impress others.
Carelessly ironed wardrobe items cause unpleasant associations; their owner may appear in an unfavorable light.
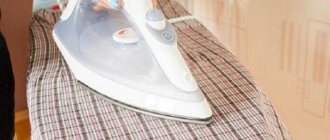
This article will be about how to properly iron shirt sleeves without arrows.
How to iron a short sleeve?
Ironing short-sleeved shirts follows approximately the same pattern. Step-by-step instruction:
- The collar, straightened on the board, is ironed with the end of the iron. If you want the fold of the collar to look natural, you should not iron it.
- Sleeves. Carefully place on the board, seam side up, first iron the seams, then the sleeves. For convenience, you can pull it on an armband or on a roller made from a folded towel.
- Shelves. Iron without creating creases near pockets and buttons.
- Back. Move the shirt along the board to iron the back from one side seam to the other.
How to do it right: step-by-step instructions with photos
Ironing a man's shirt correctly is more difficult than it seems at first glance. The shirt must be washed and dried properly.
It is best to iron an item that is not completely dry. Ironing begins with processing double small parts, usually from the collar.
It is necessary to inspect the shirt itself and perform the following actions :
- If there are special plastic parts in the corners of the collar that help it keep its shape, they need to be pulled out. But it’s better to do this before washing.
- Unfasten the buttons.
- Make sure that the item does not require repair - all buttons are present and there is no damage.
If the shirt is completely dry, or even dry, you can evenly spray it with water from a spray bottle and leave it in a plastic bag for a quarter of an hour.
Features of collar processing
The collar is laid out with the wrong side up. It is ironed by moving the iron from the edges to the middle.
Handle with care:
- space along the placket and around the top button;
- loop for the top button.
After this, the item is turned over and the collar is ironed from the front side. For materials that are difficult to iron, you can use the steam function.
If the shirt has fasteners in the corners of the collar, they are inserted and carefully smoothed. The fold of the collar should not be smoothed .
Cuffs
After the collar is ironed, move on to the cuffs:
- They are laid out wrong side up on the ironing board.
- Iron in the direction from the corners to the central part.
- Turn the part over to the front side.
- Iron with force from the corners.
- For cuffs designed for cufflinks, combine both loops and iron them together.
There are no folds on the cuffs, regardless of the style of the shirt with sleeves.
Sleeves
After processing the cuffs, iron the rest of the sleeve. To do this, first one sleeve of the shirt is processed, and then the second:
The part is turned with the seam up.
Iron, stretching and straightening the material so that arrows or creases do not form. In this case, the iron should no longer touch the cuffs, not reaching them one or two centimeters. They also leave the seams on the armhole side for later.- Turn the sleeve over and iron the central part. Turn the part over again and put it on the sleeve, starting with the cuff.
- Ironing begins by retreating 20 mm from the cuff.
- Smooth the bar on one side and then on the other side.
- Buttons on the cuffs are fastened.
- Iron the bar with the fastener.
It is convenient to iron the sleeves using a specially designed sleeve part that comes with the ironing board. Without this detail, it will be more difficult to properly iron long sleeves.
An alternative option is towels tightly rolled into a roll shape . In the same way, a duvet cover or other material can be replaced by a neatly folded and then rolled up blanket.
Shoulder part and yoke
After the collar and sleeves are ironed, the shirt is put on the ironing board from the narrower end so that it is convenient to iron the shoulder part.
Next they move on to ironing the junction of the collar with the shirt, and the seams on the armholes. When ironing shoulder seams, the collar should not fall under the iron again.
Shelf
Begin processing the shelves with the one on which the buttons are located . The front of the shirt is laid out lengthwise on the ironing board so that the shoulder part is on the narrowed side of the ironing board.
Shelf processing:
- straighten the fabric;
- near the buttons, the iron should be moved carefully, trying not to touch them;
- the iron is moved from bottom to top;
- after the part of the shelf near the collar is ironed with the tip of the iron, the device is moved to the lower edge of the product;
- repeat the processing on the second shelf.
If the strip is hard and multi-layered, it is recommended to first iron this part first from the inside and then from the face.
Back: “finish straight”
The back and side seams are much easier to iron. To do this, the product is placed on the ironing board so that the shoulder seam is on the narrow end of the ironing board, and the bottom cut is on the wide end. It is recommended to slightly stretch the side seam during the ironing process .
The step-by-step process of ironing a men's shirt is presented in the video:
Alternative ironing methods and techniques
Recently, more and more devices have appeared that perform the same functions as an iron. In addition to irons, steamers and steam generators can be used .
A steam generator, unlike a simple iron, has more power. It easily smooths out wrinkles that an iron cannot handle. A device called a steam generator is capable of producing only dry steam.
A steamer, unlike a steam generator, produces hot steam. But it is not able to replace an iron - it is used to refresh things and eliminate caked wrinkles, reduce unpleasant odors .
If it is not possible to use special devices, you can give a shirt made of synthetics, chiffon or silk a pleasant appearance without them.
To do this, hang the item in the bathroom on hangers and treat it with steam from hot water from the shower hose. Direct the jet close to the fabric so that it does not splash.
How to iron shirts correctly
Before you start ironing, you should remember a few simple rules:
After washing, the shirt should be dried on hangers, so you don’t have to smooth out folds and creases.- The shirt should be ironed from the wrong side. This rule primarily applies to colored products so that the paint does not fade.
- Before ironing the shirt, it must be sprinkled with water. Damp fabric smooths out better. To ensure uniform humidity, place the item in a plastic bag for 10 minutes, before wrapping the item in a towel.
- Ironing should begin with smaller pieces. First the collar, then the sleeves, etc.;
- Watch the iron setting and temperature, otherwise you risk burning the fabric.
- Iron only clean clothes, as even minor stains when heated can remain on your shirt forever.
- Always read what is written on the tag. This is where you can find out the washing and ironing temperatures that suit your product.
For perfect ironing you will need:
- iron with non-stick coating;
- large ironing board;
- a white cotton towel (you can put it under your shirt or iron it through it to avoid water stains and snags);
- a spray bottle to spray the fabric while ironing.
Prepare your shirt by unbuttoning all buttons, including the sleeves and collar.
Ironing long-sleeved shirts
There are subtleties and difficulties in how to iron a long-sleeve shirt correctly.
A men's shirt must be ironed immediately after washing and almost completely drying in order from least to most. To avoid wrinkles and puffs from the iron, you should follow the direction of the thread. Do not press the iron against the product or hold it in one place for a long time.
Adviсe
It is easiest to iron shirts that have just dried after washing. You don’t have to wait for final drying - the process will be easier .
Be sure to study the label sewn to the shirt - it indicates the composition of the fabric and recommendations for caring for it. Please note the recommended iron temperature.
If there is no label on the shirt, and the composition of the fabric cannot be determined, set the iron to minimum heat.
Iron, gradually increasing the temperature. Do this until the fabric begins to smooth out. If the iron suddenly begins to glide worse, the temperature must be reduced so that the sole cools down a little.
How to iron without an iron?
Sometimes situations arise when it is not possible to fully iron a shirt with sleeves. There are no universal ways to iron a shirt without an iron, but there are easy methods to get a fairly good result :
- One option to do without an iron is to turn off the “spin” mode when washing in the washing machine. In this case, the wet product is taken out, hung on hangers over a bathtub or other container, and the water is allowed to drain.
- Lightly spray the wrinkled shirt with water from a spray bottle. Before it has time to dry, they put it on the body. As the fabric dries directly on the person, it straightens out.
Please note: these options are not suitable if the collar is very wrinkled.
Steamer and steam generator
At home, you can iron a shirt not only using an iron, but also other equipment: a steamer and a steam generator. Before using a particular device, it is recommended to study the instructions for it.
Popular shirt ironing machines include the following:
Steam generator .
At its core, this device resembles the operation of an iron. The principle of operation is to steam the item with a powerful jet of steam. At the same time, dry steam can cope even with a heavily wrinkled shirt with sleeves.- Steamer . It is especially effective for loose fabrics. The shirt is exposed to hot steam, straightening out even complex creases and folds.
- Steam manquin . This device is an inflatable mannequin that resembles a human torso. This is a professional device that helps deal not only with wrinkled shirts, but also with other items of clothing. The steam mannequin is not used in everyday life.
Selecting the temperature mode
A modern iron with a thermostat, as well as a convenient ironing board, will allow you to quickly iron men's shirts made of different materials.
Here's how to properly iron a product, taking into account that each type of fabric requires a certain temperature regime:
- Slightly damp items made of viscose and cotton with the addition of polyester are ironed at a temperature not exceeding 120 °C.
- To iron cotton, select a mode of 150–160 °C; the overdried product will need to be steamed.
- To iron linen fabric, use strong pressure and intense steaming at a temperature of 180–200 °C. The fabric is ironed from the inside out.
- 100% viscose items are ironed slightly damp at 120°C. To avoid stains, it is not advisable to spray the product or apply steam.
- Silk items should only be ironed dry at 60–70 °C.
- Fabric with a compressed effect is ironed at 100 °C without steam.
Caution is exercised when working with synthetic fabrics. As soon as the iron becomes difficult to slide, stop ironing and reduce the temperature.
It is recommended to iron dark-colored shirts from the wrong side. This rule also applies to items made of shiny fabrics and shirts with embroidery.
We recommend reading: How to get rid of wax on clothes: clean the fabric from traces of paraffin
It is preferable to use distilled water for steaming. Then dirty spots and streaks will not appear on the ironed clothes, which is possible when using hard tap water.
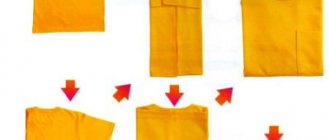
How to fold a shirt after ironing
After thermal steam treatment, you can fold the shirt and send it for storage.
Various folding methods are practiced. Here is one of them:
- Lay out the shirt on a flat surface, place the sleeves on the shelf in the chest area, bending them at the shoulder seams; if they are long, then fold them in half (cuffs to the shoulders).
- Fold the shirt, bending it longitudinally along the line along the back, aligning the shoulder seams.
- Now bend the product in the transverse direction. It should turn out that the product is folded in four, and the sleeves are inside it.
- If there is enough space, place the shirt so that other things do not press on top of it.
A few words about women's products
How to iron a shirt with a bunch of finishing elements? The most important thing is to be patient!
- First, iron the collar from the wrong side. Then smooth the front side, pushing the wrinkles towards the base of the collar. If the collar has various additional folds and decorations, try to work around all this beauty with the tip of the iron.
- Unfold the cuff and iron it without creases. Straighten the sleeves correctly in a circle on a special board. They will not tolerate any random folds or arrows!
- Straighten the back from the wrong side. Place the fold (if there is one) parallel to the side seam and secure the result with an iron. The principle of ironing is to move from the seams to the middle.
- Then proceed to the shelves. Iron the smallest parts first. The iron tip will help you straighten the fabric between buttons and embellishments correctly. Take your time, carefully go over every centimeter of the product. See if there are any random arrows.
Setting the mode and temperature on the iron
When starting ironing, you need to set the appropriate steam level and temperature. You must carefully study the recommendations indicated on the product label. They are usually accompanied by conventional images in the form of an iron and may be contained in the form of a description.
Typically, for shirts made of cotton fabric with the addition of synthetics, a medium steaming level and a temperature of 110 to 140 °C are recommended; for 100% cotton products, a high steaming mode and a temperature of 150 °C are recommended.
Clothes steamer - should it replace an iron?
Strictly speaking, now people are increasingly buying irons with a vertical steam function, so you have a chance to combine these two irreplaceable devices. But perhaps it’s worth switching to steaming only and forgetting about the classic iron? Let's figure it out now.
Iron Redmond RI-C278
RUB 1,999
Buy
The steamer removes wrinkles from the fabric without coming into direct contact with it. This device uses hot steam to “relax” fibers in clothing.
Hang the shirt on a hanger, hold and straighten the shirt with one hand, and with the other, apply a stream of steam to the fabric a couple of centimeters from it.
Vertical steamer Mie Grande with ironing board
RUB 23,490
Buy
These units are ideal for soft and delicate fabrics such as silk, satin, wool, polyester and jersey. Additionally, it can be used on fabrics that are difficult to iron, such as a screen-printed shirt or jacket.
- Fashion How to properly update a man's wardrobe to look stylish: 6 basic rules It's high time to shake up your closet!
The device is also effective for smoothing out sleeves, folds and frills in clothes. Suits, sweaters, delicate fabrics, T-shirts, jackets and garments with folds also require steam to protect the fabric and the shape of the garment.
Runzel Handheld Steamer
RUB 4,490
Buy
The disadvantage of this device is that the folds cannot be pressed into the fabric. This means that the shirt will not look “brand new” - only an iron can give this effect.
Ironing the sleeves
Shirt sleeves should be ironed without arrows. This is done like this:
- the sleeve is folded in half, seam up and it should be located in the middle;
- the seam is smoothed, the sleeve is turned over and also ironed;
- The sleeve is folded along the seam and ironed from it to the edge, starting from the shoulder and down.
Are arrows needed on sleeves?
Many have wondered: is it correct to iron shirt sleeves with or without arrows? According to etiquette, it is customary to wear a shirt without arrows.
But if a person does not plan to take off his jacket, arrows on the shirt are acceptable. It follows from this that arrows on the sleeves are in bad taste.
Ironing shirts with other equipment
There is a lot of controversy regarding what is the best way to iron shirts and what equipment to use for this. Fans of the classical approach do not perceive anything other than the iron. But there are alternative solutions that are not inferior to an iron, and sometimes allow you to iron men’s shirts even better, faster and with better quality:
- steam generators;
- steamers;
- steam mannequins.
Steam generator
If you already know how to properly iron your shirt using a regular iron, working with a steam generator will not cause you any difficulties.
This is practically the same iron, only with increased power and a constant supply of hot steam. Compared to a regular iron, the steam jet is much more powerful, which makes ironing clothes made from different materials faster and easier.
Steam generators do not apply to all shirts, but only to those that can be ironed using steam.
Steamer
The essence of the device is to supply hot steam in a dense stream. A steamer is not an analogue of an iron and cannot completely replace it in everyday life.
Steamers are well suited in situations where you need to freshen clothes, iron them after storage, or get rid of foreign odors without washing. An important feature of the device is its ability to iron clothes hung vertically.
Steam manken
This is a mannequin that can be deflated and inflated to certain limits, allowing it to take the shape of shirts of different sizes. Used for drying and ironing items.
Steam mannequins are rarely used in everyday life and for personal use. They are expensive and not easy to buy.
How to store a shirt so it doesn't wrinkle
It is best to hang an ironed shirt on a hanger, carefully straightening the shoulder seams. The hanger must be placed in the closet free from other things so that they do not crush it. You need to prepare the shirt the night before the event, the night before, or a few hours in advance. She will have time to sag, but will not lose her fresh look.
If you don't have a hanger, you can hang an ironed shirt on the back of a chair.
If you decide to store the shirt folded, you need to place it separately from other items and not press anything on top. Place the shirt on top of the rest of your clothes in your suitcase and close it carefully.
Tips for using a steamer
- Use the device only on sealed surfaces that can withstand high temperatures.
- For colored clothing, test an area of the fabric before steaming to ensure it does not fade when exposed to steam.
- It is important to be careful not to get burned by the steam.
- Allow clothes to hang and dry a little after steaming before putting them away in a closet or wearing them. If you don't do this, the wet fabric will instantly wrinkle.
- Author: Maria Minaeva
Some tips
- If you are unsure of the type of fabric the shirt is made from, always start ironing at a low temperature. You may spend a little more time ironing, but you won’t burn it.
- Always iron around the buttons, not over the buttons. Even if the buttons are under the fabric (if the shirt is turned inside out), still go around the buttons when ironing.
- You should not iron a dirty shirt if it has not been washed. If you iron stains on a shirt, it will be extremely difficult to wash the shirt, if at all.
Cleaning the iron
If you, like me, have hard water at home and mineral deposits constantly accumulate in the iron, then I recommend cleaning it occasionally. To do this, pour a solution into the water tank: 1 part water, 1 part acetic acid. They say you can also use citric acid, but the concentrate will be much more expensive than simple table vinegar (vinegar concentration is about 70%). Pour the solution, heat the iron and place it on the ironing board with the sole of the iron down, so that steam comes out from under it. When all the water runs out, look at how much dirt has accumulated in the iron. Repeat the procedure if necessary. To prevent this from happening, fill with purified water if you have a flow filter or bottled water, if possible.
Knowing how to iron a shirt correctly, you will never be afraid of a mountain of wrinkled shirts. Practice a little by ironing a couple of dozen shirts, and the time spent ironing one shirt will be reduced to an insignificant 3-4 minutes. Simultaneously watching TV or listening to the radio will help to diversify the process of ironing wrinkled shirts. I hope you have the patience to learn this not difficult but necessary skill.
Ironing the shelves and back
We place the shelf on the board, shoulder to the narrowed part. You need to start ironing the shelf from the front side. The spaces between the buttons are ironed from bottom to top.
The seam is ironed at the collar and further down. Place the shirt with the armhole side seam onto the board and iron.
Then you need to move the iron to the side seam and back. Lastly, the left shelf is ironed.
How to choose an ironing board
Shirts can be ironed on any suitable flat surface. When choosing a place, you should be guided only by the question of convenience. There are people who prefer to iron shirts on the table, spreading the product on a thick blanket spread, the final result is perfect.
But it is much more convenient to iron clothes on a special ironing board, which has a narrowed and rounded shape on one side. The width of the board at its greatest part is usually about 40 cm. The board is often accompanied by a device for ironing sleeves, which may be called:
- oversleeve;
- sleeveless;
- sleeve.
The device looks like a folding mini-copy of a smoothing iron, with a surface covered with fabric and a base made of bent aluminum profile. It helps smooth out seams in armholes, cuffs and other parts of the product.
There are special devices on sale for ironing sleeves, which are used by seamstresses - tailor's blanks. With their help, it is convenient to smooth out small seams, joints of elements, and sleeve armholes.
In what order to iron
It is permissible to iron shirt sleeves in a free manner, one that is convenient for you personally. One of the possible ways is to first smooth out the main part of the sleeves, then the cuffs, the shoulder part, and the edges (where the sleeves enter the armholes).
At the final stage, it is necessary to evaluate the result and once again run the iron over the surface of the sleeve, bringing the work done to perfection.
Shirt sleeves
It is permissible to iron them using the entire surface of the iron, having previously tested the heating level on a small piece of fabric. Move the iron freely, without holding it in one area, this can have a detrimental effect on the condition of the product. Use a device for ironing sleeves - a sleeve holder.
Cuffs
The fabric here is quite dense; it would be a good idea to treat the part with additional steam if your iron is equipped with this function. It is better to iron the element with the end of the iron, while carefully ironing small folds at the base of the sleeve.
Shoulder part
After ironing the sleeve, move on to the shoulder part. Place a sleeve underneath or place the fabric on the narrow end of the ironing surface, apply steam and iron with the end of the iron, moving the material carefully.
It is necessary to iron the place where the sleeve enters the armhole. Smoothing out the folds at the sewing site will make it easier to steam them further.
On a note
Useful tips on how to iron men's shirts:
- Without information about the type of fabric, it is better to start the ironing procedure at low temperatures so as not to spoil the product.
- Ironing items in the area of buttons, stripes and labels should be done with extreme caution: when they come into contact with a hot iron, plastic and synthetics melt even when ironing clothes from the inside out.
- To prevent the fabric from deforming and stretching, the iron is moved along the grain thread.
- It is absolutely forbidden to iron dirty things. Any stains under the influence of high temperature become fixed and cannot be washed off.