How to disassemble the lid of a thermos with a button
The principle of operation of the thermos lid is very simple.
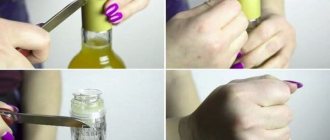
You press a button, the valve opens and the contents of the tilted thermos are poured through the hole into another container. The button is returned to its place using the internal valve spring.
Some manufacturers complicate the design of the thermos button by adding small parts to the design that allow the button to operate more smoothly and provide a better seal to the lid. But the more parts there are in the assembly, the higher the likelihood of some small thing failing, which will affect the operation of the valve as a whole.
The lid valve also has a number of disadvantages, which are caused by possible clogging of the overflow, accumulation of deposits and, accordingly, the appearance of unpleasant odors.
Thermos users deal with the situation in different ways. Some people clean the lid of a thermos with a button at a selected frequency, soaking the device in a solution of baking soda, others load the lid into the dishwasher, others completely disassemble the structure and mechanically clean each component part.
All parts of the lid valve are made of food-grade plastic. On the one hand, you get a guarantee that no harmful substances will get into the liquid, but on the other hand, the strength of the plastic is low, and the valve mechanism and button wear out quickly.
In case of damage that is not associated with deformation of the valve and you only need to restore the connection of the structure or install the fallen part in place, the repair can be done with your own hands.
Therefore, if the button in the thermos is broken , do not rush to buy a new one, but try to disassemble the lid using our tips.
Repairing a thermos lid with a button - step-by-step instructions
Let's consider three options for constructing a lid with a button. The first design is the simplest, with a minimum of details and everything is intuitive.
Here, repairing the thermos button will consist of the usual disassembly and cleaning of the valve from deposits:
- Unscrew the clamping ring counterclockwise. We apply sufficient force, but without using a metalwork tool. The ring is quite fragile and if there are signs of the part sticking, then soak the lid in hot water for a couple of minutes.
- Remove the valve from the body.
- We push out the valve mechanism to begin further disassembly.
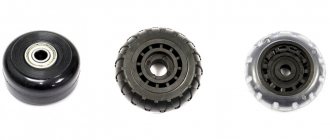
- We get three large fragments of the mechanism; all that remains is to get to the spring, button and other auxiliary parts.
- We increase the set of parts when further disassembling the button itself (usually it is fixed with fasteners).
- Carefully push out the valve stem so as not to damage the retaining ring; we will still need it for further assembly of the cover.
And here we have all the parts that need to be washed to remove deposits. As we can see, there is practically nothing to break here, unless the spring or retaining ring bursts due to wear. These spare parts can be picked up from other mechanisms or purchased at a hardware store.
VIDEO INSTRUCTIONS » alt=»»>
The next version of the cover is complicated by the presence of a second button, but here too the manufacturers have provided for the possibility of disassembly. Or rather, they did not seal the mechanism, as happens when company marketers want to sell as many products as possible.
- In this case, it is necessary to pry off the cover with a thin metal blade or other object.
- The device has hidden latches that can be damaged if handled too harshly. Be careful.
- As soon as you remove the cover, all parts will be freely accessible. To ensure that reassembly does not cause difficulties, we recommend taking a photograph of the parts in the assembled state.
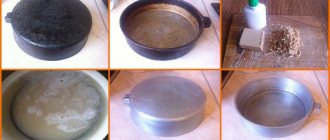
But why did you need to clean the valve?
These are deposits that have accumulated over the year of operation of the thermos. Follow simple rules, and your health will be completely safe, and the thermos will last for many years. Source
Useful tips
During the repair process, care must be taken not to damage the mechanism. In order for the repair to be successful and the plug to function like new, you must follow some recommendations.
- In order for the plaque to be washed off as quickly as possible, it is recommended to soak all parts in hot water with the addition of baking soda.
- Before putting the stopper back together, it is very important to thoroughly wipe all parts with a paper towel or dry thoroughly. Since the spring is metal, it may corrode. This will only make the button work worse.
- To make it easier to remember the location of the parts, you can pre-photograph the entire diagram.
- It is also recommended to mark the parts with numbers and lay them out on pieces of paper with the appropriate name. It is necessary to lay them out in chronological order, so that you can then assemble them in reverse order.
- If the hidden latches on the cover were accidentally damaged, then the cover can be glued on later. The only drawback is that the structure will no longer be as reliable due to constant moisture.
If you follow the recommendations, you can disassemble and then assemble a plug of any design yourself. The main thing is to thoroughly clean all existing parts and, if necessary, replace them with new ones. If the plug has any fundamental damage, for example, large cracks, in this case you should think about purchasing a new plug, since repairing the old one may not be entirely rational. And in order to ensure that the stopper becomes clogged as little as possible, it is important to thoroughly wash the thermos and dry it well after each use.
Next, watch the video with tips on how to disassemble and repair the thermos lid.
Lid device with valve
The valve in a thermos is an elastic disk with a spike in the center. A spring and a locking washer are put on the tenon. The latter is held in place by a cone-shaped thickening at the end of the spike.
When the owner presses a button on the lid, the valve lowers and allows liquid to flow to the overflow holes. When you press the second button or the same one (depending on the type of locking mechanism), the valve fits tightly to the seals and closes the leak.
How to disassemble
The best option is if the lid has a threaded fastening. All you need:
- Unscrew the ring with the button / buttons.
- Push out the valve.
- Remove the retaining washer and spring.
- Pull off the oil seal - an elastic ring - from the lower rim of the lid.
All parts must be washed to remove tea or lime deposits, crumbs, tea grounds, etc.
In old thermoses, the valve disc breaks or loses elasticity over time. Theoretically, you can replace it with a new one, but in practice these parts are usually not sold, and you have to replace the entire cover.
Chinese thermos with button:
- Pull the valve out with force.
- Place a sufficiently long self-tapping screw into the hole for its tenon and push out the mechanism with buttons.
- Remove all gaskets, springs and retaining washer to clean.
Tip Sometimes a new cap leaks fluid because the gaskets and valve disc are not designed. Dip the bottom of the lid in hot water for 5-10 minutes before first use, then carefully screw it onto the thermos until it fits tight.
How to Fix a Fallout Valve
One of the problems that does not immediately make itself felt is abrasion of the retaining washer on the valve stud. Over time, it begins to hold the spring poorly, and the valve flies off, falls into the thermos, and the liquid pours out through the overflow holes.
Replacing the washer is quite simple:
- Cut out a suitable circle from the plastic lid and make a cross-shaped cutout in it (it is convenient to perform the operation with a plastic knife, which is included in the set of modern burners).
- Select a plastic dowel of a suitable diameter, cut off the cap with a stationery knife and use it as a retainer.
What can you do if your thermal mug is leaking?
Those who have encountered at least once a leak in their favorite thermal mug have probably often wondered whether it is possible to repair the thermal mug or whether it is better to buy a new one. Theoretically, it is possible to repair a thermal mug, but practice shows that sooner or later the thermal mug will still leak. Therefore, for those who do not want to suffer and rack their brains over how to repair a thermal cup, the best solution is to purchase a new vessel.
For those who still dare to fight for the return of the former tightness of the thermal mug, there are several tips. First, try not to use the mug in a horizontal position all the time. Secondly, if the problem is a malfunction of the lid, you can buy the lid itself separately. Thirdly, you can try to carefully cover the lid with silicone.
Important details and instructions on how to disassemble the lid of a thermos with a button
Published by kachlife on 10/28/2020 10/28/2020
A thermos is a necessary thing in every family. Hiking or just a long walk in the forest is not complete without a strong, hot drink. In order for it to work properly, it is important to ensure the cleanliness and serviceability of the components. The lid with the valve is considered the “weak point” of thermoses.
Why might a thermal mug leak?
A thermal mug is the best way to stay warm in cold weather. Thanks to it, you can enjoy a sip of hot coffee or tea at any time, anywhere. Thermal mugs can be used to store both hot and cold drinks.
Thermal cups are convenient, stylish, practical and ergonomic. However, thermal mugs have one drawback - they can leak. Among the main reasons why a thermal mug leaks are:
- the vessel is broken or cracked;
- poor seal of the lid;
- unreliable manufacturer;
- the presence of defects on the surface of the vessel;
- the lid is not tightly closed;
- frequent use in a horizontal position;
- expiration date has expired.
Possible faults
Considering the simplicity of the design of the device in question, there may not be many possible malfunctions:
- The thermos does not hold the temperature, that is, it cools down quickly;
- it gets very hot outside;
- broken button on the lid.
Some other problems may be caused solely by physical damage - chips, cracks, dents, that is, solely by physical factors.
Odor appears
No surprises: foreign odors arise in containers due to the products that are stored in them. Despite the fact that the inner surface of the thermos is made of materials that do not contribute to the accumulation of sediment (glass, stainless steel, etc.), it still forms over time.
A completely new thermos can also smell, which is due to the coating. When leaving the factory, the inner surface of the flask can be treated with a special composition that retains the properties of the coating during long-term storage of the product.
Finally, elementary mold may form in the container. The mechanism of this phenomenon is simple:
- You poured your favorite drink into the thermos;
- We went fishing;
- We came home tired, forgot to wash the thermos and put it in the closet;
- Six months later, when getting ready to go fishing again, we took out a thermos and discovered an unpleasant surprise in the form of a colony of fungal formations with a specific odor.
Housing material
The design of the thermos is made of two circuits. The first is external, this is the body itself, the second is a special flask designed for storing drinks and food. There is a space between the inner flask and the walls of the thermos. Such space is divided into two types - vacuum and air. Vacuum is much better than air. The main difference is the value of thermal conductivity; in a vacuum it is zero. Thanks to this space, the heat inside the flask is retained for a long time. This is the whole point of a thermos.
If we talk about the material used to make the case, then this criterion has three options, these are:
A plastic case is a budget solution, but the quality and reliability of such a product will not inspire confidence if you use such a thermos for outdoor activities or sports. Its use is only beneficial in domestic conditions.
Much more reliable are thermoses, the body of which is made of stainless steel. But there is one drawback - the weight. But the metal case retains heat longer, which cannot be said about plastic.
Causes of problems
Now let’s try to understand in more detail the reasons for the problems described above.
If a stainless steel thermos stops holding heat, this usually happens after using the device for some time. The causes of poor thermal insulation can be:
- damage to the plug;
- poor quality or deformed silver plating;
- there is no vacuum layer between the walls of the body and the cylinder.
If we talk about the first problem, it often happens that the plug was already defective from the very beginning. But it could also happen that the owner of the thermos screwed it too tightly, and after a while the connection simply cracked, and therefore the device stopped holding heat. It’s easy to check – just tilt a closed metal thermos. If there is such a defect, hot water will leak out.
If the thermos has a glass flask, then inside it there is a damaged or poor-quality silver coating. Usually we are talking about a manufacturing defect.
The problem may also be the lack of vacuum between the body and the walls of the cylinder. Almost any thermos that exists today, even any Chinese one, has a double bottom. A copper tube passes through it inside, the end of which is flattened. It is through this tube that the manufacturer pumps out air using a special vacuum pump.
It also happens that the thermos gets hot. This is bad, because then the phenomenon of thermal conductivity appears . The hot liquid inside transfers heat to the body, which releases it into space.
Manufacturers often use inert gas as insulation. It is especially often used in Chinese models, instead of creating a vacuum layer. It's easy to fix - just take it to a workshop, where the technician must use a special pump to restore the vacuum or add gas. If the problem is a cracked bulb, it should be replaced.
To prevent problems from occurring, the thermos, despite its simplicity, requires careful handling and careful operation.
Duration of heat retention
To keep the heat longer, you need to pay attention to the height of the flask relative to the bottom of the thermos. The higher the flask is located, the longer the heat will be retained.
An important point is the lid of the thermos. Before purchasing, carefully examine it, make sure that there is no play in the lid and that it closes tightly. Otherwise, you will get "heat loss".
Each manufacturer indicates a guaranteed heat retention time for its thermos. This parameter is indicated both in hours and in degrees. Look for markings on the body of the thermos and in the product description before purchasing, and be sure to check the values. The verification method is simple. A two or one and a half liter thermos filled with fresh boiled water should produce a water temperature of at least +55 degrees within a day. This is direct proof that the thermos does its job well.
Repairing a thermos lid with a button - step-by-step instructions
Let's consider three options for constructing a lid with a button. The first design is the simplest, with a minimum of details and everything is intuitive.
Here, repairing the thermos button will consist of the usual disassembly and cleaning of the valve from deposits:
- Unscrew the clamping ring counterclockwise. We apply sufficient force, but without using a metalwork tool. The ring is quite fragile and if there are signs of the part sticking, then soak the lid in hot water for a couple of minutes.
- Remove the valve from the body.
- We push out the valve mechanism to begin further disassembly.
- We get three large fragments of the mechanism; all that remains is to get to the spring, button and other auxiliary parts.
- We increase the set of parts when further disassembling the button itself (usually it is fixed with fasteners).
- Carefully push out the valve stem so as not to damage the retaining ring; we will still need it for further assembly of the cover.
And here we have all the parts that need to be washed to remove deposits. As we can see, there is practically nothing to break here, unless the spring or retaining ring bursts due to wear. These spare parts can be picked up from other mechanisms or purchased at a hardware store.
VIDEO INSTRUCTIONS » alt=»»>
The next version of the cover is complicated by the presence of a second button, but here too the manufacturers have provided for the possibility of disassembly. Or rather, they did not seal the mechanism, as happens when company marketers want to sell as many products as possible.
- In this case, it is necessary to pry off the cover with a thin metal blade or other object.
- The device has hidden latches that can be damaged if handled too harshly. Be careful.
- As soon as you remove the cover, all parts will be freely accessible. To ensure that reassembly does not cause difficulties, we recommend taking a photograph of the parts in the assembled state.
Possible difficulties
Some difficulties may arise with more advanced mechanisms. So, if there are 2 buttons on the lid, then during disassembly the lid must be carefully picked up with something thin and sharp, for example, a knife. Such a device usually contains hidden latches that can be accidentally damaged.
In order to avoid difficulties during the assembly process after cleaning, you can photograph the original state of the button plug. After disassembly, the parts also need to be cleaned. If there are broken ones, it is recommended to replace them.
How to disassemble
The best option is if the lid has a threaded fastening. All you need:
- Unscrew the ring with the button / buttons.
- Push out the valve.
- Remove the retaining washer and spring.
- Pull off the oil seal - an elastic ring - from the lower rim of the lid.
All parts must be washed to remove tea or lime deposits, crumbs, tea grounds, etc.
In old thermoses, the valve disc breaks or loses elasticity over time. Theoretically, you can replace it with a new one, but in practice these parts are usually not sold, and you have to replace the entire cover.
Chinese thermos with button:
- Pull the valve out with force.
- Place a sufficiently long self-tapping screw into the hole for its tenon and push out the mechanism with buttons.
- Remove all gaskets, springs and retaining washer to clean.
Tip Sometimes a new cap leaks fluid because the gaskets and valve disc are not designed. Dip the bottom of the lid in hot water for 5-10 minutes before first use, then carefully screw it onto the thermos until it fits tight.
How to Fix a Fallout Valve
One of the problems that does not immediately make itself felt is abrasion of the retaining washer on the valve stud. Over time, it begins to hold the spring poorly, and the valve flies off, falls into the thermos, and the liquid pours out through the overflow holes.
Replacing the washer is quite simple:
- Cut out a suitable circle from the plastic lid and make a cross-shaped cutout in it (it is convenient to perform the operation with a plastic knife, which is included in the set of modern burners).
- Select a plastic dowel of a suitable diameter, cut off the cap with a stationery knife and use it as a retainer.
Miss Clean magazine draws your attention: the more complex the design of the lid, the higher the likelihood of failure. The most reliable are blind lids with a seal, but they also need to be washed periodically to remove deposits.
Most valve or push-button caps can be disassembled, allowing them to be cleaned and extending their life. The operation is quite simple, and it should be carried out at least once a month if the thermos works a lot.
The principle of operation of the thermos lid is very simple. You press a button, the valve opens and the contents of the tilted thermos are poured through the hole into another container.
The button is returned to its place using the internal valve spring.
Some manufacturers complicate the design of the thermos button by adding small parts to the design that allow the button to operate more smoothly and provide a better seal to the lid. But the more parts there are in the assembly, the higher the likelihood of some small thing failing, which will affect the operation of the valve as a whole.
The lid valve also has a number of disadvantages, which are caused by possible clogging of the overflow, accumulation of deposits and, accordingly, the appearance of unpleasant odors.
Thermos users deal with the situation in different ways. Some people clean the lid of a thermos with a button at a selected frequency, soaking the device in a solution of baking soda, others load the lid into the dishwasher, others completely disassemble the structure and mechanically clean each component part.
All parts of the lid valve are made of food-grade plastic. On the one hand, you get a guarantee that no harmful substances will get into the liquid, but on the other hand, the strength of the plastic is low, and the valve mechanism and button wear out quickly.
In case of damage that is not associated with deformation of the valve and you only need to restore the connection of the structure or install the fallen part in place, the repair can be done with your own hands.
Therefore, if the button in the thermos is broken , do not rush to buy a new one, but try to disassemble the lid using our tips.
Bulb material
The inner flask is made of similar materials as the body of the thermos, but in addition to these materials, glass flasks are also found. Many people praise and prefer them, since they retain heat much longer than plastic ones, and are also safer; after all, plastic is susceptible to chemical reactions when exposed to high temperatures, and not everyone will be pleased to drink such water. However, the glass bulb is not resistant to shaking, much less shocks and falls. As a result, it may crack, burst, etc. You need to use this thermos carefully.
Plastic flasks are used in budget, Chinese models. Often the surface of the plastic is processed and sprayed. But the use of such products is not always safe for health. Over time, the structure of the spraying is disrupted and undergoes deformation, after which microparticles of the spraying can get into a drink or food, and then into the body itself, causing poisoning. Such thermoses, despite the sarcasm, are only suitable for defrosting a frozen castle in winter, so be careful not to buy such a thermos.
A metal flask is no worse than a glass one; it retains heat well and is resistant to falling and shaking. If reliability is paramount to you, then this thermos option is the most suitable. Plus, a metal flask can be confidently transported in a horizontal position, which is not recommended with a thermos with a glass flask. A nice addition is that metal flasks usually have a valve in their design, which, when pressed, you can pour the drink.
Any thermos must be checked before purchasing. To do this, you need to shake the thermos and listen to see if the flask is dangling, if anything is cracking or crunching inside the body. If there are extraneous strange sounds, do not take the thermos! The flask must be integral with the body of the thermos and extraneous sounds must be excluded.
Also pay attention to the smell; the thermos should not have any specific smell.
Operating rules
Now we should say a little about how to use a thermos correctly. It seems that everything is simple, but many people, for some reason, manage to use even such a simple device incorrectly.
Before purchasing, you should inspect the product as carefully as possible for physical external damage. You need to see how tightly the lid fits, and whether the thermos makes any extraneous sounds. You can also sniff it to check for any unpleasant odors. If they are, then it is very possible that it is made from not the highest quality materials.
If the materials from which the thermos is made look suspicious, then it is better to refuse to purchase such a product. If you are often on the road, it is better to purchase a large-capacity thermos. This will not only allow you to take more warm drinks with you. Such models retain heat much better than their smaller counterparts.
If you purchased a model similar to a siphon, you should know that it has a significant drawback. It lies in the fact that heat is retained worse here due to certain features of the cork, due to which it is not completely sealed.
Why is parsing required?
The food-grade plastic from which the top of the thermos is made is durable, but tends to wear out quickly. To prevent this from happening, cleaning and replacing obsolete parts is carried out in a timely manner.
Thus, there are two reasons for disassembly: breakdown and contamination.
Don’t be afraid to carry out a technical inspection of the thermos lid at home. With careful manipulation and the ability to act as effortlessly as possible, it will be as good as new and will get rid of unpleasant odors, dirt and harmful bacteria.
Follow these simple recommendations in our article and enjoy a long service life of your thermos.
Mechanism design and basic principles of operation
There is nothing complicated about the operation of the button, enclosed in a plastic cover. It opens immediately after pressing. The liquid is poured into a glass by tilting the container. By pressing the inner spring, we restore the valve to its place, closing the hole.
The mechanism is made of special, temperature-resistant plastic. It does not harm the user's health.
Often, the manufacturer, trying to improve the system, supplements the valve with small parts. For example, to ensure tight closure or smooth opening. Breakdowns happen frequently, and harmful substances and bacteria accumulate inside.
Users take care of their thermos in several ways:
- soak all parts in a soda solution for a long period;
- washed in the dishwasher;
- disassembled into spare parts and cleaned mechanically.
What requirements must stoppers for thermoses meet?
The thermos lid must meet certain criteria. Manufacturers try to comply with them during the manufacturing process. With frequent or improper use, the plug begins to deteriorate and lose its performance properties. Among the important requirements are the following:
- ease of design - the user should not have problems opening or closing;
- long-term heat retention inside;
- principle of operation - some products have special valves or buttons that allow you to quickly supply liquid;
- safety - the material must be completely safe, not melt and not emit harmful substances;
- weight – preferably light, so as not to weigh down the entire structure;
- the presence of additional modifications that simplify the operation of the product.
Valves for a thermos are components responsible for sealing. Without them, the contents will quickly cool down and the efficiency of the device will decrease. Therefore, you need to carefully monitor this part, and at the first sign of breakdown, choose a new one.
Opening methods
Safe and effective methods for opening the lid are to cool or heat it. Using a bottle opener or knife can also help solve this problem, but may damage the thermos.
Method one (under cold water)
This method is suitable for thermoses with external threads. The essence of the method is to place a thermos under cold water to cool. This way the metal thread will begin to narrow, fitting less tightly to the flask, and it will become much easier to unscrew the lid.
- For drinks. Classic, with a narrow neck, available in different sizes.
- For food. As a rule, these are metal thermoses with a wide neck of almost the same diameter as the body itself. You can store both first and second courses in it.
- Universal. A thermos with a double neck, that is, with an additional narrower hole for drinks.
The remaining modifications can be called variations of the above.
Popular brands
The main demand in the domestic market for mobile dishes is thermoses for carrying liquids. In the last 10 years, the industry of food thermoses has been actively developing, making it possible to carry even second dishes with you. Most models keep food and drinks hot for up to 8 hours; it is also possible to transport cold drinks. On most models, the lid can be easily unscrewed. Plastic and glass (inside) products use natural (wooden) cork, but plastic is also allowed - up to polystyrene foam, and corks are also made rubberized and upholstered with textiles.
- "Arctic" is a series of products from a domestic manufacturer. They are easy to use and feature a highly hermetically sealed joint after sealing the container. Supplied mainly for thermoses with a neck diameter of 4 cm. Not suitable for products of other brands. It is possible to dose liquid.
- Biostal - purchased only directly from the manufacturer. They are of good quality, durable and easy to use.
In addition to the products of these two brands, there are dozens of Chinese modifications on the domestic market, for the manufacture of which plastic and composite materials are used.