Today, various improved models of capping systems are used to seal alcoholic beverages. Unique types of stoppers protect alcohol products from falsification and counterfeiting and are an effective way to combat counterfeiting. Redesigned closures protect products from re-filling, helping to protect the company's brand name.
The most popular are plastic closure systems. They have good tightness, sufficient mechanical strength, and do not allow air to pass through. At the same time, such closures are quite functional, especially models with a dispenser, which ensure uniform pouring to the last drop. However, ordinary users often experience difficulties, for example, when the bottle cap does not open. This can cause some inconvenience and in most cases happens at the most inopportune moment.
Where to begin
A dispenser on a bottle of vodka or whiskey allows you to conveniently pour drinks into glasses. It is usually made of plastic. The item works like a valve: it’s easy to pour the drink out of the bottle without anything getting inside. This element protects customers from counterfeits and facilitates the process of filling glasses.
Original bottles from Jack Daniels and other designer containers can be easily adapted for homemade liqueurs, as well as used for decorative purposes. Simply remove the plastic element from the neck.
It is important to act carefully so as not to break the glass container.
Required materials and tools
Before you deal with the question of how to seal a soccer ball, you need to understand what you will need for this. If you have experience gluing car/bicycle inner tubes, then you will understand the principle of ball repair.
The principle of ball repair is similar to the same process for damaged bicycle tubes.
You need to purchase the following materials and tools:
- Glue. There are a lot of options on the market, but rubber works best in practice.
- Adhesive moment (quick-drying). They are universal, act almost instantly and effectively.
- A piece of elastic can serve as a patch. Patches can also be purchased.
- Scissors or knife (at your discretion).
- Degreaser (acetone works fine). Needed to prepare the rubber surface for gluing.
Before starting work, make sure you have all the necessary tools.
The surface of the ball is pre-cleaned.
NOTE! Use only sharp scissors or a knife; they may be needed both for preparing the rubber for the patch and for unraveling the seams.
How to remove a dispenser from a plastic or glass bottle: instructions
If you have finally decided to sort your garbage and take it to collection points in your city or to environmental events, here are our instructions for you on how to prepare sorted recyclables for delivery.
“Separate Collection” environmental movement helped Recycle figure out whether it is necessary to separate metal springs from notepads, how to reduce the size of a bag with plastic, and what to do with broken glass
Adviсe
After active pastime, the ball should be washed without using aggressive agents. Chemicals corrode the surface, so the equipment becomes less durable.
Balls should be dried only in natural conditions, far from heat sources.
Store equipment under normal conditions, avoiding extreme temperatures such as heat or frost.
After playing, it is better to lower the ball a little and pump it up to the required pressure before use. But under no circumstances should you pump it.
Advice!
Recommendations for pressure levels are usually indicated next to the nipple.
Plastic
It is recommended to rinse the plastic to remove any remaining food or grease. If promotions accept different types of plastic, it is better to separate it by type (read how to do this here).
Plastic should also be reduced to a minimum volume: for example, bottles should be crushed. You can also remove the covers from them. If the labels on the bottles are easy to remove, then it is advisable to remove them as well. Do not fill plastic bottles with other plastic (bags, etc.).
Divide the bags and film into two types: only colorless, without drawings or paint, and everything else.
Waste paper
Waste paper can be divided into corrugated cardboard and everything else. Paper must be dry to be recycled.
It is better to fold the sorted piles as tightly as possible and, if possible, tie them with rope.
It is necessary to separate metal springs (from old calendars, notebooks), and also remove files, tape, and paper clips. A clear plastic window should be cut out of the envelopes.
Glass
It is recommended to rinse the glass and, if possible, remove the caps, dispensers and rings on the neck. It is advisable to put the broken glass in some container (for example, in the same glass jar).
Tetra Pak packaging
The packaging must be rinsed so that there is no odor or contents left behind, and then crumpled. For ease of washing and storage, the packaging can be cut.
Metal
Metal debris should be washed or rinsed to remove food and drink residues, then dried to remove moisture and, if possible, flattened. It is also advisable to remove labels from cans.
Batteries
Batteries must be carefully packaged to avoid damage during storage and transportation - at least put in a waterproof bag. Do not store batteries in metal containers. Use tightly sealed plastic boxes or special containers to store batteries.
Detailed instructions with illustrations on how to properly prepare recyclables for the campaign and how to sort waste in general can be found in a special brochure
Subscribe to our channel in Telegram!t.me/recyclemagru
How to insert a pompom into a hat after washing
If the fur pompom comes unfastened or untied, it will be easy to put it back in place.
We recommend reading: How to clean an iron from burnt soles: ways to remove burnt clothes
If it has been torn off, it must be sewn back in. This method is recommended for those who have at least some sewing skills. Otherwise, after tearing it off, it may be difficult to return it to its place.
If it has been sewn on, it is more advisable not to evaporate it, but simply cut it off. After washing, sew ties from a ribbon or ribbon of a suitable color to it. Using a crochet hook, pull the ties to the wrong side of the hat at the place where the fur pompom is attached at a short distance from each other and tie inside. Now, if necessary, for example, during rain or wet snow, it can be easily removed and then tied back.
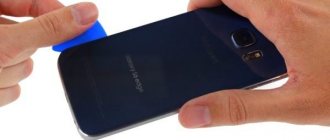
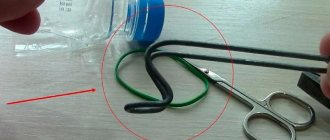
How to remove the dispenser from the bottle? – How to drink correctly
Empty liquor bottles can come in handy around the house. They can be refilled with liquid and can be used as a decorative item or as a material for crafts. But instead of a regular cap, a special dispenser is often installed on the neck of the bottle so that the drink can be conveniently poured into glasses or glasses. You cannot pour new liquid into a bottle with a dispenser. You cannot remove it by hand; it is installed tightly. How to remove the dispenser?
- First way
- Second way
- Third way
First way
This method is common among people who make their own alcohol. Vodka bottles are ideal for storing your prepared drinks because they look more impressive in a glass bottle.
The first method is suitable for removing the dispenser, which is located in the plug outside the neck.
What is required for extraction?
- Two pans.
- Hot water.
- Towel or other cloth.
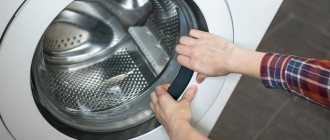
- Fill the pan with hot water to a level of 5 centimeters.
- Place the bottle upside down in the water.
- Wait 5 minutes.
- Periodically add hot water from the second pan to the neck.
- Take out the bottle, grab the bottom of the bottle. Grab the neck with your other hand; it is better to use a towel or other cloth.
- Pull out the dispenser. You may have to put in a lot of effort or repeat the entire process.
A bottle without a dispenser can be reused. You can install the dispenser back on the bottle. It can be removed many times, but over time it can deteriorate due to sudden changes in temperature.
Such dispensers are usually installed on bottles of whiskey, cognac, syrups, and balms.
Preparing the tools
For your work to be successful, you need to stock up on:
- with strong threads, thick, nylon, twisted, but the fishing line will not work - it will stretch itself and tear the material being fastened;
- an awl selected according to the size of the holes on the elements of the ball;
- with a special loop tool.
Let's take a closer look at the latter. To create it, take a piece of elastic steel string with a cross-section of no more than half a millimeter and a length of 20 cm. In the middle it is heated on a candle, burner or lighter and bent in half. The ends are clamped with an M5 screw into the rod - it will become a handle that greatly facilitates the work. The end of the loop expands to fit the thread and bends slightly to push it through. You can start working.
Is it possible to remove the dispenser from a vodka bottle?
Closure manufacturers offer improved modifications to glass bottle dispensers.
Unique models are manufactured at modern automated stations in accordance with the provisions of GOST. They are distinguished by good tightness, sufficient mechanical strength and reliability.
With their help, you can create beautiful decorated caps that will attract consumers.
Why do we need alcohol bottle dispensers?
- Provide reliable protection against refilling of glass containers, such as liquor bottles.
- Promote reliable sealing due to the tightest connection with the neck.
- Allows you to achieve increased comfort during pouring due to pouring from the outlet in any radial direction.
- Helps achieve a consistent stream without air bubbles.
The introduction of bottles with dispenser caps into production allows us to reach a new level of production and helps demonstrate the high quality of closure systems.
The unique closure system attracts the attention of buyers with its beautiful design using embossing or silk-screen printing.
What is the difference between a plastic cap with a dispenser and an aluminum screw cap?
Polymer closures, unlike metal screw closures, have increased strength. The latter are made of thin sheet of aluminum.
If the conditions of acceptance, unloading and transportation are improper, the screw cap may be damaged and the contents of the bottle will simply leak out.
Such cases have already been recorded at enterprises, and as a result, many companies suffered losses, albeit minor ones.
The most important difference is that screw closures are not equipped with a re-opening protection system, unlike modern polymer closures with a dispenser. At the same time, the cost of metal closures is higher than polymer ones.
When purchasing large volumes of closures, the difference becomes obvious. In addition, polymer closures do not oxidize and do not react with an alcoholic product, which cannot be said about aluminum stoppers.
The undeniable advantage of plastic and screw closures is the ease of opening and closing. Compared to cork, no special device is required, which is very convenient and practical. Almost everyone knows how to open a screw plastic lid. It only takes a little effort.
Advantages and disadvantages of polymer closures with dispenser
- 100% protection against counterfeiting. Your branded alcoholic products will be protected from any sale of counterfeit and counterfeit goods. Underground companies will not be able to produce their own products under your name.
- Effective presentation.
Original vodka bottle dispensers with beautiful decorations, glitter varnishes, embossing and shaving will make the product stand out on the store shelf. A great option to make your product more recognizable and presentable to customers. Excellent sealing.
The capping system is made using a unique technology, which allows you to reliably preserve the contents of the bottle and the properties of the alcohol-containing product. Increased level of comfort.
The original closure with a dosing system protects against splashing, helping to preserve every drop.
Is it possible to repair a basketball or beach ball?
To seal a hole in a rubber ball, it is recommended to use a special repair kit. Universal formulations are produced by INTEX. The kit includes VINYL CEMENT superglue. It also contains a transparent patch measuring 5x10 centimeters. You can purchase such a kit at a sporting goods store or at the market. The adhesive hardens almost instantly. That is why it is often called cold welding. A colorless transparent patch will not be visible on the product.
This kit provides thorough repair of the damage. However, the process takes a lot of time. In addition, such a kit is quite expensive. In some cases, it makes more sense to purchase a new ball. To properly seal the product, you should perform the following steps:
- Find the exact location of the puncture. The damaged area can be identified using a soap solution.
- Prepare a patch of the required size. It should have rounded edges.
- Apply adhesive to both surfaces.
- Apply and press the patch firmly.
- Inflate the ball and leave it like that for several hours.
If during the inspection it was found that air is escaping from the product through the nipple, it is recommended to glue it from the inside.
To seal a volleyball, you should do the following:
- Find the damaged area.
- Degrease the surface with acetone.
- Place the tourniquet in the small hole. It is better to use a ready-made set.
- For serious damage, use a patch. It should be glued and placed under a press. Then inflate the product and evaluate its integrity.
To avoid the need to repair the ball, you should follow these recommendations:
- After active leisure time in the fresh air, it is recommended to remove dirt with a damp cloth or rag. To get rid of heavy dirt, you should use a solution of liquid soap. However, aggressive cleansers should not be used.
- It is recommended to dry the ball in a well-ventilated area. This should not be done near heating appliances. If the item is too wet, an old towel will help remove excess water.
- The storage temperature should be maintained at +6-23 degrees. The ball should not be exposed to direct sunlight. It is also recommended to protect it from high humidity and frost.
- Glued rubber products should be kept in an inflated state.
You can seal the ball in a variety of ways. To achieve excellent results in this, you need to choose the right adhesive composition and patch.
Strict adherence to the rules of the procedure is of no small importance.
Share link:
An easy way to remove the dispenser from a bottle
A beautiful empty bottle of vodka (whisky or other alcohol) can be used as a container for “homemade” alcoholic beverages, as well as vinegar or vegetable oil.
But to pour something into an empty bottle, you must first remove the plastic dispenser. How to do this quickly and accurately? There is one proven method.
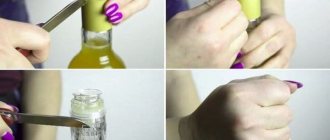
To do this you will need a pan of water. We put it on an electric stove or gas burner and bring the water almost to a boil (temperature about 80-90 degrees).
We remove the dispenser without problems
Next, unscrew the cap and remove the trim on the neck of the bottle (usually it is made of thin sheet aluminum). Then we immerse the bottle, neck down, in a pan of hot water.
It is advisable to pour hot water over the neck from another container (for example, from an electric kettle). Or you can simply turn the bottle over from time to time. You need to keep it in hot water for several minutes.
Then we take out the bottle and try to carefully pull out the plastic dispenser. Just don't use your bare hands - use a towel to avoid getting burned. In some cases, it is necessary to apply a certain amount of force.
For details on how to remove the dispenser from a bottle at home quickly and accurately, watch the video on our website.
Gold mining by electrolysis
For the procedure you need to prepare:
- Potassium cyanide (50 grams).
- Distilled water (1 liter).
- Porcelain or glass container.
- Silver or iron plates are the cathode.
The procedure itself includes the following steps:
- First of all, you need to clean the gold-plated object from all contaminants.
- Hang it from the anode and lower it into the solution.
- Turn on direct current with voltage up to 15 V.
- Remove gold from cathode.
Important! You can also take sulfuric acid as an electrolyte, lead will be the cathode, and the voltage will be 4 V.
How to remove a dispenser from a bottle
You don’t have to throw away an empty vodka bottle right away, because it can come in handy again. Especially if it looks original, and you want to pour another drink or alcohol into it, prepared yourself. But you won’t be able to unscrew the lid and pour a new drink, because the container is equipped with a special dispenser.
Remove the dispenser from the bottle
Many fans of making homemade alcohol come to try to figure out how to remove the dispenser from a bottle of vodka. Vodka - including. After all, it is much more pleasant to pour a drink into glasses from a beautiful glass container than from an unattractive container.
There are several ways to remove this dispenser. One of the simplest ones requires just a couple of pans (or a saucepan and a kettle) of hot water. This option is suitable for removing those dispensers that are built into the plug covering the outside of the neck. The procedure is as follows:
- Pour hot water into the pan.
- Place the bottle there, neck down.
- Leave for a few minutes.
- During the process, pour additional boiling water over the neck from another pan or kettle.
- Remove from the pan, firmly grasp the bottom with one hand, and grab the bottleneck with the other.
- Pull the plastic plug towards you: it will pull out with force, but it will come out.
The container can be used again. The dispenser can be easily installed back after you pour your drink inside. It will also stay firmly in place until you need to remove it again.
Using this method, you can remove the dispenser not only from a bottle of vodka, but also from any other bottle of strong alcohol: whiskey, tequila, cognac, absinthe.
How to seal a torn inner tube of a soccer ball
Before you patch up a hole in the ball, it’s worth understanding the variety of modern tools for restoring cameras. If you've repaired car or bicycle tire tubes before, some of the tools may look familiar.
Camera Repair Kit “Piece of Mind”
The manufacturer included everything you need in the kit:
- Glue,
- Patches of different sizes,
- Metal tool for surface cleaning,
- Instructions
- Spool valves.
Having everything listed at hand, you can seal the chamber of the damaged projectile in about a couple of hours, even without special skills.
Buyers respond positively to the use of this set.
YP3204P-C Camera Repair Kit
The composition resembles the first sample:
- Activating glue,
- Five large patches
- stripping tool,
- Spool valves.
The set of patches differs in size. Large sizes will help eliminate even significant camera defects.
Bicycle first aid kit Park Tool PTLGP-2
Accessories for restoring bicycle inner tubes will do our job perfectly. This set contains six self-adhesive patches.
The simplest and most convenient tool to help beginners, you just need to apply a patch to the damaged area and wait the specified time.
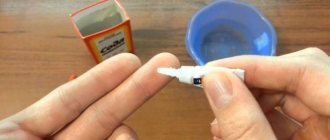
Gummi glue for repairing rubber products
If your favorite ball is made of rubber, a rubber-based adhesive is suitable for repairs. Gummi is an excellent option with a low cost and a lot of positive feedback from customers. It's not difficult to use: apply a thin layer of glue to the hole, let it dry, waiting 5 to 10 minutes. Repeat the manipulation. When the second layer dries, you can safely inflate the shell.
Glue "Droplet" from Henkel
Need to glue a patch to a leather or rubber surface? Use “Droplet” for these purposes. The manufacturer recommends degreasing the surface before use. The composition must be applied to both surfaces; for better adhesion, place the structure under a press.
Reviews
I decided to remove the gold plating from my wedding ring. It is very dear to me, although it is not made of real gold. I made a solution of hydrogen peroxide and hydrochloric acid - my husband gave it to me. I mixed it, threw in the ring, and waited a day. The next day I received a brand new silver ring. Great way. I am preparing the bracelet for cleaning.
Anastasia R., Novgorod
Mark G, Leningrad
I decided to update the chain a little, a gift from Turkey. The gold chain has become patina. I used the hydrolysis method, I read it on the Internet. The acid completely dissolved the gold plating. For 20 years I thought the chain was gold. But at least the method works, I recommend that anyone interested take note. By the way, my wife’s earrings also turned out to be fakes from Turkey.
My mother gave me an old silver ring, covered with gold... well, gilding. Beautiful, but the gilding has peeled off in places. I decided to make myself a simple silver ring. I found many methods on the Internet and chose one - “removing gold plating with citric acid and hydrogen peroxide.” I did everything exactly and now I have a brand new silver ring.
Masha P., Lviv