There are several methods for hemming the bottom of a dress, both by hand and by machine. Many housewives do not dare to do this themselves for fear of ruining the product. Of course, this process is quite responsible - one wrong move and the dress can be ruined forever. But it is not always possible to seek professional help.
Today we will talk about what edge finishing methods can be used for different types of fabric and how to hem a dress at home, even if you don’t have a sewing machine.
How to sew on a machine
Experienced dressmakers know special tricks with which these everyday moments cease to be a problem.
We have prepared for you 10 useful life hacks that will make sewing interesting, exciting, and most importantly, simple.
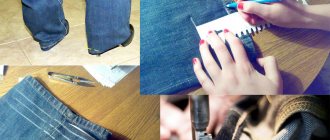
1.If you don’t like doing monotonous work, a real challenge for you will be to mark exactly the seam allowances on the fabric. To make this process easier, the best solution would be to make a template like this.
2. When you are alone at home, and you want to wear a recently bought, but too long dress tomorrow, exactly measure out the part that needs to be shortened, this simple method will help you. In the doorway, fix a rope or thick thread at the required height, rubbing it thickly chalk. To the marked line you need to add a hem allowance, the width of which will depend on the method of processing the bottom.
3. To make stitching on thick areas of fabric easier, place cardboard under the back of the foot and neck with ease and pleasure.
4. And this is another simple and convenient trick. Take some thin elastic bands and use them as stitching guides.
5. I really like this convenient way of outlining a pattern right away with seam allowances. To do this, wrap two pencils with tape and feel free to get to work. And if the allowance should be wider, add another pencil with the lead facing up in the middle of the design.
6. Correctly and accurately prepared binding is the key to convenient and quick edging of the entire product. Creating bias tape for many craftswomen was, is and remains one of the most difficult problems. I suggest you make such a template from paper, and working with the processing of this “terrible beast” will become easier and simpler.
7. Here’s an idea for a template for even allowances for hemming the bottom of the product. Very convenient and not difficult at all!
8. Another clever trick to simplify the work of securing air loops. The basis is again a paper template.
9. If there are no pins at home, ordinary clothespins or hairpins will replace them.
10. How do you like this method of processing loops on knitwear? Very convenient, isn't it?
the advice of experienced seamstresses really helps out . Feel free to adopt these simple tricks, and the issue of sewing and repairing your favorite clothes will no longer be a problem for you.
Source
Lengthening and shortening the pattern | Blog
I measured S the other day. She continues to grow and I was curious to know her size now that she is five. She is a very long and skinny baby, so I was not surprised to learn that she has a size 3 waist, chest and hips and a size 5 height.
Most likely, you are faced with a similar problem. You're ready to sew for your child (or yourself), but the size of the body the garment will be worn on is different from the size chart on the pattern envelope.
Don't worry. It's easy to make changes to the pattern to accommodate these differences. I've put together a little tutorial to show you how to do this.
Choosing the right welding location
First, assemble all the pieces you want to lengthen or shorten. It's important to make the same changes to all the matching pieces, so make sure you have pieces for the front and back of the garment.
Generally, the best place to lengthen or shorten a dress or shirt is midway between the bottom of the armhole and the hem. For pants or a skirt, the best place is midway between the rise/crotch and the hem.
Here are some illustrations showing (with a horizontal line) the recommended lengthening/shortening locations for some of our patterns.
Sailboat Top Sleeve: Extend halfway between armpits and hem Sandbox Pants: Extend halfway between instep/crotch and hem Tea Party Sundress: Extend skirt halfway between top hem and hem
By adding or subtracting length in the middle of the piece, you won't affect the hem or overall silhouette as much as if you added to the bottom of the piece. However, use common sense here. Depending on the style, you may want to choose a slightly different weld location.
I prefer to lengthen or shorten at the notch (when the notch is available) so that I can be sure to place matching or opposing pieces in the same place. For example, on the Sundress for tea drinking, I lengthened the lower of the double slits. Don't forget to do this for all parts involved: front and back!
Once you have chosen the location where you will make the seam, draw a line on the pattern at that location. The line should be perpendicular to the grain (or fold) line at the point where you want to lengthen or shorten the piece. Remember: Draw this line in the same place on all pattern pieces that you will be changing.
Then, starting with one piece, cut the pattern along your line to separate it into two separate pieces.
For lengthening
To increase the length of the pattern, attach a strip of paper under one of the two pieces and draw a grain line (or fold line) across the strip of paper as shown in the picture below.
Draw a line parallel to the cut edge of the pattern and mark the length you want to add. For S, I usually add one to two inches, but it's a good idea to refer to the finished garment measurement chart on the back of the pattern envelope so you know how long the original pattern will be when it's finished. This will help you decide how much to add or subtract from a portion.
Glue the other pattern piece to the drawn line. Be sure to match the extended grain line, even if the sides of the pattern don't match.
Finally, draw the edges of the pattern onto the strip of paper you inserted. You will need to draw a straight line or a curve. If the edge is straight, simply connect the two sides of the original pattern piece with a line. If the edge is curved, you may need to blend the edge by subtracting a little from one line and adding to the other. Use your eye to widen the curve so it looks blended with the rest of the edge of the pattern, like in this illustration.
To shorten
To shorten a pattern, fold the pattern piece over itself to remove any excess length and glue the pieces together, again maintaining the grain structure or fold line.
Redraw the sides, blending any curved lines to create a continuous curve, as you would with an elongated piece.
Sandbox Pants: Overlap the cut line to shorten
. Again, be sure to make the same adjustments for all pattern pieces, both front and back. There's nothing worse than forgetting to add length to a piece of the pattern.
similar positions
.
Impromptu method
If you do not have sewing and cutting skills, and you do not have a sewing machine, then use this method. Determine the length of the dress as indicated above. Leave a 2.5 cm seam allowance from the marked line. Double fold, press or baste the seam. Take a needle and sewing thread of the desired color, then secure the fabric with blind stitches. The hidden seam is made carefully, using a needle to pry up the upper threads of the two parts of the fabric. The stitches should be made oblique, small in size and at the same distance.
Remember: it is very important to visually imagine the entire process (sequence of actions), and then get to work. This way you can avoid mistakes and shorten your dress correctly.
Most women at least once in their lives have a question: how to shorten a dress? There can be many reasons for this. Here are some of them.
If you have chosen a dress to shorten and made a firm decision to modify it, you need to know the main points, using which you will get an excellent result. This is especially true when you need to shorten quickly. We'll tell you how to turn a long dress into a short one.
How to shorten a Herve Leger skirt or dress
I don't usually like changing Herve Leger dresses. But when changes are absolutely necessary, simple and reversible changes are best. If desired, the dress can be returned to its original design. Here's a simple tutorial on how to shorten a Herve Leger skirt or dress.
This guide applies to most Herve Leger bandage dresses and skirts. However, it should not be used on dresses with intricate patterns at the bottom, flared bottoms, or anything with hardware at the bottom.
In my opinion, this solution is better than taking it to a tailor and having the fabric removed. People often change their minds about how short a dress should be. The reversible option also makes the dress more versatile.
All you need to do to make your Herve Leger dress shorter is: 1. Turn it inside out. 2. Add up the amount you want to cut. 3. Using thread of the same color as your dress, sew a few points down. Do not make tight stitches. A couple of loose stitches at each point will do. When sewing, make sure that the thread does not extend to the outside of the dress. In areas where there is no excess fabric to support the thread (such as near the zipper or side seams), pass the thread only partially through the top layer of the dress.
It's really that simple! And it's faster than going to a seamstress!
If you need to undo a change, simply trim the loose stitches you made. Make sure you don't cut into the dress. If the dress has been changed for a very long time, you may need to press the damp fabric into the fold to remove any creases that form when folded.
Liked? Read about the opposite: how to turn a short Herve Leger dress into a long one.
.
Blind seam. How to do
I urgently need to bend the hem, but I don’t have a machine. We'll do without a machine. Many dressmakers always use a hidden seam.
Hand hemming can be done on dresses made from wool or suit fabrics. Needle punctures on such materials will not be visible on the front side.
To hem a dress by hand, you need to take the right thread. First of all, it must match the color of the product. It is better to choose a thin, non-twisted thread so that it does not twist during the process.
It is necessary to hem with a thread not in two layers, but in one, otherwise a rough puncture will be visible on the front side
. How to sew with a blind seam? Use the needle to grab only one thread at a time, then there will be no marks left on the front side. The photo shows how a hidden stitch is sewn.
A knitted dress can be hemmed by using a double stitch on a machine. First, the edge is processed using an overlocker, the excess is cut off, and a double seam is sewn from the face. There is a special needle that can make such a stitch. Or you can first lay one line, then, retreating 0.7-0.8 cm, lay another one. Before performing this operation on a dress, practice on a different material.
The hidden seam can be like in the photo. It is very convenient to hem the hem of a product made of dense material.
Fabric Features
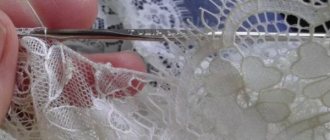
Tulle is a type of fabric, but historically, this word also refers to any translucent curtains. They can be made from tulle, as well as from a variety of other natural, synthetic, and mixed materials: voile, organza, chiffon, tulle, mesh, and even viscose and cotton. The main criteria are ease and transparency. In order to properly hem the curtains and not spoil their processing, it is important to take into account their features, namely:
The filing of each of these varieties has its own subtleties. For example, before hemming tulle with a weighting agent, you do not need to remove it at all. The seam used to process this part is specific. It will not be possible to restore it qualitatively on your own. Therefore, such curtains, as with lace or a coupon, are cut and hemmed only in the upper part. You can hem tulle without weighting from any side, but it is more convenient to do it from the bottom.
The work of shortening and hemming curtains is estimated in the range of 15-30% of their cost.
By learning how to properly hem tulle with your own hands and doing the whole process yourself, you will not only receive moral satisfaction, but also save a lot.
Hemming begins with determining the length of the finished product. To measure it more accurately, before cutting the tulle, it is recommended to hang it above the window and leave it for a while so that it takes its final shape.
Threads for all types of tulle are selected thin, No. 40 or less. It is desirable that they match the fabric composition: synthetic, silk, cotton.
The needles must be very sharp, since dull needles pull and tear the delicate fabric.
The color of the threads is chosen to match the tone of the main background. If this is not possible, you can take a thread a tone or two darker; it will be less noticeable on the canvas than a light one.
To properly hem curtains and tulle, before sewing a stitch on a sewing machine, experiment on a small piece of fabric: adjust the thread tension and stitch length. Please note that the seams are laid with a straight stitch with an average stitch length of 2-4 mm.
If you are not experienced enough in sewing, before final stitching each time, baste the folds (or pin them with safety pins) and iron the hems and finished seams with an iron.
While sewing, try not to tighten the thread too much, otherwise the thin, delicate fabric may warp.
To ensure an even stitch, hem the tulle with paper. Cut a strip with a width equal to the width of the hem and, placing one side of it against the fold, stitch along the other side.
It is convenient to hem very thin or mesh curtains on tissue paper. After stitching, the paper comes off easily.
Source
Processing without bending
Overlock processing
A fairly simple method that does not require the use of complex techniques is finishing the edge with an overlocker. A similar stitch can be made with thread in a completely different color. Even in this version it will look quite beautiful.
Processing the cut with a zigzag seam or a roller overlock, which produces an even hem, is perfect for a dress made of thin fabric and if the hem is “torn”.
There is no need to bend the edge of the material. After finishing, it is necessary to cut off the threads that stick out. The seam comes out even better if you do a zigzag stitch, stepping back from the edge, and then carefully trim off the excess material.
You can see how contrasting colors look on light fabric when processed with overlock in this video:
Using bias tape
An excellent hem can be achieved using bias tape. For thin material, it needs to be stitched like an edging. The bias tape (you can use a ready-made version) must be folded in half and ironed, then a piece of fabric is placed in the middle and stitched.
This option can be used to finish the inside seams of fabric that frays easily.
To hem such a thick fabric, you will need a hem of half a centimeter. The bottom of the dress and the trim need to be folded face down, then stitched along the bottom. Next, the binding is turned inside out, ironed and stitched along its top. This hem option can be used when the length of the skirt does not allow for a standard hem.
The process can be seen clearly in the video:
How to cut the length of a dress. How to hem a long dress to the floor straight
Hemming the bottom is one of those operations that even those who do not like to sew have to deal with. Of course, sewing curtains or adjusting trousers to fit your height can be entrusted to professionals, but almost every woman has had to deal with the problem of a torn hem or the need to shorten a skirt that is too long. This is not difficult to do, and perhaps, having mastered these simple operations, you will love to sew on your own.
How to level the bottom?
When it comes to sewing curtains, most often the hem line is straight. If we are talking about a skirt, especially a flared one, then the bottom line is aligned directly on the figure, while the belt and clasp should be well adjusted.
To carry out this operation, stand on a flat surface in the shoes with which this item is supposed to be worn. In this case, an assistant, using a vertical wooden ruler, one end of which is placed on the floor, marks the corresponding level with chalk along the entire circumference of the hem.
However, this operation can be done independently if you fix a rope thickly rubbed with chalk in the doorway at the required height (Fig. 1). To the marked line it is necessary to add an allowance for hems and seams, the width of which will depend on the method of processing the bottom.
How to mark the hem line of a skirt yourself
Processing without bending
The simplest way, which does not require the use of special techniques, is to process the edge with an overlocker. In some cases, such a stitch, for example, made with a contrasting thread, looks very attractive (Fig. 2).
Processing the cut with a zigzag seam or a roller overlock, which creates a neat scar, is also good for thin fabrics (Fig. 3). After processing, the protruding threads of the fabric must be trimmed. An even more beautiful seam is obtained if you lay a zigzag stitch at some distance from the edge, and then carefully cut off the excess material.
A beautiful and neat hem is obtained by using bias tape. For thin fabrics it is attached in the form of a border. To do this, the bias tape (it’s better to take a ready-made one) is folded in half and ironed, then the edge of the fabric is placed inside it and stitched (Fig. 4). The same method is well suited for processing internal seams of bulk material.
To hem dense material in this way, you will need a hem of about 0.5 cm. The fabric and binding are folded right sides together and stitched along the bottom edge. Then the binding is folded over to the wrong side, ironed and stitched along its upper edge (Fig. 5). This hemming method is well suited when the skirt is not long enough for a standard hem.
Finishing the edge with a hem
In flared lines, the fold is much more difficult to perform. To facilitate this operation, two parallel lines are laid along the bottom of the product (Fig. 7). Then the bottom line is gathered up a little, the fabric is folded inside out along the line of the top line, pinned and pressed.
The simplest method for processing a folded edge, which even those who do not know how to sew can quickly handle, is to use adhesive tape. It is placed in the fold and treated with a hot iron (Fig. 8). For heavy textiles, it is recommended to insert two such tapes.
Professional dressmakers do not recommend using this method of fixing the hem, believing that it makes the fabric more rigid. In addition, the adhesive tape will most likely have to be re-glued after washing. In the time of our grandmothers, traditional stitches were used for products made from suit and coat fabric - blind (Fig. 9) and goat (Fig. 10), which are still made in expensive studios.
Beautiful execution of such a binder requires skill and a lot of time. In professional clothing production, this operation is most often performed with a hidden machine stitch. A simpler solution is to simply stitch the double-folded edge (Fig. 11), which is well suited for sportswear.
With a narrow hem, such a stitch can be performed using a special
"Goat" for knitwear
For dresses made of knitwear, the goat stitch is the most comfortable seam.
How to make a hem step by step:
In this way, go over the entire hem of the bottom. Make sure that the threads are not visible on the front side of the product. Try to grab only one or two threads of material. The goat is a reliable seam; the bottom of the product will never unravel, even after numerous washes.
Hem
Whoever wears the dress must wear it. The second person should fold the hem of the dress to the desired length so that there is excess fabric on the back of the garment. Pin the hem along the entire circumference of the product and check the length.
Take sharp scissors and cut off the excess fabric from the bottom of the dress. You need to trim enough fabric so that you have about 6mm extra left after the hem is finished.
If you can't trim the old hem when the fabric is pinned, mark the new hem with a pencil and remove the pins before trimming the excess fabric.
Use a seam ripper and remove approximately 2.5cm of stitching from the hem side seams.
Place it in the sewing machine and carefully lower the sewing needle, holding the hem there.
Hold the needle down and snap the presser foot closed.
Slowly sew about five stitches on the machine. All you have to do is start stitching the seam and press it down.
Using your fingers, guide the unhemmed edge of the piece into the curved insert on the front of the presser foot.
This insert will guide the unhemmed edge of the product during sewing, folding it and bringing it to the stitching site. As a result, you don't have to manually roll up the rest of the edge; the machine will do it for you.
Continue stitching the hem along the entire length of the product. The presser foot will do most of the work, but you must manually pull the fabric slowly, carefully and correctly into the curved insert on the front of the presser foot.
If you work in parts, you need to start the process all over again with each new section.
Once the hem is done, the side seams should be pinned and sewn together with a straight stitch.
The owner of the product should try it on to see how the new hem looks. After this the process is over.
Machine blind stitch
The one who plans to wear this product must try it on, the second must measure how much material needs to be hemmed from the edge. After that, trim off the excess fabric with sharp scissors. Leave a 2.5 cm allowance from the edge for processing. The dress must be tried on together with prom shoes. The height of the heels matters when determining how the hem of the dress should be.
- You can measure the length of the hem using a tape measure and cut that way, but if you want a straighter hem, you'll have to mark the desired seam using sewing pins or a pencil around the entire circumference of the piece.
Fold over and press the raw edge. Fold the raw edge of the product inward and hide it on the wrong side of the product. You need to wrap about 6 mm of fabric. Press the new crease with a hot iron.
Fold and press the remaining part. Fold the remaining 1.8cm of fabric in the same direction as the original fold. Press the folded edge of the product with a hot iron.
Again, make sure that the folded fabric is hidden throughout the entire interior surface of the product.
Attach the presser foot to the sewing machine. Screw the foot according to the directions on your sewing machine. This presser foot is needed to finish making the hem on the machine.
Read the instructions that come with it to determine how to do this.
Place the product on the wrong side. The folded edge should be placed towards the outside of the presser foot. Fold the edge over, leaving a narrow edge showing.
Move the fabric under the presser foot and place the presser foot flange on the new edge. When the needle comes down, make sure it sews up the remaining hem and sticks out the back of the fabric. Sew along the entire length of the edge until finished.
The flange is the middle section of the presser foot and is often made darker or painted a different color to make it stand out. This part of the foot acts as a guide for the blind seam.
When finished, unroll the border and straighten the seam, carefully pulling out the hemming stitches so that the fabric remains as straight as possible. Use a hot iron to smooth out the gathers and try on the dress to make sure the new hem looks great. This completes the process.
Is it possible to shorten the dress to the floor?
Hemera Technologies / PhotoObjects.net / Getty Images
You can shorten the dress to the floor. Transform a long dress into a knee-length or mini version. Avoid embarrassing trips by keeping your long dress off the ground. If you have experience with needle and thread, you will have no problem shortening your dress. All you need is a suitable workspace, a friend for a few minutes and basic sewing supplies.
Try on a dress
Try on the dress. Stand in front of a floor-length mirror and place your finger where you want the hem of your dress to end. Use a straight pin to mark where you want the hem to end. Or, if you want it to be floor-length but it's too long, ask a friend to pin the dress to the desired length.
Make your mark
Turn the dress inside out. Measure and mark 1 inch from the pin to the desired length. This 1 inch is the hem allowance. Then measure from the bottom of the dress to the mark to calculate how much you will have to cut off. Using this measurement, make a mark again, this time around the entire perimeter of the dress, to create a cutting line. A pencil or chalk is best for marking. Avoid dark black or permanent markers. You can find tailor's chalk at most fabric or craft stores.
Cut off excess fabric
Use sharp fabric scissors to trim the cutting line. It is important that the line is straight. If it is crooked, your hem will be crooked. Before cutting, you may want to pin the skirt of the dress together near where you will be cutting. This technique prevents the dress from sliding down while you work.
Sew on the hem
Fold the bottom edge of the dress under 1/4 inch and pin in place. For embroidery, use a sewing machine. Remove the pins. Raise the bottom of the dress 3/4 inch and pin in place. Using a needle and thread or a sewing machine, sew the edge of the hem to the dress. If sewing by hand, use a hold stitch to create a flexible hem with a slight lip. Remove the pins.
Press the edge
Press the new edge, checking the heat temperature before touching the iron to the fabric. If the iron is too hot, it may melt your dress. If you don't know what fabric your dress is made from, it's usually best to use a lower heat setting. Turn the dress right side out and enjoy!
.
Put it on glue: instructions for use
The easiest way to shorten a curtain is with a special adhesive tape. Its types are described a little higher. The following are instructions for use:
Important: this processing method is not suitable for all fabrics. For the glue to work, the iron must be really hot, not lukewarm. Organza or thin tulle will not withstand heat treatment, so adhesive tape is not suitable for them.
If the tape is attached correctly, it will not be noticeable to strangers and others
Let's look at the material
To process the top edge, you need to hem the curtain to the curtain tape with fasteners. Today there are quite a few varieties of them. In addition to the material of manufacture (transparent or white), the tape for hemming curtains has a number of characteristics:
For dense, textured or patterned fabrics, a gathering factor of 1.5-2 times is quite enough: their surface attracts attention with decorative details; additional decoration with abundant drapery is not required for such curtains. But thin, solid materials will look richer and more elegant with rich and deep folds: for them, a gather factor of 2.5-3 times is used.
In the upper part of the curtain, with the help of tape, folds can be formed like an accordion, in a checkerboard pattern, there is a bow type of assembly, radial, etc.
Source
Dress with braid
This method is suitable for dresses made of suiting or other dense fabric with a straight cut. The braid will give a smooth cut, forming straight, even edges. Mark the desired length and secure the hem with a pin. Make a mark with chalk or soap, draw a hem line. Don't forget about the allowance. In this case, it is about 1 cm. Sew the trouser braid along the top edge on the front side of the dress. Then make a hem and carry out a wet-heat treatment of the seam. Secure the bottom with a straight machine stitch along the wrong or right side. Similarly, you can finish the bottom of the dress with bias tape if the fabric is thin.
Blind stitch seam
Sometimes, when hemming a dress or skirt, it is necessary to lay a decorative stitch along the hem, in accordance with the style of the product itself. But most often, when hemming the bottom of garments, especially those made of noble, natural fabrics, it is customary to hide the stitch connecting the hem and the main fabric.
Blindstitching is done by hand, but a sewing machine can also be used to make such a seam. The seam is not visible on the front side of the product; on the back side, a seam is laid, catching the thread in the needle to the thread of the main fabric.
Blind stitch made on a sewing machine
Hand stitching, called a “goat” stitch, is the easiest way to hem a dress by hand with a blind seam. You can hem knitwear by hand, just like fabric, in the same way or with an “over the edge” stitch. The thread tension is also done manually. The needle clings to the thread of the fabric below the fold with the seam back, is brought forward and clings to the thread of the fold also with the seam back. This “rapport” is repeated along the entire length of the product, attaching the fold to the main fabric. How to hem knitwear by hand
Dress with braid
This method is suitable for dresses made of suiting or other dense fabric with a straight cut. The braid will give a smooth cut, forming straight, even edges. Mark the desired length and secure the hem with a pin. Make a mark with chalk or soap, draw a hem line. Don't forget about the allowance. In this case, it is about 1 cm. Sew the trouser braid along the top edge on the front side of the dress. Then make a hem and carry out a wet-heat treatment of the seam. Secure the bottom with a straight machine stitch along the wrong or right side. Similarly, you can finish the bottom of the dress with bias tape if the fabric is thin.
Necessary equipment
To create a blind seam manually use:
You might be interested in this: Creating a pattern and instructions for sewing a corset with your own hands
Spool of thread, needle and thimble The thread should match the thickness of the fabric. Thick fabrics, wool, and suits are not hemmed with thin threads. For hemming silk, satin, and crepe de Chine, thin threads of the same composition are used. The same applies to needles; thick needles are used for dense fabrics, medium ones for suits, thin ones for silk and chintz.
For manual work, use a thimble, which will help protect your fingers from punctures and make it easier to work with the needle.
Important! When steaming or ironing, soap will completely disappear from the fabric under the action of steam. It is better to use soap without fragrances. The chalk will need to be further cleaned.
When hemming a product using a machine, use special feet or separate attachments for a standard foot. The purpose of the nozzle is to prevent the needle from catching excess threads on the front side.
Blindstitch feet are included in the set of sewing machines, and working with them is described in detail in the instructions for use.
Blind stitch foot
Materials and tools for shortening a dress
Before you begin, you should prepare the tools and materials that will be needed for shortening.
- Spool threads that match the color of the dress and match the fabric. For example, for a chiffon dress it is better to use thin synthetic threads with glitter.
- Sewing machine.
- Overlock.
- Ruler, square.
- Flexible meter.
- Chalk on the fabric or you can replace it with a thin piece of soap. Take into account the color of the fabric, since the mark left by the chalk may not be visible. You can use a special water-soluble marker.
Important! The line from a water-soluble marker can only be washed off with cold water. If you wet it hot, the mark will remain.
- Sharp scissors.
- Pins with heads for lining the bottom.
- Needles.
- Special adhesive tape (for certain cases).
Methods for hemming a product
There are several simple and popular ways to finish the bottom of a garment, including how to blindstitch a skirt by hand. Each of the methods is used when working with certain fabrics, styles and forms the hem of the product.
Note! It is recommended to make test samples if possible, make changes if necessary, and only then proceed to processing the bottom of the product.
Double hem
A double hem as an option for processing the bottom is made with a closed seam in the fold, which gives the product a neat appearance from the wrong side. It is used when working with fabrics of different densities and weaves, from thin to suiting.
Then it is hemmed with a hidden stitch or manually with a goat stitch.
Double hem by hand
Hemming with hemmed facing
The tailored facing completely follows the curves of the product and makes it possible to create unique models. These can be cutouts at the neckline, armholes, slits at the bottom. Open seams are finished with a trimmed facing.
You might be interested in this. Detailed characteristics of 1022m class sewing machines
The facing is cut out, exactly repeating the cut that will be processed. Sewn to the edges using a machine. The facing is then turned over to the wrong side and hand sewn with a blind stitch.
Hemming with cut edge
Original models with trims made from edging tape or with the possibility of double-sided wearing are processed using the cut edging method. The edging tape or trimmed strip of fabric is folded with the wrong side inward and ironed. The front side of the tape or strip is applied to the front side of the product so that the open cuts are on one side. The tape is stitched and turned down and to the wrong side. On the reverse side, the open cut is folded over and manually hemmed with a blind seam.
Hemming the cut with edging
How to correctly mark the bottom line of a product
Before marking the bottom line in a product with a free pattern, preliminary preparation for this operation is necessary. The product should be ironed well, the length should be determined, and the shoes should be prepared. The length is determined by measuring the segment from the floor to the bottom of the product. The segment must be the same length. A mark is applied to the fabric, and subsequently the marks will be connected into a single fold line.
Important! A skirt, dress or robe cut along an oblique line requires special care when preparing for measurements. Seams and darts must be perfectly ironed. Check the side seams for distortion.
Checked fabric requires a different approach: at the time of cutting, you should take into account the size of the check, its “rapport” and decide on the length.
How to work with silk correctly. Useful tips.
Good afternoon, my dear girls. Today I present to your attention a detailed article about working with silk. And this is not without reason - very soon I will create a series of articles on sewing various tunics, tops and light summer dresses from airy, flying, breathable and slippery fabrics. Working with such fabrics requires knowledge of the nuances of working with silk, chiffon, stretch, and thin knitwear. That is why I decided, first, to write 2 instructional articles “ How to work with silk ”, “ How to work with knitwear and stretch ”. And then just talk about the design, cutting and stages of sewing this or that airy summer clothing.
Today we will talk about silk . How to cut and sew from silk. How to wash and iron it. How to remove stains from this delicate fabric. Which seams are suitable for a particular model, for transparent or opaque silk.
Also, all the tips in this article apply to any light or slippery fabrics, such as chiffon, satin, acetate, cambric, etc.
In this column I reflected the sequence of points of this article:
Working with silk. Part 1 .
- The idea of the dress (whether a lining is needed, what fabric to choose for the lining)
- How to prepare silk for cutting (washing, ironing, shrinking)
Working with silk. Part 2
- How to cut (so that the fabric does not slip)
- Preparation for sewing (selection of threads, needles, special presser feet, stitch settings)
- Stitching parts - nuances of sliding and tightening.
Working with silk. Part 3
- Types of seams for silk (in which case, which ones are best to use)
- Hem hem, neckline and armhole finishing.
- How to wash silk, remove stains, disguise scuff marks
So, the first part of the article and the first point...
Do I need a lining, what fabric to choose for the lining?
Why did I start by discussing the lining? Because the beginning of the idea to sew a silk dress arises in a fabric store, when you see that amazingly beautiful silk has appeared there. You buy it to match a specific dress (the same one you’ve been carrying a photo of in your head for a long time). And right there, without leaving the cash register, you think about the lining...
Therefore, we will talk about it at the very beginning.
If you are sewing a dress from opaque silk and a loose fit, then you do not need a lining . At all.
You need a lining - in cases when:
Or the silk you liked is translucent
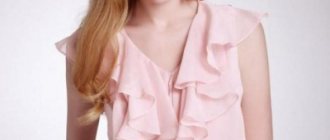
Or the Future dress has a close-fitting silhouette (as in the photo below) and then a mandatory lining is needed under it. (yes, a silk bodycon dress without a cover does not fit as it should).
This means you immediately want to buy a lining. DON'T EVEN THINK OF GOING TO THE SYNTHETIC LINING DEPARTMENT. Never, ever use synthetic lining for a silk dress. With a synthetic lining, a silk dress loses all meaning - you don’t even have to sew it - just sew a polyester one.
Fabric for lining - ONLY SILK - you can use the same one, you can have another thinner and cheaper one (even the cheapest silk will do - silk chiffon, silk satin, etc.). Just not the terrible polyester, I ask you - because you won’t be able to know the bliss of being in the caresses of a silk dress. Silk should touch the body.
As a last resort, choose a lining made of breathable natural fabric (not even from the “silk family”) - viscose (light breathable material), light acetate (material made from natural raw materials feels like silk, does not wrinkle, because it has a crochet thread ).
cambric is a very good lining - this is a translucent, thin linen or cotton fabric,
be decated before cutting (this will be discussed below).
Lining color: to match the main fabric.
If the lining is needed for transparent silk , it can be
or to match the top fabric
or another color (and then it will be a game of contrasts - for example, soft pink transparent silk on a silver-gray lining)
or flesh-colored (and then it will merge with your skin, and it will seem that you are wearing a light cobweb).
You can, of course, sew a translucent product without lining - a top or blouse. In this case, the bust that will be under the fabric should be plain without patterns or lace.
You can, of course, sew a translucent product without lining - a top or blouse. In this case, the bust that will be under the fabric should be plain without patterns or lace.
How to prepare silk for cutting and how to cut silk.
Silk fabric has one peculiarity - most likely it will shrink after washing (in 90% of cases). Therefore, before cutting, the entire piece of fabric must be washed and ironed - this is called decating the fabric. After decating, the fabric will shrink and you can safely cut the dress.
Attention - you must wash it correctly:
- The water is a little lukewarm, even rather cool (30-33 degrees)
- Detergent – shampoo (no powders). There are special products for washing silk, but people still claim that they haven’t yet come up with anything better than shampoo for silk.
- Wash by hand, do not rub the fabric , but wrinkle it a little, do not twist it, do not wring it out!
- Rinse in water with vinegar (to soften water hardness.
In short, care is like hair care.
Dry it like hair
- Not allowed under the sun's rays
- No need to be near heating radiators either.
- In a shady and cool place - just right.
Ironing silk correctly - nuances.
You need to iron without waiting for the silk to dry completely . We set the iron to “1” or o. NO STEAM!!! You can iron silk by placing a damp iron (this is a layer of silk, flannel, flannel, or linen fabric). The iron will not slide over the silk, that is, the iron, when sliding on the surface of the iron, will not stretch the silk. This is especially important if your silk has an elastic thread added to it (that is, it is slightly stretched - there are such things).
Sometimes during the ironing process you may be frightened by the waviness that appears on the silk (like bubbles on pancakes) . The reason for this phenomenon will be the sensitivity of this type of silk to the round holes on the sole of your iron. This rarely happens. Practice on a separate section of fabric. If there is such a trend, then take your iron with you and go to the store to choose a special attachment for delicate fabrics. This is such a removable sole - yes, it costs money, but silk is not a cheap fabric.
If you suddenly encounter the fact that silk does not iron after washing, then the reasons and solutions may be as follows:
Reason: You washed it in hot water - and the silk was “cooked”
The solution – there’s nothing you can do about it – let’s give up and let it be like “crushed silk”, that’s also fashionable.
Reason: You did not add vinegar to the water when rinsing - and calcium from hard water
“cemented” wrinkles on the fabric.
The solution is to rinse the fabric again in vinegar water, dry it and iron it while still wet.
Reason: You simply dried out the fabric on the rope.
Solution 1. – try rinsing the silk in water with glycerin (1 tbsp per 1 liter of boiled water), wrap it in soft cotton fabric, when excess moisture is absorbed, iron it with an iron without steam.
Solution 2 . – wrap the silk in a damp sheet, place it in a plastic bag and close tightly. The fabric will be evenly moistened after a few hours – then it can be gently ironed.
Now let's move on to the next part of the article - to find out how to properly cut this slippery and loose material.
And today we’ll talk about what scares you the most about working with silk – cutting . I will also tell you which threads and needles are suitable for silk, what stitch is best for sewing silk, and how to stitch together parts made from slippery silky fabrics.
We will learn everything about silk, and then I will create master classes on various silk tops, tunics and dresses - and you will already know all the tricks of working with silk, and not be afraid to sew them with this expensive and delicate fabric.
So…
How to cut (so that the fabric does not slip)
Difficulties in cutting silk fabric are caused by its silkiness - that is, the fabric can fidget, slide on the table and therefore the pattern will be transferred crookedly and cut crookedly.
But this is not a threat to us. Because we will comply with the following rules:
- Silk fabric for cutting should not be placed on a bare smooth table , but the surface should be covered , for example, with a woolen blanket or other rough, flat fabric (even a sheet will do if it is not made of silk). Silk will not slide on wool - besides, it will also stick to it with static electricity. Straighten the silk on this blanket - check that it lies evenly - does not bubble anywhere, does not warp.
- The pattern for cutting must be made with seam allowances . Why? Because we will pin it to the silk with pins along the edges - precisely in the allowance area. Only there can you pin it - because the mark of the pin punctures remains .
- Or you can not pin the paper pattern, but glue it with masking tape (this is the kind that is used to cover windows). First check on the edge of the fabric how your silk reacts to the touch of masking tape. This is a very convenient way - we attach this masking tape in places to the back of the pattern (it can be attached to the pattern with strips of ordinary stationery tape). We put such an adhesive pattern on the silk and calmly cut it - the pattern will not budge.
- There is another option - transfer the paper pattern to cotton fabric. And place the already cut out cotton piece with pins on a silk canvas and cut it out.
If you plan to put a silk part on dublerin or non-woven fabric (that is, glue it), this must be done before cutting. That is, cut out the required part from dublerin. Place it on the silk, (where it should lie according to cutting), cover it with what is required, and iron it and glue it with an iron. And only after that cut it with scissors. By the way, for silk fabrics it is recommended to use the thinnest transparent interlining - it does not show a bit on the front surface of the part.
For transparent fabrics , it is better not to use adhesive pads ; they show through the fabric, and the adhesive composition can (oh horror) bleed onto the front side of delicate silk. Therefore, for transparent silk, organza is used as a reinforcing pad (if needed) (it is cut out in the same fractional fusion as the silk part)
Natural silk is very frayed when cut. Therefore, it is better to process the sections immediately after cutting, using any simpler method. It also helps against excessive friability of the cut - cutting with special scissors with zigzag blades.
Preparation for sewing (selection of threads, needles, seam adjustment)
Selection of needles . Silk is very damaged by the needle (a puncture mark remains), so to baste it by hand you need to take bead needles . They have a tiny ear and they themselves are thin - traces from such a running seam will not be so visible.
And you need to put thinner needles in the machine - No. 60-70 . And make sure that the needle is smooth, without roughness - it’s better to buy new ones.
Also try not to redo the seams when sewing - because after ripping the seam, a very visible mark remains. Before you sew, try on your future product and make sure that it is cut correctly and you will not have to redo the seams later.
Choice of threads. The best choice is silk threads (No. 65). But if you can’t find one that matches, then cotton or linen will do. Polyester is possible (if there is nothing at all), but check how the stitching fits - it happens that the polyester thread, when it comes out of the machine, stretches, and then “relaxes” at the seam, shrinks back and tightens the seam.
And cotton threads are also good because if your dress gets caught on something, the seam with the hebash thread will burst rather than tear the expensive silk fabric. And if there are seams made of polyester threads, then the seam itself will hold up and will not burst, but the silk fabric will unravel along the seam. It's better to let the threads burst.
Preparing the sewing machine.
When sewing silk, some seamstresses install a special foot with a small hole . Or a special needle plate with a small hole for the needle (by the way, you can also seal a regular plate with tape). These devices prevent the delicate silk fabric from being lifted up when moving the needle up and down.
But these devices are not required . Not every silk has such viscosity and lightness that it can be pulled upward by a needle. But if this is observed, then it is enough to put a strip of paper (tracing paper, newspaper, toilet paper) between the silk and the needle.
The lower conveyor (an iron engine with teeth that scrolls the fabric forward) can also injure delicate silk If this happens, place a sheet of tracing paper (toilet paper, newspaper) between the conveyor and the silk.
Set the stitch length to a distance of 1.5 - 2 mm. This is the best step for silk fabric so that the seam has less chance of unraveling. Experiment with scraps of silk fabric to fine-tune your stitching.
Stitching parts - nuances of sliding and tightening
Practice grinding parts:
Most sewing machines attach the bottom fabric . Most often this happens on slippery fabrics. That is, the lower protractor pushes the lower layer of fabric forward with its teeth, and the upper layer of fabric slows down a little (because the fabric is slippery and the adhesion between the two layers of fabric is weak - the lower fabric moves a little faster than the upper one).
Conduct an experiment on patches. Sew 2 pieces of equal length. If the bottom flap in the seam area is shortened, but there is excess left on the second flap, then this means that this fabric with this machine gives a fit. But this is not scary at all; as a rule, the fit is quite insignificant. And it can be solved in several ways.
Method one. The simplest and most reliable thing is that even before sewing two parts onto machines, they must first be sewn together by hand. Then both layers will be one whole and will travel on the conveyor at the same time.
Method two. It is also very reliable - future seams on parts need to be glued with narrow strips of the thinnest adhesive interlining. Moreover, glue the strip of non-woven fabric in such a way that it protrudes only 2 mm beyond the intended seam line - and most of it lies on the seam stitch. This is necessary so that it does not peek out of the seam later
Method three. Install the upper protractor on the machines - it will, in parallel with the lower conveyor, scroll the top layer of fabric. The upper conveyor can be either built into the machine or removable, sold separately.
Method four. Let him adjust it - it’s not scary - that is, you want it faster, and this adjustment of the lower layer of fabric is not very important to you. Then at least follow this rule :
- When sewing paired parts (front + back, back leg + front), you must maintain symmetry of the fit.
I show the example of sewing 2 shelves to the back. We place the shelf and the back on top of each other with the right sides facing inward and place it under the machine so that the shelf is on top. That is, we grind (sew together) the parts from the side of the shelf, then the back part will fit (shrink slightly). And when we sew on the second shelf, we also put two parts under the machine so that the top one is a shelf - then on the other side the fit will also occur on the back.
- And the second nuance is that the side seams (right and left) should go in the same direction - from the armpit to the bottom. Then at the bottom (at the end of the seams) on the shelves there will be an extra centimeter of edge (because along the back line the seam has grown, shortened, but at the shelf it remains as it was). This extra piece at the bottom of the shelf parts can be simply cut off.
- By following these rules (for the fourth method), we will get a high-quality product, where the drawstring will be symmetrical on both sides , and the drawstring will be located at the back (on the back) - which corresponds to the technology.
- Well, now you already know as much about working with silk as professional tailors.
But that's not all. In the third (last) part of the article I will tell you what seams are used when sewing silk. What seams are used to process loose cuts (if there is no overlocker).
And also how to care for a silk item and remove stains from this delicate fabric.
And after this we will begin to sew wonderful models of dresses and tunics and silk (such as in the photo above). We already know from the first and second parts of the article:
- how to prepare fabric for cutting (so that it doesn’t shrink later),
- how to wash silk (so as not to “cook” it and so that it doesn’t wrinkle too much)
- how to iron correctly (so that it doesn’t go into waves and bubbles)
- how to cut silk (so that the fabric does not slip),
- what threads and needles do not spoil silk,
- how to adjust the stitching so that the seams fray less
- how to grind silk parts so that they do not slide relative to each other and do not shrink.
And today the third article dedicated to silk will tell you:
- what seams to sew transparent and opaque silk,
- how to process the neckline and armholes,
- how to properly process the bottom of a silk product in order to maintain a flow or, conversely, a flat surface; how to process the bottom of corrugated folds.
- how to process cut edges if you don’t have an overlocker
- how to remove stains - especially oily stains that are stubborn on silk
Types of seams for silk.
If the silk fabric is not see-through:
Everything is simple here:
Regular ground stitch - we use it in silk products made from opaque fabric (of any cut).
And also in the case when the product is supposed to be placed on a lining case.
A regular stitch - but with the smallest stitch size - so that the silk fabric does not have the opportunity to unravel at the seam.
If the fabric is see-through , then you need to be very careful about the seams. The seams will be visible through the fabric, so the seam allowances must be finished perfectly.
If you have an overlocker, then practice on a piece of scrap and choose the most accurate overlock stitch on this fabric.
If there is no overlocker, then:
- Cuts of seam allowances can be processed with a zigzag stitch in two passes (so that the zigzags are layered on top of each other).
- Process the cut manually using the twist method . That is, use scissors to trim the hems so that they are the same width of 1 cm along the entire seam. And then we sew the edge of the cut with thread, slightly twisting the edge itself into a roll with your fingers.
This will be easier to do if you use a needle to help the cut twist - to do this, you need to alternately stick the needle either into the edge of the cut of the roll, or into the inner fold of the roll, while the needle should pick up no more than 2-3 threads of the fabric. Yes, it's not fast, but in the evenings... to the sounds of TV... and after 2-3 evenings all the seams on your dress will be perfect.
- Use special seams ( French or closed seams ), in which the cut edges of the seam allowances are hidden inside the seam itself. Only these seams cannot be performed on rounded relief lines (such as a sleeve cap or a “princess silhouette.” That is, they are suitable for sewing straight edges of parts, or with a very slight (almost invisible) bend.
French seam (consists of 2 seams).
Place the parts on top of each other with the wrong sides inward (Fig. 1) , cut evenly to the cut (if the cuts do not line up somewhere, crooked ones, straighten them with scissors). If the seam allowance was 1 cm, then step back 0.5 cm (that is, half the allowance) from the cut to make a stitch (Fig. 2).
Now we need to shorten the allowance a little - so that it is no longer 5 mm, 3 mm - we use scissors to trim the edges of the allowance along the entire length of the seam (Fig. 3).
Now we fold our parts with the right sides inward (that is, we close the “book” so that the allowances remain inside the “pages”), and the fold line falls exactly along the first seam (Fig. 6, 7).
And we sew the seam along the intended line (Fig. - (in our case, at a distance of 0.5 cm from the first seam). Thus, our sections remained inside - sewn on both sides with stitches. We unfold the flaps (Fig. 9) and see that from the front side everything is beautiful too (Fig. 10)
This seam looks very neat.
Backstitch (quick) seam.
We stack the parts on top of each other with the right sides inward (Fig. 11) and stitch along the intended seam line (Fig. 12).
We iron the allowances in one direction. We cut one allowance (that is, one flap) close (3 mm) to the stitching (Fig. 13, 14), and fold the second allowance and place it on the first one, which is trimmed (Fig. 15). We baste it so that it holds, put it under the machine foot and stitch it next to the previous seam (Fig. 16). This sewing seam is quick to do and only one line is visible on the front side.
How to process the bottom of silk products.
There are several ways. Some of them have the goal of preserving the flow of folds (at fluffy hemlines). Others are used to prevent the bottom of the dress from flowing, so that the surface of the hem is as smooth as possible (silk pencil skirts, dresses with a tight silhouette).
This pattern can be reflected in one phrase: the wider the skirt (or tunic), the thinner the hem should be.
There are the following types of bottom processing:
Processing with bias tape. This method is sometimes used when sewing from thin transparent fabrics , if this is provided for by the design. This edge of the hem, sealed with tape, is less plastic; it restrains the flow and gives it a rounded smoothness. I’ve already told you more about how to make and how to sew bias tape here. This method is also used when sewing pleated skirts made of thin fabrics. To prevent the folds from losing their shape at the bottom of the hem, the bottom is reinforced with edging cut from the same fabric.
Hem with zigzag stitch. The edges of the product are ironed to the wrong side and stitched along the fold using a frequent zigzag stitch. We cut off the excess piece of allowance with scissors as close to the stitches as possible.
By the way, if the fabric is very transparent and airy, then monofilament is better suited for this processing (it looks like a thin fishing line). It will process your edge with invisibility and will not look rough, as it would with ordinary threads.
Narrow hem to maintain flow . They are convenient for finishing the edges of wide skirts or tunics. You need to fold the edges to the wrong side and sew with a regular seam, retreating 3 mm from the fold line.
Remove excess hem with scissors as close to the stitching as possible.
Fold this edge to the wrong side again and stitch along the same line again. Iron the seam.
Hem with twist for loose fabric. For this method you need a special twisting foot, the kind that is used to fold handkerchiefs. If the fabric is very loose, then this method is just good. But if you don’t have such a foot, then try doing something similar by hand - in the same article, above, I already described the method of manual twisting when processing seams.
How to process a neckline and armholes and loops
- For transparent silk products, it is recommended to process them with piping (the middle model in the photo below), then all the seams are hidden inside the piping and do not show through the transparent fabric.
- You can edge the neckline and armholes with ruffles (see the first model in the photo below)
- do the treatment using the twist method (also good for transparent fabrics)
- zigzag stitch made with monofilament (it is transparent like fishing line) - and then hide the finished seam by folding it to the wrong side and stitching it along the edge.
- Do the processing with a backstitch (this is when a “duplicate” of the same material is sewn onto the wrong side, repeating the outline of the neckline - and all the seams are hidden between the duplicating fabric and the top one (the 3rd top in the photo was processed with this technique)
In order for the neckline to retain its shape, before bending it or edging it, you need to lay one stabilizing line . Or if it's opaque silk. You can glue it with a strip of transparent interlining before processing.
How to hide knots on transparent fabric.
I’ll tell you using the example of darts – darts on transparent fabric. After we have sewn the dart, we usually tie the threads into a knot and cut them, leaving 2 tails of thread sticking out (as we do when sewing from opaque fabrics). You can’t do this with transparent fabrics - the knot will be visible through the fabric - it’s not beautiful. It is better to do this: after finishing the stitch, raise the foot, and, removing the fabric, pull the thread from the needle and from the shuttle to a sufficient length, cut at this distance. Next, you can tie these long ends of the threads together into a knot at the end of the line at the dart itself, but do not cut them off. Now, one by one, we insert each end into a hand needle and raise it with stitches by hand along the seam of the dart a few centimeters. After that, there, on the seam, we make a small knot and use a needle to dive inside the dart itself, walk a few centimeters inside the dart, emerge anywhere and cut the thread at the level of the place where it comes out from inside the dart. Thus, the tail of the thread remains inside the dart and is not visible. And it is best to process darts on transparent fabrics with monofilament (it looks like a thin fishing line).
Well, here's all the knowledge you need to fearlessly take on sewing from delicate, silky fabrics. Now you are not afraid to buy even very expensive silk - after all my advice, it will be impossible for you to spoil it.
And when you have a ready-made silk product in your hands, all you need is to follow the rules of care. I talked in detail about washing and ironing in the first part of the article (where we washed and ironed silk for cutting).
And here I will only mention what to do if a stain appears on the silk or the silk is worn out from wear.
How to remove a stain on silk.
So... SPOT!!!
How to wash it?
If you can't go into hot water,
not with powder
and you can't rub it with your hands?
Especially if the stain is greasy. As you know, greasy stains on silk cannot be washed off. No soap. Not washing powder.
THERE ARE ALTERNATIVE METHODS, tested by people and collected by me from various forums. Here they are:
Try the Sprite drink - it also eats away stains, there are people who swear that it has removed fat from silk.
Champagne is also a good anti-stain product. This is where the successful tandem of “alcohol + bubbles” works. As you know, the surface is wiped with alcohol to remove oil stains. And the bubbles allow alcohol to penetrate between the silk fibers. I accidentally came up with this method when I spilled a glass of champagne on a silk sheet with a stain.
Gasoline - apply with a cotton swab to the stain several times and wash in cool water with shampoo.
Talc – removes fresh stains well. There are even special aerosols for dry cleaning with talcum powder and a brush on the cap.
Urine - if you leave it for half an hour, sometimes the stain will go away. A solution of ammonia in water works the same way. Just check if this will affect the color of the product.
If the stain is not greasy - a stain of dirt, graphite pencil, etc. - then you can rub it with a cloth soaped with laundry soap (Antipyatin soap is wonderful in this regard) and then wash with shampoo as usual.
And finally, if the stain cannot be removed - and the silk item is very dear to you - it can be repainted. Or with special dyes - cold method (hot silk cannot be used). Or if you like shades from light beige to dark brown - there is MANganese. Any light silk can be re-dyed by simply dipping it into a cool solution of potassium permanganate - the darker the color you want, the stronger the solution and dip more. After this, there is no need to rinse the fabric - you have achieved the desired shade and hung it up to dry (mmm, interesting, but if there is a stain in the tea... or onion skins... you should try it).
The silk blouse is frayed - what to do.
Yes, this happens. You love it, wear it almost every day and suddenly notice that the delicate fabric has worn out. Typically on the shoulder where the bag hangs. On the hip where the bag meets the fabric. At the waist, where the belt injures her.
Should I throw it away..?
No, we will save you.
Option 1. Add cut elements.
- Drape the folds in this place.
- Sew a flounce, a flower cut from lace, braid . Moreover, eclecticism - a combination of incompatible things - is now in fashion.
- If there is wear from the bag on the shoulder or at the hip, then flounce sleeves (see photo below). True, if the blouse already has sleeves, they will have to be cut off. And it’s okay if the flounce sleeves are a different color. They can be supported with jewelry of the same shade, for example, a bracelet and earrings.
- Option 2. Hidden application.
- If you have, for example, a flowered blouse, then you can cover the fray by cutting out a flower along the contour and using it to cover the fray by gluing it like an applique onto a thin interlining (double-sided adhesive web). The flower can be cut out by sacrificing the bottom edge of the blouse, or by shortening the sleeve, or if you have a turn-down collar, cut it out from the inside of the collar - it’s not noticeable there.
- Or scatter sequins here and there, they will cover up the wear where it exists, and in other places they will draw attention to themselves!
In general, there are a lot of options - I wouldn’t be surprised if after modernization you love your blouse even more.
That's all I wanted to tell you about working with light and silky fabrics.
Happy sewing and wearing!
How to sew knitted jersey?
To sew clothes, you can use a regular sewing machine and synthetic threads. As for the needle, it must have a rounded tip. During the sewing process, when racing stitches, it is better to stretch the fabric a little for better elasticity. If it stretches too much, treat the seam with starch or place paper under the fabric. If you have a modern machine, use a narrow zigzag, knit or pseudo-overlock stitch.
The side seams can be sewn with a regular seam without much tension, since they do not have much stretch. As for the shoulder seams, they need to be stabilized with regular braid inserted under the seam. This is done so that over time the shoulders do not stretch and maintain their shape and length.
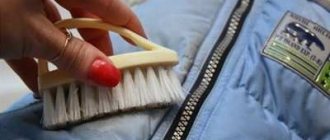
To prevent the bottom of the knitted item from stretching, a strip of non-woven fabric should be glued under the hem finishing line, which will give the bottom of the item a static shape.
Many women wonder what to sew from knitted fabric? The most popular options are:
Such things keep you warm even in the most severe frosts and at the same time look stylish on anyone. When complemented with patterns, prints or rhinestones, these products look sophisticated and original.
If you want to see the range of this material in our online store, then visit the Knitted Knitwear category. We are sure that the Italian options presented there will not leave you indifferent!
About our store
Fashion Fabric is a store of high-quality clothing fabrics at affordable prices. We deliver throughout Russia by mail or transport company.
Here you will always find a large selection of seasonally relevant fabrics from European collections!
Our contacts
Stay up to date with our promotions, subscribe to our newsletter:
In recent years, the requirements regarding the properties of clothing have become noticeably stricter: it must be made of natural fabric, fit well, breathe, not wrinkle and, most importantly, cost reasonable money. Knitted fabrics meet all the listed parameters, therefore they are actively used in sewing skirts and dresses. Thanks to synthetic additives, knitwear has varying densities and degrees of stretch, however, in order for the product to fit well and maintain a neat appearance for a long time, the fabric must be properly processed and sewn. In our master class today, we will briefly tell you how to create a dress pattern from thick knitwear, and together we will sew the product from A to Z!
Source
Trying on a wedding dress
Do not hurry. The fact is that the manufacturer sews a dress for an average, in some way ideal figure, which, of course, your parameters do not completely correspond to. And the length is made with a margin, approximately 175-195 cm. This practice allows you to adjust the outfit to specific sizes already on the spot: sew in somewhere, unravel some seams. Even the straps and hangers are sewn in such a way that they can be easily shortened if necessary.
Of course, not every model can be adjusted to fit every figure. Therefore, listen carefully to the advice of the consulting manager in the salon. If it seems to you that the dress doesn’t fit well, but the seller assures you that it can be fixed, then it really is. But if the manager says that the situation cannot be changed and the dress is “not yours,” then you will have to resume your search and find another model.
That’s why fitting in a salon is so important; with us it’s completely free. Set aside at least half a day for this, preferably a whole day. The sales consultant will devote as much time to you as you need and will deal only with you, without being distracted by other buyers. Bring your wedding shoes. Some girls try on an outfit with everyday shoes, in the hope that later they will buy themselves a model that is similar in style, shape, and heel height in white or another desired color. Should not be doing that. It’s better to buy shoes first, and only then choose a dress.
Take your friend, mother, sister with you to the fitting. They will not only help you put on a voluminous outfit, but will also be able to objectively evaluate it from the outside.