The same type of tying of shoelaces can get boring, and sometimes the bows unravel quickly. I want something new. So let's learn how to tie your shoelaces in an original way!
Laces are not just an attribute of your shoes that help keep them on your feet. Lacing can decorate the image and add some zest to it. Learning this will be as easy as shelling pears, so don’t deny yourself the pleasure, improvise!
How to lace beautifully in a complex way?
Problems may arise when deciding to try out more intricate variations.
Truly complex schemes, although they seem very impressive, require attention, effort and time to implement. This unique “Ladder” is useful for tying long shoelaces. In addition to visual magnetism on sports shoes, this one looks especially striking on high-top models.
You can make the mentioned pattern using the following algorithm:
- The lace stretches through the lower rings and ends up on the outside of both sides.
- Next, the ends that you hold in your hands should be lifted into the next upper holes.
- The ends are connected to each other and follow a vertical line to the opposite row of lace, after which they are directed into the next hole at the top.
- There they cross again, follow the vertical lacing and then again diverge in different directions. This way they are woven into the overall row and create a strong tie, thereby fixing the shoes more firmly on the foot.
Checkered lacing can compete and even be the exact opposite of the above method.
The display of the scheme can be seen already in the name, but not everyone can technically repeat the principle, which is simple at first glance. A free space is formed along the edge, which simply cannot be designed as tightly as possible - it was invented specifically for loose shoes.
Step-by-step instructions will help you learn it:
- You should start with two different-colored sets of laces, preferably wide ones.
- One color is required to be done in the style of “straight light” weaving.
- In a different tone, proceed to the bottom row, stretching it in waves to the very top.
- Next, both shades need to be wrapped around each other and duplicate the wave format downwards.
- It’s worth continuing this type of lacing as long as the length of the lace allows, then fix the edges inside (the bow doesn’t fit here either).
How to tie sneakers using the original “Checkered” method is shown in the video:
Basic functions and basic lacing rules
Shoe laces perform several important functions. Practical requirements require tying them tightly: to securely fix the shoes on your feet, ensure comfort and ease of wearing. The decorative function lies in the ability to tie a knot beautifully and originally, even when using ordinary laces. Unique lacing methods can successfully complement your look, making it more vibrant.
It is recommended to tie your shoelaces according to the following rules:
- The toes should be squeezed when lacing, which will allow you to regulate the pressure of the shoes;
- laced shoes should not interfere with movement and squeeze the legs - you can check this by rotating your foot and rolling from toe to heel;
- for high shoes it is undesirable to use the simplest well-known patterns, since they unevenly tighten the foot;
- for people with narrow feet, it is advisable to use an additional row of loops installed wider than the usual placement;
- if there is an injury on the foot, you should skip the holes located above this area - this will reduce the pressure on the sore spot;
- Lacing should be done only with shoes on, unlacing them before removing them - this will ensure the correct tightness and increase the service life of things.
The emergence of new ways of tying shoelaces is also associated with fashion. New trends put demands on everything, even on lacing patterns. Although the classic options such as “zigzag” or “ladder” still remain popular.
How to tie laces on sneakers without a bow?
There are several simple and interesting ways to tie laces on sneakers without a bow, that is, with a knot hidden from view. Recently, these methods have become very popular, and stylists advise starting practice with the following techniques:
- Lines - weaving based on the principle of snake movement, looks restrained and original. To do this lacing of sneakers, you need:
- take the left edge of the lace, thread it through the left hole from the inside, and from the outside into the right hole;
- the right edge is threaded into the left hole from the inside, and then through the right hole from the outside;
- then you need to skip one hole with the right edge, threading it again according to the method described above;
- according to this principle, lacing is continued until the last holes;
- at the end, both edges of the lace need to be tied on the wrong side.
- Mesh - weaving according to the snake principle, but without missing holes. You need to weave in the following sequence:
- first, a snake is drawn with the edge of the lace, as described in the previous technique, but without gaps;
- the second edge is woven like a snake perpendicular to the first edge, thus creating a mesh;
- to get the correct mesh, you need to make a complete row from top to bottom, lacing the second edge either under the first edge or above it, after which the second and subsequent rows are made;
- at the end, both edges are tied from the inside of the weave, sending the knot to the wrong side.
- The classic version is the principle of weaving crosswise, to obtain it, you must do the following:
both ends are laced into both holes, after which the edges are inserted alternately into the holes on opposite sides; It is important to follow a clear sequence in order to obtain the correct geometric pattern.
- Overlapping lines are the principle of weaving laces with lines and forming crosses with them. To get such a pattern, you need to perform several steps:
- the edges are laced into two holes, after which they are moved 2 holes up and laced in the opposite row;
- at the same time you need to lace the edges into the upper holes of the same row;
- now they go down 2 holes lower, after which, in the same sequence and synchronously, they weave each lace into the original row;
- The ends of the laces are pulled into the remaining holes, forming a knot on the wrong side.
- Corset - here the principle of weaving is repeated, as in the classic version, but each time the laces are directed into opposite holes, they will need to be twisted together. The edges are finally tucked inward so that the laces do not stick out.
Advice! To tie the laces correctly without decorating the end of the bow, you need sneakers with an even number of holes, ideally there should be 6 of them. Otherwise, the man will have to improvise, reducing the number of steps.
Fine motor exercises
To make stubborn laces manageable for small fingers, training is needed. Fun exercises will not only strengthen muscles, but also develop creative abilities, teach you to think logically, and improve coordination of movements:
Connect the dots. There are many educational publications on sale in which the task for the child is set out - to trace the outline dot by dot so that it turns out to be an image.
Mosaic. The ability to lay out a pattern of small elements in a certain sequence is the first step to mastering the basics of mathematics.
Sorting small items. In schools that teach children using the Maria Montessori method, clothespins, buttons, cereals and other small items are actively used. During classes, kids string beads, sort elements according to various criteria, and transfer them from one bowl to another.
advertising is not displayed
Coloring pages with stickers. The child’s task is not only to color the picture he likes, but also to find the corresponding image and carefully stick it on the desired fragment of the sheet.
Finger games. Two in one: gymnastics for little hands and learning funny poems.
Drawing on sand, semolina. There is real scope for creativity: you can learn letters, numbers, draw themed pictures, or simply pour warm sand with your hands.
The correct shoe tie
For women's, men's winter and other boots, you can use classic cross lacing. You need to go through the holes that are located at the bottom and cross the ends so that they fit under the sides of the boots.
If we are talking about military boots, another scheme will do that will prevent them from coming undone. On one side you need to tie a knot, and only then start tying the laces.
In order for this to be done correctly, the product must be pulled all the way, and then make sure that the fixation is secure. The free end is passed outward, then through the adjacent loop. This is repeated until the length runs out.
Why is this necessary?
Most people don’t even think about taking the laces out of the shoes they bought and re-tying them in a different way. Why, when everything is already ready? On the one hand, yes, it is, but on the other hand, we can name several reasons when stylish lacing is needed:
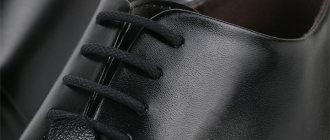
- stylish oxfords made of leather will look much more interesting if you make custom lacing on them;
- representatives of many subcultures prefer bright and tight lacing to emphasize their individuality and stand out from the crowd;
- If you let your child learn different types of lacing, this will develop fine motor skills and memory, he will have to use spatial thinking. This is a very powerful way to develop the thinking of a preschooler or a child of primary school age;
- If children are interested, then adults don’t need to lag behind. Remember the last time you trained your memory? It seems like a good time to learn a new way of lacing;
- lastly, it's just a fun way to make a small change in your daily routine. Believe me, even such a little thing can lift your spirits and give you a pleasant day.
How to get people interested in learning
The kid himself may ask to be taught how to tie his shoelaces when he sees new sneakers with images of his favorite cartoon characters or when choosing roller skates
You need to explain to him how important it is to fit your shoes correctly on your feet: this is required by safety rules. Laces tend to treacherously come undone at the most inopportune moment; if you get caught on them, you can fall
The child is also captivated by the look of the original bright lacing on dad’s sneakers or mom’s ankle boots. If there are older children in the family, they can also be involved in the process.
The boy might be interested in stories about representatives of professions who wear lace-up shoes: military, police, athletes, firefighters
Girls are already interested in the process of weaving bright ropes, just pay attention to what beautiful types of combinations can be used
Offer your child a reward: if he laces up his sneakers or boots himself, he will go to the park or circus to buy something he wants.
Before teaching you to train on real shoes, buy or make a manual from cardboard or plywood, on which the elements are attached to the image using a string.
Lazy laces
The Chinese also helped in this matter, releasing laces without any bows. The secret is simple: they are attached in two places to sneakers or sneakers, and they themselves are made of... elastic. Therefore, you can easily take off and put on shoes, and there is no tying or untying.
But reviews about such a new product are mixed. Consumers complain that the elastic bands break down very quickly and, as they stretch, they no longer secure the sneakers tightly on their feet. And the fastenings don’t look very presentable. But for sloths this is just a godsend.
Now you know how important it is to pay attention to detail and be sure to get rid of those annoying lace bows by putting them inside your shoes using any of the methods listed above.
DIY New Year's wool paintings
What should be longer: a dress or a coat?
Lacing of sneakers, sneakers, boots: features of tying laces according to the type of shoe with 4, 5, 6 holes
Lacing of sneakers, boots and sneakers has many options: from the classic method to complex weaving. Interesting options for tying laces on sneakers can be used as a way to secure shoes more tightly and protect against possible injuries when playing sports.
Beautiful lacing on sneakers, sneakers and boots has become a way to stand out from the crowd and make shoes individual. At the same time, beautiful types of lacing are not at all difficult to make yourself.
The universal (classic) option for lacing a wide variety of shoes is simple:
- First, both halves of the lace are threaded alternately, from the inside to the outside, into a row of holes that are located at the very bottom.
- The ends of the lace, pulling them both to the top, need to be aligned in length.
- Then they are intertwined with each other and passed through a series of holes (eyelets) higher from bottom to top.
- You need to do the same, constantly tightening the lace, until the very last hole, after which the lace is tied tightly.
This option is not only simple, but also allows you to quickly tighten the laces on your sneakers to make it easier and more comfortable to move in them. Even a child can cope with this type of weaving.
Professional athletes use a tighter and safer lacing method, which will prevent shoes from flying off their feet during training. And the knot itself must be tightly fixed inside so that the laces do not come undone during active movements. How to tie laces on sneakers beautifully using various weaving options, and highlighting your shoes is quite simple in other ways.
To do this when lacing:
- use round or latex laces;
- the color of the laces is changed to bright or contrasting;
- use 2 colors of laces for each sneaker;
- decorations are strung on laces;
- shorten or use long laces.
There may be 4,5,6. For shoes that have an even number of holes (4.6), parallel lacing, double turn, ladder lacing, twist lacing and the classic lacing method are suitable. On shoes with an odd number of holes, you can try all other types of lacing. There are many of them, but they can all be divided into lacing options without and with a bow.
| Name of lacing | Required number of holes in shoes, pcs. |
| Ladder | 4,5,6 |
| Zipper | 5,6 |
| Double back | 5,6 |
| Loop back | 4,5,6 |
| Bush walk (forest walk) | 6 |
| Saw tooth (saw teeth) | 6 |
| Foot bag (suitcase for feet) | 6 |
| Hash (mash) | 6 |
| Twistie | 4,5,6 |
| Riding bow | 6 |
| Lattice (mesh) | 5 |
| Bi-colour (two-color) | 4,5,6 |
| Checkboard (chess board) | 4,5,6 |
| Display | 4,5,6 |
| Hidden Knot (hidden knot) | 6 |
Lacing by number of holes
Lacing a sneaker largely depends on the number of holes, their size and location. For small holes it is better to use thin laces, and for larger ones - thick or flat ones.
For 4 holes
For a small number of loops, the straight horizontal method and the crosswise method are suitable. They will look most organic.
For 5 or more holes
If you have 5 or more holes, you can safely experiment, trying both simple and patterned options.
With 5 holes
Five holes fit the straight, cross method. Sawtooth and knotted lacing will look good.
With 6 holes
For six holes, any of the above methods is suitable - from the classic zigzag to the sophisticated “snake”.
With 7 holes
With a large number of holes you can give free rein to your imagination. Checkerboard, zipper, web, Roman or European lacing - everyone will find an option to their liking.
LiveInternetLiveInternet
- 1000…+1 tip (307)
- Tips for all occasions (104)
- Little tricks of big cooking (85)
- Note to the hostess (121)
- Self-development (83)
- Memory development (48)
- Life tips (13)
- Time management (11)
- Communication Skills (9)
- Speed reading (3)
- Dancing (83)
- Latina (29)
- Zumba, dancing for weight loss (16)
- Dance elements (7)
- Club dancing (5)
- Go-Go (5)
- Oriental dance (25)
- FAQ (81)
- FAQ video (20)
- LiRu (2)
- Decoration (6)
- Memo (27)
- Our smaller brothers (659)
- Dogs (35)
- “They live like a cat and a dog” (25)
- My beast (5)
- From the life of cats -1 (154)
- From the life of cats-2 (35)
- Interesting things about cats (63)
- Kittens (18)
- Cats (pictures) (234)
- For cat owners (37)
- These nice little animals (75)
- On the World Wide Web (327)
- MuzCollection (32)
- How far has progress come... (8)
- I want to know everything (114)
- Creative (17)
- Myths and facts (36)
- You can't make it up on purpose (3)
- Passion-faces (44)
- Amazing things are nearby! (14)
- Showbiz (40)
- Everything about everything (39)
- Life is a joy (668)
- Live easy (187)
- Rituals, fortune telling, signs (131)
- Holidays, traditions (100)
- Money Magic (73)
- Man and Woman (46)
- Simoron (36)
- Numerology, horoscope (28)
- For the soul (25)
- Feng Shui (17)
- Esoterics (2)
- Palmistry (1)
- Shrines (5)
- ABC of Faith (107)
- Health (810)
- Help yourself (367)
- Self-massage according to all the rules (81)
- Diseases (71)
- Qigong, Tai Chi Quan, Tai Chi (66)
- Acupressure, reflexology (42)
- Is old age not a joy? (26)
- Vision correction (9)
- Traditional medicine (9)
- Oriental medicine (5)
- Live healthy (134)
- Traditional medicine (46)
- Cleansing the body (42)
- Last cigarette (24)
- Israel (146)
- Cities (33)
- Promised Land (11)
- Useful information (5)
- Izravideo (21)
- Photo reports (11)
- Yoga (210)
- Yoga complexes (123)
- Yoga solves problems (43)
- Exercises (30)
- Asanas (9)
- Yoga for fingers (mudras) (7)
- Tips (2)
- Beauty without magic (1195)
- Gymnastics for the face, exercises (230)
- Luxurious hair (133)
- Massage techniques (93)
- Japanese beauty, Asian techniques (86)
- Secrets of youth (60)
- Original manicure (22)
- The path to glowing skin (115)
- Cosmetic bag (55)
- Flawless Makeup (105)
- Problems (46)
- The art of being beautiful (36)
- Style (136)
- Care (284)
- Cooking (775)
- Baking (93)
- Side dishes (18)
- First course (12)
- National cuisine (8)
- Dessert (53)
- Snacks (119)
- Dough products (84)
- Food served (51)
- Meat (115)
- In a hurry (31)
- Drinks (76)
- Vegetables and Fruits (115)
- Recipes (25)
- Fish, seafood (34)
- Salads (62)
- Sauces (8)
- Terms (16)
- Useful sites (11)
- Photos (8)
- Photo editors (3)
- Food (7)
- (7)
- Programs (11)
- Through life, laughing... (135)
- Video jokes (33)
- Photo jokes (3)
- Toys (25)
- Oh, these kids... (29)
- Tricky stuff (29)
- Just great! (16)
- Needlewoman (209)
- Knitting (21)
- Handicrafts (11)
- Repair (3)
- DIY (83)
- Create comfort (37)
- Sewing (70)
- Poetry and prose (247)
- Lyrics (152)
- Proverbs (68)
- Aphorisms, quotes (22)
- Prose (4)
- Catchphrases (1)
- Perfect body (638)
- Bodyflex, oxysize (120)
- Pilates (41)
- Aerobics (25)
- Callanetics (22)
- Milena. Fitness (18)
- Gym (17)
- Bodytransforming (5)
- Anatomy (1)
- Tips (69)
- Fitness program (89)
- Stretching (40)
- Exercises (237)
- Photo world (63)
- Artists (5)
- Nature (5)
- Photos (16)
- Photographers and their works (31)
- Flowers (8)
- Photoshop (5)
- Let's challenge excess weight (552)
- Trapped by diets (63)
- Laws of nutrition (118)
- Eat to live... (76)
- Healthy lifestyle (16)
- Products (73)
- Losing weight the smart way (128)
- The path to ideal (103)
Important nuances
When choosing a way to tie your shoelaces beautifully, you need to analyze some facts. Before lacing up your shoes, you should decide on the style of your look and the type of shoes.
In addition, it is important to consider the purpose of tightening the tape. So, for playing sports there is a method, and for celebration there is a method.
For children, it is best to choose the simplest method possible. But first you need to choose the appropriate length of the braid. After all, the free ends should not dangle, as this can be dangerous.
The length of the lace depends on the number of holes:
- from two to three pairs of eyelets - from 40 to 45 cm;
- four holes - up to 60 cm;
- from five to 75 cm;
- six holes - about a meter;
- seven eyelets - 100 cm;
- for nine - about 120 cm;
- for ten pairs - 150 cm;
- if the shoes have sixteen pairs of holes - 2.5 m.
For high boots, the length of the twine must be appropriate so that the lacing is uniform and beautiful. Before you lace up your shoes, you need to consider your foot type. If the leg is narrow and the instep is low, then additional holes will be required. To fix the foot, you need to control the tension - it should be uniform, but not strong, so as not to disrupt normal blood circulation.
The following factors should be taken into account:
it is necessary that both free ends are not excessively long; it is important that, if necessary, they can be easily loosened; The tension along the leg should be uniform so that the braid does not press on the vessels.
It is important to choose the type of lace. Thus, synthetic twine is very strong and wear-resistant, but its surface is slippery, and this provokes unraveling (which, as is known, can be dangerous)
Therefore, it is better to choose laces made from natural fabrics. To ensure that laced shoes stay firmly on your feet, you should consider the following recommendations:
- you need to choose a strong lace of sufficient length;
- the knot should be tightened well;
- It is better to give preference to dense round braid.
Lacing is an important process that is often underestimated. Properly tightened shoes will help not only in sports, but also in everyday life. After all, any discomfort interferes with the performance of usual tasks. As for the decorative function of lacing, it certainly helps to make the everyday process more diverse.
The lacing method is selected depending on the purpose of the shoes. The length of the laces is selected taking into account the number of eyelets in the shoes
Durable round laces made from natural materials are most suitable for lacing boots.
How to lace high-top sneakers beautifully: instructions
Absolutely any type of lacing is suitable for high-top sneakers, as well as for regular ones. The main thing here is to choose the option you like and enjoy contemplating the creative idea.
"Sawtooth"
- Pass one end of the lace through the first hole on the right side of the sock, and thread the other end through the next hole on the same right side.
- Pass the near lace inside the left hole opposite it. Pass the next end of the right lace through the next left hole.
- Next, remove the nearest lace from inside the third hole on the right side. And take the second end of the lace out of the fourth hole on the right side.
- Then flip the ends over to the left side and thread them through the holes. Repeat steps if necessary. Fasten the laces according to the diagram.
"Lightning"
- Thread the string from the inside of the holes so that the ends come out.
- Then pass them under the stretched part of the lace, cross them and take them out from inside the next holes.
- Pry it through the stretched part again, cross it and again pull it out from inside the next holes.
- Repeat these steps until you run out of holes, then secure.
"Ladder"
- Thread the lace through the holes in the sock. Then remove the right end from under the left hole, and the left end from under the right, but the third, not the second hole.
- Throw the left end to the right side and thread it inside the second right hole. And transfer the right end to the left side and thread it inside the third left hole.
- Then remove the right end from under the fourth left hole. And take the left end out from under the fifth hole on the right.
- Repeat the necessary steps for the required holes and secure the laces.
"Web"
Recently, this method has been gaining popularity.
Lacing technique:
- Pull the tip of the lace into the second hole from the inside.
- Pass from the outside and through the first holes.
- Make the laces crosswise and pull them from the inside through the third holes.
- The ends must be pulled out under the upper holes and inserted from the inside into the fourth holes.
- Finally, thread the aiglets under the second holes and pull them from the inside into the fifth holes from the outside.
- The knot is hidden behind the tongue.
Eglet is the metal end of a cord.
Suitable lacing shape
It often happens that the laces become unusable and need to be replaced. And the question always arises: “Which laces are suitable for any particular shoes?”
You need to remember a few simple rules:
First of all, you need to look at the length. It depends on how many holes there are in the shoes. For example, if there are three pairs of holes in the shoes, then sixty centimeters of rope will be required. The more holes, the longer the lace you need to buy. Certain American brands indicate lace length in inches. For sports shoes, sellers recommend using a special table, since they require tight lacing. If the laces are long, you can cut them. The edges will need to be secured to prevent them from unraveling.
Synthetic laces can be burned, but this must be done carefully.
Lacing is needed in order to properly fix the shoes on the foot. According to experts, improper lacing causes diseases that are directly related to the feet.
Why protruding laces are unaesthetic
Young people pay a lot of attention to details. Where an adult “put on shoes and forget,” a teenager will spend a long time trying on, choosing the color and length of the laces. And then he’ll be upset because of the bow that’s sticking out. And it constantly comes untied, threatening the owner of a pair of sports shoes with a fall if he steps on the protruding end.
Of course, sneakers will look much more attractive with lacing that goes somewhere inside. But how to achieve this effect? It turns out there is such a possibility.
So that they are not visible
A more complex alternative further reduces the space allocated for decorative weaving. Minimize weaving and carry out basic manipulations away from the eyes - this is the main rule of the next method.
One of the variations involves such a popular scheme as “straight lacing”, which is performed in the mentioned sequence:
- The initial cord is fixed through the lower rings and taken inside the substrate, symmetrically relative to the sides.
- One edge is directed upwards from the right, appears from the top hole and is threaded into the left one.
- Then the ends involved in the process go up and end up outside, but each through a separate hole, are threaded onto the opposite row and then go up.
- From now on, the lacing stretches along the axis of the shoe until one of the laces reaches the last hole.
- The finishing touch is to pull the second tip through the final ring at the top. Therefore, this format will only work with a paired number of rings.
The video shows how to tie shoelaces using the straight lacing method:
The presented type of lacing is characterized by the absence of an inconspicuous diagonal arrangement of seams inside the shoe.
Another lightweight version of the stylish design is also suitable for models with a paired number and is even known as “Light lacing”:
- The tip is threaded through the bottom rings and pulled through the middle of the shoe on both sides.
- One of the edges of the lace runs along the entire length and appears immediately from the hole on the left side at the very top.
- At the same time, the second end should be directed into the upper hole, thrown to the opposite line and again pulled up through the inner wall so that it subsequently remains outside.
A different shade (from 2 colors) can simplify the procedure and decorate the final result.
Additional lacing options
Special
For sports shoes
Lacing is specially designed for active activities. In it, the knot is tied not at the beginning or end of the shoe, but in the middle.
- The first row is not tied in a standard way, but runs diagonally between the first and last hole.
- The lacing at both ends is done using a zigzag method (first diagonally, then straight).
- Both ends meet in the middle, where a knot without a bow is tied
Bicycle
It is used to prevent the knot from getting into the elements of the bicycle when riding. To do this, it is located on the side.
- In the first row, both edges are brought up.
- First you need to deal with one part. It must be put through one hole, but on the same side.
- Pass it inside and bring it out on the other side and again, bypassing one hole, run it.
- The same should be done with the second part of the lace.
Original
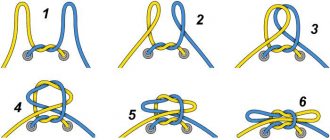
Nodules
- Both edges after the first row are brought to the top.
- Then they are twisted with each other 2-3 times or tied in any interesting way.
- Then the ends diverge in different directions and are brought out again.
This method is not the easiest, but it looks impressive and holds tightly.
Lightning
- Insert the laces into the first row.
- Pass one part from the bottom and pull it diagonally into the last hole.
- The second part should be inserted diagonally into the hole next to it.
- Then insert it into the hole that is higher on the same side and send it diagonally to the other side.
The same must be done with the second part.
This method is very simple, easy and reduces wear.
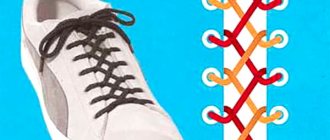
Chess
This option would look great if you have two pairs of laces of different colors
. You can use standard white and black, or you can approach the issue in a more interesting way.
The first row is inserted from the bottom. In this case, one edge should be asymmetrical to the second, since all work will be done only with the second part of the lace.
- It needs to be tied in a parallel way. That is, you should launch it from below and lead it into a hole located on the same side, but higher.
- Send the lace from above into the hole opposite, which is parallel.
- These steps should be done all the way to the edge.
- Next, take a lace of a different color and send the tip to the end of the first lace, they can be tied together and hidden.
- After this, in a chessboard manner, you need to first draw it over the first one, then from below.
- To complete the work, turn around and do these manipulations with all the holes to the end.
Cobweb
- For this option, you need to put the lace on the first row from the bottom, let the edges out and cross both parts.
- Insert diagonally into the holes, skipping two rows.
- Then pass the lace through the bottom into the adjacent hole on the same row and put it diagonally on the other side.
- For greater beauty, the second part must be placed between the already stretched ropes.
Butterfly
This method looks stylish and original.
- It is necessary to thread the lace into the first row and bring the ends inward.
- Next, you should thread each end into the grommet located on the same side, only higher.
- Cross the laces over each other.
Lacing patterns without bow
Some people prefer to tie their sneakers so that there is no bow on them. Weaving without a bow allows you to make the knot hidden or leave short ends. The remaining ends can be easily hidden behind the tongue of the sneakers and securely fasten the weave, because in this case the lace will definitely not come undone.
Checkboard (chess board)
The Checkboard weave is done with 2 laces on each shoe. It is better to take long laces in contrasting shades for this. For example, brown and yellow.
- The brown lace is inserted from the bottom up into the lower left hole of the sneaker, and then from the top into the opposite right hole.
- So they lace it along all the rows of holes located above until the very end so that at the end the lace enters from the right into the hole in the top row.
- The yellow lace is pulled out from under the lower right corner of the tongue of the sneaker and woven through the brown lace to the top, winding it alternately over and under the existing loop.
- Then the lace is bent to the bottom and weaving continues in the reverse order down and up again.
- The end of the yellow lace is placed behind the tongue of the shoe.
- The ends of the lace inside the sneaker are tied together so that the knot remains hidden.
Display
When performing a “Display” weave, the crossing of the laces goes down and remains inside the weave. This not only looks unusual, but also provides increased comfort for the foot when walking.
- First, in the bottom row of holes of the sneaker, the halves of the lace are threaded from the outside to the inside and equalized in length.
- Then they need to be crossed over the tongue and pulled out through the 2nd row of holes inward.
- Repeat until the very top, then tighten the lace and tie it into a knot under the tongue of the sneaker.
Hidden Knot (hidden knot)
The “Hidden Knot” weave (hidden knot), in which the knot on the laces is completely hidden, is becoming increasingly popular. Weaving must be done freely, because the edge of the laces is simply cut off after tying the knot.
- The ends of the lace need to be pulled into the bottom row of holes on the sneakers from top to bottom and trimmed to length.
- The right half of the lace is inserted from the right into the 3rd row of holes from the bottom, and then from the left in the same row from top to bottom.
- The left half of the lace is threaded into the left hole 2 from the bottom of the row, pointing upward, and inserted on the right in the same row from top to bottom.
- The right end is pulled out from the left eyelet 5 from the bottom of the row and inserted into the right hole next to it.
- The left end of the lace is threaded from the inside into the left hole 6 from the bottom of the row and inserted from the right into the hole of the same row.
- Inside, the laces must be tightly tied in a knot so that the shoes can be easily put on your feet.
- The ends of the laces are cut off.
Hidden node
Many people use this method to hide the knot on their shoes and maintain a beautiful and laconic appearance of the lacing.
- To begin with, we divide the lace into two equal parts and begin weaving.
- We pass the lace from the inside and bring it into the loop from the outside, thus obtaining a straight line.
- We start the next level of lacing one row lower and repeat the previous step.
- Having finished lacing, we go back in the opposite direction and bring the ends of the laces into the free holes.
The peculiarity of this method is that the lacing looks neat on the outside, and the bow remains inside without attracting unnecessary attention.
How to tie laces on sneakers with and without a bow?
The options for fixing the laces depend on who owns the shoes and what their dress code is. Therefore, we will present two of the simplest and most convenient options.
"Diagonal"
- In the diagonal version, after the manipulations have been performed, the ends of the lace are removed from the inside.
- Next, you need to cross them and secure them with a bow.
- If your bow does not hold on and is constantly untied, then it is better to fix the knot first and make a bow for decoration.
"Display"
- In the version without a bow, you need to thread the ends of the lace inside the last holes.
- Then the ends can be hidden inside and fixed there.
- They will not be visible, but they will perform their function of supporting the foot inside the shoe.
With a gap in the middle
This option not only looks beautiful, but also has a positive effect on the foot, helping to reduce the pressure of the laces, as a result of which the foot will not hurt.
We lace according to the rules:
- We pass the egglets through the lower holes from the inside.
- We cross the ends and thread them into the second holes.
- We draw the ends again in the same way as in the first step.
- Before the fourth row of holes, we do not cross the laces; we thread them from the outside to the inside.
- Next, we cross the aiglets and thread them through as before.
- We insert the laces into the last holes from the inside, first crossing the ends.
- The bow is hidden inside.
Lacing in this way is ideal for shoes with six holes.
Chess method
There is another unusual way of lacing shoes. It's called "Chess".
The process may seem laborious, but in fact there is nothing difficult about it:
- We take the first lace and weave it in a direct way.
- With the other lace, the wavy weave starts at the bottom and ends at the very top.
- It wraps around the top lace and goes down in a wave-like manner. Lacing continues until the holes run out.
The most popular ways of lacing men's shoes are shown in the video:
Every person has many different shoes that need to be laced. Frequent use of classic skills can become boring and uninteresting, but there is still a way out.
You can lace shoes in different ways, which you can only find on the Internet. There are heavy types of lacing, and light ones, and the most original ones.
Each person can choose the one that is more suitable for their shoes.
How to lace sneakers without tying a bow
How to beautifully tie laces on sneakers, sneakers, boots, with a crochet hook, without a bow, so that they don’t come undone. In order to prevent the laces from coming undone, there is a special knot that will securely secure the entire knitting and will not be noticeable. How to lace up sneakers so as not to tie a bow PACK We'll tell you HOW TO CORRECTLY TIE SHOES ON SHOES SO THAT THEY DON'T INTERFERE WITH YOUR TRAINING How to lace up sneakers without tying a bow How to tie laces on shoes - 7 ways to lace men's shoes How to lace sneakers without tying a bow tick
List of sources
- razvitie-vospitanie.ru
- moipravila.com
- qulady.ru
- mir-obuvi.org
- lifegirl.ru
- le-protestant.ru
- hozyaike-na-zametky.ru
Lace-up zipper
Beautiful and reliable lacing.
It's very simple to do:
- Pass the cord through the bottom pair of eyelets and pull the ends out.
- Cross the laces in 2 turns and bring the laces to a new row.
- Continue weaving to the very top.
Tie the ends with a classic knot.
With 4 holes
Lacing shoes with four holes will not be difficult. Here you can even show your imagination and come up with something of your own, or you can turn to the Internet for help.
The most common lacing is called “Diagonal”:
- So, take the end of the lace and push it through any lower hole.
- What is the result? This very end goes out to the opposite hole, and then slides through to the bottom, parallel to the first hole.
- Each step is repeated until the holes run out.
Some tips
Tying your shoelaces may seem like a simple procedure, but only if you consider the methods that are familiar to everyone. Another thing is the original and more complex lacing. In this case, it is advisable to follow a few tips:
- When you tie a knot, you need to tuck your toes. Then the lacing will tighten tightly, but will not tighten the leg when the toes return to normal.
- The sneakers are tightened at the last hole so that the foot is firmly fixed. If you do it differently, there is a high risk that a person may twist his leg or suffer another injury.
- It is better to use semi-synthetic laces. They are more durable and will not fray at the most inopportune moment.
- If the sneaker has a high instep, it is recommended to use horizontal types of lacing.
- For wide feet, it is advisable to use criss-cross lacing.
- A narrow foot will be well supported and emphasized by the zigzag technique.
- To securely fix the lace, you can tie it with a double slip knot. And before you start playing sports, the strength of the knot must be checked.
But the most important piece of advice is that the lacing should fit comfortably on the foot, not tighten anywhere or give any slack.